I am so glad you are here for a spiral deco mesh wreath tutorial! I haven’t made a deco mesh wreath in a long time, which made me realize I don’t have a tutorial on the blog for you yet. We are going to fix that today! Deco mesh wreaths can be very expensive to buy, but you can save yourself up to $100 by making your own. They aren’t too hard, and by the time you’ve made a couple you’ll have the technique mastered. All of your friends and family will be asking you to make one for them! The one I’ll be sharing with you today part of my summer balcony decor, but you can use different colors to make your own for any season.
Looking for a great Christmas wreath? This spiral deco mesh ribbon is a beautiful Christmas wreath, and it will save you a little more money, deco mesh, and ribbon than this spiral deco mesh wreath tutorial.

Make sure you don’t miss out on great tutorials, free printables, and other fun posts by following me via email. Enter your email address below and you’ll get an email when I add a new post, and never any spam. You can also follow me on social media using the buttons in the sidebar.
For this spiral deco mesh wreath tutorial you need:
- 2 10 yard rolls of 10″ deco mesh in 2 different colors- I used teal and coral, both from Michael’s. They only had 5.5″ rolls of the teal, so I had to make do and add two pieces to each twist on the wreath form.
- 14″ wire wreath form (from Dollar Tree)
- chenille stems (pipe cleaners)
- 2-4 rolls of wired ribbon. I like use 2 sizes. In this wreath I used 2 2.5″ ribbon, coral with gold polka dots and gold, and 2 1.5″ ribbons, white and teal. For some wreaths I only use 2 different ribbons, so just go with what you like.
- wire cutters- If you want to extend the life of your scissors.
- scissors and/or rotary cutter- I love my rotary cutter, and it cuts your time in less than half!
- self-healing cutting mat (Optional but it saves your work space & helps you measure quickly and easily!)
Create a Work Wreath Form
You can purchase and use a pre-made work wreath form, but I choose to make my own. Dollar Tree sells several sizes of wire wreath forms and pipe cleaners, so you only have to spend $2 on your base. For this wreath we are using a14″ form. I tried a new spacing to my pipe cleaners to begin with on this project, but it didn’t allow for the wreath to be as full as I like, so I ended up adding more and going back to the old spacing. Many people use an entire pipe cleaner for each spot, but you end up cutting more than half of it off at the end, creating more work for yourself. To save time and money, cut each one in half before you begin.
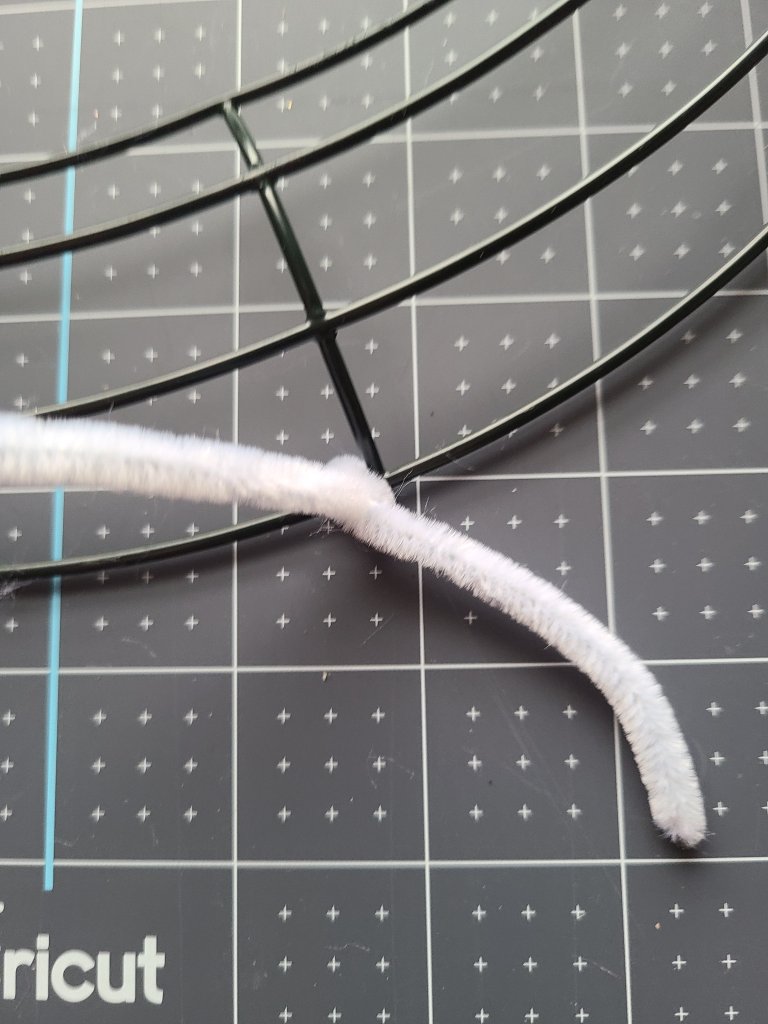
Start on the outer ring of your form, and twist a pipe cleaner around that wire and one of the crossbars.


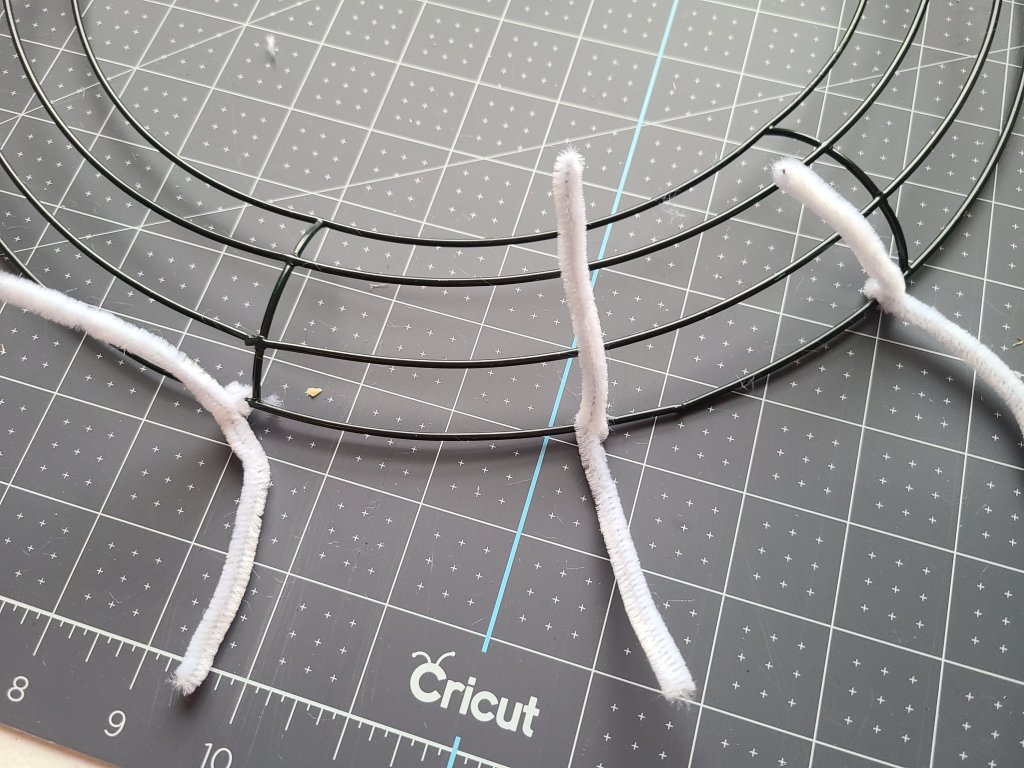
Next twist one in between the two crossbars on the same ring. Then one on the next crossbar. Continue like this all the way around the form.
On the second ring you will attach a pipe cleaner between each of the three on the outer ring. That will give you two between each crossbar. Complete the second ring in the same way.

Finally, fill in the third ring just like you did the outer one. One on each ring and crossbar and one in between them, all the way around. Now you are finished with your work wreath form! Don’t worry about the inner ring, the wreath will be full without it, and this leaves you a place to add a sign, if you’d like, to the middle of it.


If your pipe cleaners are sliding around a lot, add a dot of hot glue on top of each pipe cleaner or right up against the side of them. This will keep them in place.

Cut the Deco Mesh
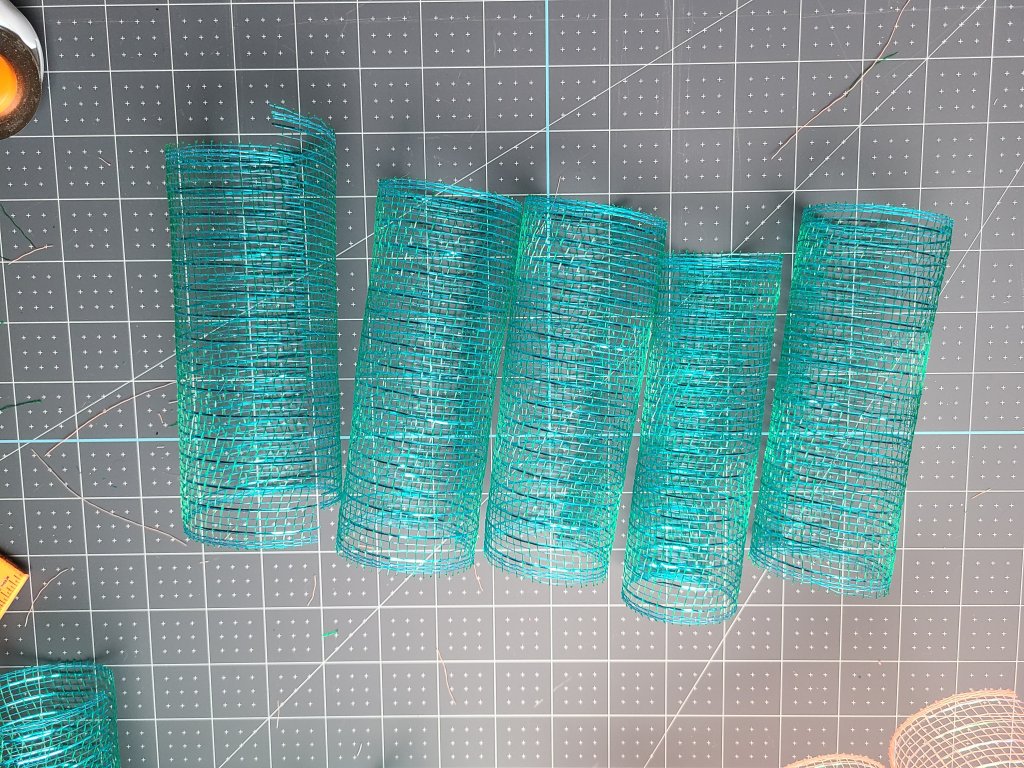
Now you’re going to cut your deco mesh into 7″ strips. Having a rotary cutter and a self-healing mat for measuring and cutting at once is a huge time saver here. I mean huge!! Lay your two rolls of deco mesh on top of each other, lined up at the end, and roll them out on the mat. You will need to lay something on top of the ends to keep them flat, then just roll your rotary cutter along them, cutting them to 7.” I have a 24″ mat, so I was able to cut 3 pieces each time I rolled another length out.


You will use the entire roll of mesh, so just keep cutting until it’s gone. It’s helpful to separate the colors from each other as you go, otherwise they get all tangled up and can snag one another.
Create Spirals & Add to the Wreath
It’s time to make some rolls! This part is pretty easy, it just takes time and patience as you add them to the form. Since the mesh comes on a roll, when you cut the strips off, they pretty much roll themselves which is great.
Roll each piece and pinch it in the middle. Place one of each color on top of one another, still pinching in the middle, and put them in a pipe cleaner, then twist it closed.


Continue like this all the way around the wreath until every pipe cleaner has a roll of each color twisted inside it. It’s that easy!

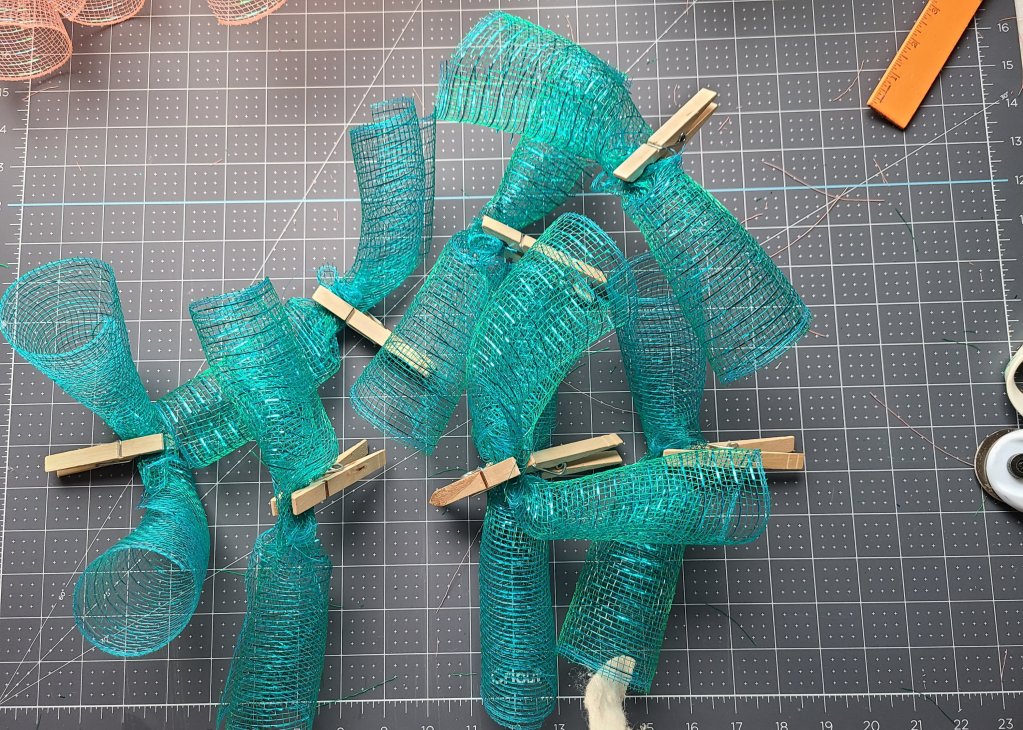
Work-around for 5.5″ Deco Mesh Rolls
Now, if you need two particular colors and the store only has one of them in 5.5″ rolls like my teal color, I can show you a little work-around. This isn’t optimal, it’s time consuming, but it works. When you roll the 5.5″ mesh, you will combine two of them (of the same color) to go in each pipe cleaner. Instead of pinching in the middle, pinch at the bottom of each spiral, laying the pinched ends on top of each other. Then you will place them in the pipe cleaner and twist it around the overlapped section, adding the deco mesh of your second color in with it. I added clothespins to hold mine together while I rolled the coral color, which will help you keep everything together a lot easier, but isn’t necessary.

Cut the Ribbon
For my mesh wreaths, I usually use between two and four different color ribbons. For this spiral deco mesh wreath tutorial I used four. I used two different widths, 1.5″ and 2.5.” Roll them out, and cut them into 10.5″ strips. This will allow you to see them above the mesh spirals. I cut ten pieces of each color ribbon.

Next you want to cut dovetails on the ends. Fold each piece in half lengthwise, then in half widthwise. Now cut the end into a half V. When you open it, you will have a V at each end of the ribbon.


Add Ribbon to the Wreath
You will be adding two pieces of ribbon together to the pipe cleaners you choose. I like to keep the wreath consistent by adding the same two colors together all over. For example I put the white 1.5″ with the 2.5″ coral polka dot ribbon together every time. Then the 1.5″ teal with the 2.5″ gold together every time. You can mix them up if you’d like, but I’ve found this looks better.
Pinch two pieces of ribbon in the middle and lay them diagonally on top of each other. Lay your pinch in a pipe cleaner then twist it closed over them. Use you wire cutters to cut off any extra pipe cleaner you have left over. Make sure not to do it super close to the twist as it can come undone.


Go around your entire wreath, alternating color combos of ribbon as you go. When you are finished, make sure to snip off any pipe cleaners with extra length that ribbon wasn’t added into.


Add Embellishments to the Spiral Deco Mesh Wreath
There are several ways to complete the look of your wreath. You can add a large wreath bow, add some greenery and faux flowers, or add a complimenting sign. If you’re looking for a bow tutorial, I have a few easy-to-follow tutorials. This decor bow is so easy to make. The loops are made separately, so it’s so, so easy. I forced my 10-year-old son to make one to prove how easy it is! This decor bow tutorial is made with one length of ribbon but is still very easy to make.
For this wreath, I created a beachy sign using my Cricut and some vinyl. It only took me about 20 minutes, and it was worth it because it took the wreath to the next level. The wreath is really full, so I was able to just sit the sign inside the spirals, and it is held very snugly. I love the way it turned out!

Remember to pin the image below or share this post with the buttons on the left side of the page so you can find it when you’re ready to start your project! Also, follow me on Pinterest for new ideas added weekly! Be sure that you never miss a great tutorial for decor like wreaths, signs and other home decor, free printables, crafts, and other fun posts! Enter your email address below to be notified of new posts! Use the buttons below to follow me on social media for other great content.
Looking for other wreath tutorials?
You might enjoy these wreaths. All of the colors and additions can be altered to fit your home decor or the season.


There’s more!
If you like this summery wreath, check out my beach yarn wreaths here and here (this wreath is the same, but the post has a step-by-step Cricut tutorial for the sea animals). I think you will love them! My most popular wreath is this braided nautical rope wreath. Everyone loves it, and whoever visits your home will want to know where you bought it. You can proudly say you made it! Love themed tiered-trays? Check out this beach themed tray with lots of DIYs for all of the contents! Another popular home decor item you can update for summer is lanterns; check out this beachy update!


Follow me on Pinterest for new ideas added weekly!


Wow, this is SO cute! <3 I've never seen a wreath like that before…I so want to make one now! 😀
Thank you! You definitely should make one! They look great on your door. Tag me on social media when you do. I would love to see it!
Looks pretty, I like the colors you chose! Thanks so much for linking up with me at the Unlimited Link Party 30. Pinned!
Thank you so much for the thorough tutorial! Pinned it so I can try at another time and chose you for the OMHGWW linky party at MyCraftyZoo.com! Thank you for sharing your fabulous talents!
Thank you for the feature! You made my week! Thanks for hosting every week!
Such a cute wreath! I love the colors!!
Thank you! They matched this adorable sign I’m upcycling from Dollar Tree. I thought they were so cute together.
Thank you for showing us how to make this fun wreath. I learned something new and for sharing on the Classy Flamingos blog party.
You’re welcome, and thanks for hosting!
Thank you for the feature Kaycee. and thanks for hosting each week!
Nikki I always enjoy visiting your blog and seeing your lovely creations especially your pretty wreaths! CONGRATS – you are our Friend of the Week at Friendship Friday 493 at Create With Joy !:-)
Thank you, I’m honored!
Love this. It turned out beautifully. Very creative 🙂 Thanks so much for linking up to Creative Mondays. #CreativeMondaysLinkUp
Thanks!
CONGRATS! Your post is FEATURED at my Unlimited Link Party 31!
Thank you Dee, I’m honored! Thanks for hosting!
Such a cute wreath. I haven’t tried making a wreath with deco mesh yet but you make it sound simple so I’ll have to try it. Congratulations on being featured on the Unlimited Link Party.
Thank you! You can definitely do it!
Love your wreath! Thanks for sharing at Friday Favorites. I’m featuring you this week.
Thank you! I’m honored!
Honored to be a Friday Favorite!
This is really stunning, thanks for sharing your tutorial at #WowOnWednesday! Hope to see you next week
Thank you! I will see you there!
What a beautiful wreath! I love the color palette for summertime and the beachy theme. Thanks for sharing and linking with me!
Shelbee
http://www.shelbeeontheedge.com
Thank you Shelbee! Love sharing with you & checking out all of you adorable outfits & fashion advice!
Gorgeous!! The gold touches are the perfect accent to this color scheme! Thanks for playing with The House That Stamps Built.
Thank you and thanks for hosting a lovely party!
Thank you! I love gold and rose gold!
Hey there, You have performed an incredible job. I will certainly Digg it and for my part suggest to my friends. I am confident they’ll be benefited from this site.
It’s fantastic that i am getting ideas from you.