Designing Devotion Edition
I just posted a tutorial for how to make an easy burlap wreath. The one I made is for fall, but you can use that tutorial for any burlap wreath, no matter the season. I found the perfect farmhouse truck burlap ribbon to use to make a bow for that fall wreath. You saw the bow in that tutorial. In this tutorial I’m going to show you, step by step, with lots of pictures, how to make a bow for a wreath. You can actually use this bow for anything: lantern or mailbox swag, on top of a beautifully wrapped gift, as a Christmas tree topper, and more.
If you have a hard time forming loops and holding everything in place, this easy cheater loopy bow tutorial is one anyone can make. Even my hubby and son can do it, and they are not crafty!
It’s been a little while since I wrote a Designing Devotion post, so if you’re newer to Life as a LEO Wife, let me tell you what that is. First I will give you the tutorial for creating a bow, then I will follow it with a very short devotional on the original bow. So let’s get to it!
To make a wreath bow you need:
- 2.5″ wired ribbon- I got this ribbon from Michael’s on sale for $6.99. I know it’ll be cheaper when they do their 50% fall stuff, but I needed to get this bow made for my wreath. (If you’re really new to bow making, a ribbon that is double-sided is easiest to learn with, but I will show you how to get around that if you just love a particular ribbon that’s only one-sided.)
- pipe cleaners or floral wire (I used pipe cleaners because I have plenty.)
- scissors

Getting Started
I am going to attempt to explain to you how I made this bow and add pictures to help with the explanation. I really hope this makes sense!
Unroll a pretty good amount of ribbon from the spool. because you don’t to mess up your bow because you’re struggling to get more of the ribbon off the roll. Pinch the end of it to start the bow. In the picture below you can see under my left thumb about .5″ of ribbon. So pinch yours about that far from the end. You can give yourself a little extra room and pinch it farther away if you’d like. I prefer to not have to hide a lot of extra ribbon at the start of the bow once it’s complete. I made my first two loops about 4″ wide. My finished bow is a little over 9″ wide and a little over 13″ from top to bottom including the tails.

Make a loop with the ribbon, by bringing it out, then back to the pinch where you started. Don’t worry about holding extremely tight with your thumb and forefinger. Try to hold it back more toward the palm of your hand so that it can take most of the work. This will help you keep from dropping it.
Now make a second loop, across from the first. Bring the ribbon out, then back to the middle pinch forming the second loop. Make sure that it’s the same size as the second. I usually just eye it, but if you’d like to check it, place your thumb in one of the loops and forefinger or middle finger in the other and pull them up. They should be the same height. Make sure you are holding your bow back away from the tips of your fingers. You want to be adding loops with it sitting back toward your palm more.


Continue Making Loops
If you are using a single-sided ribbon, here’s where it’s a little harder than a double-side. At the pinch, use the hand that’s not holding the bow and twist the ribbon so that the print on the ribbon is now facing up. You will twist it like you would when twisting a pipe cleaner closed.

Now make a third loop behind the first one. Make it just a tiny bit bigger than the first loop, or larger if you want a larger bow. I just like the way mine look when they are more uniform looking. My third and fourth loops are just about 4.25″ each. Make a fourth loop behind the second. You can again check that they are the same size the way you did above.

Again if you have one-sided ribbon, twist it so the print side is up. Make your fifth and sixth loops, again just a little larger than the last two. Mine were almost 4.5.” Notice I am holding the bow more in my palm. You can tighten the middle more at the end with the pipe cleaner if you need to.

Twist again. Now make the seventh then eighth loop. Each of these loops were 5″ wide. I stopped with eight loops, but you can continue if you’d like a fuller bow.

Add Tails & Pipe Cleaner
Take about 18″ of ribbon (again you can eyeball it) to create the tail. With about 9″ hanging, take the other 9″ and bring it back up to back of the wreath where you are holding the middle of the bow. I’m sorry I didn’t get a pic of me bringing the tail back up, but you can see the long loop hanging here. I’ll explain below this pic how to begin adding the pipe cleaner. Don’t cut your ribbon yet. Fluff it up a little first and make sure you have what you like. You don’t want to waste this much ribbon!
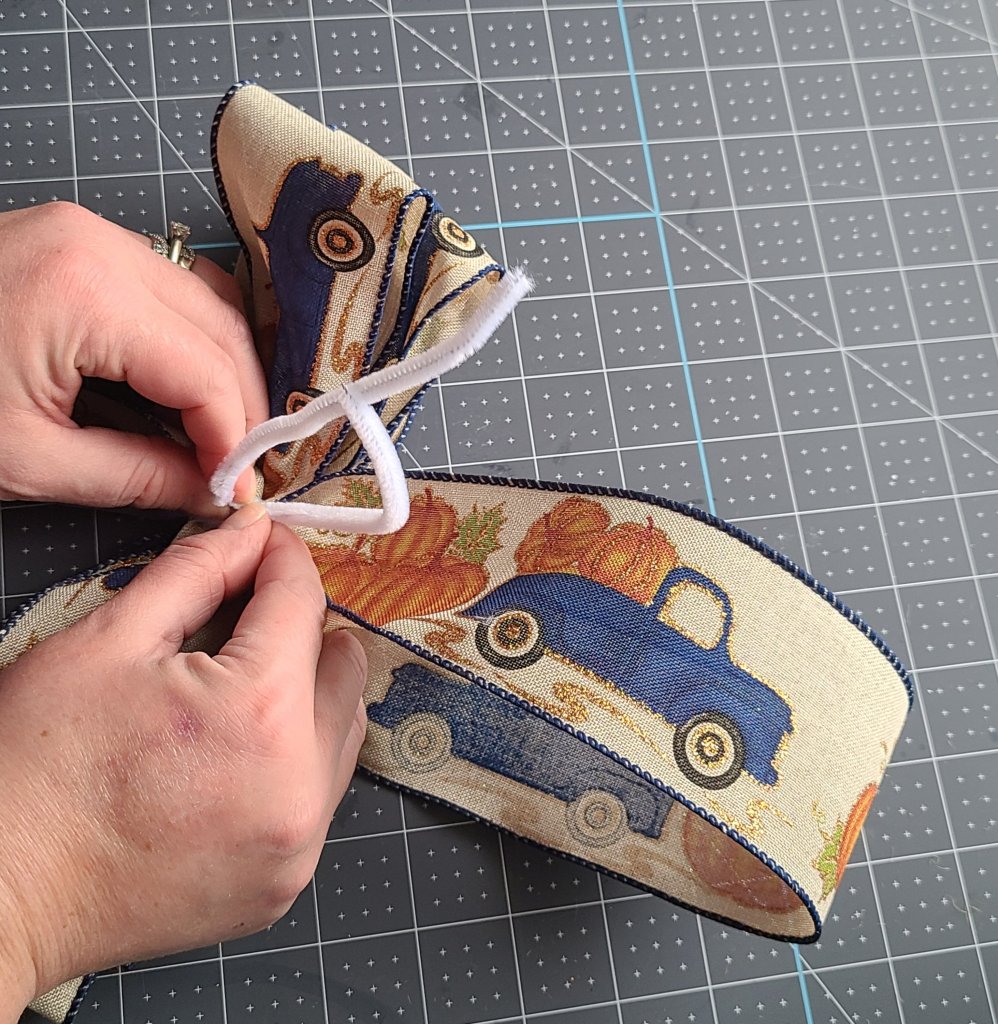
While still holding your bow (you can see I’m still supporting the wreath on each side with a thumb on top and fingers underneath), wrap middle of the pipe cleaner around the bow and across the back. Make sure that the large loop that will be the tails, is the side that is on top and is past where you’re twisting the pipe cleaner closed.

Begin twisting the pipe cleaner closed with one twist, then start spinning the bow. This makes the bow much more securely closed. You can’t see it in these pics, but I didn’t cut the rest of my ribbon off until I closed the pipe cleaner. Sometimes if you do it before, you realize the pipe cleaner wasn’t in the right place and the tail falls out. With your bow secure, cut the bow from the rest of the ribbon.


Cut the long loop that will be your tails right in the middle. Then lay each tail on top of the other and fold them in half length-wise. Cut it at the end in a half V.


Last steps for how to make a bow for a wreath!
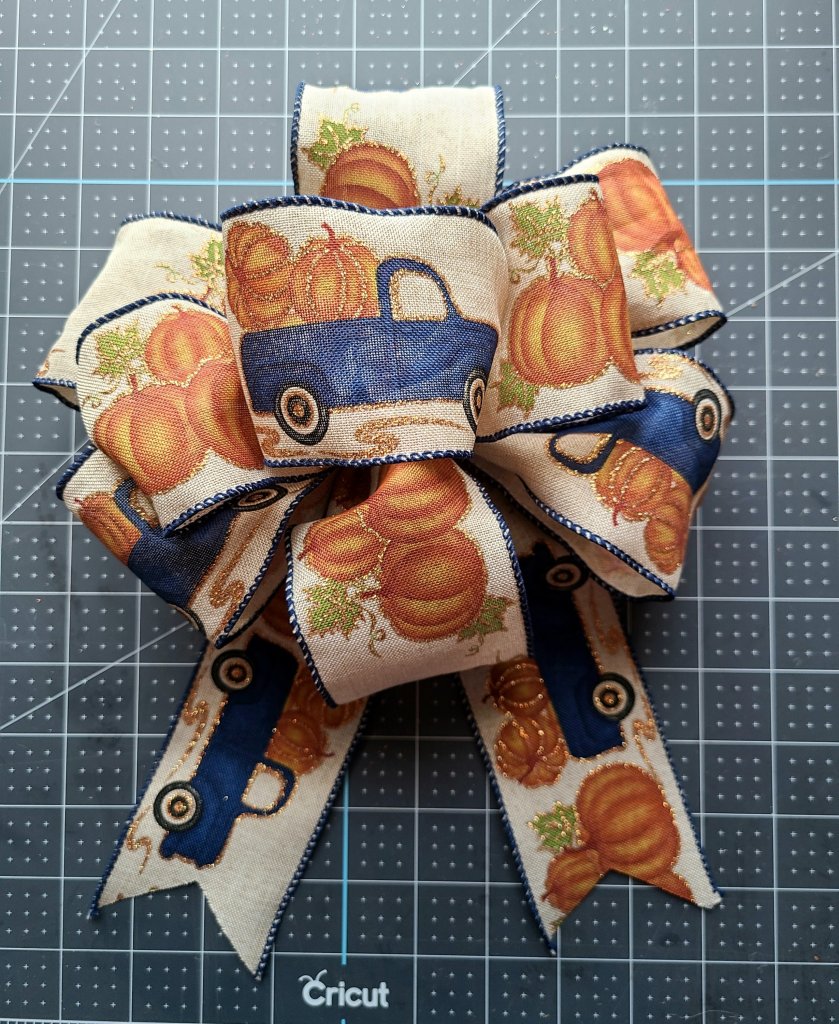
Now begin to fluff each loop and pull them out and around in to the shape that you want.


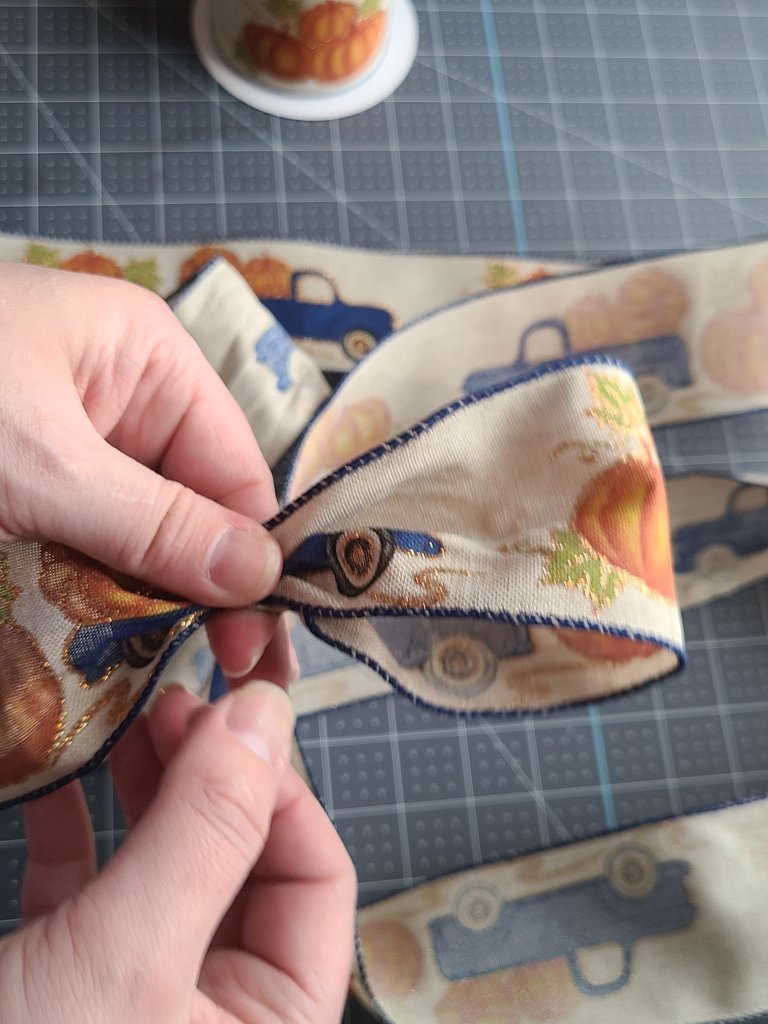
Once it’s all fluffed, you’re finished! I decided that I didn’t want an even number of loops and I wanted the entire truck showing on the middle of my bow. I made a loop with the entire truck showing, then twisted it closed with a small piece of pipe cleaner. Then I spread out all of the loops to the sides and hot glued my new loop right in the middle.

Here is what the finished bow looks like!
Add the Bow to the Wreath
Using the pipe cleaner that is still attached to the back of the bow, move some of your burlap away from the second wire from the outside, and wrap the pipe cleaner around it. Not using it for a wreath? You can use the pipe cleaner to wrap around whatever you’re attaching it to. You could also hot glue it on.

Here’s what you’ll have!

Check out the full tutorial for the burlap wreath here.

A Word From The Authority
Designing Devotion
Before we had into the next part of this post, I’d like to again give you a few words from the Word. Today we made a bow. As beautiful as it is, it cannot compare to the original bow. The spectacular, incomparable bow created by God Almighty. He is such a good & faithful God, long-suffering & kind. He made us a promise that no matter how bad man-kind gets (again), that He will never again destroy the earth with water. He sealed that covenant promise with the “rain”bow.
Genesis 9:12-16 ESV reads, “And God said, ‘This is the sign of the covenant that I make between me and you and every living creature that is with you, for all future generations: I have set my bow in the cloud, and it shall be a sign of the covenant between me and the earth. When I bring clouds over the earth and the bow is seen in the clouds, I will remember my covenant that is between me and you and every living creature of all flesh. And the waters shall never again become a flood to destroy all flesh. When the bow is in the clouds, I will see it and remember the everlasting covenant between God and every living creature of all flesh that is on the earth.'”
In a sometimes ugly world, we can look up, on what is a usually dreary looking day, & see beauty perfected in the rainbow. We can remember God’s loving promise to His beloved, you & me!

Check out these other wreath & fall decor tutorials!
I hope that you enjoyed this tutorial! Make sure you pin this tutorial to use every time you want to make a beautiful bow. I would love for you to share this on social media using the buttons at the bottom of this post.
If you are decorating for fall, check out these tutorials: reversible faux wood books for fall & Halloween, reversible Dollar Tree pumpkins for fall/Halloween, & this adorable farmhouse fall centerpiece using Dollar Tree items!


If you’ve seen all of the pretties on my site and on Pinterest that you are dying to make, but you don’t have a Cricut, use my tutorial to make home & seasonal decor and just about any other craft without one! All you need is a printer and a pencil!

Make sure you don’t miss any other the great tutorials, free printables, and other ideas shared here! Follow me using the social media buttons along the sidebar! It is greatly appreciated as I grow my accounts (finally!). Enter your email address below to get an email when a new post goes up so you don’t miss a post! You’ll never get any other mail or spam!
If you love decorating for fall, make sure you follow my Pinterest board for fall decor!


Great tutorial! Bow making takes practice and patience at times. So glad you decided to share with us this week. #HomeMattersParty
It definitely does! It took me forever to calm down enough to get them done in the beginning, ha!
Thank you Donna! I’m honored!
Such a pretty ribbon! Thanks so much for linking up at the Unlimited Link Party 33. Pinned!
Thank you Dee!