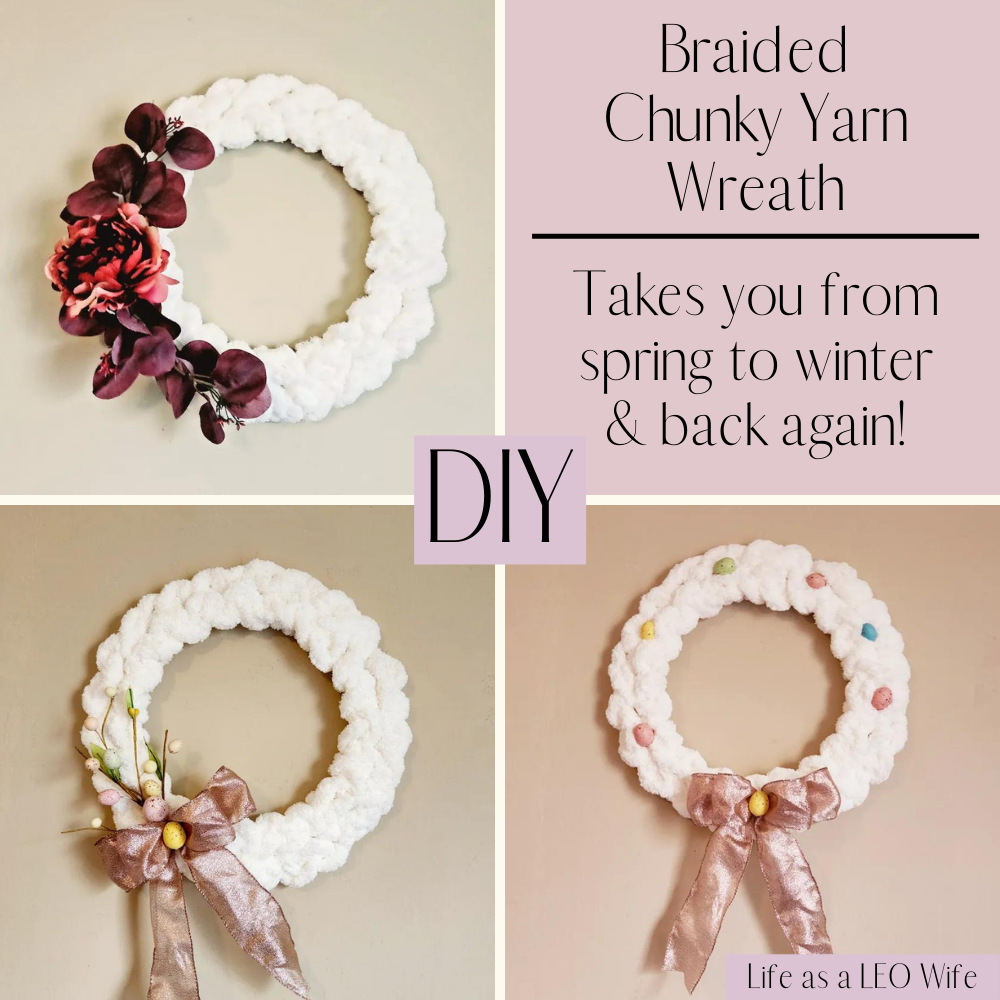
Welcome everyone! Last week I found some chunky yarn at Walmart for $6.88. I snatched it up because it’s normally over $10 per skein. As I searched Pinterest for ideas about how to use it, I saw a few braided wreaths, so I decided to try my hand at creating my own. I figured out how to do it, so today I’m sharing a tutorial for making a braided chunky yarn wreath. It’s handmade, no crochet hooks, knitting needles, or skills required!
These wreaths can be made in several ways. This chunky yarn wreath is similar, but a little bit faster with a solid base and the braid only on the outer wire. Both are incredibly cute, versatile, and can be used yar-round!
Sustainable Pinterest Challenge
I’m so glad you’re dropping today because it’s time for our monthly Sustainable Pinterest Challenge, hosted by Julie from Sum of Their Stories. On the first Tuesday of each month, I join a group of lovely bloggers from around the world for a blog hop. We find a pin on Pinterest that inspires us and recreate it with our own twist using something that is sustainable, reduces waste, or is ecofriendly.
I found a chunky knit wreath on Pinterest that I thought was pretty. It was not $63.80 pretty however! Also, I don’t knit, but I knew I could figure out a way to DIY a chunky yarn wreath by hand. It only took a few minutes for me to figure out a way to hand knit my yarn onto a Dollar Tree wire wreath form. So, I was able to make a braided chunky yarn wreath for $7.88 plus the cost of embellishments, which can be changed out each season or holiday. That’s a great price for a wreath that can be used year-round! That saves time, money, and materials which is extremely sustainable!
For everything there is a season, and a time for every matter under heaven.
Ecclesiastes 3:1 ESV


If you missed last month’s Sustainable Pinterest Challenge Hop, you can check it out along with my beautiful floral bike wheel wreath tutorial here. I love the way it turned out, and it’s perfect for spring and summer.
Braided Chunky Yarn Wreath Supplies:
- The yarn in the inspiration photo looks like merino wool, but I used about 1/3 of a Mainstays 31.7 yd skein of chenille chunky yarn from Walmart. This yarn will work well. You may need two skeins of these.
- 14″ wire wreath form– This is a 2 pack that comes with floral wire to attach your embellishments to the wreath.
- scissors– These are great, sharp scissors for an amazing price; 3 pair (that are so cute) for $9.99!
- embellishments like faux flowers, stems, speckled eggs, ribbon, or other seasonal items
- pipe cleaners or floral wire
- hot glue gun if you need to attach embellishments to pipe cleaners
Embellishments I used so far:
- 2.5″ metallic pink wired ribbon recycled from last year’s bunny wreath
- small, speckled eggs
- speckled egg pick
- large pink, mauve, & purple roses- These peonies are gorgeous, hold up well, and look fabulous. You can use the leftover ones in my bike wheel floral wreath.
- purple eucalyptus


Disclosure: I am a participant in the Amazon Services LLC Associates Program and the Dollar Tree Affiliate Program, affiliate programs that allow me to link to the products that you can use to make this project quickly and easily. If you purchase any of these products I may receive a very small commission at no cost to you! That commission helps me continue to bring these great decor DIYs, free printables, and all of the other goodies on this site to you. Thanks so much for your support!
Shop this project for everything you need!


Attach the Chunky Yarn to the Wreath Form
To cover the entire wreath form, you’ll “braid” around it twice. The first time you’ll cover the outer two wires, and on the second round you’ll cover the inner two. Place the yarn from the front of the form in between the middle two rings.

Wrap the yarn around the outer two rings and tie a slip knot around it.

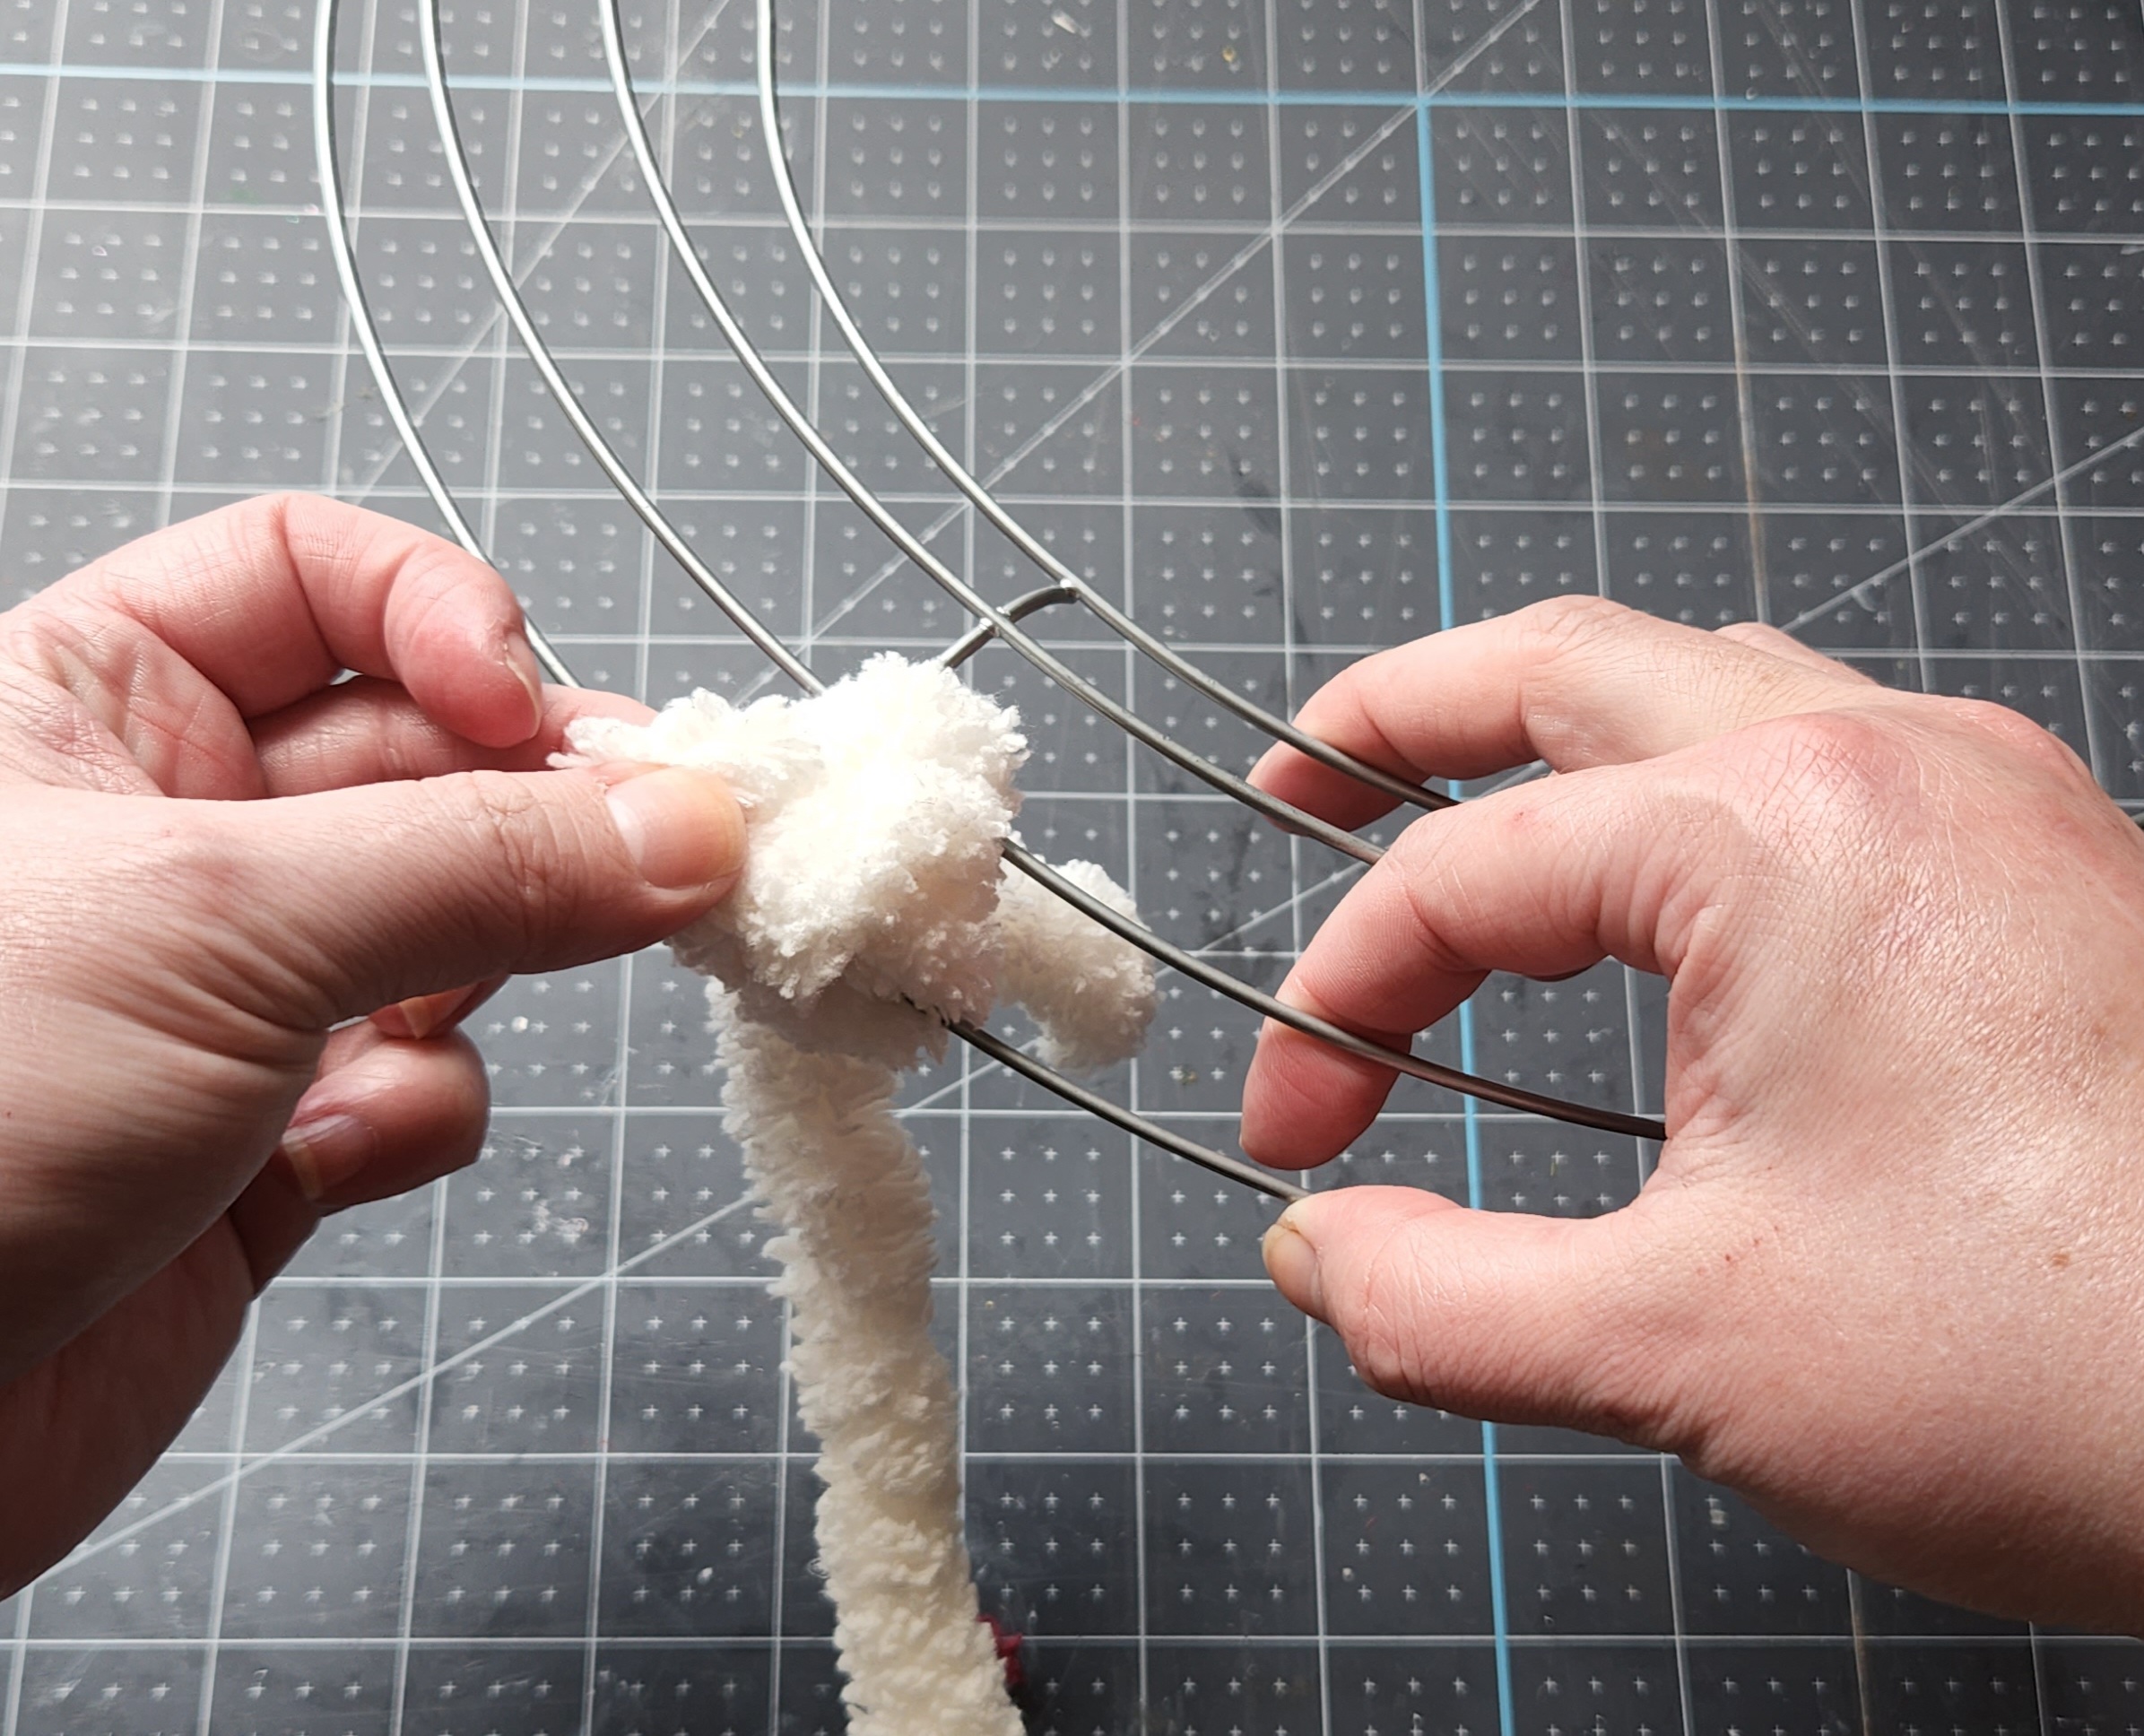
Begin the Braid
Once you’ve pulled the yarn through the slip knot, you’ll have a ring of yarn (that’s all I can think to call it lol). You’ll begin to pull more yarn through, creating a chain (like when crocheting, but don’t worry; you don’t need to know how to crochet for this).

Push a small amount of yarn through the middle two wires and pull it through the hole from the slip knot. We’ll call that a chain from now on.


Next, do another chain, but this time pass the yarn from outside the wreath and through the hole, not between the inner two wires. This will attach the braid to the form.


Continue creating chains, alternating bringing the yarn through the middle two wires then from outside the form.


This video may help if you need more of a visual. Forgive me for having to remove some of the chains. I was figuring out how to make it as I went!
Continue chaining until you’re back to where you started.
Braid Around the Inner Rings
Once the outer two rings are covered, you’ll move to the inner rings. Make the final chain that completes the outer coverage, and you should have this:

Move the braid to the inner two rings like this:

Instead of bringing the yarn from the outside of the wreath through the chain (the slip knot ring), bring it from the inside of the wreath and chain it through the ring.

Continue chaining, bringing the yarn from the inside of the wreath on one chain, then from between the middle two wires (just like you did on the first row) for the next chain, until your braided chunky yarn wreath is complete.

If you need more of a demonstration on how to move from the outer two rings to the inner, take a look at this video. Sorry for bumping the tripod and for going so slow! I was doing this with my arms wrapped around the camera and tripod to “get the best shot.” Can you tell I film projects on super-rare occasions?!
(Update 2023: I’m now filming all of my projects with a new tripod made for filming crafts and cooking. Follow me on TikTok and Instagram using the buttons below to watch the tutorials for all of my projects! When you see something you like, just come on over to the blog to see the entire video, slowed down, with written instructions. Be sure to pin them for later!)
Finish off the Wreath
Once you get back to the start of the wreath, push the chain through the wreath form to the back.
Turn the wreath over and cut the yarn off about 3 to 4″ from the slip knot ring. Then tie a knot in the yarn around it.

Flip the wreath back over (face-up) and fluff the yarn to cover any of the wreath form that’s showing and to fill in any open-looking spots.

Here’s another video to help:
Embellish the Chunky Yarn Wreath
I plan to use this wreath year-round, but for now I decorated it for spring. I created three different wreath looks that I can use for Easter, spring, and even into a bit of the summer.
Easter Wreath Option 1
First, I removed the 2.5″ wired pink metallic ribbon from a bunny wreath that I styled last year, but never really used. I made a simple four loop bow with 4″ dove tails and secured it in the center with a pipe cleaner. When you make your bow, leave the pipe cleaner or floral wire long so you can use it to attach it to the wreath.

Use the wire to attach the bow to the wreath. For my first option, I placed the bow at about 7 o’clock, in the bottom left corner.

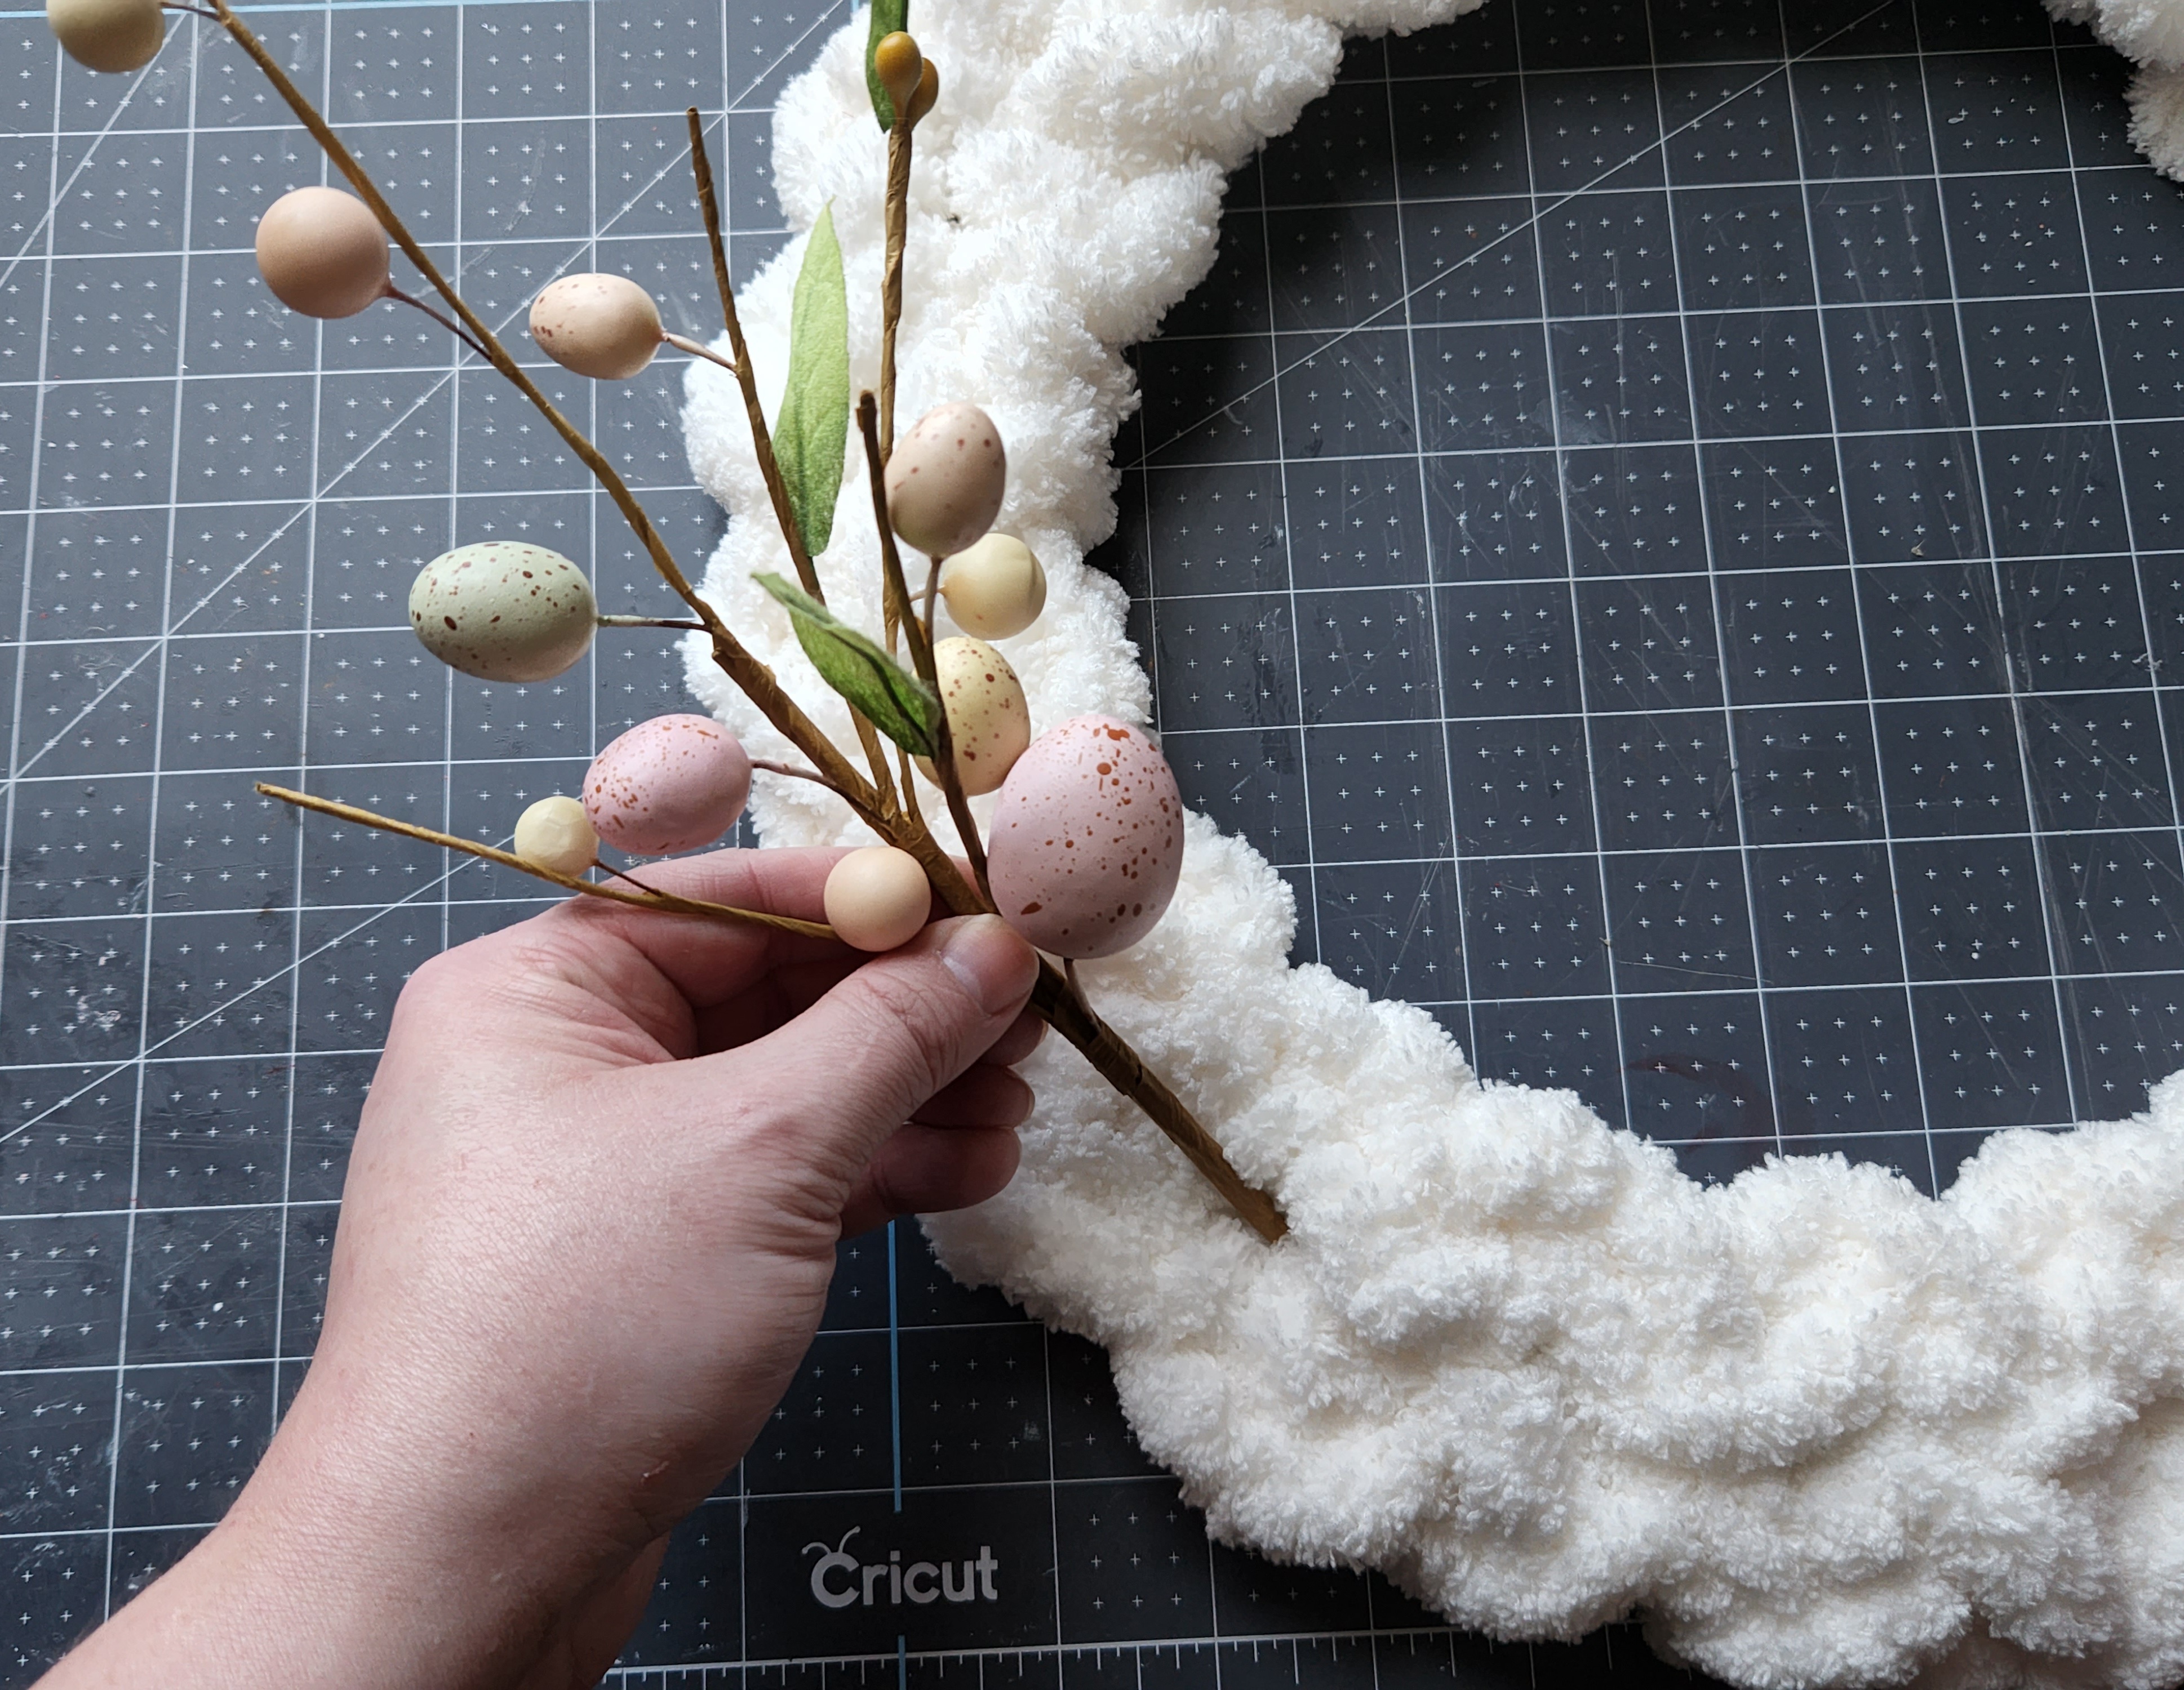
Next add your picks or florals. In this picture, I was adding a speckled egg pick before I put the bow on. I ended up taking it out and placing the bow first, but I didn’t get a second picture when I added the pick after the bow. I didn’t need wire to keep the pick in, and you probably won’t either. Just slide it through the yarn and bend the pick to the curve of the wreath in case it sticks out farther than the yarn.
To cover the pipe cleaner holding the bow together, I glued a small speckled egg over it.


I took a few pictures with the bow tails long, but ended up folding them up a bit for a different look.

Braided Chunky Yarn Easter Wreath Option 2
Next, I tried a slightly different Easter look. I moved the bow to the bottom center of the wreath and placed some small speckled eggs in the yarn around it. The yarn is pretty tight, so the eggs stayed in with no glue or wire. If you need to, you can glue some floral wire on the back of the eggs and place them on the wreath. That way you can remove them to change the wreath for the season without damaging it.

Here’s what it looks like as Easter wreath #2:

Spring Wreath Option 3 & 4
Finally, I removed the bow and the eggs and replaced them with florals. I placed a large purple rose in the left bottom corner. I left the stem long so that I can use it for future projects, and wove it through the wreath form wires.

Next, I cut apart 3 stems of a purple eucalyptus bunch and added them to the wreath. I tried a few different placements, two above the rose and one below,


then I removed the one from the bottom and placed all three extending from the top of the rose, forming a slight curve.


The braided chunky yarn wreath is ready for its place of honor!
Here are a few pictures of the many looks of my completed wreath:


Remember to pin the image below or share this post with the buttons on the left side of the page so you can find it when you’re ready to start your project! Also, follow me on Pinterest for new ideas added weekly! Be sure that you never miss a great tutorial for decor like wreaths, signs and other home decor, free printables, crafts, and other fun posts! Enter your email address below to be notified of new posts! Use the buttons below to follow me on social media for other great content.
Don’t go yet! There’s more to see!
There’s plenty more to see here on the blog! If you’re looking for something specific, use the search box in the sidebar to look it up. If not, you might enjoy these ideas. Don’t have time to read them all now? That’s ok, just click over to the posts using the pictures and pin them for later. You can also add Life as a LEO Wife to your favorites and check back for new ideas and free printables and SVGs every Wednesday, as well as link parties with tons of shared ideas on Sundays!


On to the Link Up!

Click on the name of the blog to head to their main blog page and on the name of the project to head straight to the project itself!
Julie from Sum of Their Stories | Button Bouquet in a Cotton Reel
Gail from Purple Hues and Me | Woven Cord Basket
Terri Steffes from A Good Life | Chalk Paint Vase for Spring Flowers
T’onna from Sew Crafty Crochet | Fluffy Crochet Duster Cover for Spring Cleaning
Julie from Treasures Made from Yarn | Crochet Butterflies
Allyson from Southern Sunflowers | Painted Bunnies on Wood for Easter
Mel from Decor Craft Design | DIY Spring Wreath – Upcycling a Rattan Basket
Lydia from Life Beyond the Kitchen | Floral Tray Pouch
Linda from Crafts a la Mode | Homemade Cotton Bunny


How lovely, I see this super chunky yarn but don’t really know what to do with it. I like the idea of reusing the decorations from things you’ve made previously; if it’s not working for you pull it apart and reuse the pretty bits! I like all your versions but the one with the eggs dotted around has my heart right now!
Thank you! This wreath won’t get to hang in a place of honor for a month or more. I’m moving, so my shelves and walls aren’t getting too updated for Easter. I’m mostly making things then boxing them up lol.
I love how you made your wreath using chunky yarn. It’s very pretty and quite unique! You can get really creative making all sorts of cool looking projects with it!
Thank you! I’m looking for something else to do with it now. I believe a bunny wreath is next on the list!
I love the Easter versions of this wreath! I love the chunky white yarn with the colorful eggs.
Thank you! I think they’re my fav too. The purple/pink/mauve colors will be for my everyday decor when there’s no holiday or season near. At least I think so. We’re moving and buying new furniture and decor, so I think I’m going to go with a navy, mauve, gray, cream, and purplish color scheme. Although I have so many schemes I’ve picked lol. I think I’m going to write a post with all of the schemes and get a poll going in the comments lol!
I really like this braiding technique, Niki. There are so many ways this wreath can be used for Spring and other times of the year. I’m already thinking about Fall and Christmas! LOL
Thanks Ann! I know. Just between us, I’ve already slipped a few pumpkins and holiday picks in to see what it will look like lol!
Great idea making the wreath base so you can continually change out the embellishments when the mood strikes! I always love feeling that kind of fuzzy yarn.
Thank you! This yarn is sooo soft. I haven’t found any merino yarn near me yet, but when I do, I’m going to make one out of it because it looks so silky soft.
Beautiful wreath. Pinned to my wreath board on Pinterest. Your post is well thought out and illustrated. Thanks for the inspiration and tutorial. Best wishes, Linda @ craftsalamode.com
Thank you Linda! I really appreciate that!
Oh wow! Great project! I love the use of the chunky yarn. Between your description and the videos I have a great idea of how to make my own now. It’s great that you can reuse the form for various seasons, too.
Thank you! I was hoping the video would help. I’m not an expert at filming my projects yet lol!
Such a flexible wreath; it’s like a blank canvas and you can have fun and be creative with different decorations for the wreath. That’s clever!
Thank you! I’m already trying to figure out what I’ll do with it for the summer!
I may have to try this.
I’d love for you to take a pic & tag me on social media if you do!!
Thank you for the easy instructions to follow and the videos!
You’re welcome, Barbara!
I love this!! I have quite a bit of this yarn that was gifted to me a couple years ago and didnt know what to do with it. Now I do!!. Thank You for this fabulous idea.
You’re so welcome! I’d love to see your version when you make it. If you’d like, you can tag me on any social media platform @LifeasaLEOWife. Thanks for your kind words!
I like this however how would you do with a frame with three wires?
If it’s like I would picture it, with three sections instead of four like mine, I would make it with one go around the wreath form instead of one on the outer two section and one on the inner two. Still make the slip knot and the tutorial as described, just covering the entire form in one go. Another option is my hand-crocheted chunky yarn wreath, which is linked at the top of the post. It’s a lot like this one, but with a solid interior and the braided look going around the outside of the wreath. No crochet skills required, so don’t sweat that! I hope this helps!
I used the chunky yarn but still find there are huge gaps that I can see through the wires. Any suggestions to remedy this please?
You need the jumbo chunky yarn. It’s about 2″ thick at least. If you’d like, you can email me photos of how yours looks to theleowifelife@gmail.com & I can take a look to see what it looks like & if I have any ideas on how to help. I didn’t have any gaps in mine, so without seeing it I wouldn’t be sure how to tell you to fix it. Perhaps before moving to the next braid, you could move the chunky yarn over & make sure everything is covered before moving to the next chain (or braid).