
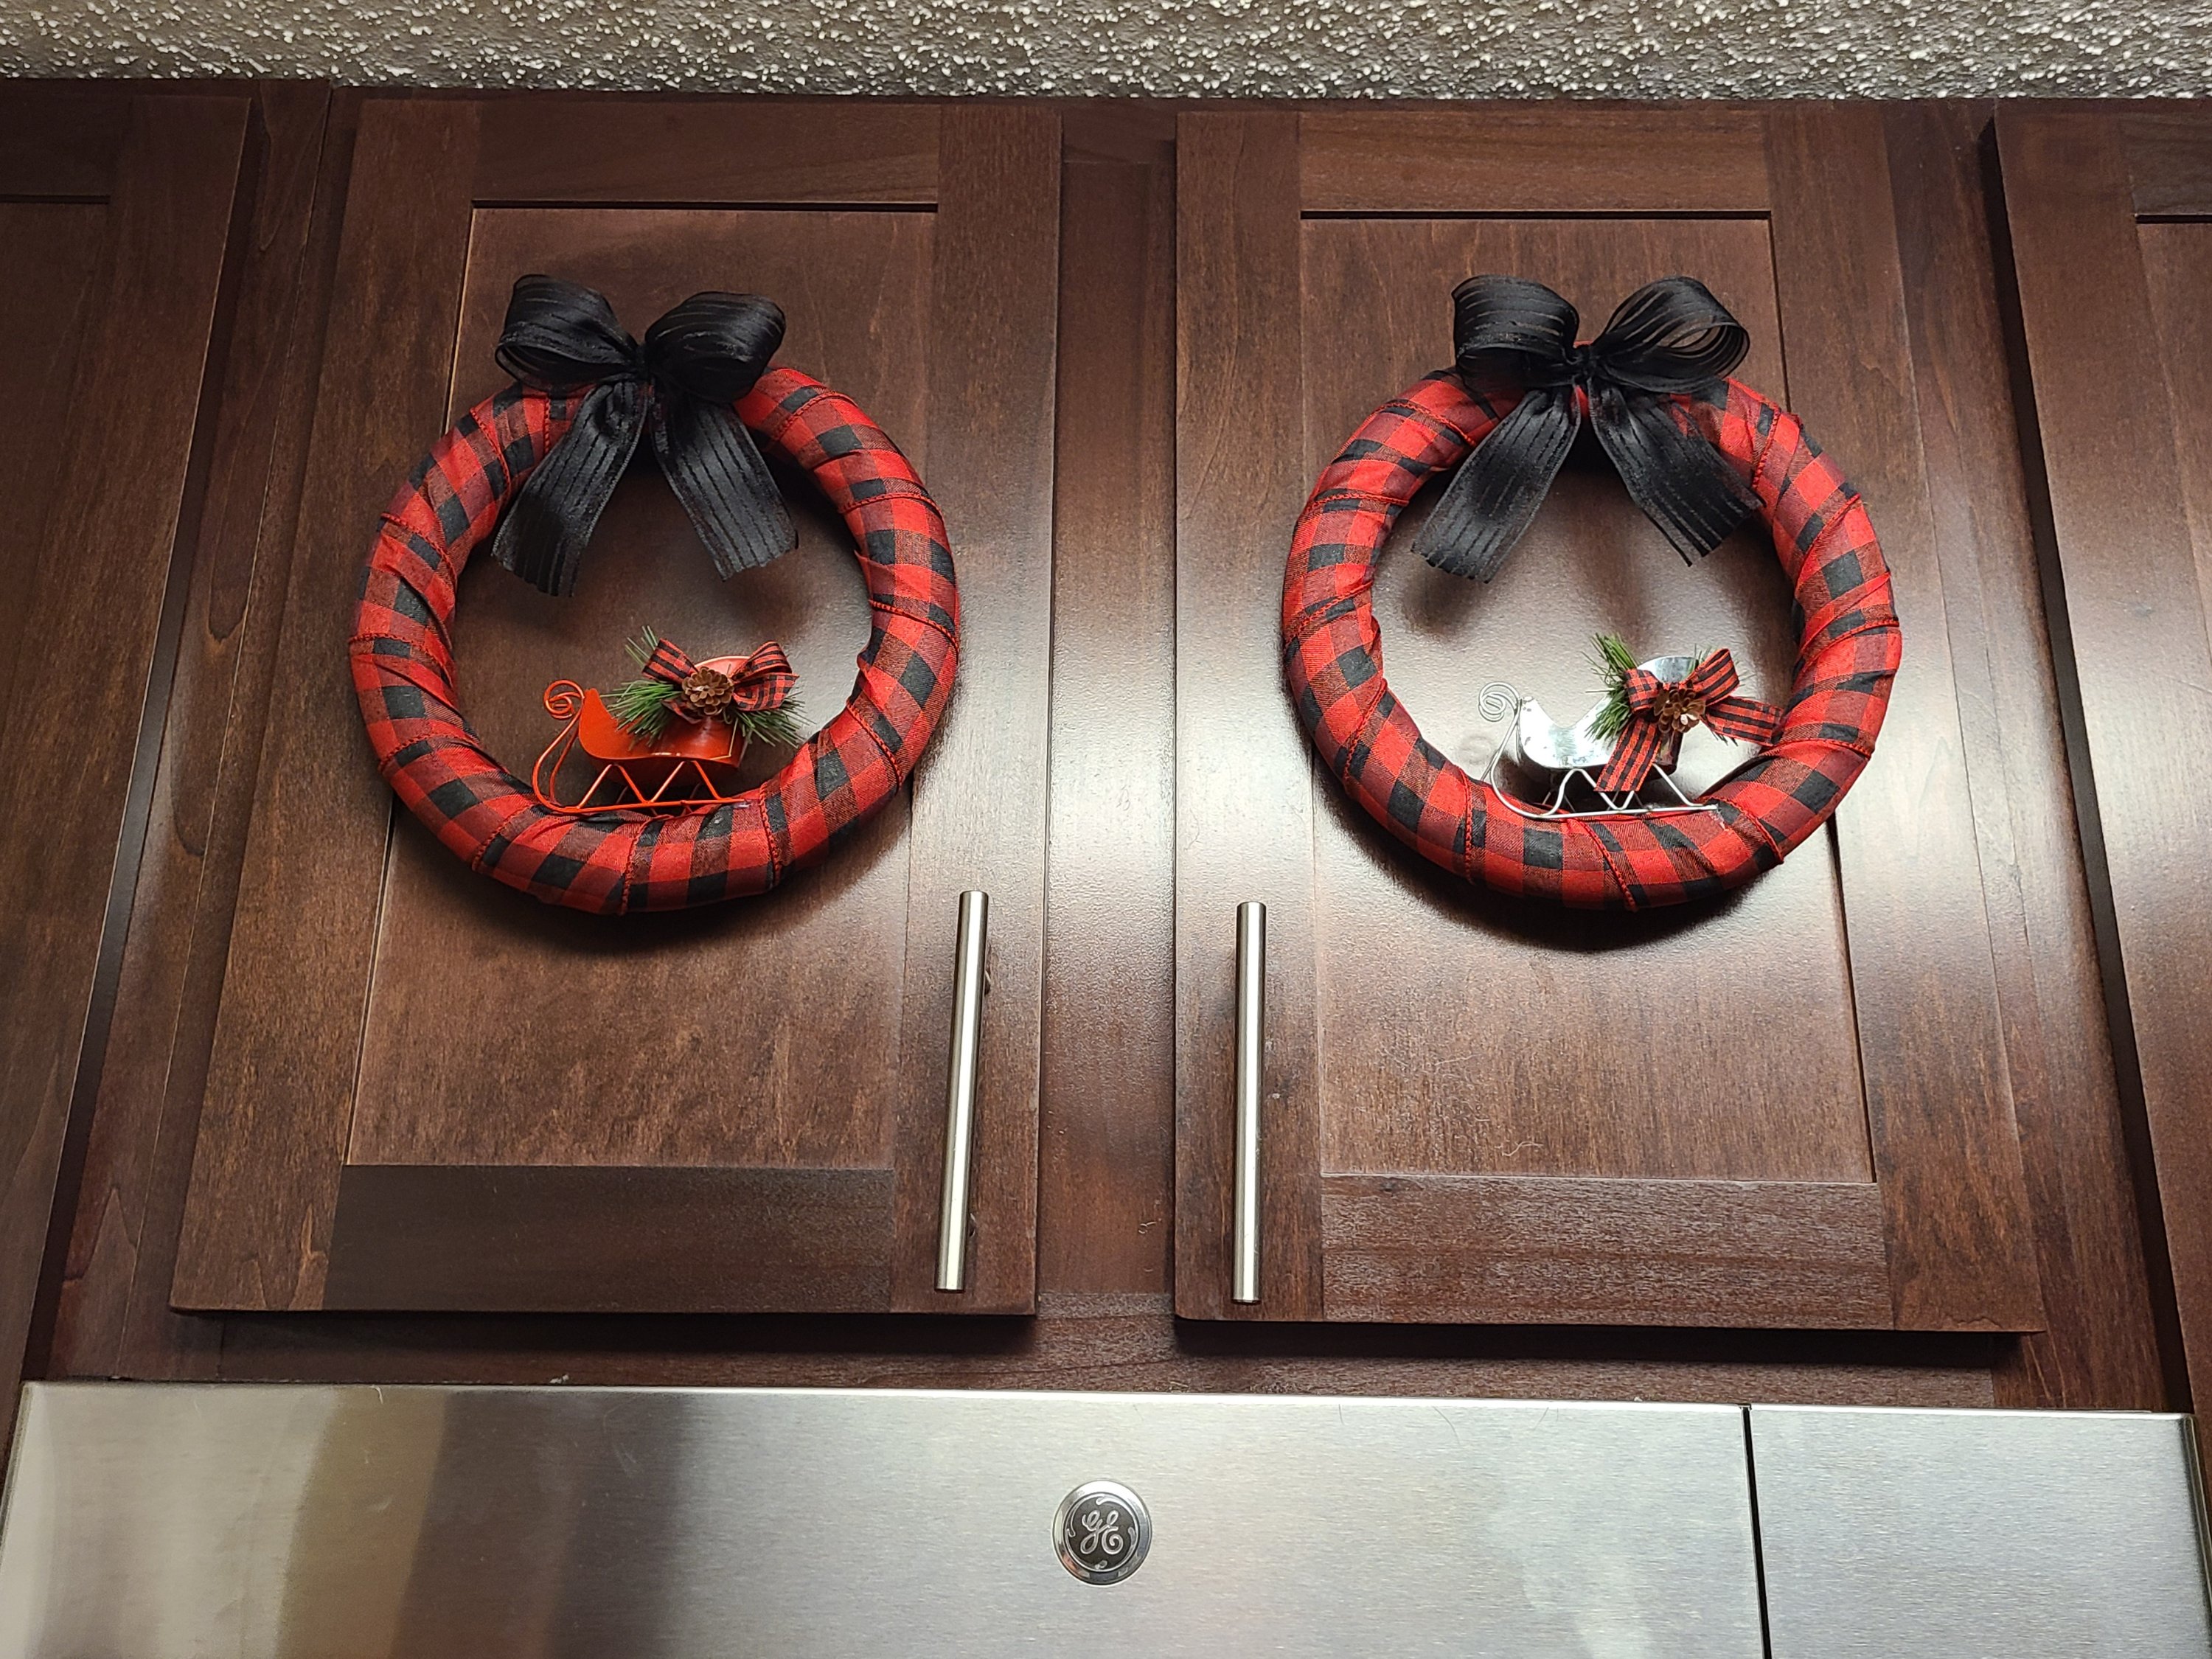
As promised here is another Christmas decor piece (or pieces) tutorial for you for December 2. I mentioned yesterday that I have different Christmas themes for the each room in our home. My kitchen is decorated with red buffalo checks.
Last year when I saw all of the buffalo check items, I didn’t like them very much. I guess it grew on me because this year it adorns my kitchen and our family Christmas pj’s.
I will be doing a decor reveal for our kitchen tomorrow (hopefully), but now I’ll show you how to make some wreaths to decorate your cabinets with. I love the way they look, and they make the room Christmas-y without cluttering up the counter tops. I also made a red buffalo check candy cane wreath for our laundry room door, but I will give you a tutorial on that later.
To make your own wreaths you need:

- styrofoam wreath form- You’ll need 2 if you plan on placing them on two adjoining doors.
- small sled ornaments with red buffalo check bows- I bought a red and a galvanized silver one from Dollar Tree.
- 2.5″ wired red buffalo check ribbon (Michael’s)
- 1.5″ black wired ribbon
- hot glue gun and glue
- scissors
Place a strip of hot glue on your ribbon and glue it to the back of the wreath form. Begin wrapping the ribbon around the form until you end up where you started. Cut off the remaining ribbon and glue the end to the form.


Remove the packaging and the jute rope,that would normally hang it on a Christmas tree, from your sleds. That will leave a metal circle where the jute went through. Bend it down, which will leave it flush with the sled seat.


Make any adjustments needed to the greenery and the ribbon on the side of the sled. I ended up taking mine off to make the bow even, then replaced it by hot gluing the pieces together and gluing it on the sled. It’s originally attached with a twist tie, so the glue is sturdier.
Now glue it to the bottom of the wreath on the inside of it. Play around until you get the placement you like. You’ll notice that it’s a bit uneven, so you’ll have to glue it the way it’s made. Glue the front loop of the runners on the back of the wreath. I placed mine until it was good and even, then lifted it just a little, put some glue on, and then pressed it back down. Then add a small dot of glue on the front of the wreath under the tip of the runner.


All that’s left is to add your bow. Make a normal bow, similar to tying a bow in your hair. Leave about 1.5″ on your tails on both sides. Put a dot of hot glue on the top of your form, centered as best as you can, and glue your bow on.

Repeat the same process for your second wreath, and you’ll have beautiful wreaths to adorn your cabinets. Having two looks great because they balance the decor.

I hope this tutorial helps decorate your home for the holiday season! Please leave a comment and/or a picture of how your wreaths turn out. Please share on your social media accounts and follow Life as a LEO Wife on Facebook, Instagram, Twitter, Parler, and MeWe.
I’ll be posting my entire kitchen decor soon, but here’s a peak of the two cabinet doors my wreaths are hung on.
If you enjoyed this tutorial, you might like some of these:

Happiness is Homemade #547
Join us for Happiness is Homemade Link Party where you can share & be inspired by blog posts from bloggers around the world. You’ll find recipes, DIYs, crafts, home decor, fashion, gardening, & so much more!
Happiness is Homemade #546
Join us for Happiness is Homemade Link Party where you can share & be inspired by blog posts from bloggers around the world. You’ll find recipes, DIYs, crafts, home decor, fashion, gardening, & so much more!

8Happiness is Homemade #545
Join us for Happiness is Homemade Link Party where you can share & be inspired by blog posts from bloggers around the world. You’ll find recipes, DIYs, crafts, home decor, fashion, gardening, & so much more!

Happiness is Homemade #540
Join us for Happiness is Homemade Link Party where you can share & be inspired by blog posts from bloggers around the world. You’ll find recipes, DIYs, crafts, home decor, fashion, gardening, & so much more!
Happiness is Homemade #535
Join us for Happiness is Homemade Link Party where you can share & be inspired by blog posts from bloggers around the world. You’ll find recipes, DIYs, crafts, home decor, fashion, gardening, & so much more!

Happiness is Homemade #534
Join us for Happiness is Homemade Link Party where you can share & be inspired by blog posts from bloggers around the world. You’ll find recipes, DIYs, crafts, home decor, fashion, gardening, & so much more!
Happiness is Homemade #533
Join us for Happiness is Homemade Link Party where you can share & be inspired by blog posts from bloggers around the world. You’ll find recipes, DIYs, crafts, home decor, fashion, gardening, & so much more!

Happiness is Homemade #532
Join us for Happiness is Homemade Link Party where you can share & be inspired by blog posts from bloggers around the world. You’ll find recipes, DIYs, crafts, home decor, fashion, gardening, & so much more!

Floral Door Basket Pin Recreation: 2 Styles!
Let me show you how to DIY a beautiful floral basket to hang on your door or wall for less than $20 in less than 10 minutes!

One thought on “DIY Christmas Wreaths”