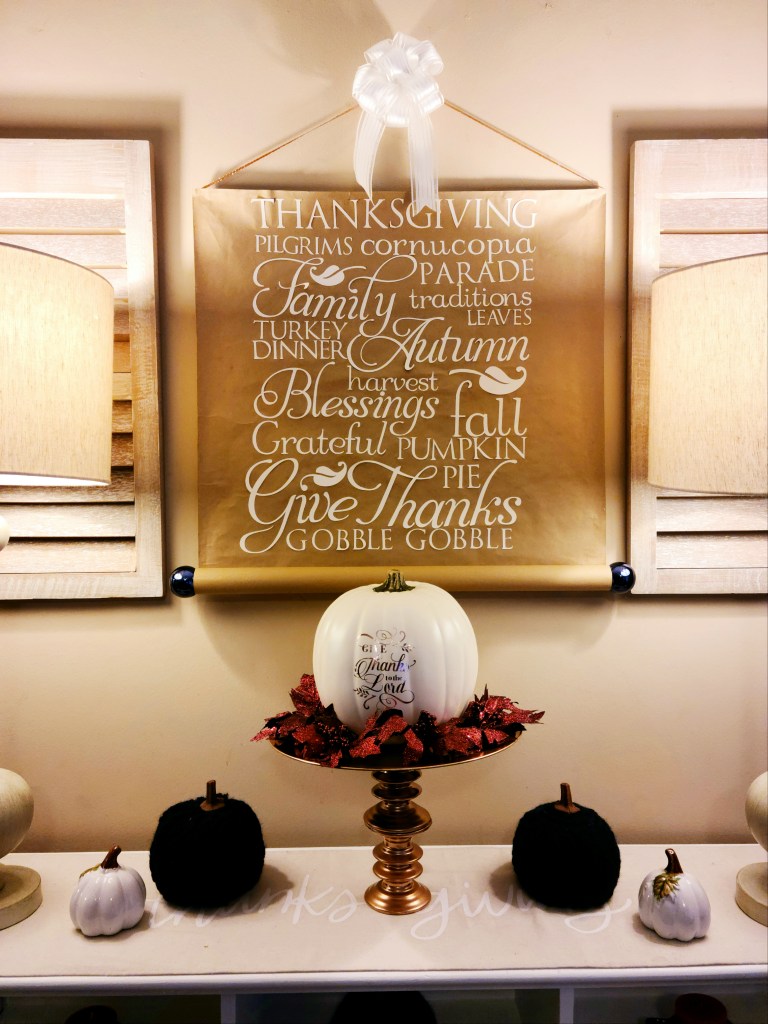
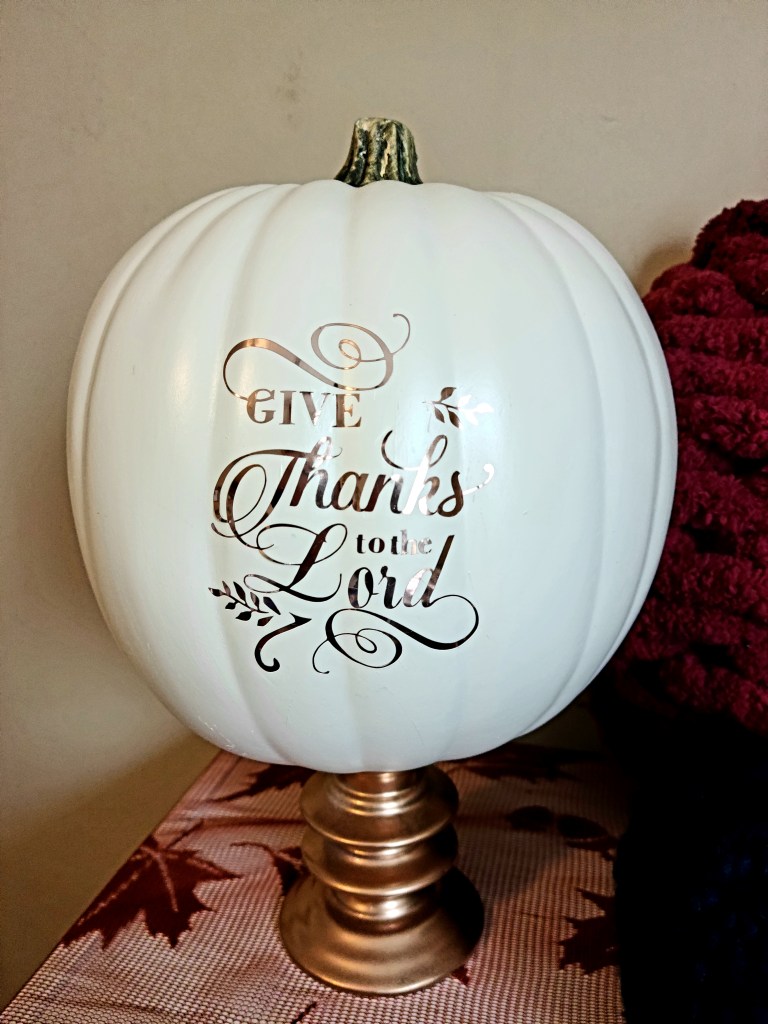
Not too long ago I saw a scroll wall hanging, and I fell in love. However I was not about to pay $45 to $50 on Etsy or $89 from Pottery Barn! I don’t have a lot of decor specifically for Thanksgiving, so I thought the perfect time to make my own scroll was now. This project is so easy (if you use a simple design), and looks amazing on the wall! If you like the Pottery Barn dupe tray holding the pumpkin in the picture below, check out the $3 tutorial here. The white pumpkin is also a DIY that you can make into a great Thanksgiving family tradition with this tutorial.
For a scroll wall hanging you need:
- roll of kraft wrapping paper from Dollar Tree
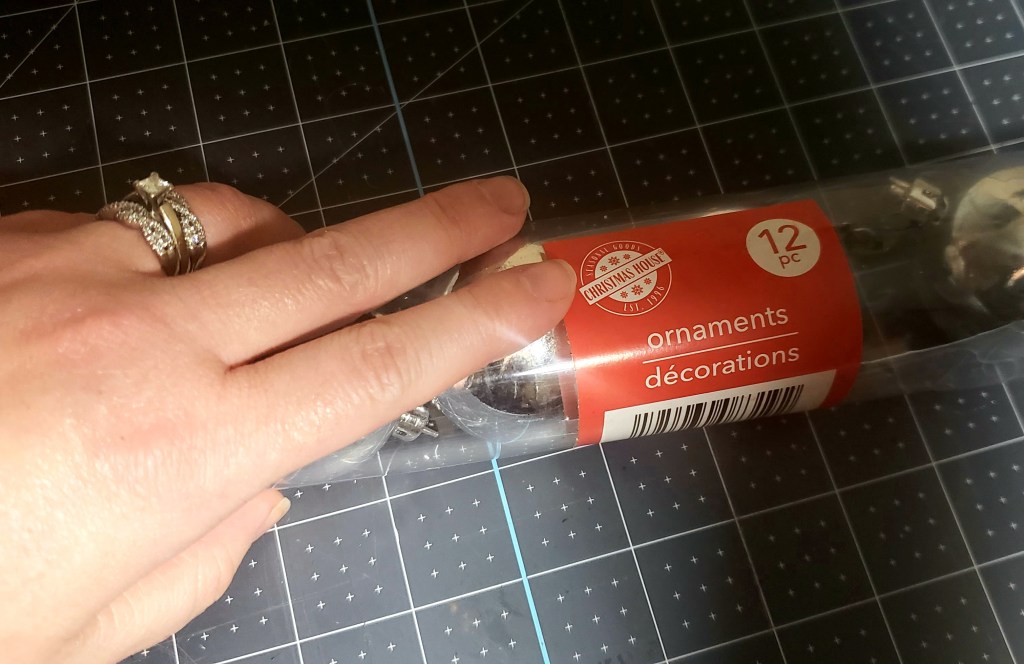
- plastic ball ornaments in your color choice- I used two blue ornaments from Dollar Tree.
- scissors
- hot glue gun
- glue stick (like Elmer’s)
- pencil
- ruler and measuring tape or yard stick
- ribbon- I used 1.5″ wired white ribbon.
- twine or 1/8″ ribbon- I used 1/8″ copper colored ribbon.
- cardstock or vinyl for the design
- stencil, cutting machine, or a printer with this tutorial to transfer your own design to the paper
- popsicle sticks, paint stirrers, or other wood for support
- glass gems or small flat rocks for weight at the bottom
Create & Cut a Design
I wanted a scroll wall hanging to use specifically during Thanksgiving, not all of fall. I used a Thanksgiving subway art design from Cricut. It comes with the Cricut Access subscription, but I think it’s like $.99 or $1.99 to buy it outright if you’d prefer. If you don’t have a Cricut, you can use a stencil or add a design by printing your own to transfer onto the paper with the carbon copy method. You can see my tutorial on that method here. For that process you need a printer and a pencil and that’s it. This is the design I used.
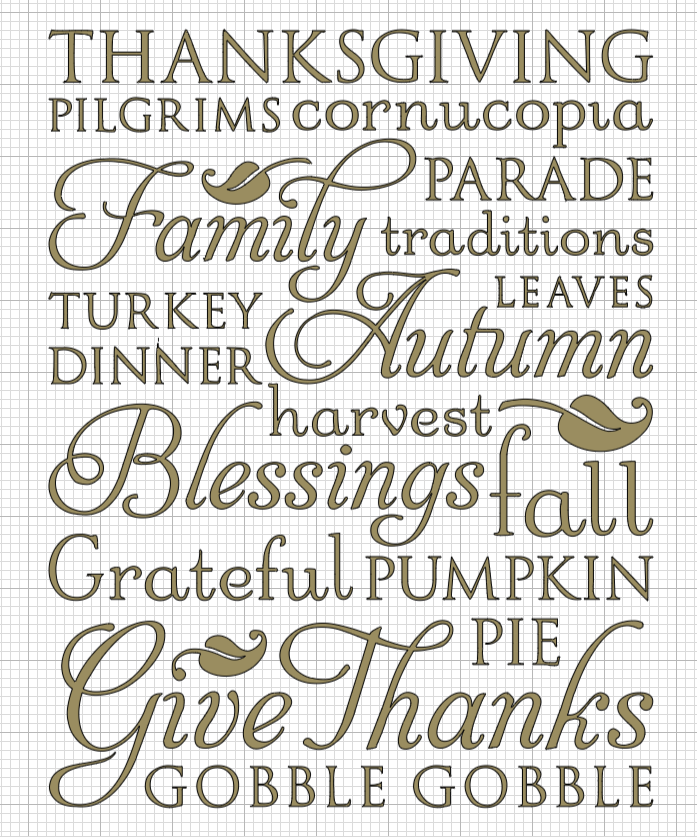
The paper section of my scroll is 24″ wide and 23.5″ long. I sized the image to 22″ long and 16″ wide. Since I didn’t have vinyl that was longer than 12″, I had to use cardstock to cut the image on. This was absolutely insane design to add to the scroll, and I did not realize it until I was about 30 minutes into making the it! If at all possible, use vinyl or a stencil if you’re using a design with a lot of letters or separate parts. You can absolutely make yours exactly like mine, just know that it will take about 8 to 10 hours if you want it perfect, even, and professional-looking. Size your image to fit the size of the scroll you want to make.
If you’d like to keep this as budget-friendly as possible, you can go with all Dollar Tree items. You can use poster board to cut a design from instead of cardstock if you’re cutting a Cricut design. That will look exactly like mine. They also now sell vinyl in some stores. I think I’ve seen white, black, as well as primary colors. Another option is to buy their pre-cut vinyl words which would be perfect if you can find one you like and one that’s large enough.
Cut the Kraft Paper
Once you have decided what size scroll wall hanging you’d like, cut the paper to size. If you have time and buy your paper in advance, it’s so helpful to roll it out and place heavy objects on top of it prior to working with it. This will help it stay flatter and not roll up as much. You will still have to keep something on each corner when you’re working, but it helps so much. It helps you to be able to hang it faster once it’s complete.

Measure & Mark
My entire scroll from the tip of the bow to the bottom is 24×31.5, without the bow it’s 23.5″ long. If you’d like the same size, roll out the paper and use your tape measure to make a mark with a pencil at 30″. To make sure that you cut a straight line, measure from the bottom and make small pencil marks across the paper at 30″. If you are going to be using a ruler, you’ll need to make a mark every 10-11″, and if you happen to have a yard stick, you will just have to measure and mark each side since it’s long enough to stretch across the entire width of the roll. I had a 16″ level, that you can see in the above picture, so I made marks about every 14.” If you feel like you can make a straight line without doing that, go for it. I would at the very least, measure and mark each side. Otherwise you might end up with a slanted line. Connect those marks, creating a light pencil line that you can cut along with scissors.

Now it’s time to measure and mark it to the correct width. Mine is 24″ wide. Repeat the process you did above, this time measuring and marking going down from the line you just created to the bottom of the paper. Mark at 24″ across (from the edge of the paper) every few inches if you have a ruler, farther if you have something longer just like above.

Cut the Paper
Now use your scissors and cut straight along the lines you just made. If you have sharp scissors, you will be able to slide them along the line once you get going. That will help you keep the line straight. I was home alone while I was cutting this so I didn’t get a picture of me cutting the paper. I’m so sorry! It’s pretty easy though, just cut along the line. Once your scroll wall hanging is cut, place something not too heavy on each corner. Make sure it’s not something that will leave a dent or crease the paper. You can see above that I used a few kitchen towels, my son’s flip flops, and a ruler. I removed the crate once I had the roll flattened a bit. You may need something in the middle sections too, if it starts to roll in at all.
Add the Design to the Scroll Wall Hanging
Now that your design and the paper is cut, it’s time to add the design to the scroll. Ok, here’s where it turned into a 12-16 hour process for me. I’m a perfectionist, so it’s not hard for something to become labor-intensive for me, ha! Since you can’t cut something larger than 12×24 or 24×12 with a Cricut, I had to cut this design in pieces. I couldn’t just size it to fit my scroll because as a whole it would be too large to cut. If you could this would’ve been so easy. I said earlier that it would be easy with vinyl, but with this design it wouldn’t change anything. With the kraft paper, you can’t use transfer tape to place the entire image in one shot because pulling the transfer paper off would rip the paper. If you use vinyl, you will have to place it piece by piece just like cardstock, but it will save you the step of applying glue with a glue stick to the back of it.

Measure and Line Up Design
If I had to do this over, I would’ve left more space at the top of my design. My son made rip in my paper so I had to cut it to where there’s only about an inch from the top of the design to the top of the paper. In the best scenario, you’d want about 3″ for a design like mine. Again, where you start yours depends on what your design is.
Measure and center your image before you glue it down. Lay it all out so you can see the way it looks before committing to it. Since my design is basically laid out in a rectangle with many lines of text in the middle, I had to measure and draw pencil lines that I could line the bottoms of the letters up on. I did this row by row. If you’re using a stencil, measure from side to side so you can place it in the middle. Then begin to paint it on. I did attempt to paint this image with a stencil of made of cardstock, because I couldn’t use anything sticky like vinyl or contact paper nor could I add Mod Podge to the edges because when I’d take the stencil off, it would rip the paper. Since it was just me trying to hold down the cardstock stencil and dab on the paint, it just went under the cardstock, so I went with just gluing on cardstock.

My image is 16.5″ wide at it’s widest, so I measured and left about 3.6″ on the left and right sides. I measured and made marks to draw lines for each line of text in the image. Again I measured from the top of the paper with my tape measure and make pencil marks the connected them using my level as a straight-edge. For example I placed the first word, “Thanksgiving,” 6″ from the top. So I used the tape measure and measured from the top of the paper, 3.6″ from the right side, and made my first mark. Then I moved the tape measure about 10″ over and marked there, then finally made another mark 3.6″ from the left side at the 6″ mark, then connected those marks with a pencil line. Since I used a subway art design I had to draw a line, glue on the words, then draw the next line. Even if you use the exact same image, I can’t tell you exactly where to draw your lines because your size will be different.

Glue & Place Pieces
When your lines are drawn, place glue on the back of the image, or in my case letters, and line the bottom of it up with the pencil line. This was labor intensive for me, taking about 30 minutes or more per line of text. It’s hard to get enough glue on those skinny little letters, ugh! If you’re using a simple image, this process is so easy. Having a large image with few pieces is best if you have a large scroll like mine. Again you can do any image you want, it will just take more time to make it look professional and perfect. If you have a scripty image with lots of swirly lines, you won’t have to be so precise with your measuring and lining up because it’s meant to look wavy. Making this is easy, just takes a lot of time, and patience is key.

If you have a stencil, go ahead and paint it on now. Using vinyl? Do just as I did above. Line up your stickers with each line, since you can’t transfer the entire design at once because the transfer tape will rip the paper. However using canvas would be perfect for a scroll using vinyl. You could transfer with transfer tape with no problem. Each step would be exactly the same. I will try this soon, using a drop-cloth, and share the results with you. Here’s my scroll wall hanging with the entire design glued on.

Create the “Roll” at the Bottom of the Scroll Wall Hanging
Next it’s time to create that “scroll” look with the roll at the bottom. You will need two ball ornaments for the ends of the roll. I used the ones that come in the 12 pack at Dollar Tree, and they are about 2″ tall.
If you are using the same ones, you will roll the paper until you have a 1.5″ circle on each side of the scroll. You’ll need a circle that’s about 3/4 the size of your ball if you’re using a different size. You can create a roll and put the ball in to see what size roll looks best. I left 2″ from the bottom of my words to the top of the roll. When you roll the paper, make sure there’s the same amount of space on each side. You don’t want it lopsided. Place something heavy on each side to keep the paper from rolling up higher.

Roll the paper back just a bit and use your hot glue gun to put a dot hot on one of the sides not too far from the edge, then roll the roll back over it. Repeat on the other side and that will make your roll permanent.

Add Weight
Now, your roll may want to keep roll-ing lol. If that’s the case, which if probably will be, you will need to place some weight on the back to keep it hanging down. I used glass gems from Dollar Tree but round magnets, small, flat rocks, or similar items will work. Bring the roll up so that you have access to the back of it. Place a bit of hot glue on the back of your gem or other weight.

Place the gem directly on the back of the roll. So it will be exactly 180 degrees from the front of it. It will be flush on the wall when you let the roll fall back down. Repeat this process with four gems, spacing them evenly across the back of the roll.

Glue the Ornaments in the Scroll Wall Hanging
With your roll created, it’s time to add the ornaments. Place a strip of hot glue just inside the roll all around the circle. Move quickly, but carefully.

Place the ornament in the hole, onto the glue. Make sure to put the hanger portion of the ornament inside the scroll so it doesn’t show.

Add the Ribbon Hanger
Now you need to add a way to hang the scroll. I used a copper 1/8″ ribbon because my late fall color scheme is copper, burgundy, and navy. You may like my woven pumpkin wreath or pumpkin topiary in those colors. They look amazing together. If you’d like, you can also use twine or thin rope to hang the scroll with instead. My finished scroll is 31.5″ with the ribbon. If you’d like yours the same, cut 30″ of twine or ribbon. You can hold your scroll up with ribbon to gauge how long you’d like it if not. Add a dot of hot glue to each end of the ribbon and press them to each top corner of the scroll. The ribbon will come up in an “A” shape, pointed at the top, extending down each side to the corners of the top of the paper.

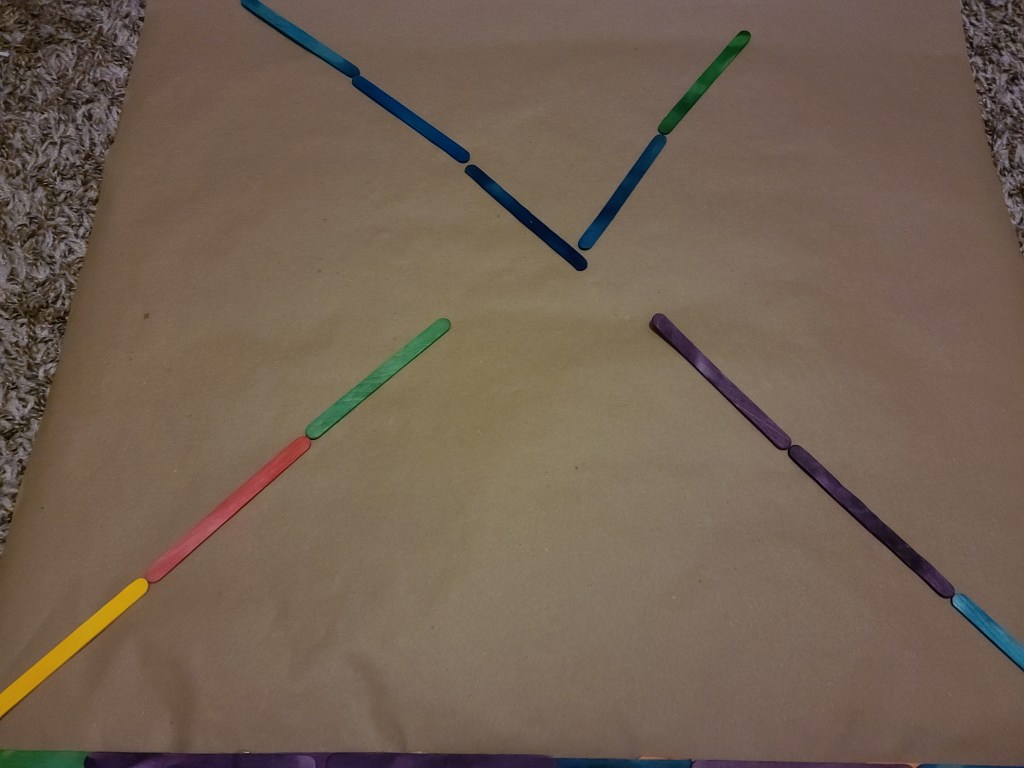
Add Wood or Popsicle Sticks for Support
At this point I tried to hang my scroll. NO GO! It just kind of folded in in the middle. What to do, what to do??! Stroke of genius- add something solid through the middle for support. I used popsicle sticks because I had them on hand, but you can use paint stir sticks or other wood.
Line up some popsicle sticks along the top of the back so you can see how many you’ll need. You may need to cut one to size. Add hot glue to the back of the stick and press it on the top.

Continue until you have the entire top covered. You may need to add a couple of support braces across two sticks. Like where the middle of one popsicle stick will be glued on top of where two meet each other.

Now if you want to, you can glue a few in a wide V pattern from the top or the bottom just to make sure it doesn’t fold in on the sides in the middle. It may not be necessary for you. It wasn’t absolutely needed on mine, but I had the popsicle sticks out, so I went ahead and did it. I was going to do a full X, but I ran out of sticks. Here I had them laid out, but I ended up only gluing the bottom ones, going all the way to the roll, adding one just below that top (which is actually the bottom of the scroll) green one on the right side.
Add a Bow to the Scroll Wall Hanging
Finally, it’s time to add the bow! I used my super easy bow, which you can see how to make here. I mean it’s absolutely the easiest bow you will ever make. I made this bow with 10 loops and 9″ tails. You can use floral wire or a pipe cleaner to attach it to the top middle of the ribbon hanger. I had a little bit of extra ribbon on my hanger, making it a little too long, so I added some hot glue around the back of my bow where the all the pieces of ribbon are gathered (you’ll know what I mean if you use the tutorial), and I wrapped the ribbon around it in a circle.

You’re scroll wall hanging is now complete!
That’s it! If you used an easy design you can have this on the wall in two hours or less, and for under $5! That will save you over $40 from Etsy or $80 from Pottery Barn. So, so worth the time! Here’s a few shots of my Thanksgiving scroll wall hanging.


In these pics you can see some of my other late fall projects that you might like to make. Here’s those links and a few more you might like.


I hope that you enjoyed this tutorial and this scroll wall hanging becomes a beloved feature in your home. I think it will be for fall in ours! If you have family and friends who would love to add this to their own home, use the buttons at the end of the post to share this on social media. Make sure you pin this idea so you have it when you’re ready to make your own scroll.
I hope that you’re all having a blessed week, and that you’re coming weekend is even better! I have a fun collab coming up with House Finch Entertainment again soon. If you missed it, make sure you check out our first collab on our Halloween movie date night with fun printables. Sunday is our monthly DIY blog hop and I have an amazingly beautiful, super easy DIY tutorial to share with you. You don’t want to miss that! Make sure you follow me on social media using the buttons on the sidebar to keep up with what’s going on here on Life as a LEO Wife. Don’t want to miss a great tutorial, free printable, or other post? Enter your email address below, and you’ll get an email when I add a new post. If you’re a blogger friend, you’ll get a reminder to come by and share your family friendly posts on my link parties, Happiness is Homemade, You’re the Star Blog Hop, and Traffic Jam Weekend.
Don’t miss any great ideas! Get an email when new posts are added.


I like your scroll and you’re doing a fantastic job putting everything together as a focal point for the coming Thanksgiving decor.
Thank you Mel! This was a huge time consuming project. I should’ve chosen an easier design, but I love the way it turned out!
Absolutely gorgeous. Thank you so much for sharing your post at our Senior Salon Pit Stop.
Pinned to Senior Salon Pit Stop InLinkz Linkup Shares board and tweeted @EsmeSalon #SeniorSalonPitStop
Thank you!
This is a fantastic project and tutorial. Your step by step instructions are wonderful. Thank you for sharing over at Crafty Gals. DT~Jana Forrest
Thank you!