Welcome to week four of One Room at a Time, my master bedroom refresh! This week I’ve added a few new pieces to the bedroom and recovered my headboard with a linen tablecloth. You heard that right. Let me show you how to reupholster a headboard using fabric or a fabric tablecloth in this tutorial.

I’m joining Teresa of Through a Vintage Door who is a vlogger on Facebook this week. You can see the progress she’s made in adding wainscotting to her guest bedroom in this video. Tammy of Patina and Paint took a break this week, as did Terrie of Decorate and More with Tip because she had a family emergency. We were supposed to finish this week, but due to several setbacks that the girls have had, we’ve postponed our reveal until next Friday.
Our One Room at a Time update videos are on Facebook on Fridays at 7am. You can see this week’s video, week 4 here. If you missed the other videos, you can see week 3 here, week 2 here, and check out how the room looked at the beginning on week 1 here. Next week, will be the final week where we will all finish our rooms and share the big reveal.
Week 4 Updates
This week I got a few new pieces that I added to the room.
I spray painted two curtain rods gold, hung them and added these farmhouse/boho curtains. They are pretty, but since I also changed the rug, I may end up changing them next week. We’ll see!
Since these windows are small, I decided to hang one panel on each window and add a tieback to the side of each one. Here are the curtains before I added the tieback.

To hold the tiebacks, I hammered a nail into side of each window at the same height (even though the windows aren’t- oddly!). Then I looped the tieback around the nail and wrapped it around the curtain.


Here is the second window the curtains and the tieback.

The last new item that I added is a new rug. The rug matches the blues in the room. It is a very, very light pink with a tan-ish mauve trim with tans and yellow elements as well. I liked the beige rug, but it was only a 5×7 and this one is a 6×9, so it works better in the space. The rug is so soft, is washable, and the price was AMAZING!

How to Reupholster a Headboard Easily!
Next, I reupholstered my headboard. It would take so long for the fabric that I wanted to come in from Amazon, but I found a solution to that problem. I simply ordered a linen fabric tablecloth which worked perfectly. Just make sure that you order one that will fit your headboard. A 72″ wide rectangular tablecloth should fit most queen headboards.
Place the fabric over the front of the headboard, centering it widthwise.

Start on one side and fold the top of the fabric down, then pull the side of the fabric back over it just like wrapping the end of a gift. Staple it in place.

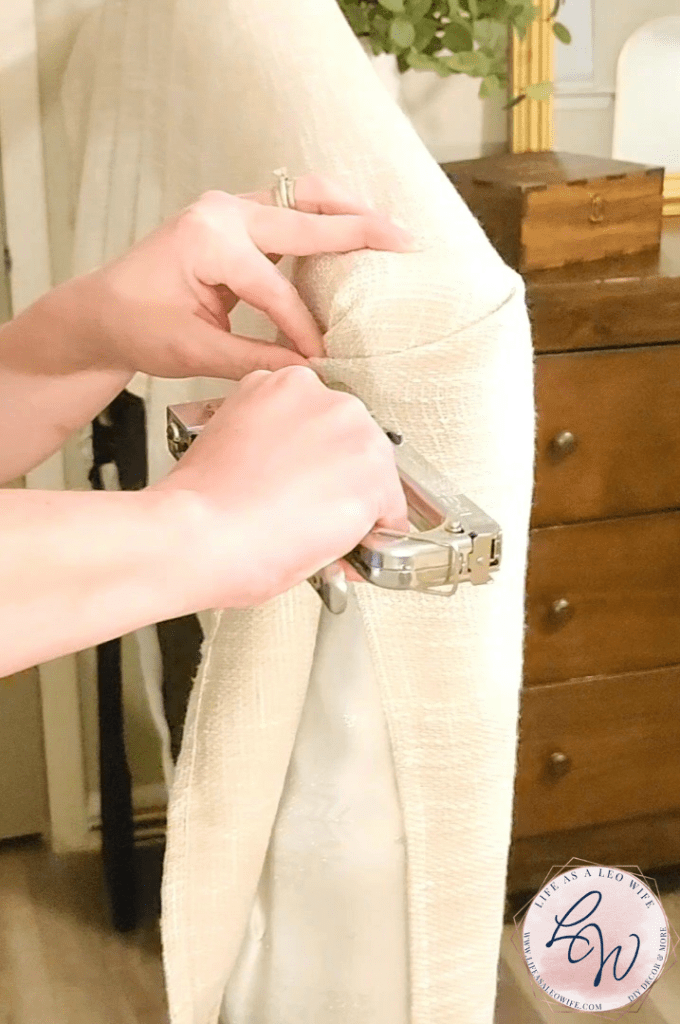
Pull the fabric down tightly then continue stapling it along the side all the way to the bottom. Be sure not to move it from the other side. My fabric was only 70″ wide, so it didn’t wrap around very far on the back. That wasn’t a big deal for me because I’ve done this several times.

Repeat on the opposite side.
Now, move on to the bottom. Cut a square just wide enough for the leg if your headboard has its leg on each end. Do this on both sides, then fold the fabric like a gift, just like you did on the top side.


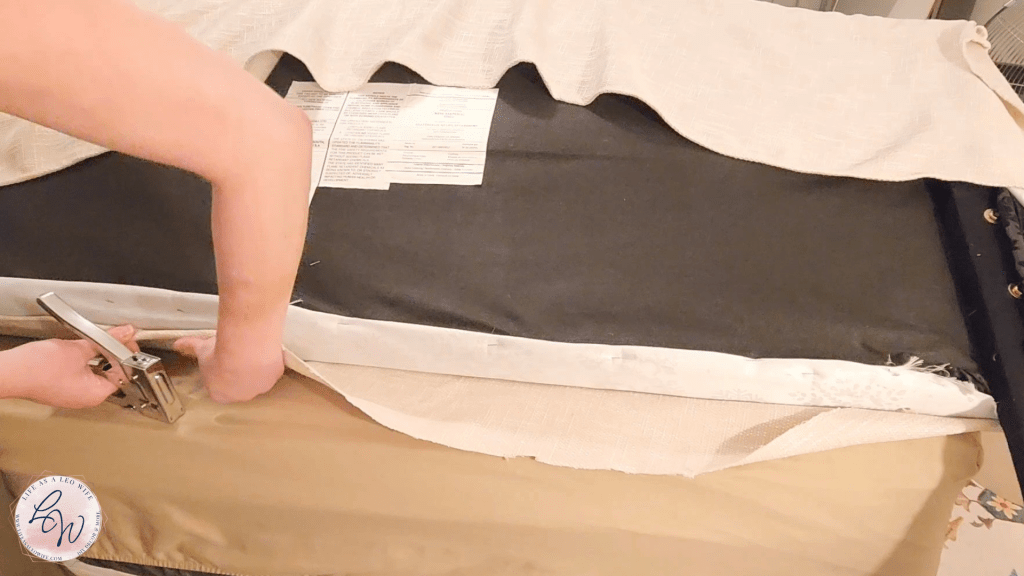
Next I cut off the excess fabric at the bottom so that I had about 8″ from the headboard to the bottom of the upholstery. I laid the headboard on the bed for the next part.
Fold the upholstery in so that you have a clean edge, then staple it in place across the entire bottom of the headboard.


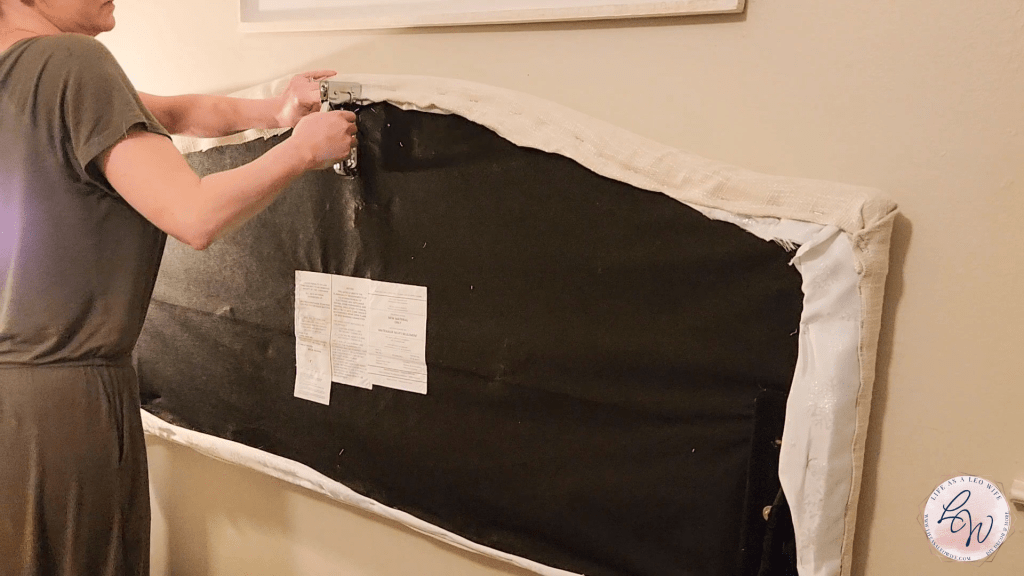
Finally, move to the top. Cut off the excess fabric so you again have 8-10″ of fabric.

Fold the fabric so you have a clean edge and staple it across the entire top.


Here’s a close look at the reupholstered headboard staples.

And the finished headboard. It’s hard to see the difference in the headboard and wall colors in these pictures, but in reality, the wall is a very light grayish color (not my choice, it came this way, ha!) and the headboard upholstery is a wheat linen.


Next week I’ll have the decorative pillows on the bed for the big reveal!
That’s it for this week’s master bedroom decorating!
Come back next week to see the final reveal! I will be hanging the wall art, adding decor to the nightstands including new lamps, dresser decor, hang curtains, and add the doorknobs to the closet doors. Can’t wait to see you then!
Remember to pin the image below or share this post with the buttons on the left side of the page so you can find it when you’re ready to start your project! Also, follow me on Pinterest for new ideas added weekly! Be sure that you never miss a great tutorial for decor like wreaths, signs and other home decor, free printables, crafts, and other fun posts! Enter your email address below to be notified of new posts! Use the buttons below to follow me on social media for other great content.

Or pin this image for headboard reupholstering!

Don’t go yet! There’s more to see!
There’s plenty more to see here on the blog! If you’re looking for something specific, use the search box in the sidebar to look it up. If not, you might enjoy these ideas. Don’t have time to read them all now? That’s ok, just click over to the posts using the pictures and pin them for later. You can also add Life as a LEO Wife to your favorites and check back for new ideas and free printables and SVGs every Wednesday, as well as link parties with tons of shared ideas on Sundays!


One thought on “One Room at a Time: Master Bedroom Refresh Week 4 with a Headboard Reupholstery Tutorial”