Fall is upon us, and what better material to decorate with during early fall than burlap?! Last year during fall I gave you a few wreath tutorials, including this beautiful burlap pumpkin wreath. This year I thought I’d give you the full burlap wreath tutorial to ring in the fall decor-making season!
For this burlap wreath you need:
- 14″ wire wreath form
- 2 rolls of 20ft, 5″ wide burlap
- 2.5″ orange wired ribbon (or print/color of your choice) to run through the wreath
- 2.5″ farmhouse truck wired ribbon (or your choice) for bow
- pipe cleaners or floral wire
- scissors

Don’t miss a great tutorial or free printables! Get an email when new posts are added!
Tie & Add the Ribbon To the Wreath Form
Turn your wreath form upside down, and tie your accent ribbon, in my case 2.5″ wired orange ribbon, around the innermost ring of the wreath form. Just tie it in a simple knot around the wire.
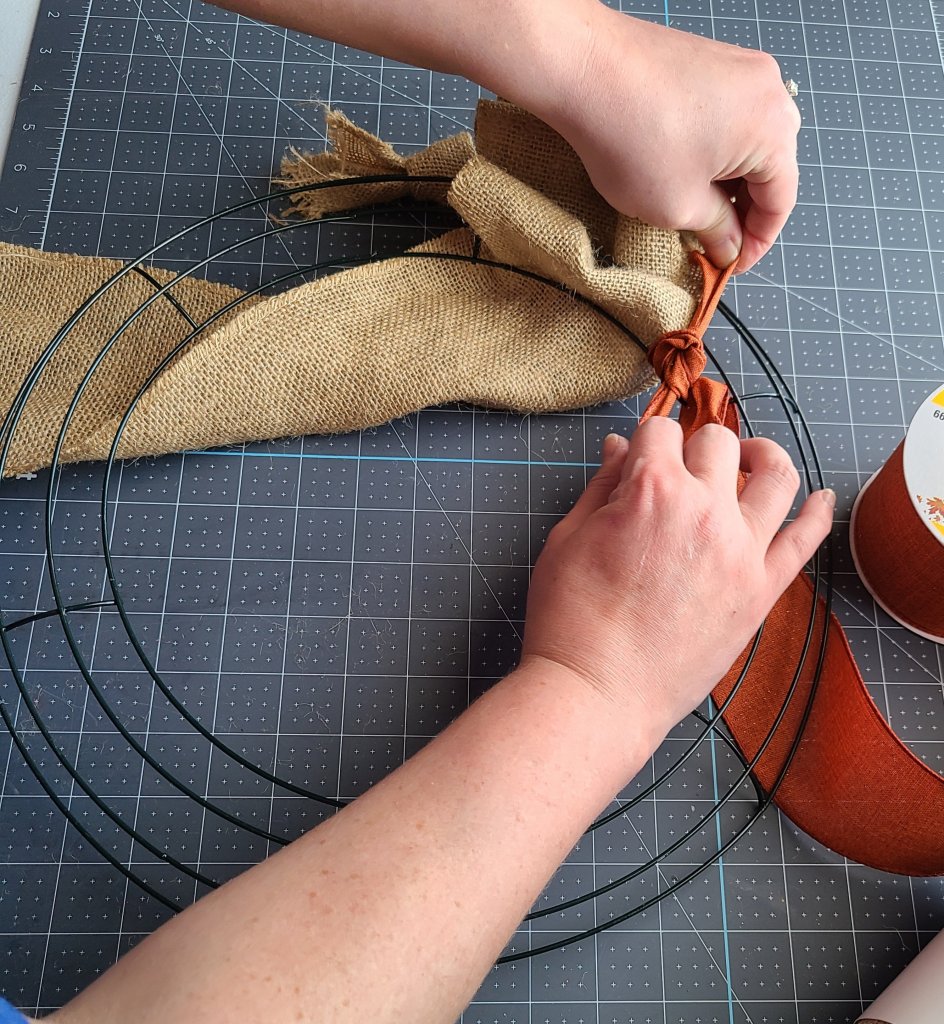
Turn it right-side up and pull about 6″ of the ribbon in between the innermost wire and the second one in, creating a “bubble.” You can see below that my ribbon is folded in a little, but that’s ok. You can smooth it out when it’s pulled through completely. Also I had already tied my burlap on in this picture, but I pulled the “bubbles” out and added the ribbon first. It looked better once I had several rows of burlap pulled through to have the ribbon on first.

Attach Burlap to the Form & Begin “Bubbles”
Turn the wreath form upside down again and tie the end of your burlap around the outermost ring. If the ribbon falls out while you’re doing this, that’s ok. You can push it back through once you have a row of burlap in.


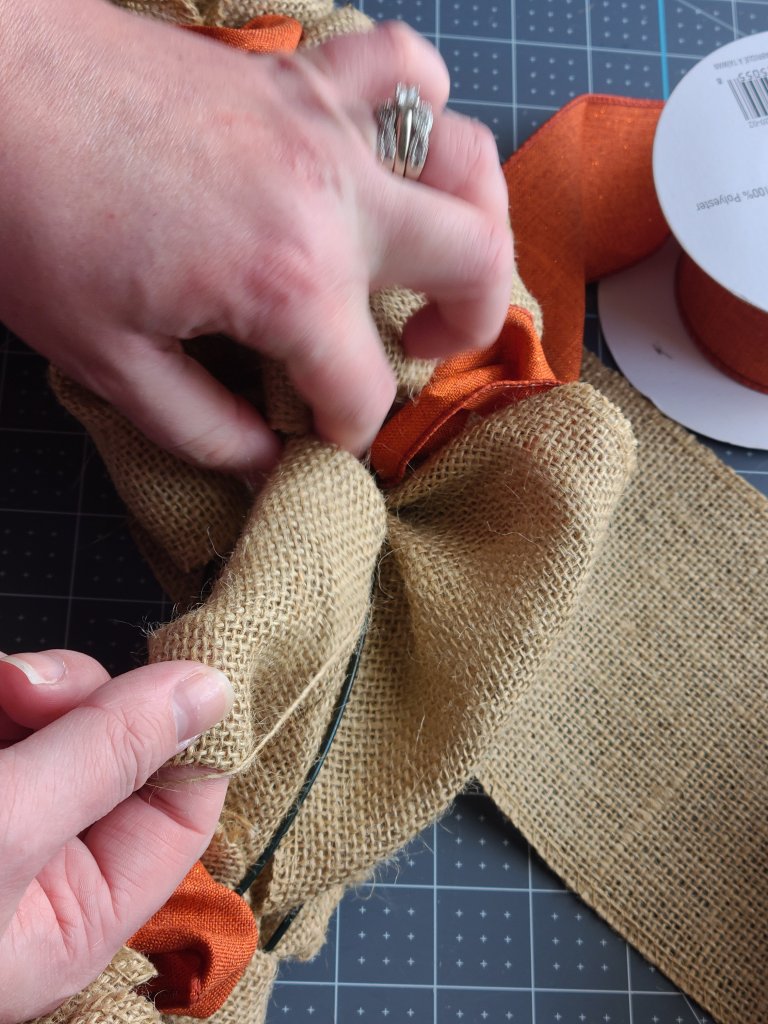
Take about 6″ of burlap and push it up between the outer ring and the next one.

Now push another 6″ up through the middle opening, then push another 6″ into the inner space. You’ll have a line of burlap, straight down. If your ribbon bubble has fallen out, push it back up through the inner ring.

Continue Making “Bubbles” on the Burlap Wreath
Now that you have one full row, push another bubble of the ribbon through the middle ring. You are going to place a bubble of ribbon through the next slot after every row of burlap. So this time it will be the middle ring, then a row of burlap, then a bubble of ribbon in the outer ring. When it’s time to do another ribbon bubble, it’ll be on the inner ring again.

Begin a new row of burlap bubbles right next to the orange ribbon. Again, starting on the bottom ring, between the inner wire and the second wire. Push another 6″ of burlap above that one, and another in the outer ring. You’ll now have six bubbles of burlap and two ribbon bubbles.

As you add rows of burlap, push them closer together so that they actually “bubble up.” When you have more burlap and ribbon in the form, you will have an easier time keeping everything in. So add rows, then push them closer to each other. I added about 5 rows of burlap in between each crossbar. You can add more or less, depending on how tight or flow-y you want your burlap wreath.


Here is what it will look like when you move to the next “section.”

Add a New Roll of Burlap to the Form
Continue adding rows around your wreath until you run out of burlap. I didn’t tie the end of the first burlap ribbon to the wreath, it was just held in really tight by the rest of the wreath. However, you can tie off the end if you need to, just like you did in the beginning. Begin the next roll of burlap by tying it to the ring that you will be pushing the next row through. If you are using a similar amount of rows that I used, about 5 between each crossbar, this roll should last you through the rest of the wreath.


My ribbon lasted me through the entire wreath by adding one bubble for each row of burlap bubbles. Actually I already had that spool of ribbon open, so I may have started with about half a roll. If you add more and run out, tie a new piece of ribbon on just like you did for the burlap.
This is the back of the wreath about half-way through the project.

Here is what adding the last few rows of bubbles should look like.


Finish off the Burlap Wreath
When you push the last bubble through the wreath form, leave about 6″ of the burlap, then cut it from the rest of the roll. Tie it around one of the wires by the last bubble.


Next repeat the process of cutting off the ribbon and tying it to the form.


This is the back of my finished wreath.

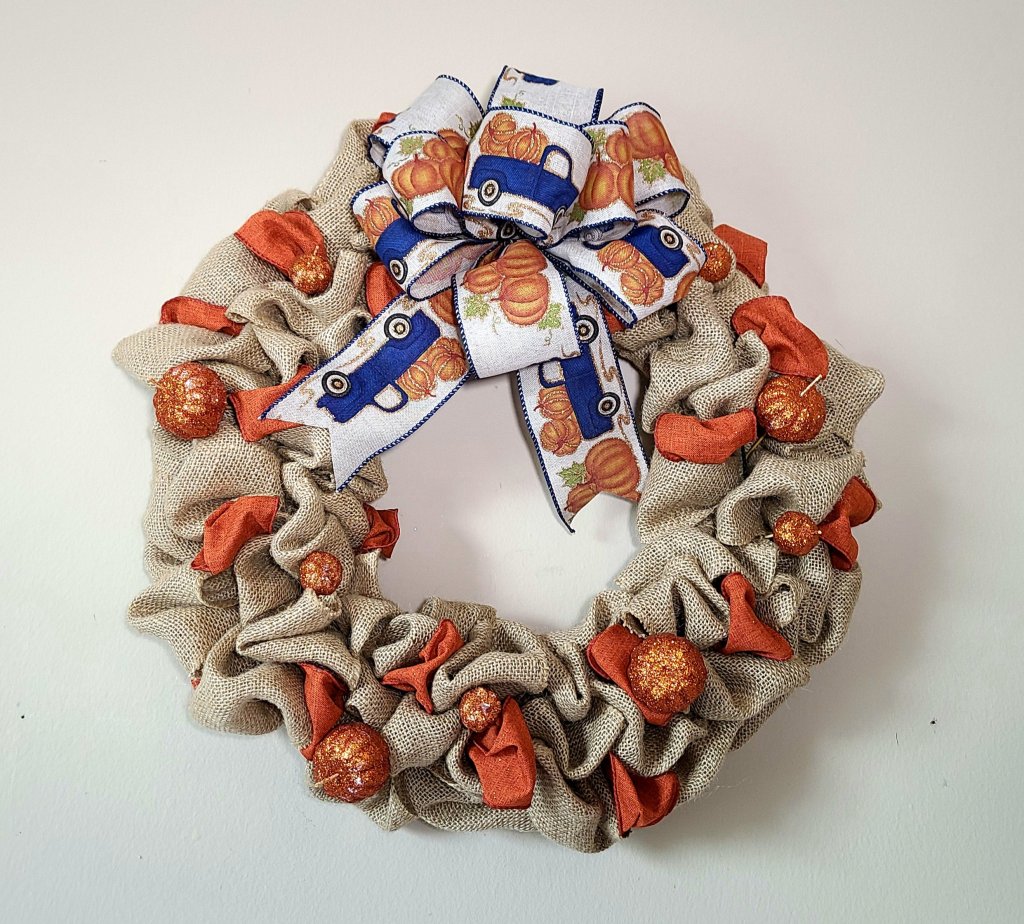
Your burlap wreath is complete!

You’re all finished with the main portion of your wreath! You can add embellishments to it like a bow, faux flowers, a sign, metal words from Dollar Tree, etc. For my wreath, I thought a bow would look best. I don’t think you’ve seen me use this type of bow before (at least I don’t think I’ve added a tutorial for one before). The tutorial for it is now live! See the bow tutorial here.
I did add a few glitter pumpkins, but I didn’t really like them, so I don’t think they’ll stay in when I put this wreath on the door. Let me know in the comments what you think. Pumpkins or no pumpkins?

I hope that you enjoyed this tutorial! Make sure that you pin this for when you’re ready to make your burlap wreath and for when you’re ready to make another one. Trust me, you’ll want to make another one!
I would love for you to follow me on social media using the buttons on the sidebar. If you would be so kind, use the buttons at the bottom of this post to share it on any of your social media accounts. I’m finally trying to grow my social media accounts and use them more now that I’ve got the technical side of blogging down a little better. Let me know in the comments or on social media if you follow, and I’ll give you a follow back! Tell your friends about me too so they can get all of these wonderful tutorials!
The wreath bow tutorial is on it’s way so make sure you are either following me on social media or enter you email address below. You’ll get an email when I post so that you don’t miss a thing. The surest way for you to not miss a post is through the emails. You’ll never get any spam.
More Great Fall DIY Decor & Tutorials
If you’re a wreath fan like me, make sure you check out these adorable wreath tutorials: this elegant fall floral hoop wreath, this luxurious woven yarn pumpkin wreath, Halloween pumpkin wreath, this glamorous gold hoop wreath for Halloween, a super cute early fall pumpkin wreath, and these extremely budget friendly fall yarn wreaths (I made 2 for under $5!).


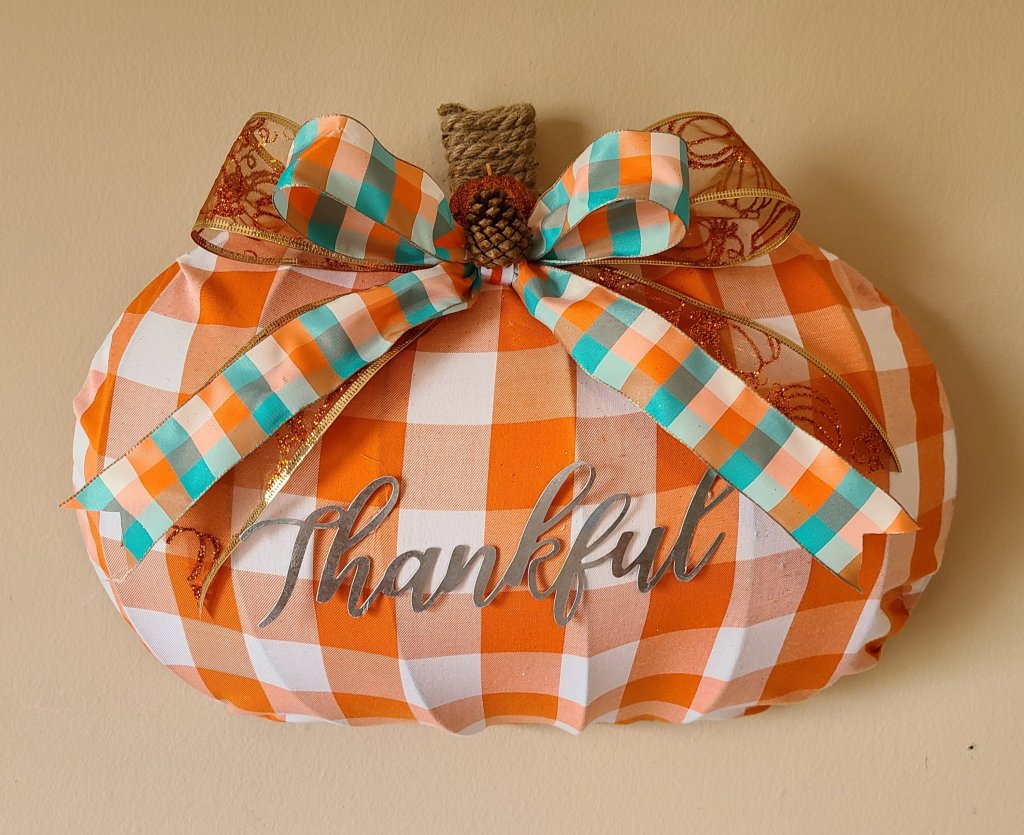

If you’re ready to make your early fall decor, you might like these posts that will go perfectly with this burlap wreath. I made reversible wood faux books for fall/Halloween (you can use these on a tiered-tray or a vignette), and these reversible Dollar Tree pumpkins for fall/Halloween. You could also make either of those projects for fall then Thanksgiving as well if you don’t decorate for Halloween. This really cute farmhouse truck fall centerpiece also goes perfectly with this burlap wreath! If you love all of these projects and all the pretties on Pinterest and you don’t have a Cricut, I made a tutorial to show you how to make signs, home decor, and just about any craft project you can think of without one. You just need your printer and a pencil! I go more elegant for my late fall and Thanksgiving decor. If you’d like to go that route, you will probably like this pumpkin topiary. I love the burgundy, navy, and copper colors, but if you want to stick with the farmhouse style, you can use other colors.


For more fall decor ideas, follow me on Pinterest. I’m adding new pins each week. Check out this fall decor board.
If you love to find great ideas for things like recipes, fashion, home & seasonal decor, crafts, DIYs, family tips & ideas, gardening, and much more, make sure you check out the three link parties that I co-host each week: Happiness is Homemade, You’re the Star Blog Hop, and Traffic Jam Weekend. For my blogger friends, make sure you come by each week and share your family friendly posts on those parties. You can widen your audience and get a chance to be featured on the next week’s party!
Have a blessed weekend everyone, and I appreciate you, my dear readers, so very much! I’d like to leave you with some words of encouragement from the Word of the Lord. The world around us seems to be going crazy, so make sure you take time away, relax, and let the stress of life go out of you as you craft. Release your cares to the Lord. He wants to take them. He doesn’t want you to worry- ever. Jesus said in Matthew 11:29-30 ESV, “Come to me, all who labor and are heavy laden, and I will give you rest. Take my yoke upon you, and learn from me, for I am gentle and lowly in heart, and you will find rest for your souls. For my yoke is easy, and my burden is light.“


I’ve often wondered how people make these burlap wreaths because they come out so neat. Thank you for the step by step tutorial! Do you find it hard to work with burlap because of the fraying of the edges? I’ve had that problem in the past and just wondering if there’s a trick to it! 😉
You’re welcome Emily! The kind of burlap I bought has sewn edges, so it doesn’t fray. It’s Ashland from Michael’s, and I only paid about $3 per roll. I used about a roll and a half so I only spent about $4.50 on it. I feel the same way about deco mesh. I use it, but I hate how it frays, so I work quickly and gently lol!
Great tutorial, Niki!! Thanks so much for sharing!!! Pinned and shared on FB!!
Hugs,
Deb
Aww, thank you so much Debbie!
This is lovely, great step by step tutorial too, thank you.
Thank you Julie!
Oh, WOW, I really like it! I’m crazy for anything made with burlap. Very pretty! Thanks so much for linking up at the Unlimited Link Party 33. Pinned!
Thank you! I love burlap too, especially in fall!
Wonderful, thanks for participating and sharing your link at SeniorSalon
Thank you!
How quaint and I love the autumn feel! 🙂
Thank you! I certainly wish it would feel like fall where I live lol! Yesterday the heat index was still over 100!
love your wreath… good instructions
Thank you!
You did a great job on this wreath. I have so much trouble getting my wreaths to be full like this.
Thank you! This particular burlap brand works really well for me. The kind without the hem (with the edges that fray more) I have a more difficult time with.
I love this type of creativity and really enjoyed this tutorial! Thanks so much for linking up with me!
Thanks Lucy! I appreciate your visit!
CONGRATS! Your post is FEATURED at my Unlimited Link Party 34!
Thank you Dee! I will share the new party across my social media!
Love this wreath! Revisiting to say thanks so much for linking up at A Themed Linkup 116 for Denim, Burlap, or Lace Crafts and Décor. Pinned.
Thank you!
CONGRATS Niki! Your post is FEATURED at A Themed Linkup 117 for Laughter Is the Best Medicine from the previous linkup for Denim, Burlap, or Lace Crafts and Décor.
Thanks Dee!