
Thanksgiving is sometimes a holiday that we just smash between Halloween and Christmas. Most of us start decorating for fall at the end of August, then change it up for Halloween in October. I see so many people skipping right to Christmas after that, but I wanted a wreath to hang just for Thanksgiving this year. Since I have several pumpkin wreath forms from Dollar Tree I decided to pair them with some burlap and lace, and this beautiful wreath was born.
It’s time for our monthly Under $10 on the 10th Blog Hop hosted by Tammy of Patina and Paint. Each month I join in with a few talented bloggers to bring you fabulous projects that we created for less than $10. This month our theme is Thanksgiving. Stick around after the post to see what each of the other ladies have created for you.
Burlap & Lace Thanksgiving Wreath Supplies
- pumpkin wreath form– $1.25
- lace covered burlap– You can get a roll from Michael’s with a coupon for $7.79.
- 2.5″ wire ribbon (optional)
- 5/8″ satin ribbon
- wood leaf shape– Dollar Tree sells a pack of 8 for $1.25
- “Thankful” metal word– Dollar Tree has a pack of 3, also with “Welcome” and “Harvest.”- $1.25
- scissors
- hot glue and glue gun
- acrylic paint in 2 colors
I had everything I needed to make this project on hand, so I made my Thanksgiving wreath for free. My cousin went to a wedding where they were going to throw away all of their burlap table runners. Throw them away! What?! I’ve had them for about four years, using pieces on and off. If you have to buy the burlap, you can get it on Amazon for $5.99 a roll. A wreath form and three-piece word pack from Dollar Tree are $1.25 each, so if you have to buy all three, you can make this for about $8.49!

Disclosure: I am a participant in the Amazon Services LLC Associates Program and the Dollar Tree Affiliate Program, affiliate programs that allow me to link to the products that you can use to make this project quickly and easily. If you purchase any of these products I may receive a very small commission at no cost to you! That commission helps me continue to bring these great decor DIYs, free printables, and all of the other goodies on this site to you. Thanks so much for your support!
If you’re looking for more ideas to use your Dollar Tree wreath forms with, you may like these: Dollar Tree Halloween scarf wreath, fall/Halloween wire pumpkin centerpiece, buffalo check pumpkin wreath, chunky yarn pumpkin wreath, Halloween deco mesh pumpkin wreath, and this burlap bubble pumpkin wreath.
Weave the Burlap onto the Thanksgiving Wreath Frame
Start with your burlap. Mine was a foot wide. You will essentially be weaving it through the wires that run vertically. Feed it over the left outside wire, then under the second wire.

Now weave it over the third wire. Keep pulling the burlap through as you go. The next two wires (the two middle ones) should be seen from the front. So the burlap will go under both of them. Then feed the burlap over the fifth wire. Just as the second from the left had the burlap under it, you’ll do this for the second wire from the right. At the end, wrap the burlap over the right outer wire and around the back of the form. Use something like a clothespin to hold it for just a bit. I really didn’t need mine because the burlap is stiff, but it’s there just in case.

You will have a few inches short of finishing the bottom of the pumpkin wreath, but we’ll address that later.
Wrap the Wires in Satin Ribbon
Next, wrap the satin ribbon over the uncovered wires of the form. You can use any color you’d like, but I used ivory. Begin at the base of one of the exposed wires and wrap the ribbon around the back of the wire and hot glue it there. Then start wrapping it around the wire from the base to the top. Repeat this on every wire that is in the front of the burlap.


Now the bit of wire that will be exposed around the stem needs to be covered, where the burlap won’t rise enough to cover it. To the right side (or the left, doesn’t matter what side goes first) wrap the ribbon around the outer wire right next to the stem. Put a little glue on the wire to hold it in place. Wrap it a few times, then cut the ribbon and glue it down. Repeat this process on the left side of the stem.

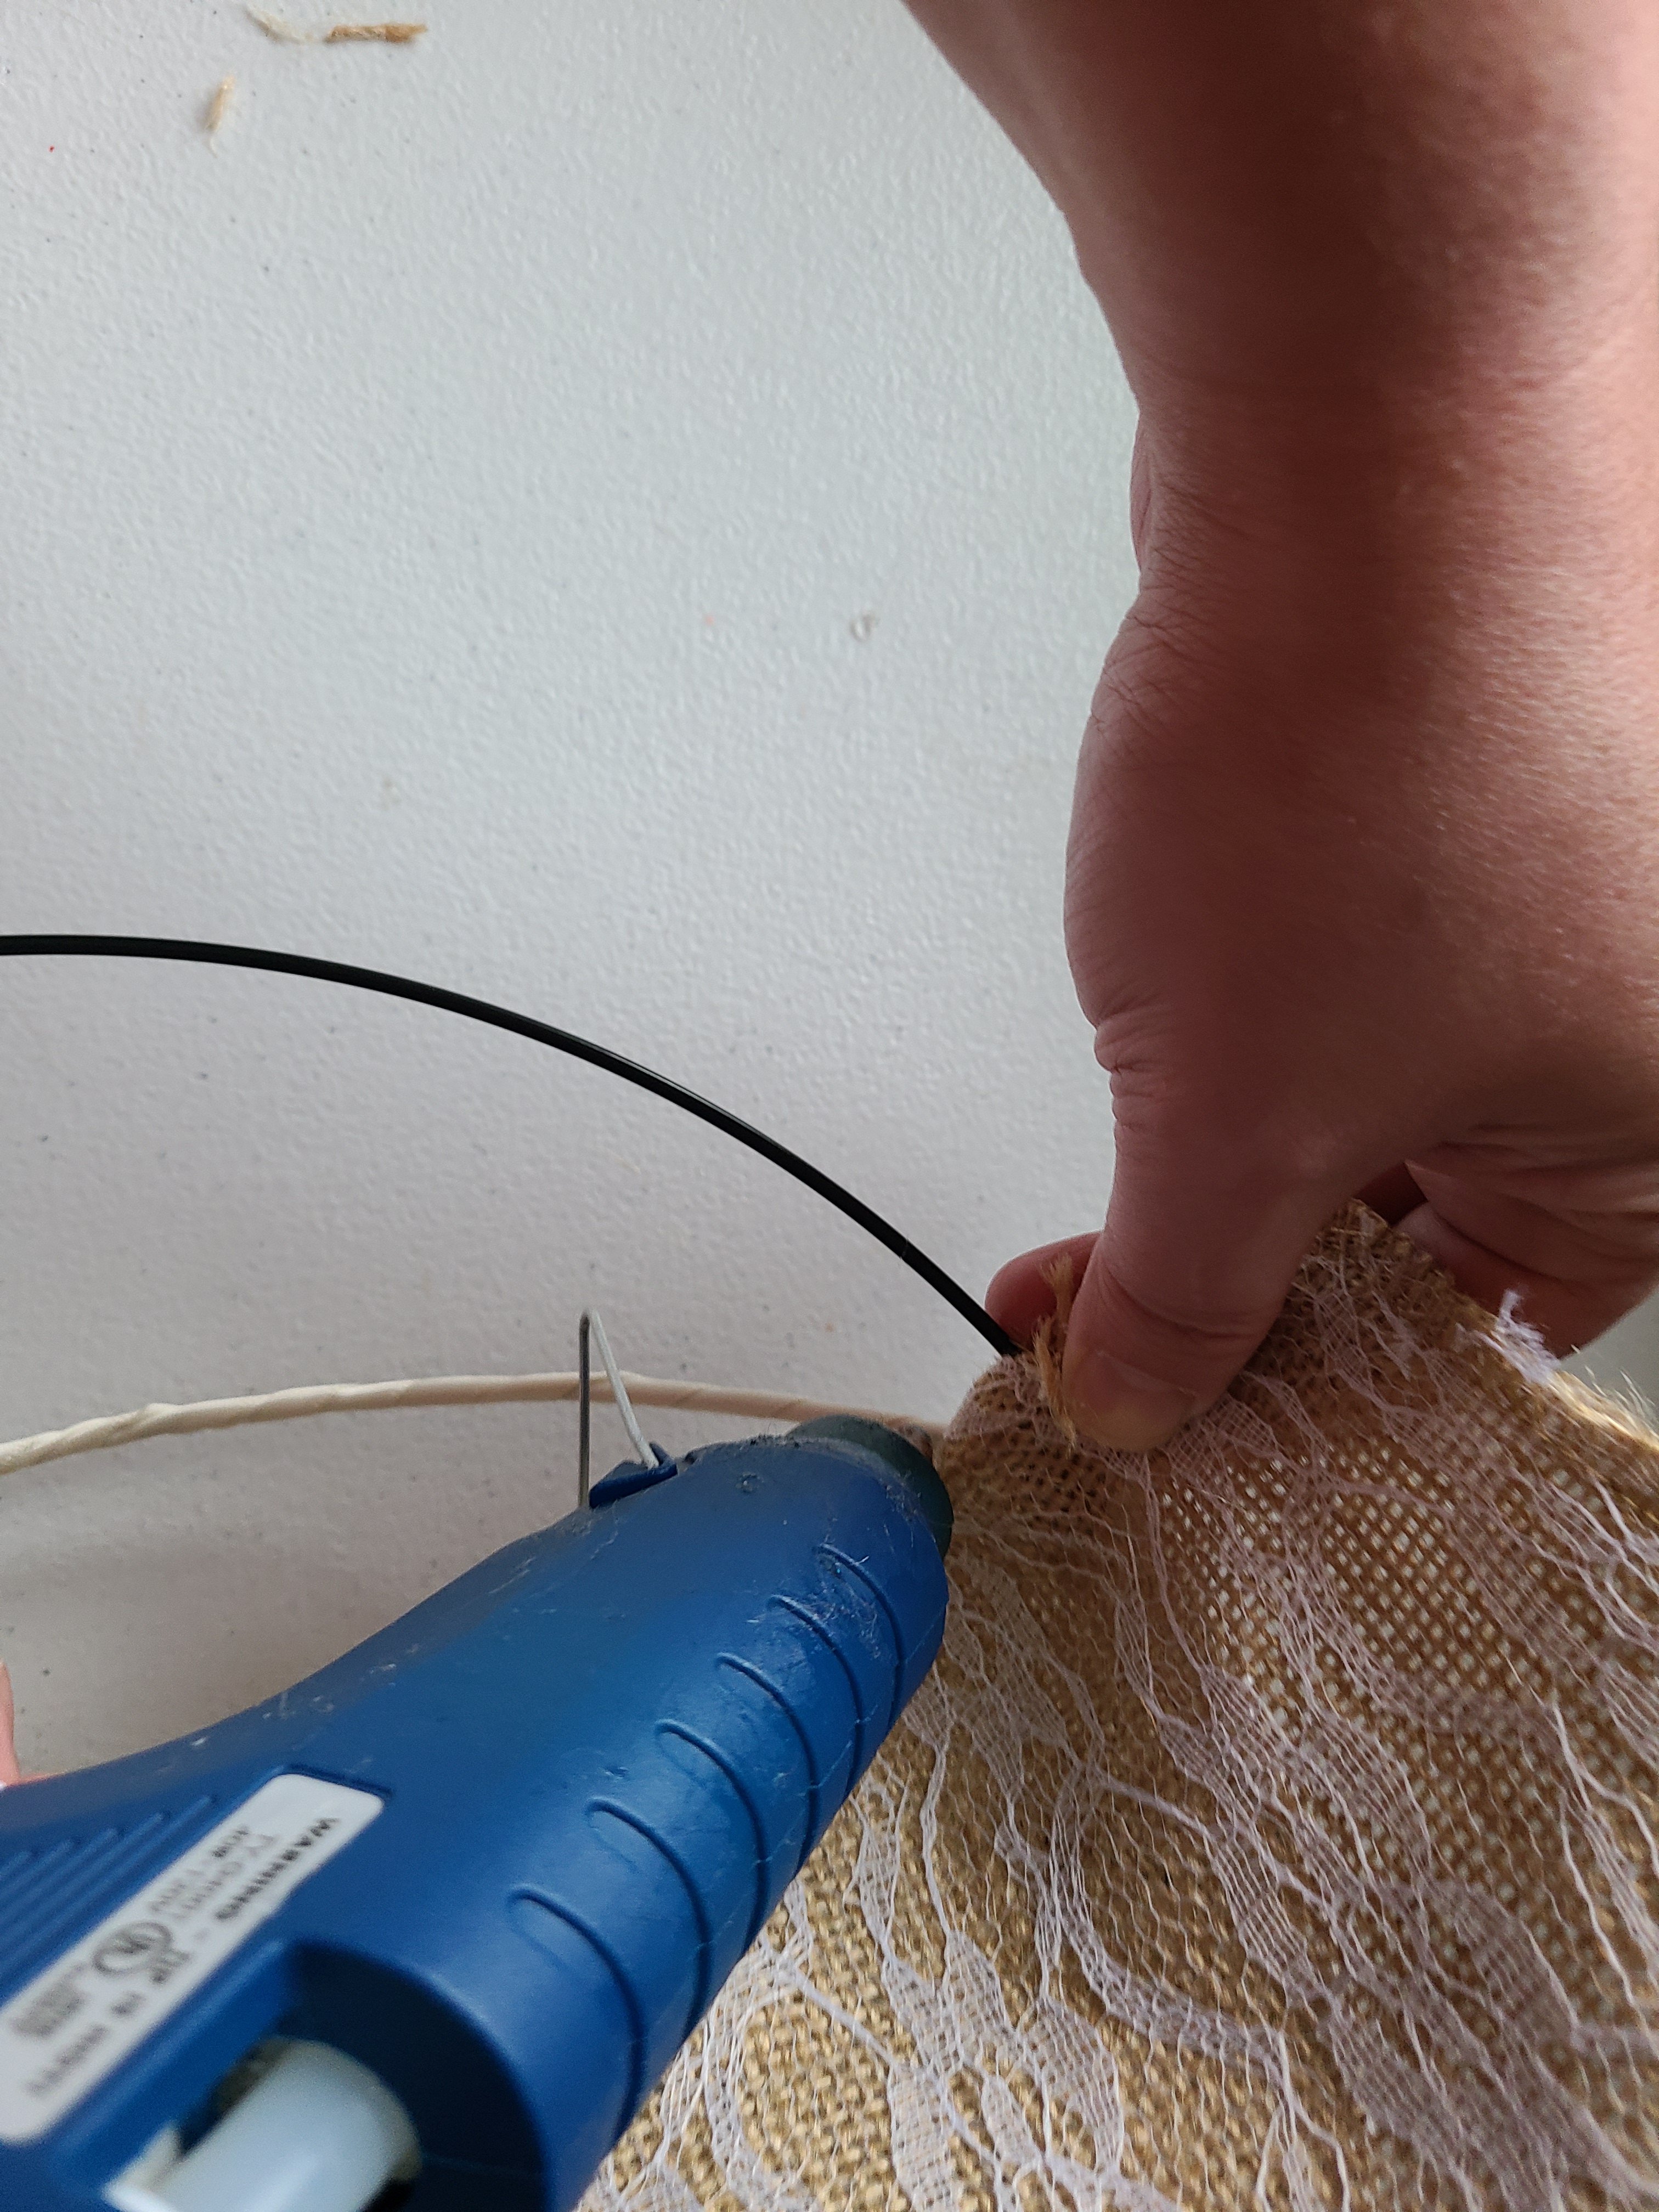
Cut Slits in the Burlap
Right where the stem attaches to the outer wire, you’ll need to make a tiny slit so that your burlap can cover each side of the wires, on the inside of the stem and to the wire just outside of the wire. Do this to the other side as well. Now wrap a bit of the burlap around the wire to the back side while gluing it the frame. Glue the inside of the stem and to the right and left now. You can see how it looks when finished in the picture below. The picture I took of this process turned out really blurry. Sorry!

Glue the Top Section
Start gluing the top of the pumpkin first, right where you just glued the stem. On the right side of the stem, pull the burlap tightly around the wire to the back. Put a strip of hot glue on the back of the upper wire then push the fabric down. Continue until the top side of the right is attached. Repeat this process on the left of the stem, but don’t glue down the wires that are on the curved sides yet.

Glue the Burlap on the Inner Pumpkin Wires
Place the wreath form face down to begin gluing down the inner wires. Start on the right side with the second wire from the outside, the first one covered with ribbon. Put a line of hot glue down the back of that wire, then press it down to firmly attach it. I went about 2″ at a time so the glue didn’t dry before I could push the fabric down. Continue until you’re about an inch and a half from the bottom which is where you’ll put more burlap to cover the bottom of the pumpkin. Repeat until the burlap is glued on the back of all the wires that are seen from the front.
Glue the burlap to the outer wreath wires.
Pull your fabric taunt and run a strip of glue down the back of the outer wire, wrapping the burlap around to the back of the wreath, securing it as you go. Again, leave an inch to an inch and half unglued, just as you did on the front first wire.

As you glue you may need to cut slits in the burlap so that you can curve it and have it lay flat and to have it cover the wires that the burlap is running under. Keep gluing until the Thanksgiving wreath form is covered.


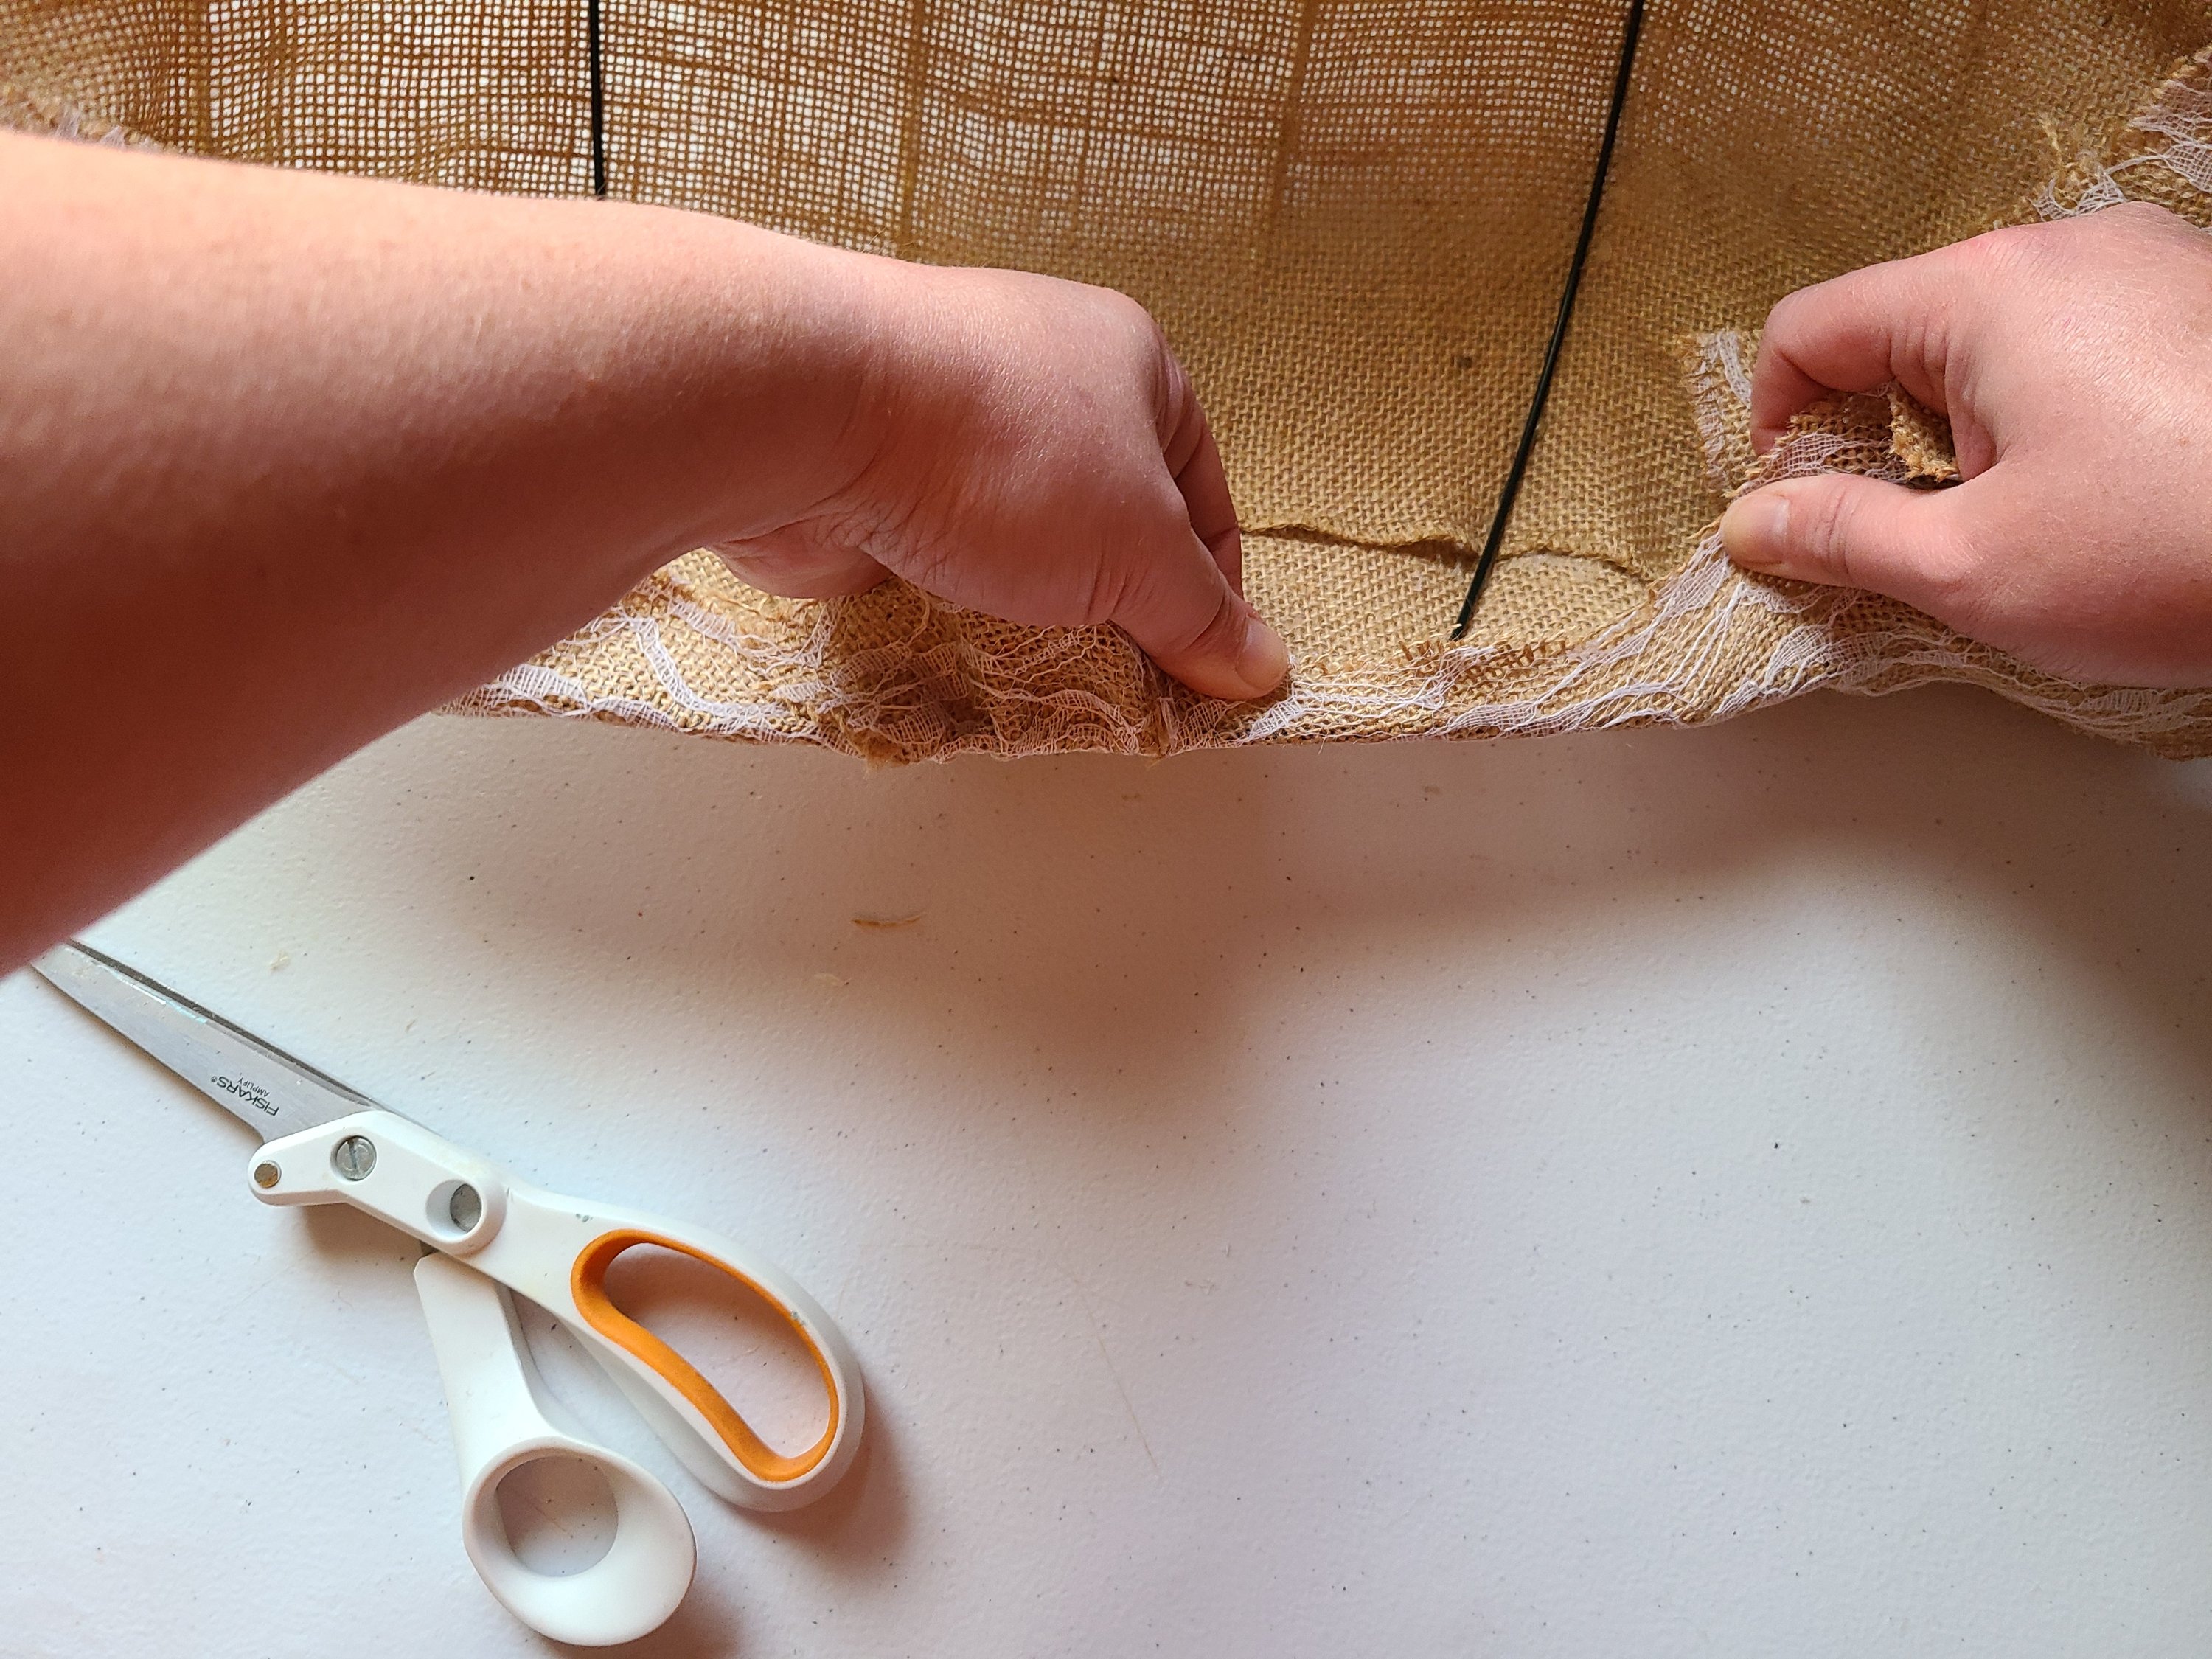
Add more burlap to the Thanksgiving pumpkin wreath.
Let’s fix this uncovered section of the wreath. Drape some burlap across the section that’s open. Mark the back of the burlap section with a pen so that you can cut it to fit your wreath.
Run your next section the pumpkin wreath form just as you did with the first section of the fabric. Then glue just as you did the first section. You will need to cut slits where the wires are, just as above.


Prep the leaf & word.
Paint the wood maple leaf. I used a color called orange spice.
Next, paint the metal “thankful.” You could leave it as is, but I didn’t want the shiny surface to clash with the rest of my Thanksgiving wreath. I used chalk paint in patina.
Cover the stem of the Thanksgiving wreath.
Place a dot of glue on an end of your satin ribbon. Now wrap that ribbon up and around the stem until the metal wires are completely covered and glue that end down.
Add a bow & embellish.
Create a bow for the stem of your pumpkin wreath. This is optional, but I like the look. I made a simple four loop bow, but if you’d like a tutorial on making one you can see this Halloween Dollar Tree scarf pumpkin wreath. I made a two-loop bow for that one, but it’s the same process.
The leaves I bought from Dollar Tree have a small hole to hang them from. I made a tiny bow with the ivory satin ribbon and glued in on top of the hole. Position your dried leaf in the middle of your wreath, then glue it on.

You can choose whether you want a metal word on your wreath or choose to have a different one than my Thankful. It will still be beautiful. I glued mine on the center of the leaf. I love the look! Place a little hot glue along parts of the letters that will touch the leaf, just don’t add too much.
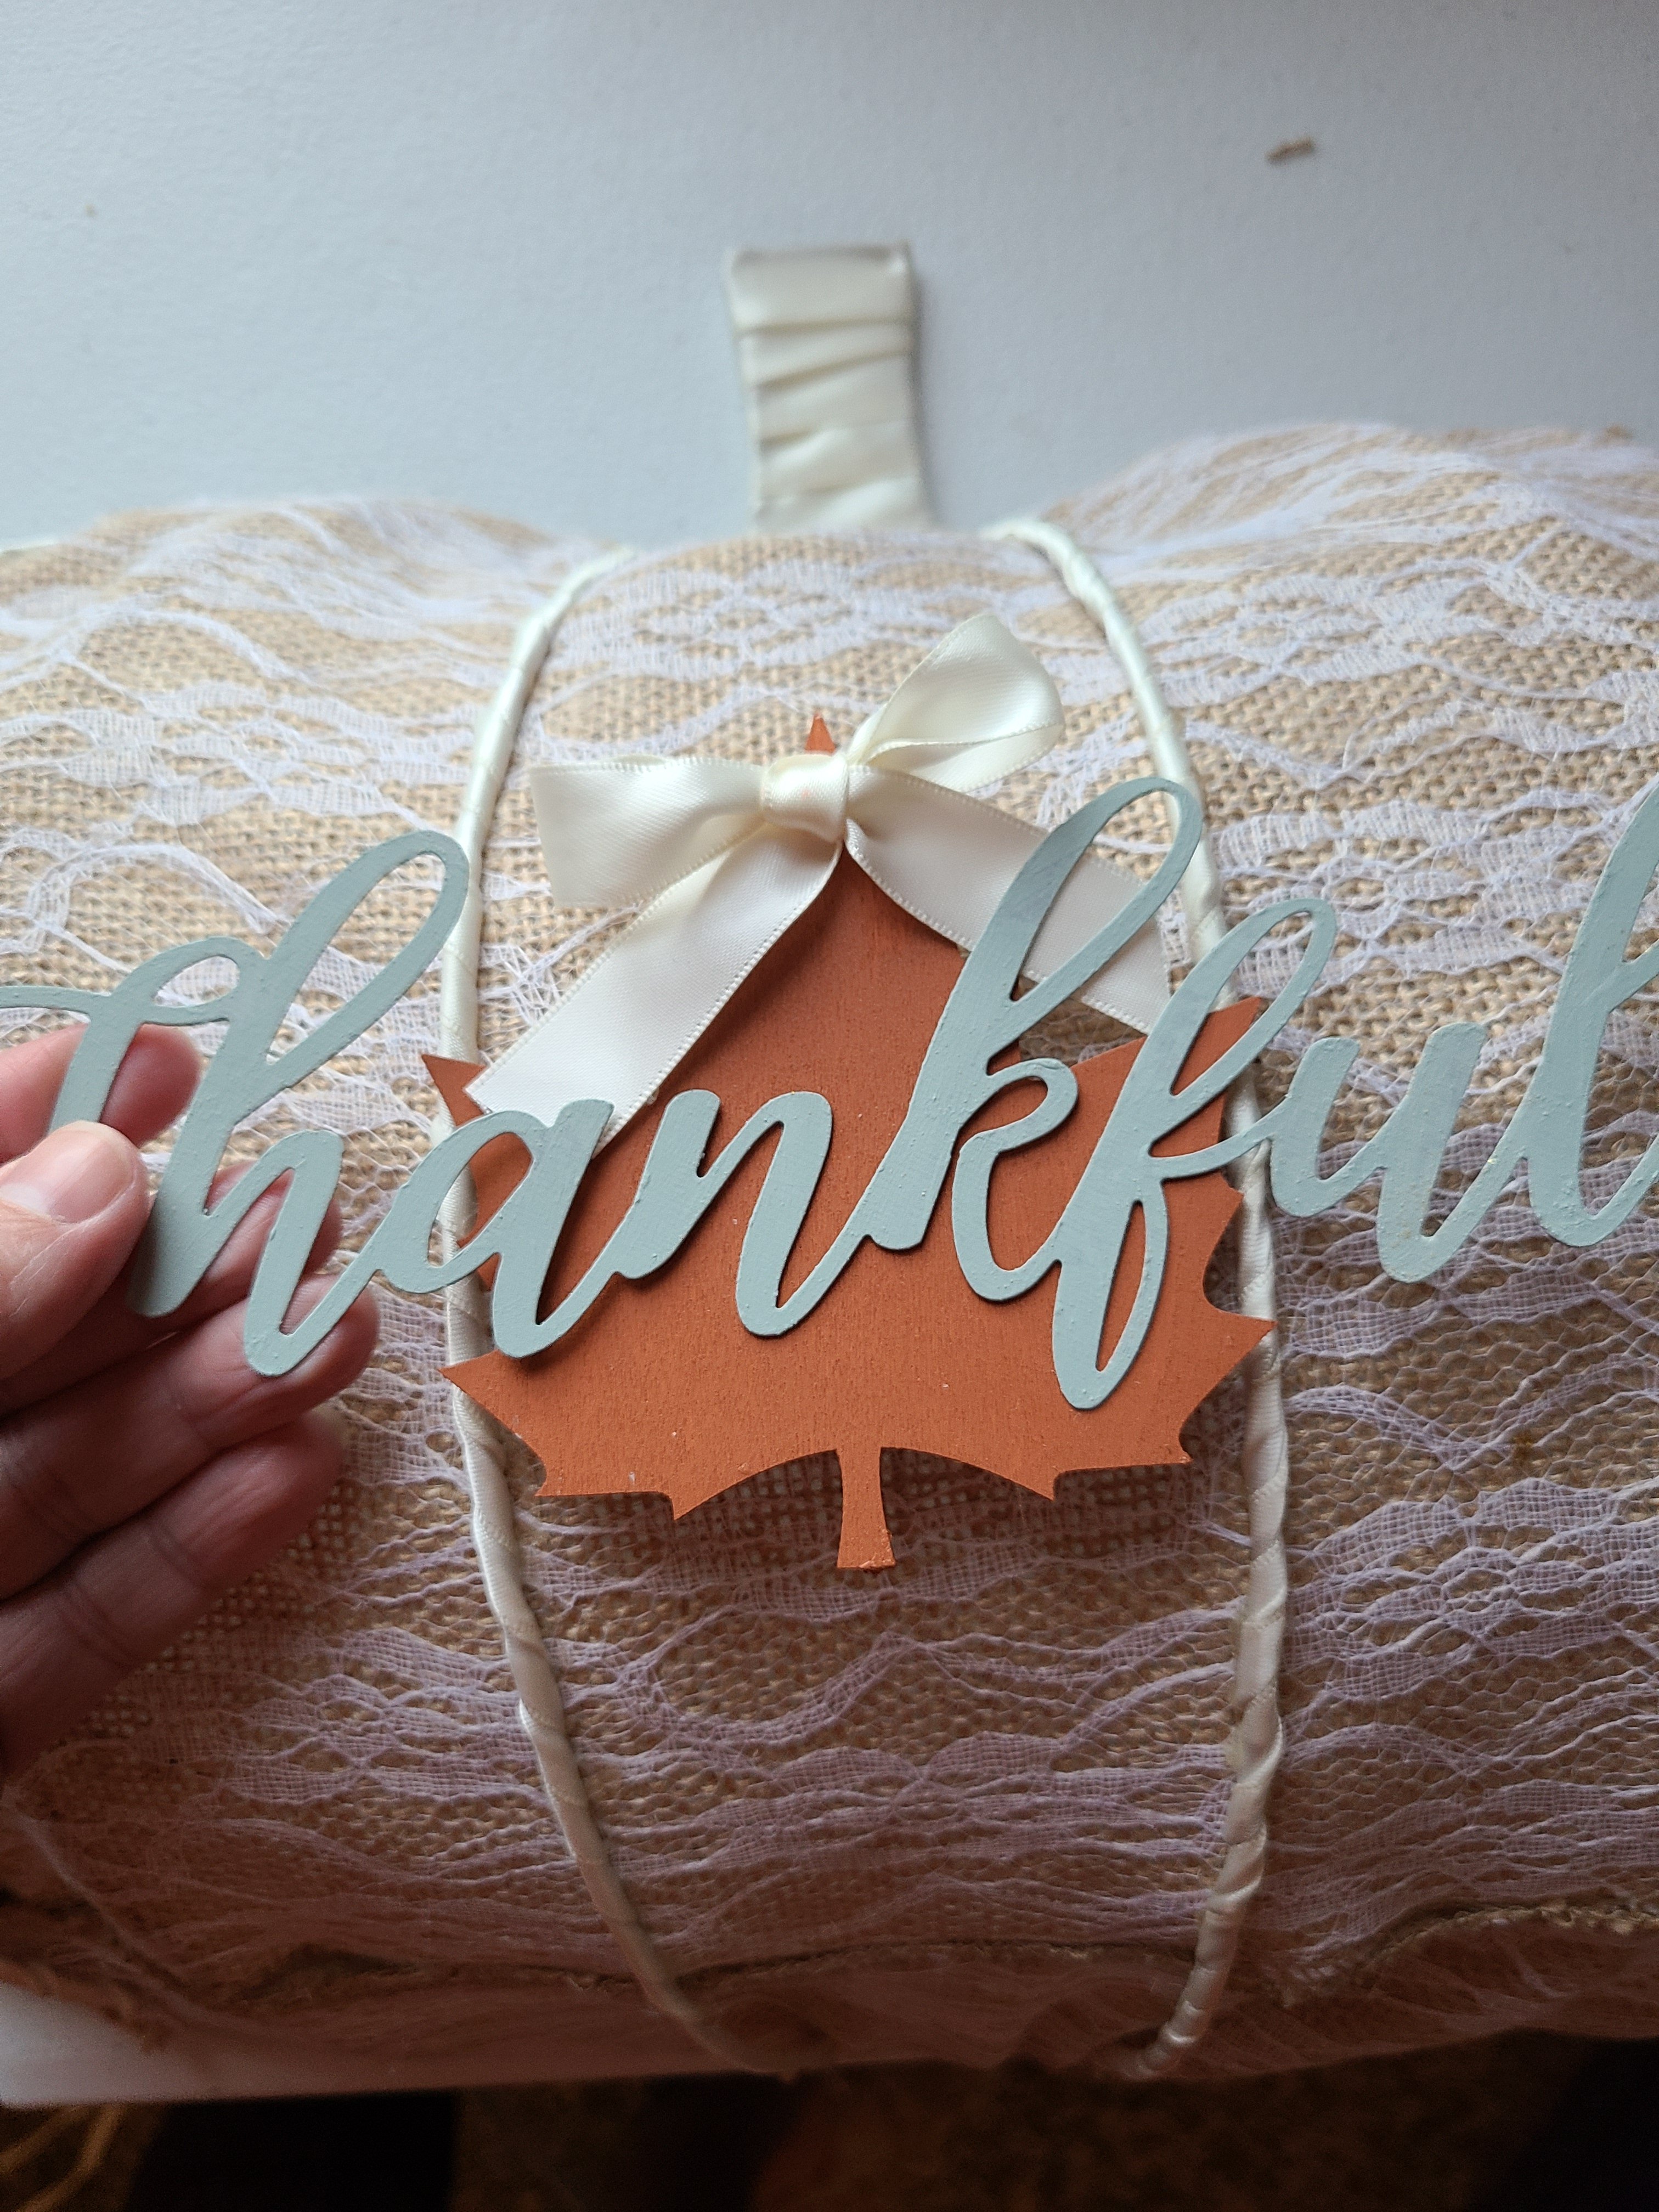
That’s it! Your burlap & lace Thanksgiving wreath is complete!
The wreath looks so pretty on our door. I’ve taken it down for now, but I’ll replace it after Halloween. I may hang in on my dining room wall for Thanksgiving. It might be too pretty for me to allow the elements to get to it!

I hope that you enjoyed this tutorial. If you make your own burlap and lace Thanksgiving wreath, I’d love to see it. Tag me on social media (@LifeasaLEOWife)! Remember this is a blog hop, so keep reading for to see the projects the other ladies on the hop have to share!
Remember to pin the image below or share this post with the buttons on the left side of the page so you can find it when you’re ready to start your project! Also, follow me on Pinterest for new ideas added weekly! Be sure that you never miss a great tutorial for decor like wreaths, signs and other home decor, free printables, crafts, and other fun posts! Enter your email address below to be notified of new posts! Use the buttons below to follow me on social media for other great content.

Under $10 on the 10th Blog Hop
Now check out the other fall projects that you can make for under $10! The bloggers on this hop are so talented, so I know you’re going to love everything they’re sharing!

Terrie | Decorate and More with Tip
Don’t go yet! There’s more to see!
There’s plenty more to see here on the blog! If you’re looking for something specific, use the search box in the sidebar to look it up. If not, you might enjoy these ideas. Don’t have time to read them all now? That’s ok, just click over to the posts using the pictures and pin them for later. You can also add Life as a LEO Wife to your favorites and check back for new ideas and free printables and SVGs every Wednesday, as well as link parties with tons of shared ideas on Sundays!


Nikki I have never thought to cover the metal part of the wreath! How smart and pretty! Thanks so much for sharing how to make this beautiful wreath!
Thank you! I usually hide them behind the fabric, but I thought I’d try something new!
Niki, I just love how your wreath turned out. This will be super cute in your Fall home. Happy Thanksgiving to you and your family.
Thank you! Happy Thanksgiving to you as well!
Very pretty! You used 2 (burlap and lace) of my 3 favs, now where’s the denim? Thanks so much for linking up at the Unlimited Link Party 84. Shared.
Ha! I do have several pair of jeans that were mine & my son’s that are too small. Just have to find something to do with them. Those extra pumpkin wreath frames are waiting as well!
CONGRATS Niki! Your post is FEATURED at the Unlimited Link Party 85!
Thank you Dee!
Your thanksgiving wreath looks wonderful! That’s awesome you were able to get something free for your stash to use on future projects ~ can’t believe they were going to toss that pretty burlap fabric. Who does that? – LOL
I know! I think there were like 30 rolls 6′ long they were going to trash. My cousin gave me 6 rolls some completely covered in the lace and some with lace down the center. Score! I’ve used them for years!