Welcome, friends, to our monthly DIY Blog Hop, hosted by Tarah of Grandma’s House DIY! Each month I team up with a group of lovely ladies and we bring you some awesome DIY projects. This month we’re all bringing you an upcycled piece that will bring you a bit of inspiration to start your own. Today I’m going to show you how to upcycle a pumpkin sign into an adorable fall keyholder for your entryway. You can turn a simple Dollar Tree sign into beautiful fall decor! Stick around after the tutorial to see what the other talented bloggers on the hop have to share!

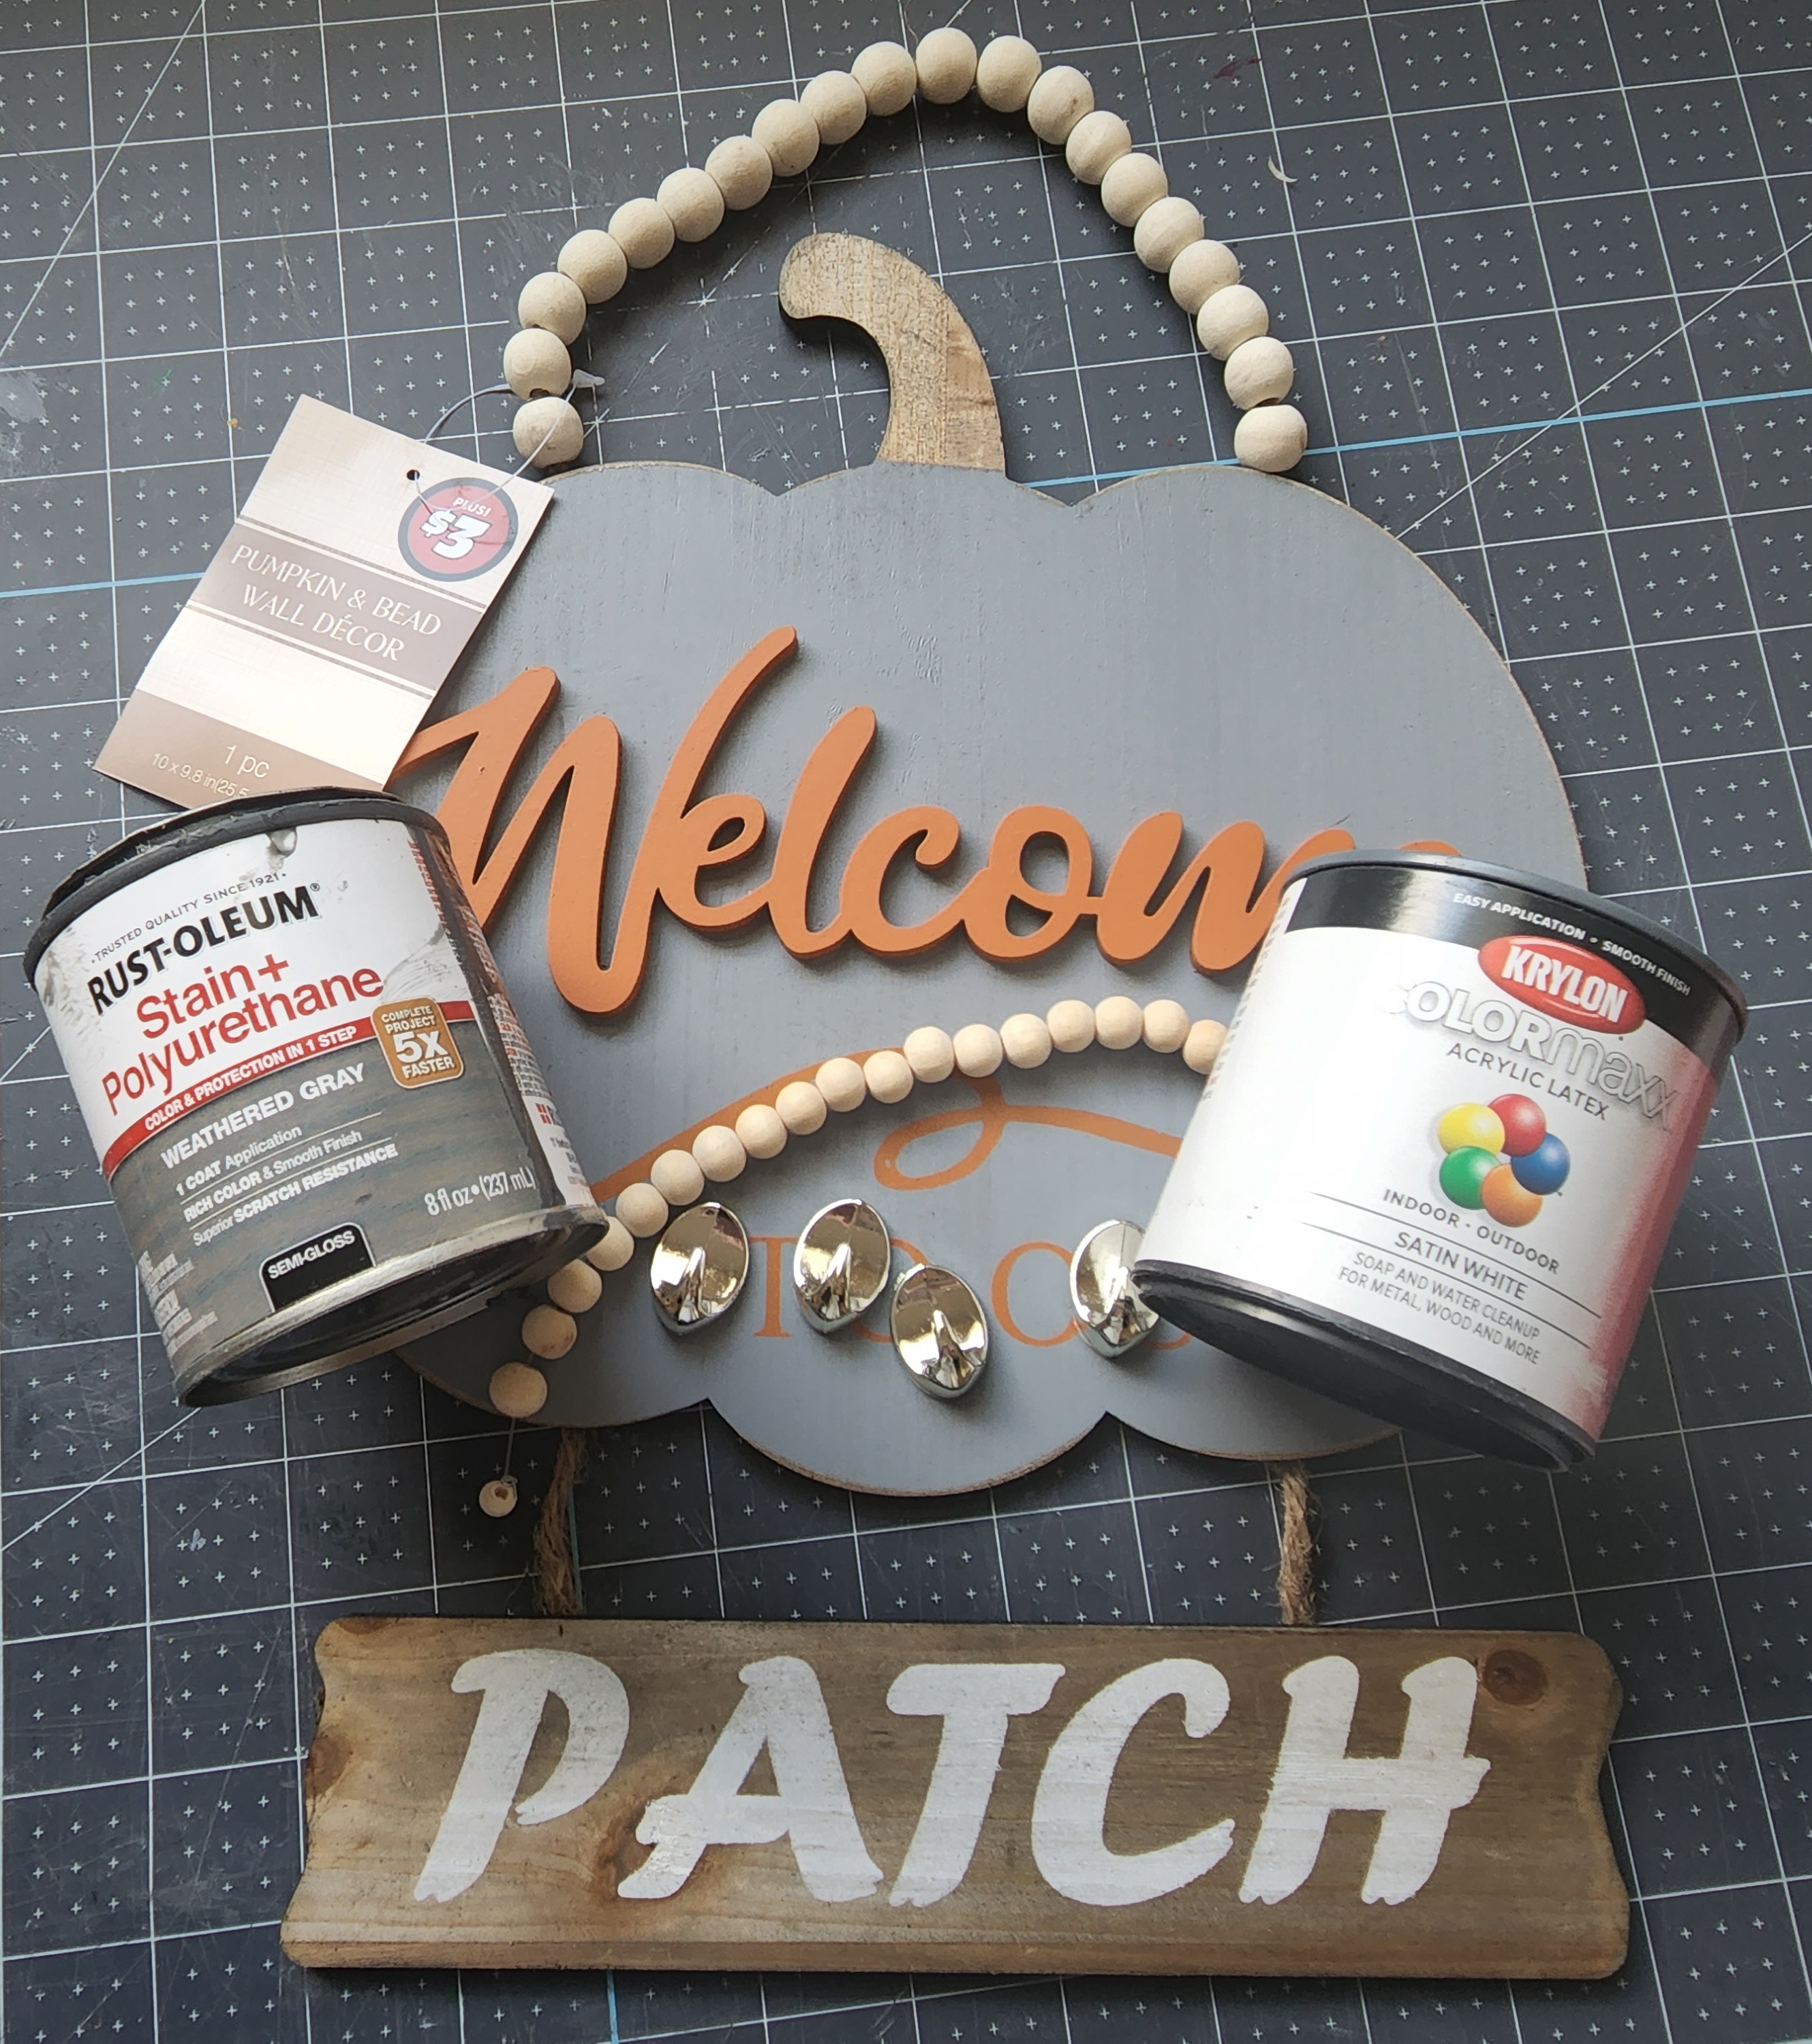
Fall Keyholder Supplies:
- pumpkin sign with beaded handle from Dollar Tree
- acrylic paint
- paint brush
- wood stain & foam brush (optional)
- hooks
- hot glue gun & glue
- twine
- extra wood beads (optional)
Prep the Sign
Before you can turn this Dollar Tree sign into beautiful fall decor, you need to do some quick prep work. Remove the staples from the back of the pumpkin sign, both those holding the beads on and those holding the “patch” sign on.


Sand the smaller section of the fall sign that says “patch.” If you can get all of the white paint or whatever they used to write it on with off, that would be ideal. For some reason, I couldn’t get it to budge much at all! I also sanded the words on the pumpkin, but it mostly just spread the orange paint. Having “to our” on the sign without the “patch” part wouldn’t make much sense, so I had to paint over it.

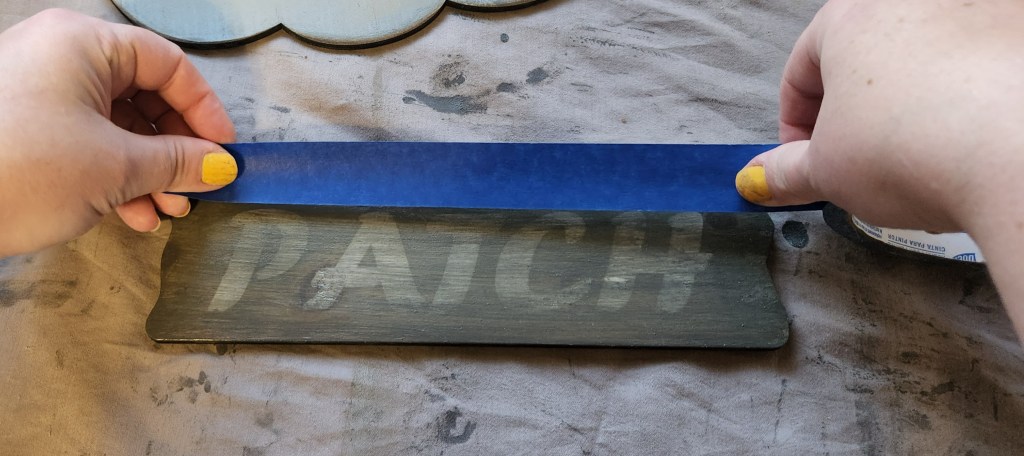
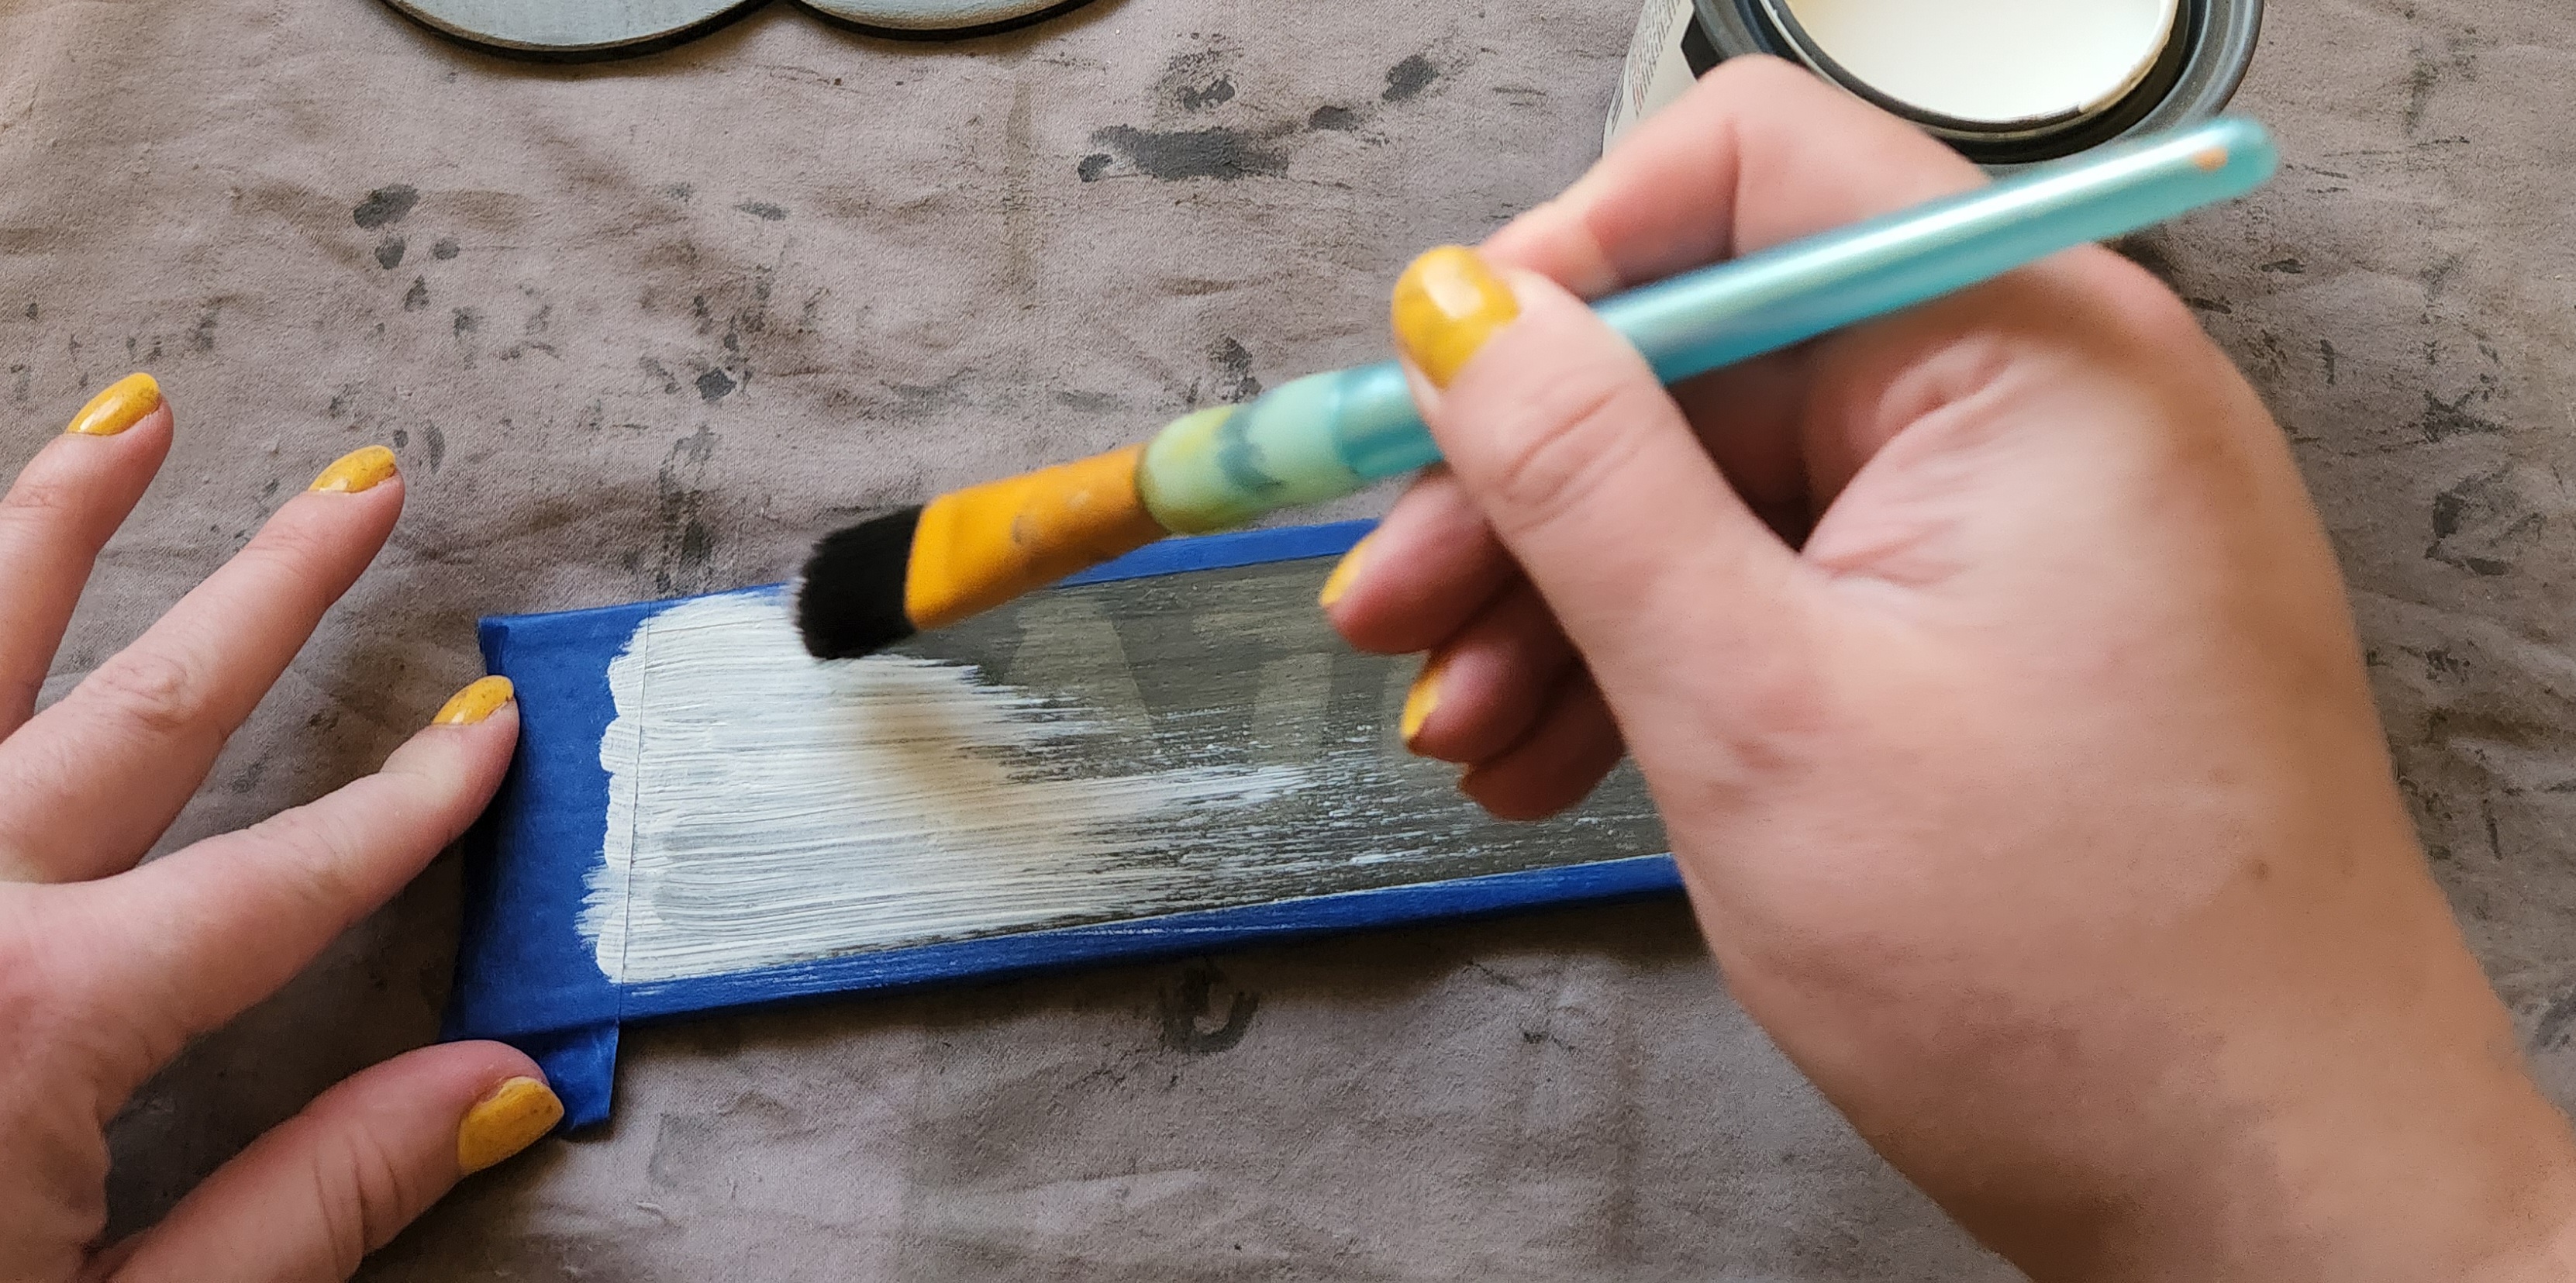
Stain the Fall Sign
Stain or paint the bottom sign that says, “patch.”

If your stain won’t cover the word, you can paint the entire thing or tape it off with painter’s tape and paint over the word. You can leave the stain on the outside.
Stain the wood beads that you removed from the fall sign’s handle. I stained those, then painted the smallers ones that I added between the main sign and the “patch” sign. If you place them on a BBQ skewer they are much easier to paint or stain.

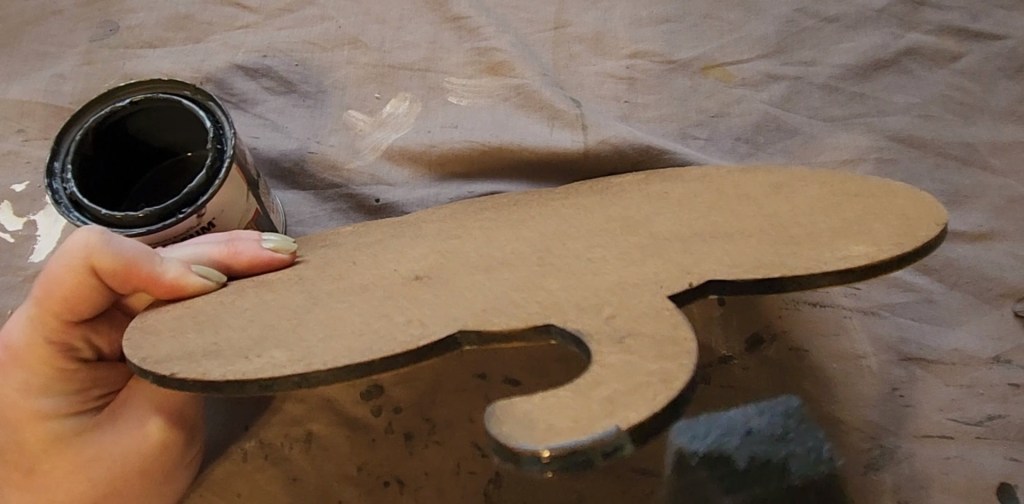
Paint the Pumpkin
Ok, here’s the deal. My plan was to paint around the raised “welcome” wood word, but that went out the window. If somehow you can manage that, go for it. If not, just paint the whole pumpkin sign, except for the stem. I used white latex paint. Even more went wrong on my fall keyholder later, but we’ll get to that in a minute. We won’t let that happen to you!

If you’re adding additional wood beads to the bottom of the sign, you can paint them now.
Now stain the stem of the pumpkin. I used Rust-oleum weathered gray with the polyurethane coat in one.

If you got any paint on the edge of the soon to be pumpkin keyholder, sand it off. Sand a little bit off of the front edge too.
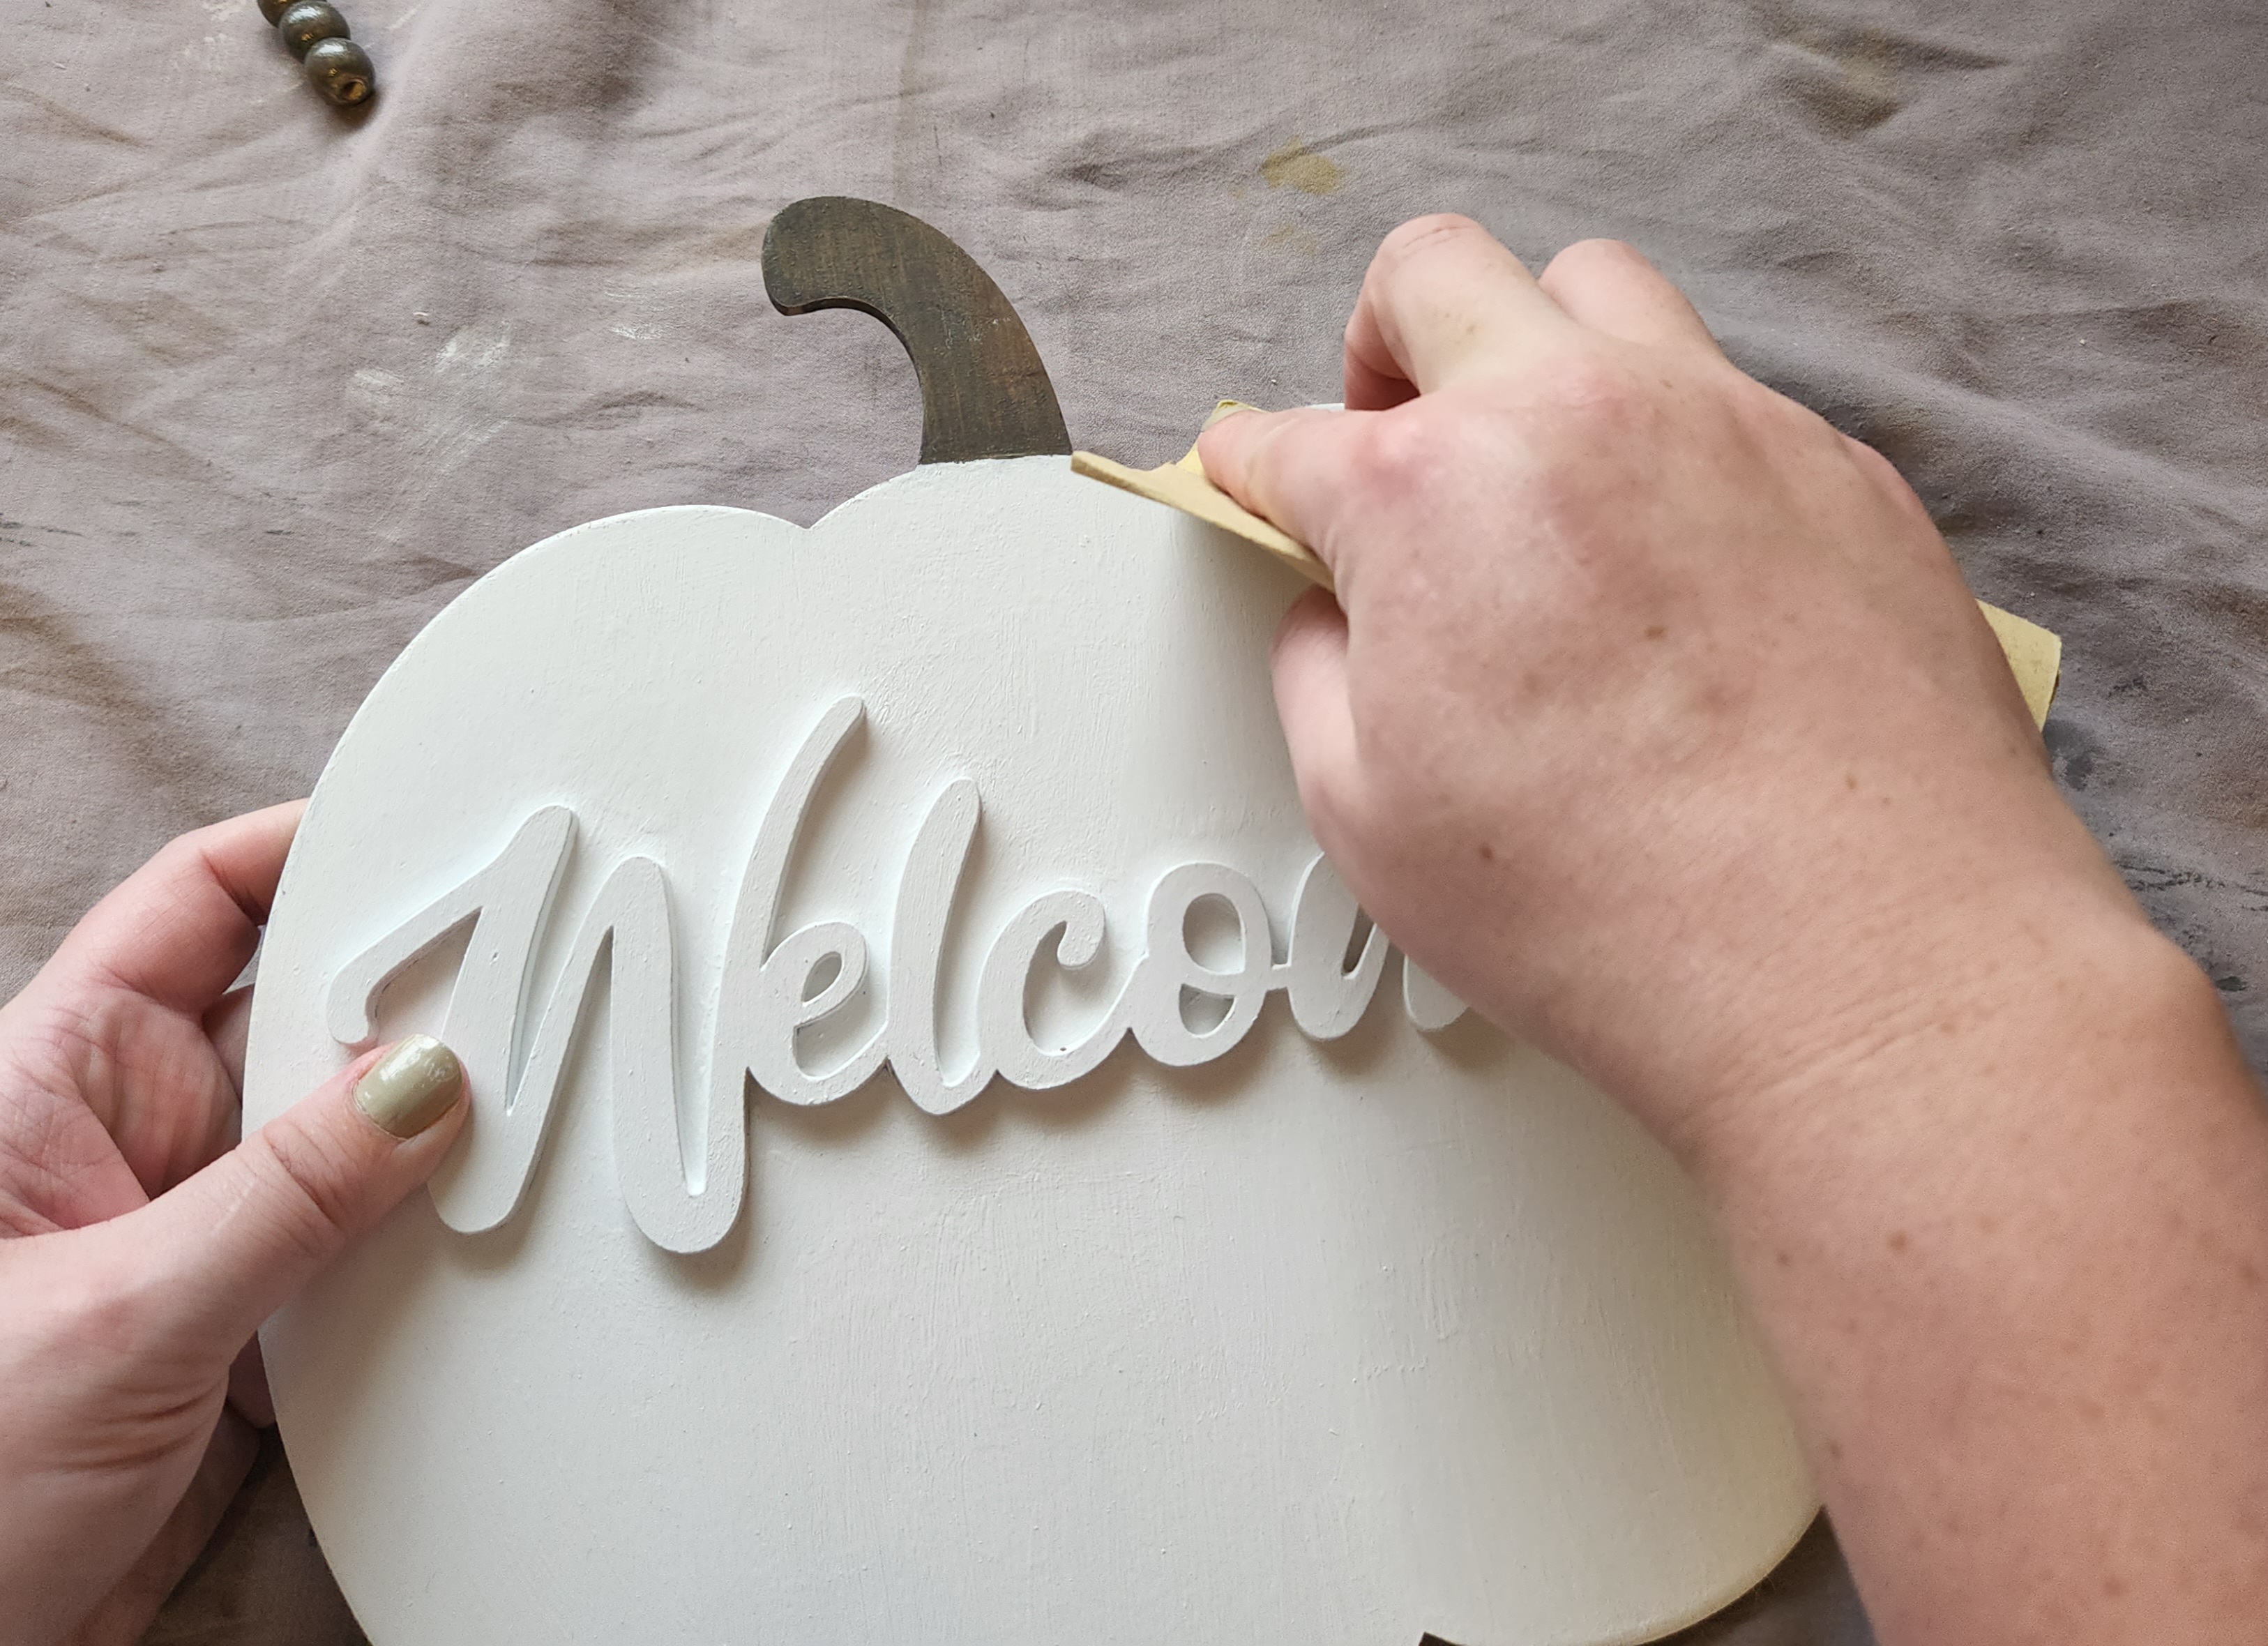
If you painted over the welcome part, sand the very edge of the front of the letters. That will leave them with a bit of the orange peeking through.

This is what you’ll have. If you’d like more to show through on your Dollar Tree sign keyholder, keep sanding or add a little paint of a different color.

Now add paint or stain to the edge of the pumpkin keyholder. Allow a bit of it to go onto the front of the sign where you sanded off the paint.

Restring the Twine
I cut a new piece of twine so that I could string the wood beads more easily. The original pieces were thick and wouldn’t fit through my smaller wood beads.
String all of the original beads onto a piece of twine. Leave both ends long enough to attach to the back of the fall keyholder.

String five 10mm beads onto a piece of twine. Repeat with a second piece. Tie a knot in each end so that the beads won’t slide off.


My Fall Keyholder Diversion
Ok, so here’s where things went oh-so-wrong with my fall sign. The twine hanger with the beads and the ones holding the little sign on were attached to the back of the sign with outdoor staples. So, I attempted to put them back on in the same way. Like this:

When I flipped it over, so happy that I was finally almost finished with this project, I was confronted with this!!!

I was absolutely devastated. After calling the hubs, nearly in tears because this project had to be finished for this blog hop, he saved the day. Well, he tried to save the day. He searched Dollar Tree high and low. looking through all of their fall decor, but there was not one of these signs to be seen. There was one that was another color, but the front had “pumpkin” as its wood word, and it was off-center. I told him to just grab a regular one.
The regular one was quite a bit larger, and thinner, but it worked. I tried to take the wood “welcome” off the front of the destroyed sign, but after nearly two hours, it came off in pieces. So, there went that. There I was at 9pm having to start all over again!
Fixing My Mistake
I painted the back of the pumpkin white and stained the stem just like the first one. Hopefully you won’t have to do this. However, it happening to me might be a blessing. I’m showing you two ways you can make your own fall keyholder from Dollar Tree decor. If you can’t find the $3 sign I started with, you can use one of the regular pumpkins like I used. Then you can use a smaller sign or a wood plaque from DT as the bottom section in place of the one that said “patch,” and add the key hooks to it.

If you have to use the same sign I did, fill in the hole in the stem with spackling. Then stain the stem and edges just like above.
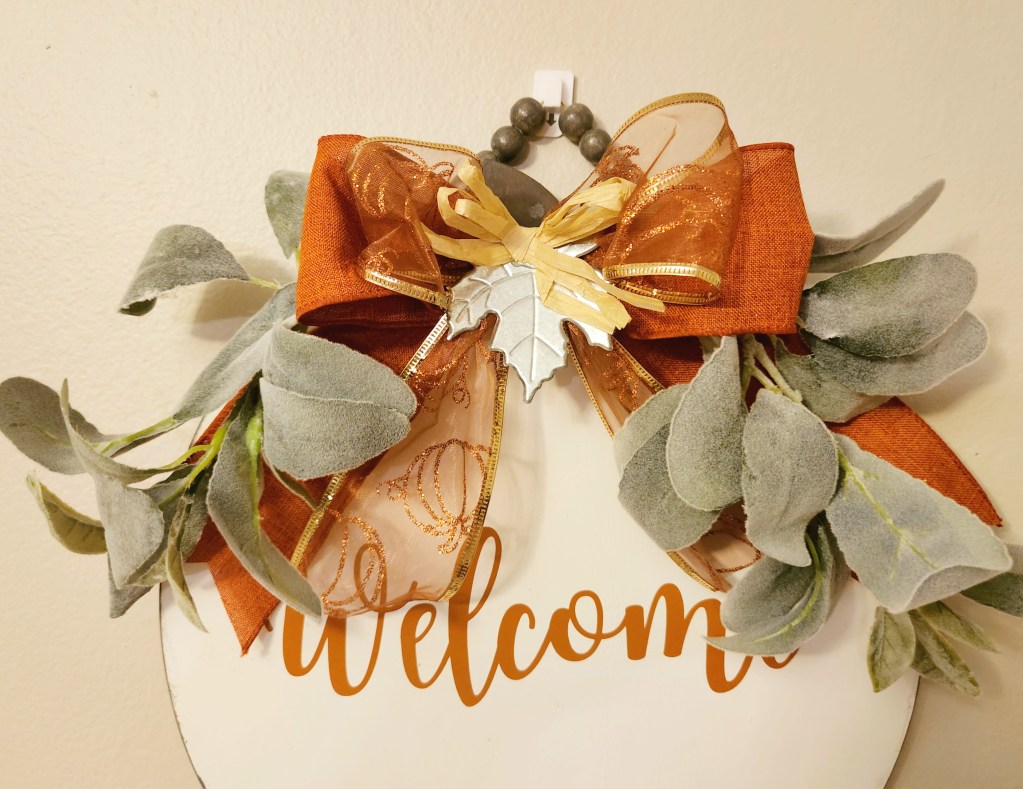
I cut the word welcome in orange spice vinyl with my Cricut. If you’d like the file, you can get it from my round “Welcome” door hanger for free.
Next, I placed the vinyl onto the pumpkin keyholder with transfer tape.

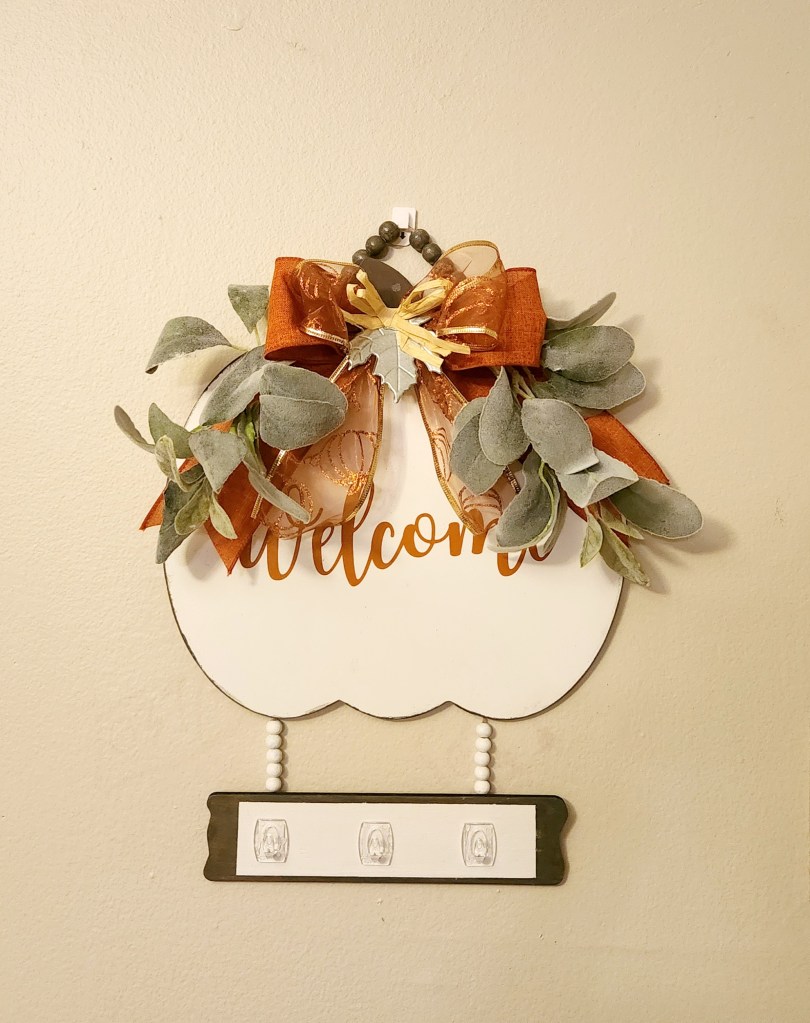
Place the Strung Beads on the Fall Keyholder
Now you can attach the wood beads onto the pumpkin keyholder without breaking it! Turn the sign facedown. Add hot glue to the upper right (or left) side of the pumpkin stem then place one end of the long strand on it. Repeat on the other side.

Next glue one of the short bead strands on one side of the bottom of the fall sign. Add glue to one end of the strand and place it on the bottom of the pumpkin, then glue the other end to the facedown small sign. Glue each end so that only the beads are between the two signs, not a lot of extra twine.

Finally glue the other strand to the pumpkin and the small sign.


Add Hooks to the Keyholder
The next step in creating your adorable piece of upcycled Dollar Tree fall decor is to add hooks to the small bottom sign.
I used three clear hooks, but I’m not sure where I got them from. Probably Dollar Tree, but they aren’t like the regular ones with the adhesive on the back. You can use those faux Command hooks that they sell as well.
Squeeze hot glue on the back of the hooks and place them, evenly spaced on the small sign.


Add Embellishments
I made two regular two loop bows with about 4″ tails and secured them together in the center with a pipe cleaner. Both were made with 2.5″ wired ribbon, one solid orange and one with gold trim and orange glitter pumpkins. Then I added a lamb’s ear stem to each side of the bow and twisted the pipe cleaner closed over them.

Use the rest of the length of the pipe cleaner around the pumpkin stem. That way you can switch the bows out at Halloween and for late fall for a whole new look!


I added the metal leaf with raffia on it that came on the top of the second pumpkin. It covered the pipe cleaner nicely.

Now fluff the bows and adjust the greenery until you’re happy with the look. Here I am fluffing my bows at 1am!

Your fall pumpkin keyholder is complete!
It’s that easy! How gorgeous will this look in your fall themed entryway?!


I hope that you make a fall pumpkin key rack of your own, and when you do, I’d love to have you tag me in a photo on social media! Keep reading to see what the other ladies on the hop have upcycled for you!
Remember to pin the image below or share this post with the buttons on the left side of the page so you can find it when you’re ready to start your project! Also, follow me on Pinterest for new ideas added weekly! Be sure that you never miss a great tutorial for decor like wreaths, signs and other home decor, free printables, crafts, and other fun posts! Enter your email address below to be notified of new posts! Use the buttons below to follow me on social media for other great content.

Don’t go yet! There’s more to see!
There’s plenty more to see here on the blog! If you’re looking for something specific, use the search box in the sidebar to look it up. If not, you might enjoy these ideas. Don’t have time to read them all now? That’s ok, just click over to the posts using the pictures and pin them for later. You can also add Life as a LEO Wife to your favorites and check back for new ideas and free printables and SVGs every Wednesday, as well as link parties with tons of shared ideas on Sundays!


On to Our DIY Blog Hop
Our theme for September is “upcycle.” I know you’re going to love what the other ladies on the hop have for you, so let’s get to it!
Tarah from Grandma’s House DIY | Antique Insulators Upcycle into a Table Centerpiece

Niky from The House on Silverado | DIY College Side Table

Lydia from Life Beyond the Kitchen | Upcycled Canisters for Craft Storage


Wow, Niki! That turned out great despite the all the problems you had to deal with. I love how you “kept it real” though. It’s nice to read about real situations that have to be problem-solved when working on a project. Thanks for sharing your journey, and your lovely key holder!
Thank you! And thank goodness it worked out! I was up until 4am to finish the post after the craziness. Thank the Lord my husband was at least able to get to DT before they closed!
Despite your struggles, the end results look great!
I’ve seen the pumpkin forms in the dollar store but never thought to make something useful like a key holder from them.
Thank you!
What an awesome upcycle – I love it! Its great hopping with you every month!
Thank you! You too1
oh my I am so happy it worked out in the end. It came out so cute! Perfect for any entrance way. Stop by my new link party Home Imagined, I would love for you to share it. Have a great week.
Thank you! I’ll be there!
Thanks for stopping by and sharing today!
You’re welcome!
This is great!!
Thank you!
very cute pumpkin key holder. I am happy to feature you at Love Your Creativity.
Thank you Linda!