
Welcome friends! It’s time for our monthly Sustainable Pinterest Challenge, and I’ve got a great project to share with you. For this challenge I used only items that I had on hand since our theme for this month is zero waste. In fact, most of the items that I used in this adorable Halloween welcome sign I’ve had for more than three years. Let me show you how you can make an adorable entryway sign where you can hang your keys and the broom you rode in on!

Dollar Tree Halloween Welcome Sign Supplies:
- Dollar Tree welcome sign: I had mine on hand from when my fall keyholder sign went wrong. (Don’t worry, I fixed it. You can see that adorable sign here.) You can use a regular pumpkin sign if you don’t have or can’t find the one with the beaded hanger and separate bottom sign. Here’s one from Amazon. This one has the pumpkin sign & the small bottom sign attached, you’ll just need to add 15mm wood beads.
- black spray paint or acrylic paint (I’ve had it for 2 years)
- 15mm wood beads (optional)
- hot glue gun & glue (on hand for I don’t know how long!)
- 2.5″ wired ribbon (had this bit of scrap ribbon for at least 3 years)
- faux florals & stems (definitely had these for 3 years or more)- These black eucalyptus stems would work well. If you’re looking for more color, these glitter stems are cute.
- painter’s tape
- glitter paint (clear with only the gold glitter showing. You’ll use this only on the “welcome.”)
- pencil & paint for wording at the bottom if you don’t have a cutting machine (FolkArt metallic gold) or
- vinyl- I used gold glitter which I got four years ago.
- my free printable design

Disclosure: I am a participant in the Amazon Services LLC Associates Program and the Dollar Tree Affiliate Program, affiliate programs that allow me to link to the products that you can use to make this project quickly and easily. If you purchase any of these products I may receive a very small commission at no cost to you! That commission helps me continue to bring these great decor DIYs, free printables, and all of the other goodies on this site to you. Thanks so much for your support!

Paint the Halloween Welcome Sign
First remove the wood bead hanger and the twine holding the bottom sign on the main one. Use a butterknife or flathead screwdriver to lift the staples and they will come out easily. Next use painter’s tape to cover the stem of the pumpkin.
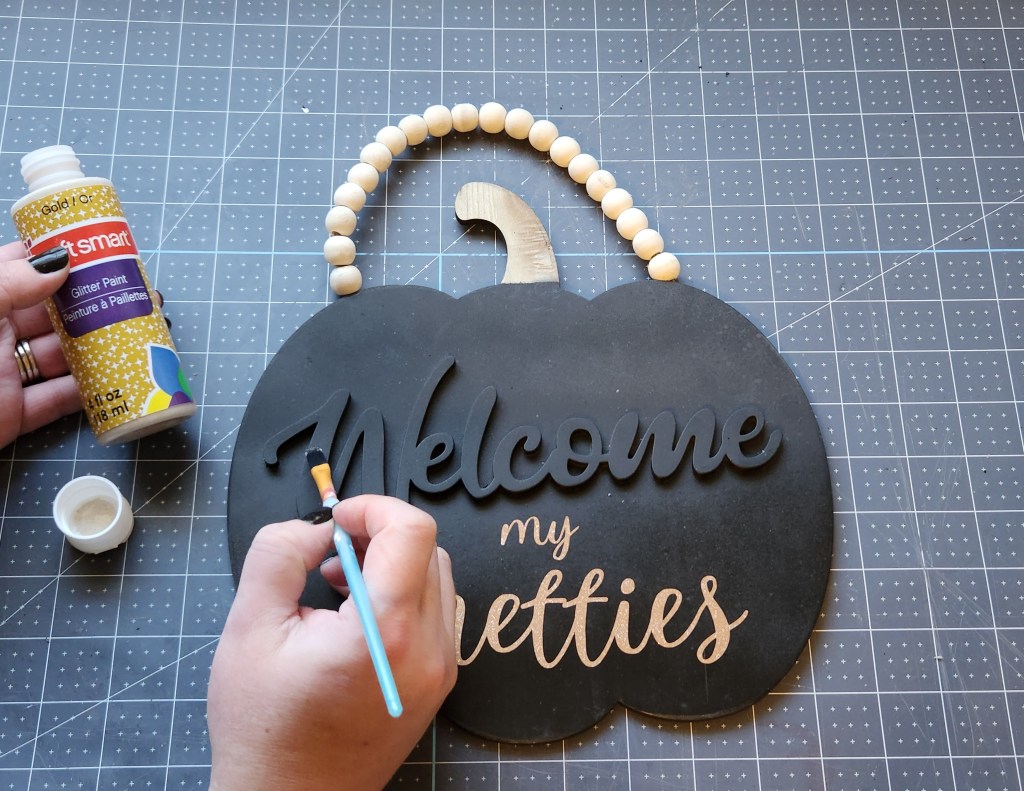
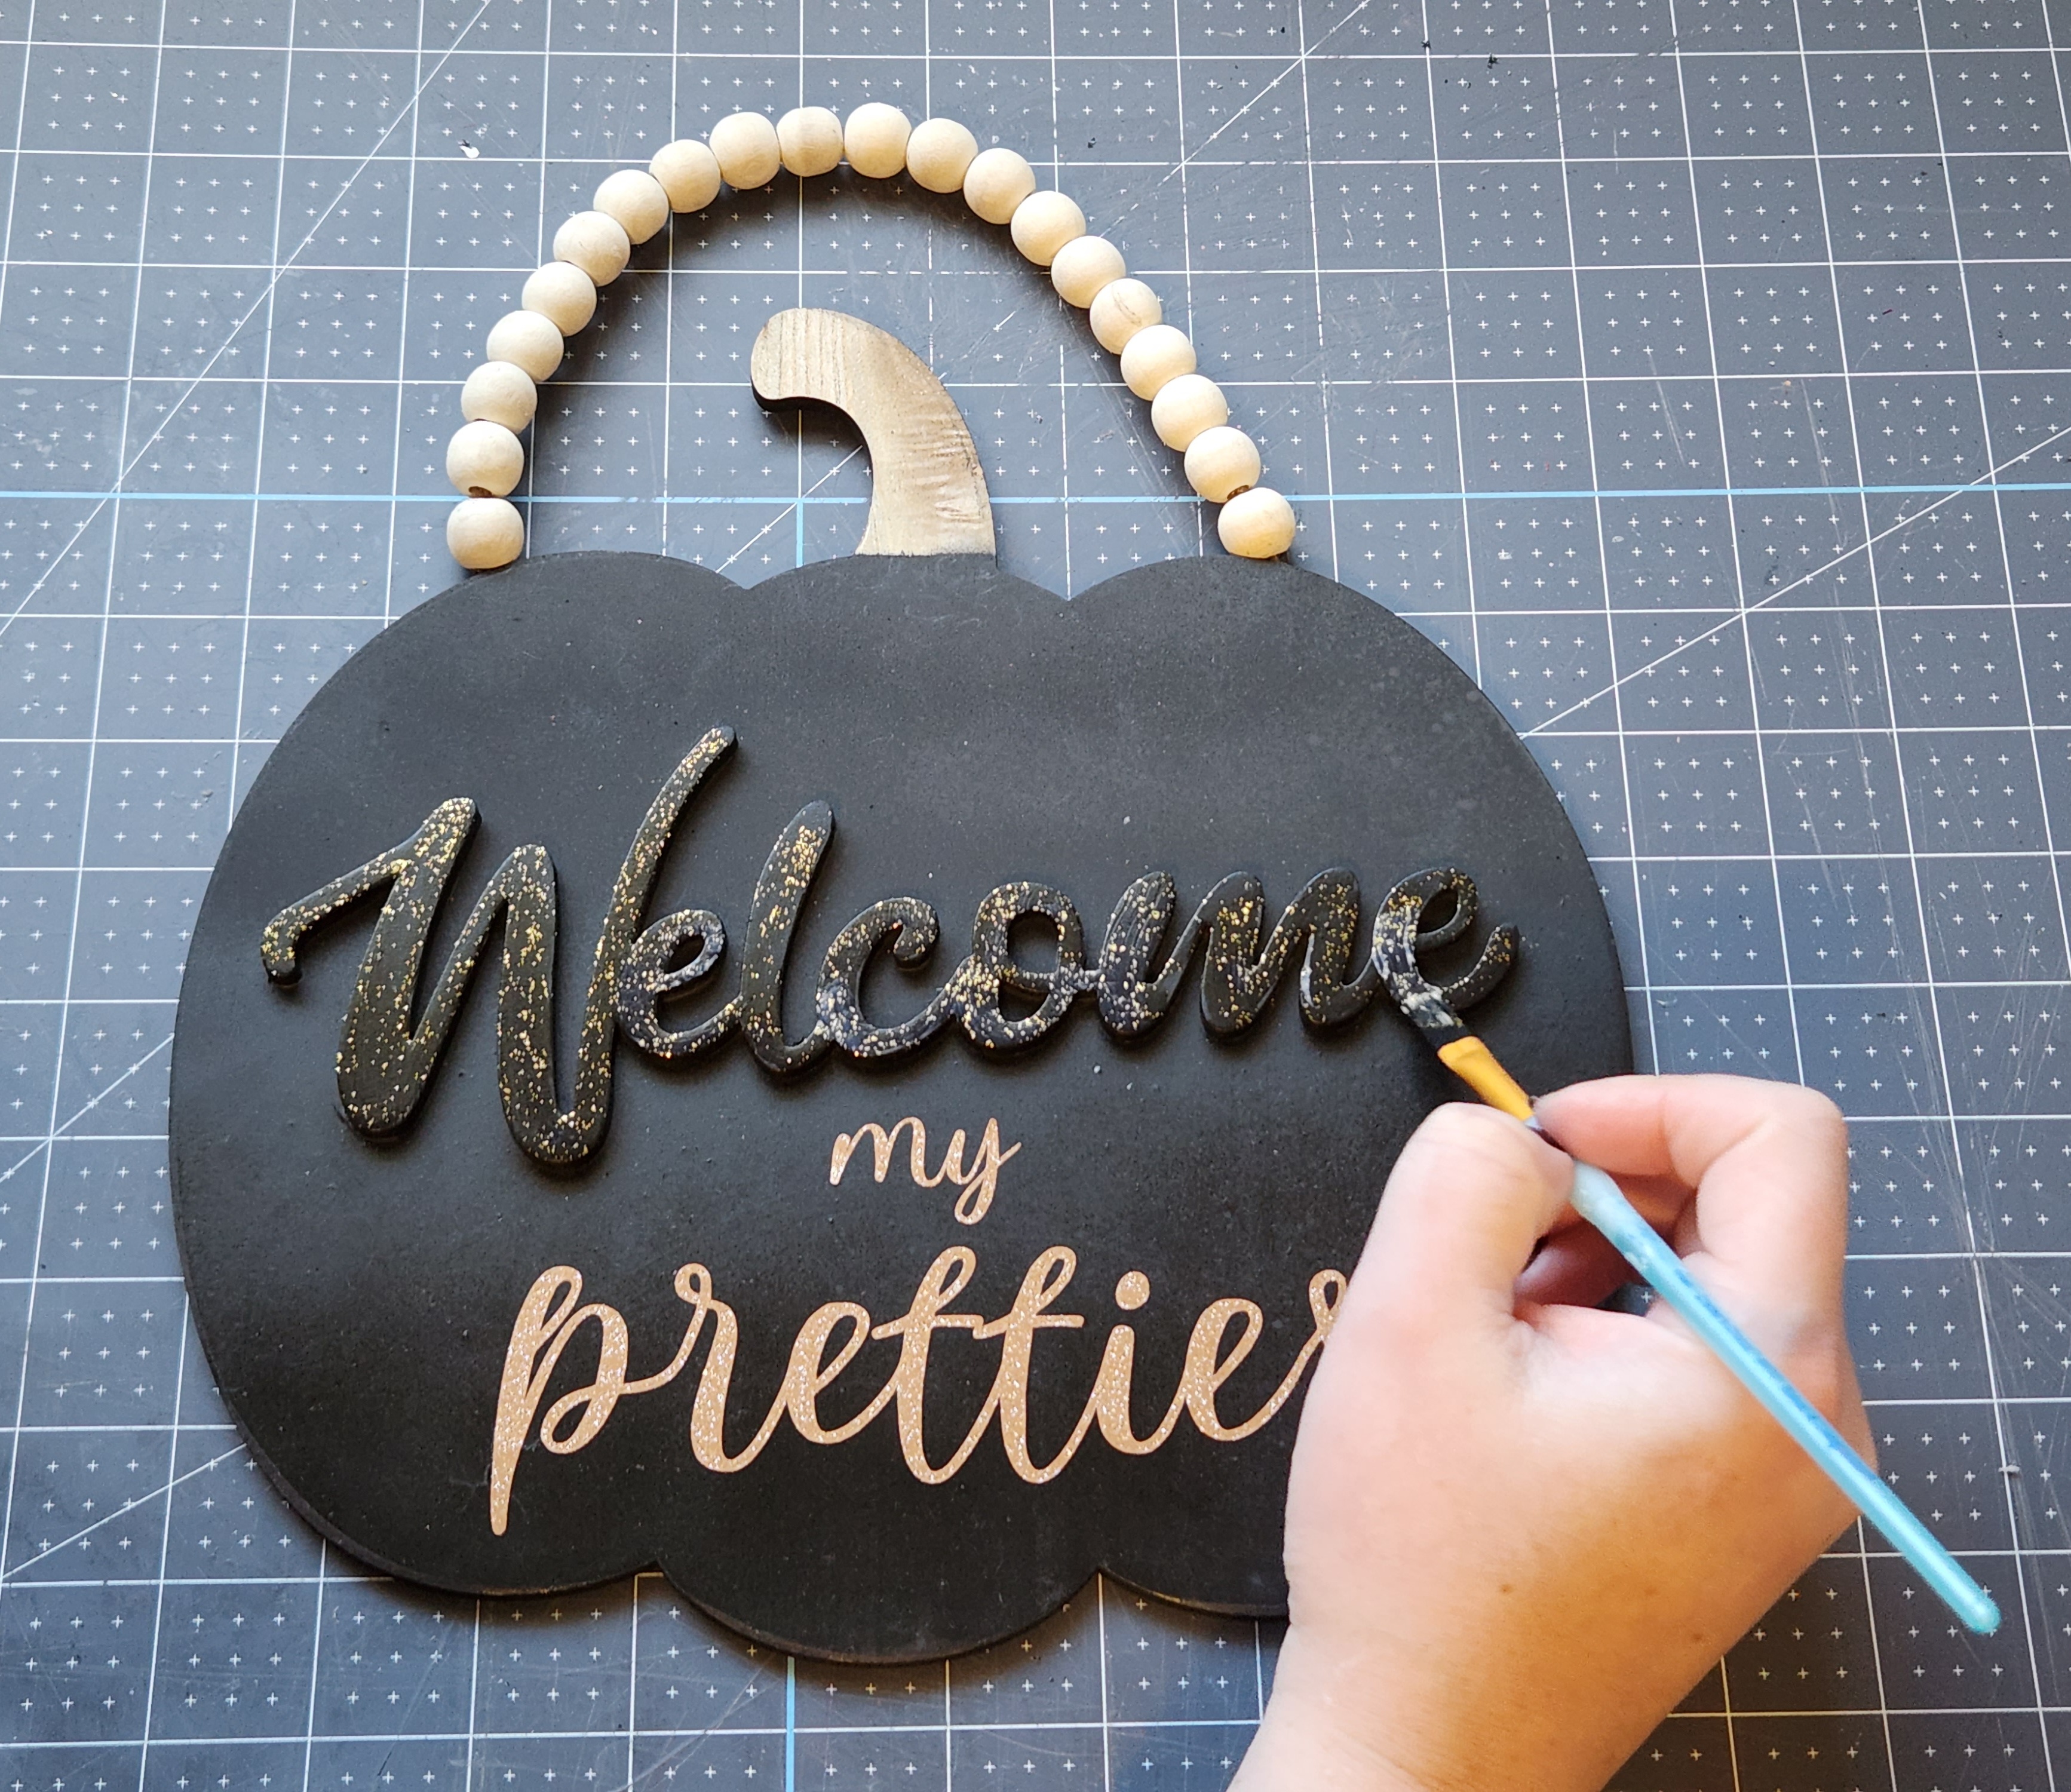
Spray paint both sections of the sign. It took two coats to cover the pumpkin portion of mine properly. I ended up giving the little sign a coat of acrylic paint after the spray paint because “patch” was not going gently into that good night! I don’t know how, but my pumpkin ended up having a gorgeous ombre pattern! The top is matte black and the bottom has a shiny black finish. No clue how it happened, but I’m in love!

Cut or Print the Design
For personal use only. All of my free printables & cut files are copyrighted material. Feel free to download these free designs and print them or use on your Cricut projects for your own use at home. They are not for commercial use, not to be placed on items for sale. That helps me keep these printables, SVGs, and PNGs coming to you for free! Another note: you will not my logo overlay on your downloaded design. It is there to keep people from downloading the images straight from Google, or others from stealing them to use on their site. Thanks for understanding! Feel free to share this post for your friends and family to make their own projects with this design!
I created and cut a design to go below “welcome” on my sign. I thought “my pretties” would be perfect for an entryway sign to hang my keys on and some mini brooms that came from Dollar Tree. If you have a cutting machine, you can download the image and cut it on vinyl. Once in Design Space I sliced the words so that I could resize both of them separately. For some reason when you upload the design it doesn’t place it on the mat the same size as I made it. You’ll need the “my” to be about .75″ tall and “pretties” about 6.5″ wide.

If you don’t have a cutting machine, you can print it and use the carbon copy method. You will find the instructions for using that method in this tutorial. All you do is print the design and cover the back with pencil lead. Next, place it on the sign. You can cut “my” away from “pretties” to place them separately so they are in the places you’d prefer. Outline the words which will transfer the design to the pumpkin. Finally, paint the words and, boom, an adorable sign without a cutting machine!
Apply Vinyl or Paint to the Sign
Once your design is cut or covered in pencil lead, apply the words to the sign. I’m sure you know how to add vinyl if you’re using your cutting machine. If you’re not, just follow the carbon copy instructions.


I added a bit of gold glitter paint over the “welcome” on the sign so that it stands out a bit more.
Reassemble the Halloween Welcome Sign
Use hot glue to reattach the wood bead hanger to the Halloween sign.

If you’d like, string two wood beads on each of the twine ropes that held the bottom sign on to the top section. Hot glue the pieces of twine back on the sign where they were initially. I made sure that only my two beads would be seen from the front.

Embellish with Floral Stems
Now it’s time to add the floral stems and a bow to the top of the Halloween sign. Trim them so that they don’t extend too far past the edges of the welcome sign. I used four feather stems and four glitter stems on mine. Next, make a simple four loop bow and secure it in the middle with a pipe cleaner. Attach the stems to the back of the bow with the wire and wrap it around the stem of the pumpkin. I chose this option rather than hot glue so that I can change the bow up next year if I want to.

If you need more visual help, here’s a video of the entire process.

That’s it! Your Halloween entryway sign is complete and adorable!
I hope that you enjoyed this tutorial. When you make your own sign, be sure to tag me on social media (@LifeasaLEOWife) because I love seeing the spin y’all put on these ideas! Remember this is a blog hop, so keep reading for all of the other projects brought to you by the other talented ladies on the hop!


Remember to pin the image below or share this post with the buttons on the left side of the page so you can find it when you’re ready to start your project! Also, follow me on Pinterest for new ideas added weekly! Be sure that you never miss a great tutorial for decor like wreaths, signs and other home decor, free printables, crafts, and other fun posts! Enter your email address below to be notified of new posts! Use the buttons below to follow me on social media for other great content.

On to Our Sustainable Pinterest Challenge
I’m so glad that you’re still here! I hope that you’ll head over and check out all of the great posts that are shared in today’s Pinterest Challenge!

Julie from Sum of Their Stories | How to Make Drawstring Tabs
Christine from Christine’s Crafts | Zero Waste Makeup Remover Pads
Gail from Purple Hues & Me | Zero Waste Wool Dryer Balls
T’onna from Sew Crafty Crochet | Pencil Pillow Redo
Julie from Treasures Made from Yarn | Plarn Basket
Mel from Decor Craft Design | DIY Vase with Zero Waste Plastic Bottle
Vicki Myers Creations | DIY Tassel Wall Decor
Don’t go yet! There’s more to see!
There’s plenty more to see here on the blog! If you’re looking for something specific, use the search box in the sidebar to look it up. If not, you might enjoy these ideas. Don’t have time to read them all now? That’s ok, just click over to the posts using the pictures and pin them for later. You can also add Life as a LEO Wife to your favorites and check back for new ideas and free printables and SVGs every Wednesday, as well as link parties with tons of shared ideas on Sundays!


This is such a fun way to make this sign over, who knew this kind of sign was so versatile? Well, apart from you who obviously saw the potential for lots of different looks for it!
It’s amazing to see what you can make with supplies that you already have.
Thanks! I wasn’t sure what I would do with it when my husband came home all happy because he found the sign I needed days before lol. God bless him, he had driven to several DTs to find it! I was forced to tell him I didn’t really need it anymore, but I could definitely use it (had to get that sad look off his face somehow lol). Why not use it for Halloween?
Super cute Niki! Love the broom!
Thank you! Dollar Tree special, just painted it and added a bow!
This sign is too cute and adorable, Niki! I wish I could ride in on a broom, lol! It’s amazing what we can find in our stash to make fabulous crafts! You did really great in creating this!
Thank you! I do too. I read a series of books where the main character can fly. Yep, that would be super handy!
Wow! It looks so different at the end. You could do this with any signs you find cheaply. Thanks for sharing!
Thank you!
This Halloween sign is gorgeous! I love that you can hang your keys on it or those cute brooms! The bow at the top of the pumpkin sign is so cute! Love it!!! Pinning!!!
Thank you!
Ok… so this is just adorable Niki! As always, thanks for the inspiration and the great tutorial. Pinned!
Thank you!
Super cute!
Thank you!
That turned out nice, I like it! Thanks so much for linking up at the Unlimited Link Party 84. Shared.
Thank you!
This is a terrific makeover for a dollar store sign. I love the spooky colors, and it was so smart to add the hooks for hanging keys or other decorations. Pinned to my Crafts board.
Thank you for sharing this post at Talent-Sharing Tuesdays Link-Up 37.
Carol
http://www.scribblingboomer.com
Thank you!