
Welcome to this month’s Creative Craft Hop! I’m joining some talented bloggers to bring you some DIYs that I know you’re going to love. Today I’m going to be showing you how to DIY your own Halloween crystal ball to spookify your home this October. You won’t believe how easy and inexpensive it is! This is an easy project, and you can make several in different sizes in just a few hours. Let’s get into it!
The Creative Craft Hop is hosted by Sara of Birdz of a Feather. Each month we get together to bring you new and creative ideas. Keep reading to the end of the post where you will find all of their projects linked. If you missed last month’s hop where I showed you how to make a fall doormat for $1.25, you can check it out here. In that post I shared a “gourd-geous” free file that you can use on any fall decor DIY, including the fall doormat. No Cricut needed!


Disclosure: I am a participant in the Amazon Services LLC Associates Program, an affiliate program that allows me to link to the products that you can use to make this project quickly and easily. If you purchase any of these products I may receive a very small commission at no cost to you! That commission helps me continue to bring these great decor DIYs to you. Thanks so much for your support!
DIY Crystal Ball Supplies:
- glass fishbowl shaped vase for a large crystal ball
- wax warmer from Dollar Tree (or another item that the jar can sit securely upside down on)- Here’s another wax warmer that would work.
- mini round candle jars for mini crystal balls- I used a pack from Michael’s that are in the wedding section. I got them on clearance years ago, but they’re still available. These would be perfect for creating a set of crystal balls for centerpieces.
- lighter- This one would work way better than the lighter I used. It won’t flick on and off.
- styrofoam skulls for mini crystal balls
- larger skull for large crystal ball- You can remove the head from skeletons from DT as well as rat skeletons.
- E6000
- 2″ terra cotta pots for mini crystal balls
- cheesecloth
- spiderwebbing (optional)


Paint the Small Pots
First paint the small terra cotta pots black. If you’re only making the large crystal balls, skip this step.

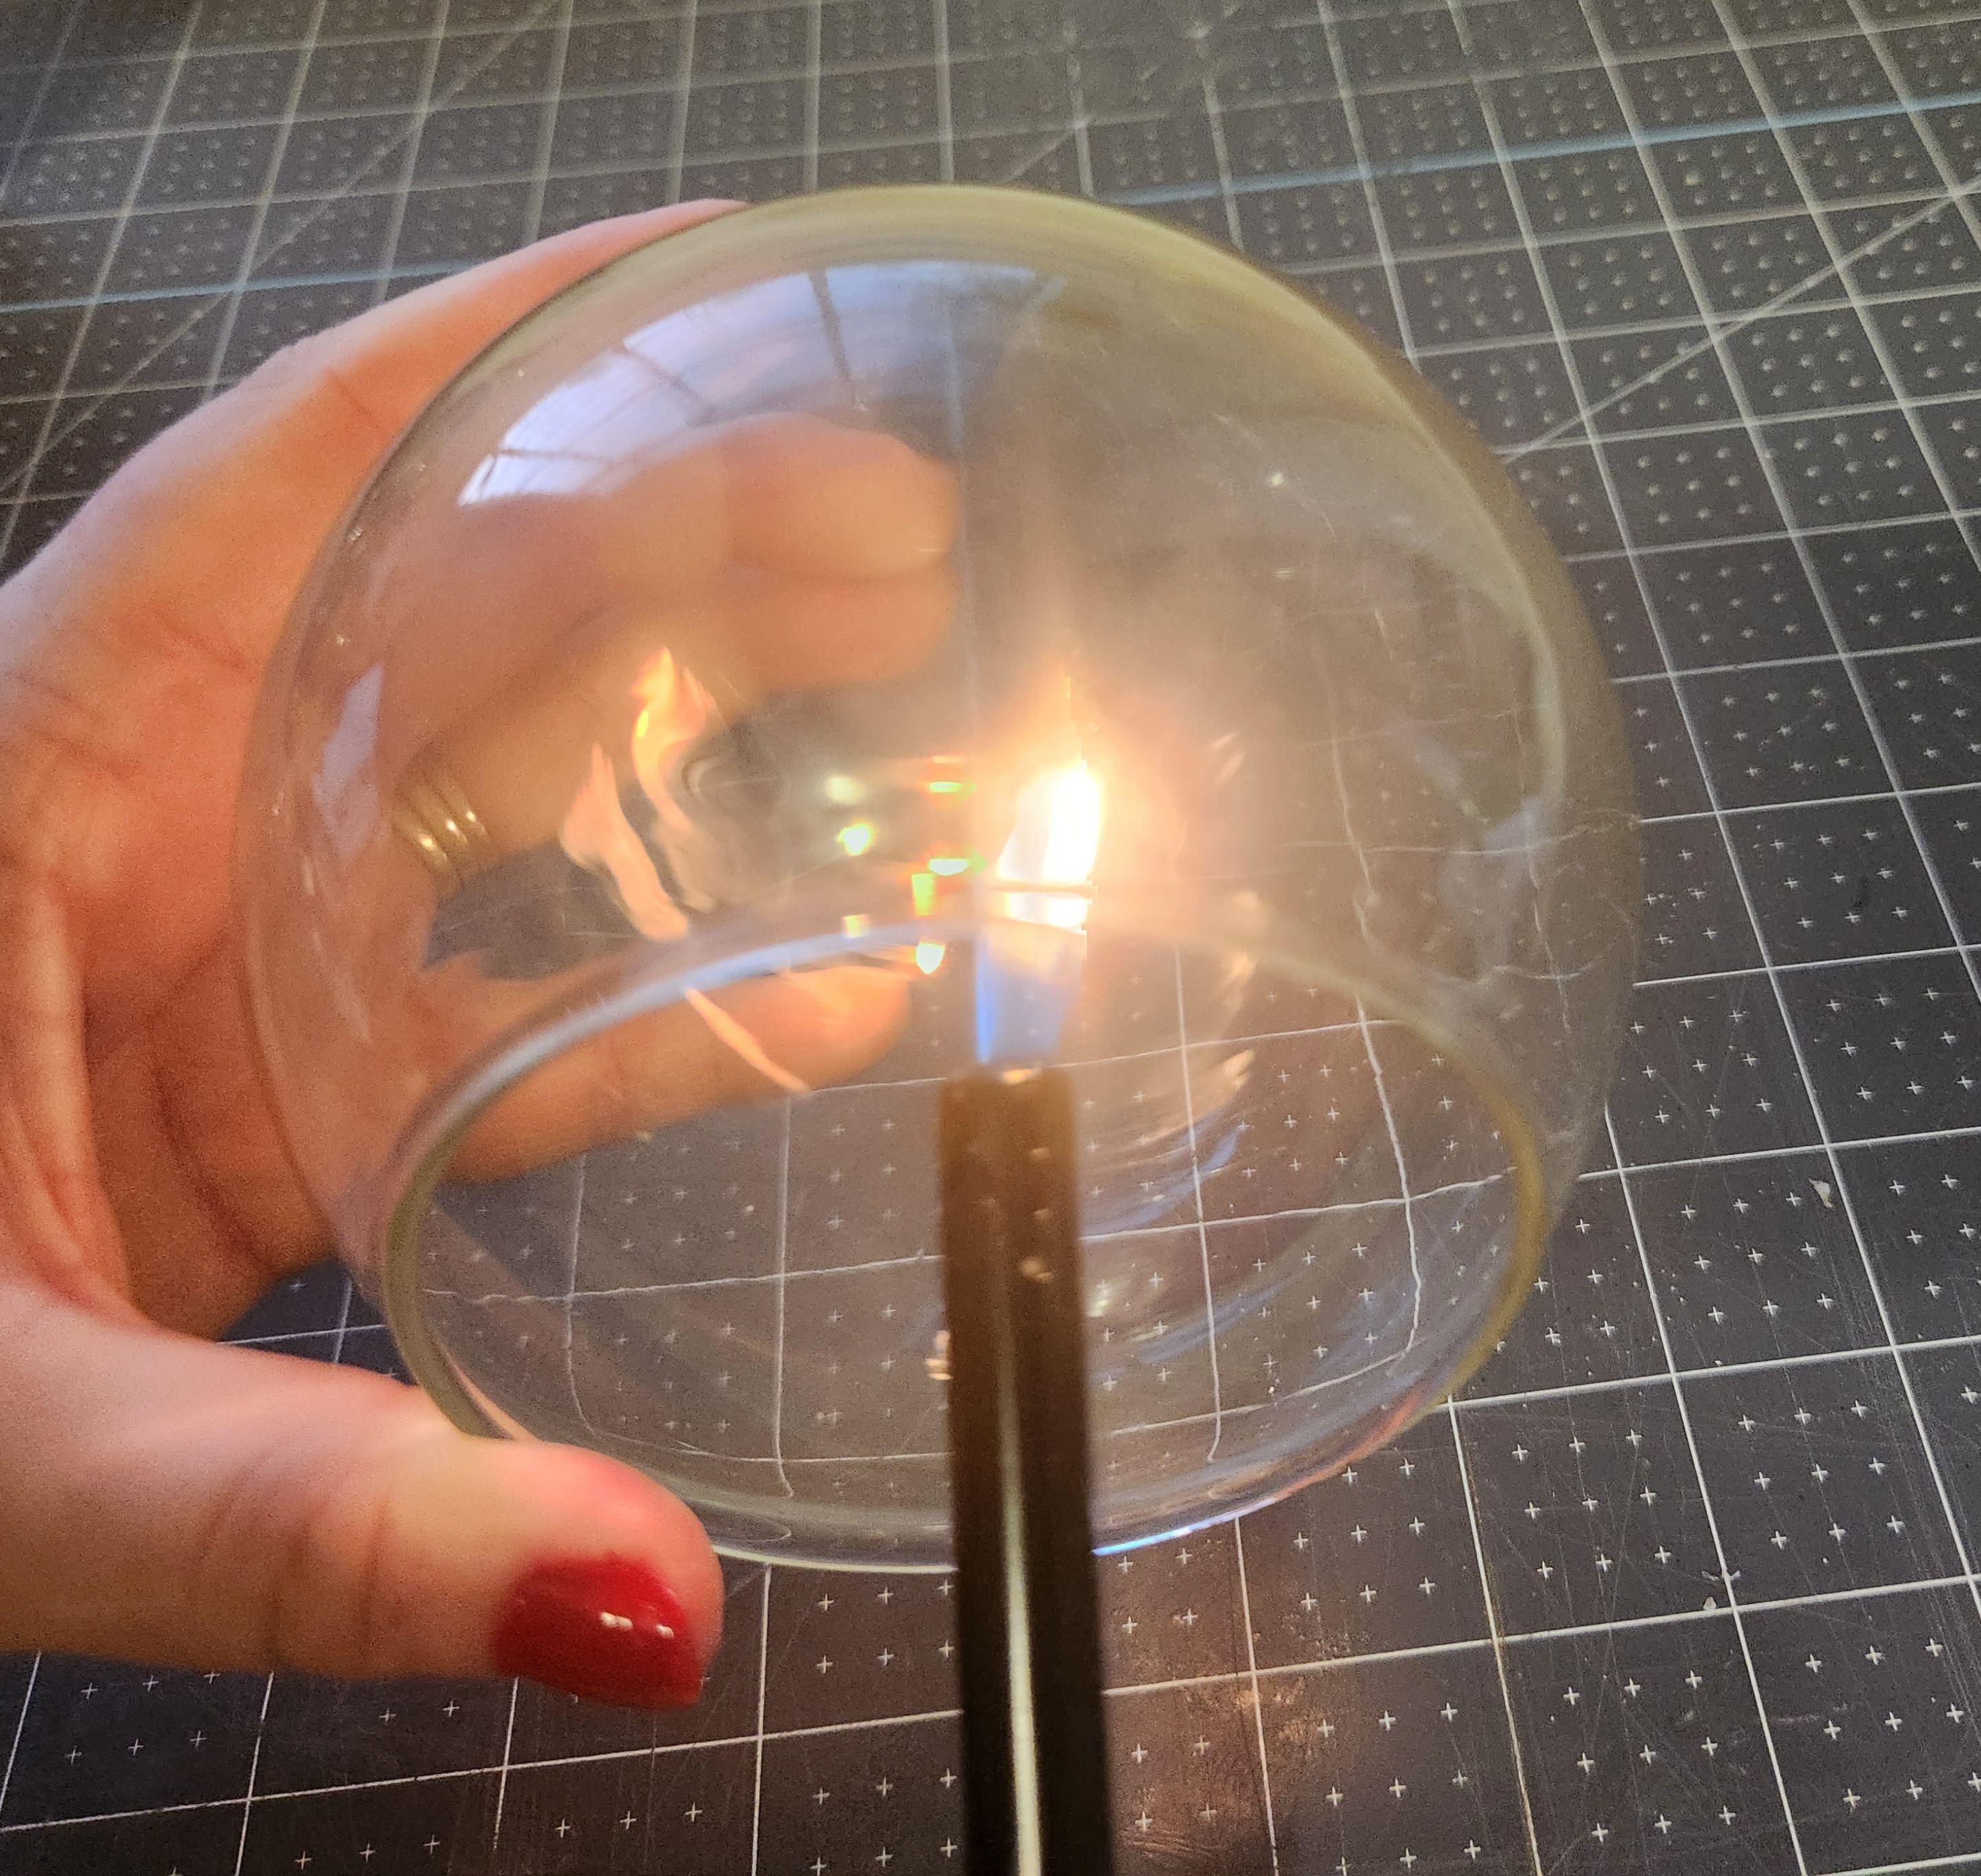
Smoke the Glass
First you need to make the glass less transparent. You want to create a spooky, smoky look like something is manifesting in the crystal ball. Use a long lighter or candle to do so.
Place the lighter inside the jar and it will create soot on the glass. Be careful because it gets hot really fast. Use a towel or potholder if necessary. I started by using a candle, but using a long lighter is much easier.

The process is the same for a large vase.
Assemble the Mini Crystal Ball
For my tiny vases, I used styrofoam glitter skulls from Dollar Tree. I tried using thread to attach it inside my vase at first, but you could see it. If you don’t have fishing line, however, it will work.
Press a piece of fishing line, about an inch or so long, in the top of the styrofoam skull. It will push in easily like a pin. I trimmed the fishing line in this photo down.

Fold the line so that you can place a piece of tape or hot glue flat on it.
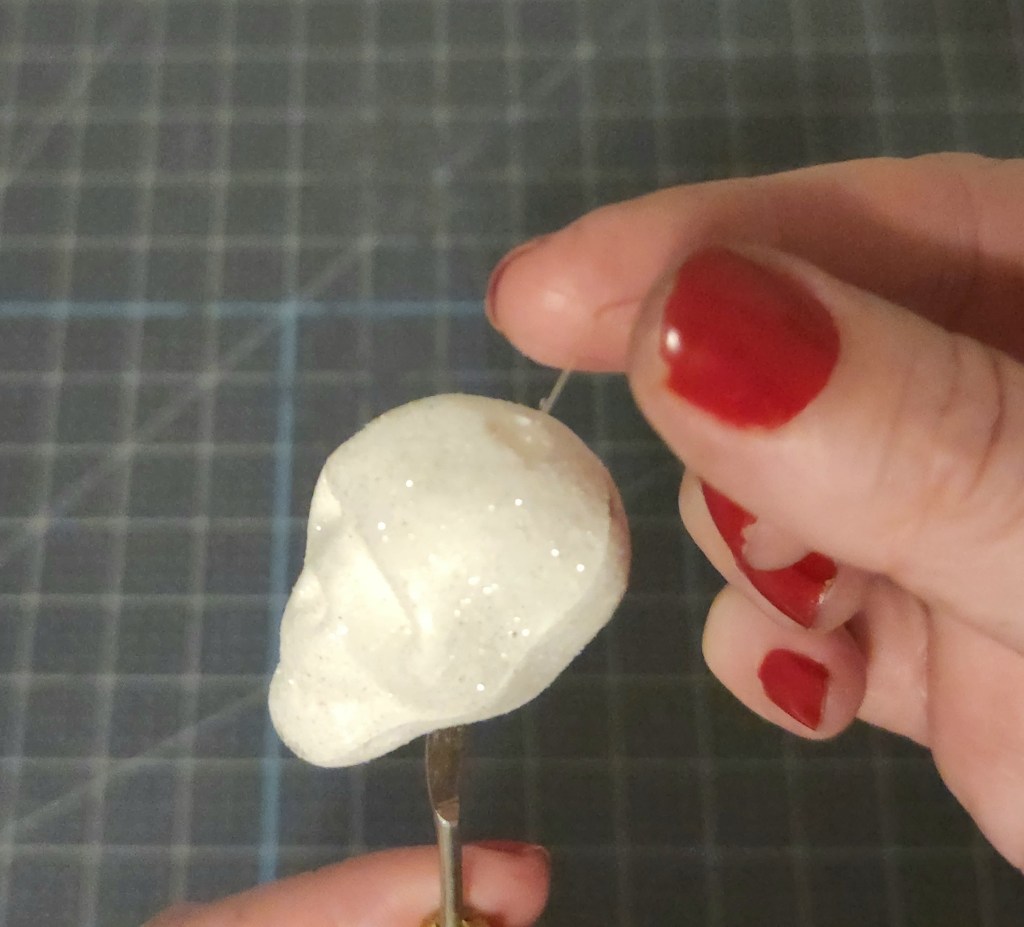

You can either add hot glue or tape to the bent portion of the fishing line.


It’s hard to get your fingers or hand inside the vases, even the large one. I placed a clay sculpting tool inside the bottom of the styrofoam skull to fit it inside the vase. Use the tool (a knife will do in a pinch) to place the skull inside the vase with the tape or glue on the fishing line. When I used tape, I used the other end of the clay tool to press the tape down.


Add E6000 along the top of the 2″ terra cotta pot. I used a BBQ skewer to spread the glue on. Finally sit the vase upside down on the glue. Now your mini crystal ball is complete!
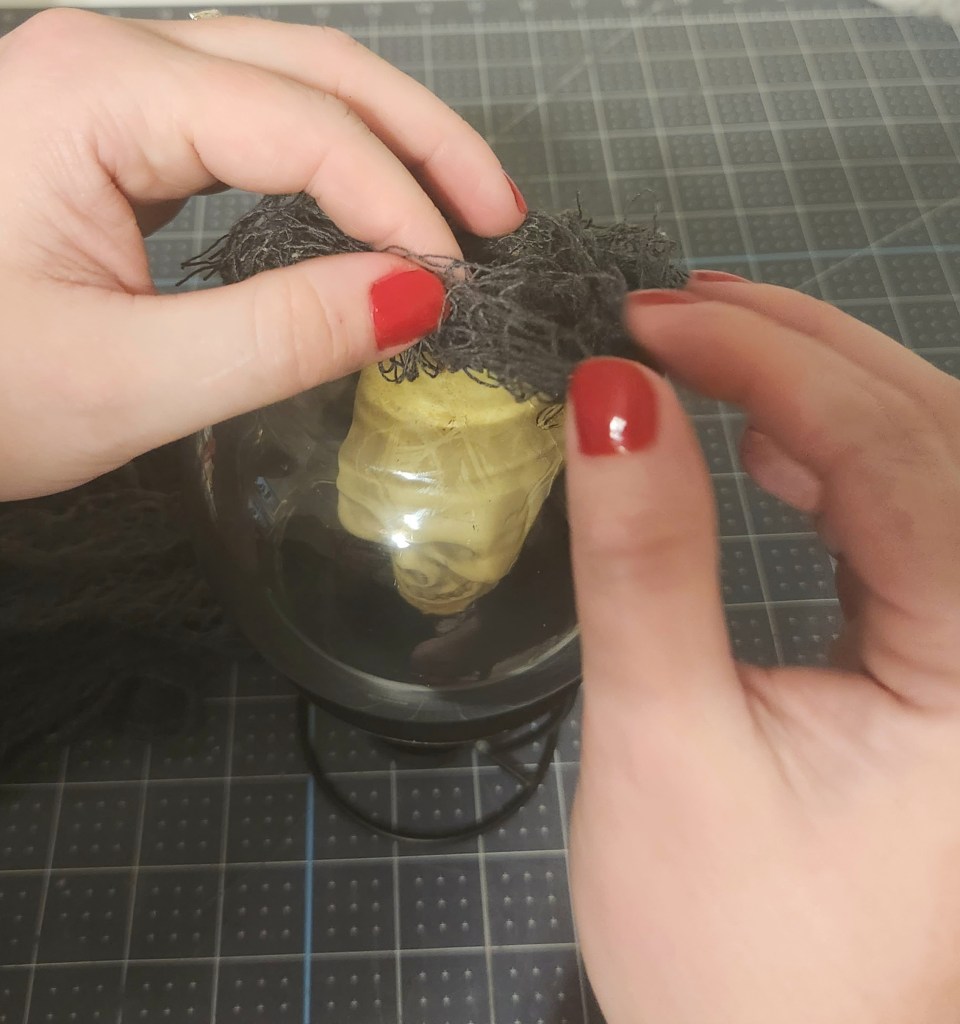
Add hot glue to the top of the crystal ball and drape cheesecloth, faux spiderwebbing, or both on top. You can place a plastic spider or other Dollar Tree bug on it.
Here’s a video for making the small crystal ball.
Assemble the Large DIY Crystal Ball
Remove the skull from the large skeleton. Just pull and it will pop right off.

If you’re using the larger round vase from Dollar Tree, you can use the fishing line method for this vase as well. But if you’re using the smaller one that’s about 4″ tall, you can just add hot glue to the round tab at the top that it hangs from. Once the glue is on the skeleton, place it in the center of the vase and hold it in place for a moment while the glue dries.

Add E6000 along the edge of the crystal ball.

Sit the vase on the iron wax warmer.

Add hot glue to the top of the vase and place cheesecloth or spiderweb on it. That will cover the flat bottom. To cover the candleholder at the bottom of the wax warmer, drape the cheesecloth in front of it along with some spiderwebs. You can add faux insects or styrofoam skulls or pumpkins to it as well.


That’s it! Your DIY crystal balls are complete!

How cute are these going to be sitting out for Halloween?!

I hope that you enjoyed this tutorial, and you make many adorable crystal balls this Halloween! When you to, tag me on social media because I would love to see them (@LifeasaLEOWife)! Keep reading to check out the other great projects shared by the bloggers on the Creative Craft Hop.
Remember to pin the image below or share this post with the buttons on the left side of the page so you can find it when you’re ready to start your project! Also, follow me on Pinterest for new ideas added weekly! Be sure that you never miss a great tutorial for decor like wreaths, signs and other home decor, free printables, crafts, and other fun posts! Enter your email address below to be notified of new posts! Use the buttons below to follow me on social media for other great content.

Creative Craft Hop
Next up on our blog hop is Carol over at Blue Sky at Home. You’re going to love her tutorial for how to decorate a vase with twine! After you check out her post, be sure to visit the rest of the ladies on the hop. They’re all so talented so you don’t want to miss the ideas they’re sharing this month! The links to their projects are on the right with their blog homepage linked on the left.
Carol – Blue Sky at Home | How to Decorate a Glass Vase with Twine
Tammy – Patina & Paint | Halloween Shadow Box
Gail – Purple Hues & Me | DIY Clay Fall Leaf Dish
Ann – Apple Street Cottage | A Denim Pumpkin Sign
Donna – Modern on Monticello | Scrap Wood Black Cats for Fall
Cecelia – My Thrift Store Addiction | Dressed Up Dollar Store Pumpkin Place Cards
Jenna – The Painted Apron | Haunted Halloween Mansion
Terri – Decorate & More with Tip | Faux Terracotta Pumpkin Tutorial
Sara – Birdz of a Feather | DIY Sewing Kit
Don’t go yet! There’s more to see!
There’s plenty more to see here on the blog! If you’re looking for something specific, use the search box in the sidebar to look it up. If not, you might enjoy these ideas. Don’t have time to read them all now? That’s ok, just click over to the posts using the pictures and pin them for later. You can also add Life as a LEO Wife to your favorites and check back for new ideas and free printables and SVGs every Wednesday, as well as link parties with tons of shared ideas on Sundays!


Niki, how cute are these?? I love them and pinning to make some soon! Thanks so much for sharing!
Thanks Tammy!
Fabulous! I’m so impressed by the details and how you added the soot; such a great touch!
Thank you! That glass heats up quick. I’m so glad none of the broke!
These are so creepy great for Halloween, great idea, love how creative you are!
Thank you!
EEK! Very spooky Niki! What a fun and clever project, I love how you smoked the glass what a great effect! I swear Dollar Tree has everything! Great idea, they turned out so creepy cute!
Thank you!
Very cute idea. Love that it is so inexpensive to make.
The definitely are. I had everything on hand except the bigger skeleton, so it was $1.25 for me!
What a fun idea, Niki! I love dollar store projects and these are so creative! Blessings, Cecilia @My Thrift Store Addiction
Thank you! DT decor is my favorite to make!
You have the best creative imagination, Niki! How cool is this for Halloween!
Thank you! All praise goes to God for any talent that He gave me. I didn’t start using any creativity until after I had to leave pre-med in college due to my illness. I never made less than an A in through my entire school life, so my creativity came as a shock to me later on lol!
Love a good Dollar Tree DIY! These turned out so cute! Love your creativity!
Thank you Donna!
This is such a clever project, Niki. Love the soot on the inside!
Thank you!
Looks fantastic. We aren’t overly crafty here but this looks like something even we could handle! #lilbitofeverything
Thanks! They are easy, especially the larger one. The hardest part is getting the fishing line on the little ones in the right place inside the tiny vases!
This is a great project to add a bit of spookiness to your fall/Halloween decor. Thank you for participating in Talent-Sharing Tuesdays Link-Up 34.
Carol
http://www.scribblingboomer.com
Thank you!
How creative! Thanks so much for linking up at the Unlimited Link Party 82. Shared.
Thanks Dee!
These are so elegantly spooky and remind me of Disney’s Haunted Mansion. Featuring when my link party opens!
Thank you! I’m honored!
Niki these are great! I love the smoked glass look! I hope you will stop by my weekly link party every week for a chance to be featured my friend!
https://www.ourtinynest.com/2022/10/05/wednesday-link-party/
Thank you! I’ll stop by!