
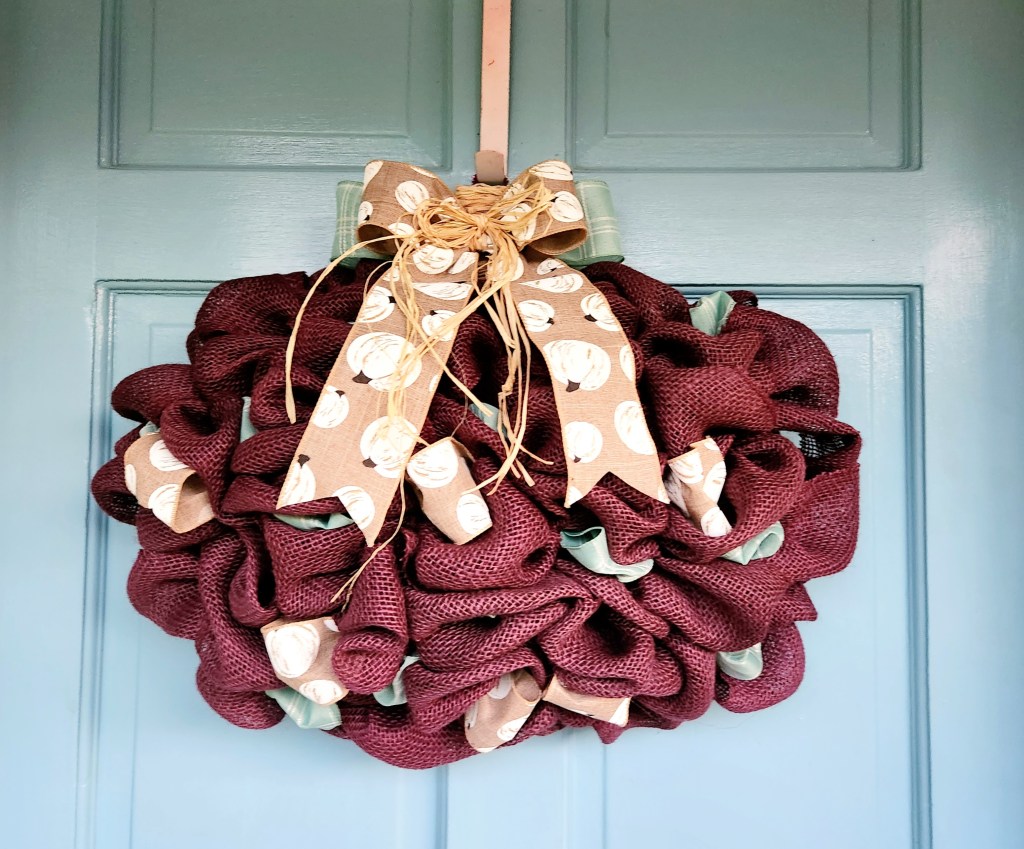
Welcome everyone! I’m so glad that you’re here today because it’s time for our Fall Crafts and Decor Blog Hop. I’m joining some other talented bloggers to bring you some great projects that you can use to decorate your home this fall. In this post I’m going to show you how to make an adorable bubble burlap pumpkin wreath that’s perfect to pair with fall farmhouse decor. You can easily customize it to fit your fall color scheme and style!

These are the lovely ladies joining me for today’s hop!
Beverly | Across the Blvd
Niki | Life as an LEO Wife
Gail | Purple Hues and Me
Allyson | Southern Sunflowers
Michele | Coastal Bohemian
T’onna | Sew Crafty Crochet
Julie | Sum of Their Stories
Disclosure: I am a participant in the Amazon Services LLC Associates Program and the Dollar Tree Affiliate Program, affiliate programs that allow me to link to the products that you can use to make this project quickly and easily. If you purchase any of these products I may receive a very small commission at no cost to you! That commission helps me continue to bring these great decor DIYs, free printables, and all of the other goodies on this site to you. Thanks so much for your support!
Burlap Pumpkin Wreath Supplies:
- pumpkin wreath form
- burlap- I used 4 rolls of plum burlap ribbon from Walmart (the tag says burgundy, but it is not!). This regular colored burlap comes with 2 30′ rolls, so it will be all you need.
- pipe cleaners cut in thirds- These will match regular burlap well. These will match the plum burlap I used.
- ribbon for bow & accents- This 10 pack of ribbon would be perfect for a farmhouse style wreath.
- raffia or other ribbon to cover the stem
- cardboard
- hot glue gun & glue

Oh give thanks to the Lord, for He is good, for His steadfast love endures forever!
Psalm 107:1
Attach Burlap to the Pumpkin Wreath Form
Pinch the burlap together about 2″ from the end. Place it on the wreath form where the first inner wire meets the bottom wire.

Pinch another section of burlap about 8″ down and attach it to the outer wire with pipe cleaner, opposite the pipe cleaner you just added. You will be able to slide it down the wire to the bottom.


You’re going to add the burlap to the form by attaching one pipe cleaner to the inner wire then one to the outer wire, back and forth. That will form the bubbles. Attach your next pipe cleaner on the inner wire. That will form the second bubble. Slide it down to meet the other one.

Note: you can change the amount of burlap that you leave in between the pipe cleaners. I like 8″ because the bubbles are less floppy. You will make the fall pumpkin wreath fuller by moving the pipe cleaners down in order to add more bubbles to the form.
Continue Adding Bubbles
Attach the third pipe cleaner to the outer, forming the third bubble. In this photo you can see how it looks when you slide the burlap down to meet the other bubbles.

Keep moving up the first column of the pumpkin, placing pipe cleaners on opposite wires. The last section of burlap you attach with pipe cleaner should be on the first inner wire, not the outer wire. Here are my last two placements in that column.


Move to the Next Column
Add the burlap bubbles to the next column just like you did in the first. Gather another section of burlap and attach it where the top wire and the second inner wire meet.

Create another bubble and secure it to the first inner wire, between two of the pipe cleaners you already added.

Continue adding bubbles until you reach the bottom wire. Like at the top of the first column, your last bubble will be added to the second inner wire.
Ending & Starting a New Roll of Burlap
Whenever I moved into the third column, I was at the end of my first roll of burlap. Move into the third column, attaching the burlap to the third inner wire.

If you’re out of burlap now, or whenever you do run out, just secure it where it ends. Start a new roll and add it to the pumpkin wreath across from the end. In my case I started it on the second inner wire in the third column.

Continue adding burlap this column. I added more bubbles in the three inner columns than in the outer ones to give my fall wreath more dimension.

Fill the Pumpkin Wreath with Bubbles
Continue adding burlap to the wreath form until it’s full. Here’s a video of me filling half of my form. I figured you didn’t need to watch me fill the entire form with burlap because you’ll get the gist in this ten minute video.
Create & Cover a Longer Stem
Since the bubble style burlap wreath will be extra full, the short stem on the Dollar Tree pumpkin forms will be too short to see well. I created a longer stem by cutting a piece of cardboard to fit over it. Trace the stem on a piece of cardboard, cut it out with a utility knife, and hot glue it to the stem. Wrap the stem in raffia and hot glue it in place.


Here’s a quick video.
Embellish with Ribbon Accents & a Bow
If you’d like to add a little more to the body of the pumpkin wreath, you can embellish it with ribbon. All you have to do is push a bubble of ribbon between the burlap ones. I left my ribbon in one piece so I can remove it and use it again if I want to. If you want a lot of ribbon, you can attach it with the burlap as you add it to the form.


I also added a second ribbon, but I didn’t have much of it. So, I cut pieces about 6″ long and added them into the wreath.

Make the style of bow that you’d like to add. I made a simple two loop bow with long dove tailed ends and put a two loop bow made with the mint ribbon behind it. Finally I rapped raffia around the pipe cleaner that I secured the bow with and tied it in a bow.

Finally, attach the bow to the wreath.

That’s it! The burlap pumpkin wreath is ready to hang for fall!

I hope that you enjoyed this fall wreath tutorial! Remember this is part of our fall craft blog hop, so keep reading to see what the other ladies on the hop have to share with you!
Remember to pin the image below or share this post with the buttons on the left side of the page so you can find it when you’re ready to start your project! Also, follow me on Pinterest for new ideas added weekly! Be sure that you never miss a great tutorial for decor like wreaths, signs and other home decor, free printables, crafts, and other fun posts! Enter your email address below to be notified of new posts! Use the buttons below to follow me on social media for other great content.

Fall Craft & Decor Hop
I’m so excited to see what the other ladies on the blog hop have to share! They’re all talented, so I know you’re going to love their ideas! With all of my blog hops, I share their main blog page on the left with their name and the link straight to the project on the right with its name.
Beverly from Across the Blvd. | Quick and Easy Fall Tray Centerpiece
Gail from Purple Hues & Me | Loopy Yarn Wrapped Pumpkin
Julie from Sum of Their Stories | Autumn Quote Cross Stitch Design
Allyson from Southern Sunflowers | DIY Painted Farm Truck for Fall
Michele from Coastal Bohemian | Watercolor Sunflower Pillow
T’onna from Sew Crafty Crochet | Fall Gnome Scarf
I hope that you enjoyed today’s projects! If you’re looking for more fall decor ideas to pin, you might enjoy these (or use the search box in the sidebar):


The textures on this pumpkin wreath are fabulous. It looks like you had fun putting it together too. It looks great!
Thank you! It was fun.
Your bubble pumpkin wreath is too cute, Niki! I love the color! I’ll have to add this to the many ways of decorating a wire pumpkin!
Thank you! I think I have 7 different pumpkin wreath form ideas on the blog now!
Your wreath is super cute! That plum burlap is sooooo pretty, and I really like the pumpkin ribbon!
Thank you!
Beautiful pumpkin wreath! I love the way the burlap bubbles look to create the pumpkin. Your wreath looks great against the color of your front door, too! Pinned to one of my fall boards.
Thank you! I’m hoping to repaint the door soon. We bought the house in May and the previous owner didn’t sand the door down before repainting, so it’s quite messy in places. Laziness doesn’t pay off lol.
I love the colors you chose for your pumpkin wreath, Niki. It turned out so pretty and your tutorial is great.
Thank you! They are colors that come from a table runner I bought from Target a few years ago. They’re what I’m using as my color scheme for early fall.
I love the color choice for this wreath. It’s a great welcome piece. Pinned!!
Thank you!
Niki this came out so cute! I’ve never seen a bubble wreath!
Thank you! Bubble burlap is just the term for burlap wreaths that you see, even with the round wreath forms where you have small bubbles of burlap come through the form, then another next to that one, and so on.
The burlap pumpkin is an attractive alternative to a traditional wreath. I really like the colors you used.
Thank you for participating in Talent-Sharing Tuesdays Link-up 33.
Carol
http://www.scribblingboomer.com
Thank you!
I love this idea #alittlebitofeverything
Niki,
I love your wreath. I bought those wired pumpkins last year but made mine different. Yours is a great idea. Congratulations, you are being featured on Thursday Favorite Things. https://www.eclecticredbarn.com/2022/09/ghosts-and-thursday-favorite-things.html
I hope you stop by.
Hugs,
Bev
Thank you so much!
Looks nice, I love burlap! Thanks so much for linking up at the A Themed Linkup 121 for Fall Crafts and Décor. Shared.
Thank you!
What a fun and creative fall pumpkin project Niki. I love the rich purple colour too!!
Thank you for sharing your burlap pumpkin wreath DIY at Create, Bake, Grow & Gather this weekend. I’m delighted to be featuring it at tonight’s party and pinning too.
Happy fall,
Kerryanne
Thanks Kerryanne! I’m honored!