When I started out with my Cricut, it was a bit daunting. I saw so many beautiful things on Pinterest, and when I tried something, it certainly didn’t turn out the way those projects looked! I’ve had my machine for five years now, and I’ve learned a thing or two about using it. In this tutorial I’ll show you how to create a split letter monogram, a capital letter with a name in the middle. I’m so glad that my back to school teacher’s door hanger is featured on Creative Jewish Mom, and if you’re looking for that post click on the link here. It was linked to this post.
This tutorial will be a bit different than most. I’ve seen others that just show you how to cut a section of the letter out and pop in the name. That’s fine and dandy, but I’ve noticed that it can look a little weird with most of the letter missing. Especially with letters like K, S, and H where the middle is pretty important. So here I’ll show you how to cut the letter, but also to make it into two different sections that you can move further apart and/or closer together. You can choose to skip the last part if you’d like though. It’s all about your preference.
Open Design Space & Enter the Letter
First open up Cricut Design Space, and create a new project. I do have the Cricut Access subscription which is $7.99 a month, and gives you a ton of images and fonts that you can use in your projects. I didn’t have it for years, but once I got it, I started making a ton of stuff and wondered why in the world I didn’t do it before! If you don’t have it, you can still do this project easily, you’ll just use a different font that’s free, download a free font from a site like Da Font, or pay a one-time price to buy a font in Design Space. For a split letter monogram you’ll usually want a fancy font and a more plain one to compliment it.
Now let’s get started. On the left side of the screen click “Text” and enter your letter. In my case I was creating a sign for my son’s teacher, Mrs. Harris, so I entered H.

When you enter the letter it won’t be in the font that you want, so it’s time to change it. Click on the drop down arrow under “Font” next to the current font name. Scroll through the fonts until you find the one that you want to use for your letter. Feel free to try them out, changing them until you find your favorite. I chose Vintage Curveball.

You see the size of my letter is changed, but you’ll do that in the next step.


Next drag your letter to the size you’d like. I made mine 5.5″ because it fit the sign I was creating. You can do this by dragging the arrows on the bottom right of the letter that’s shown when the letter is selected, or by entering the size you want in the size box on the top task bar in the middle.

Slice the Letter for the Split Letter Mongram
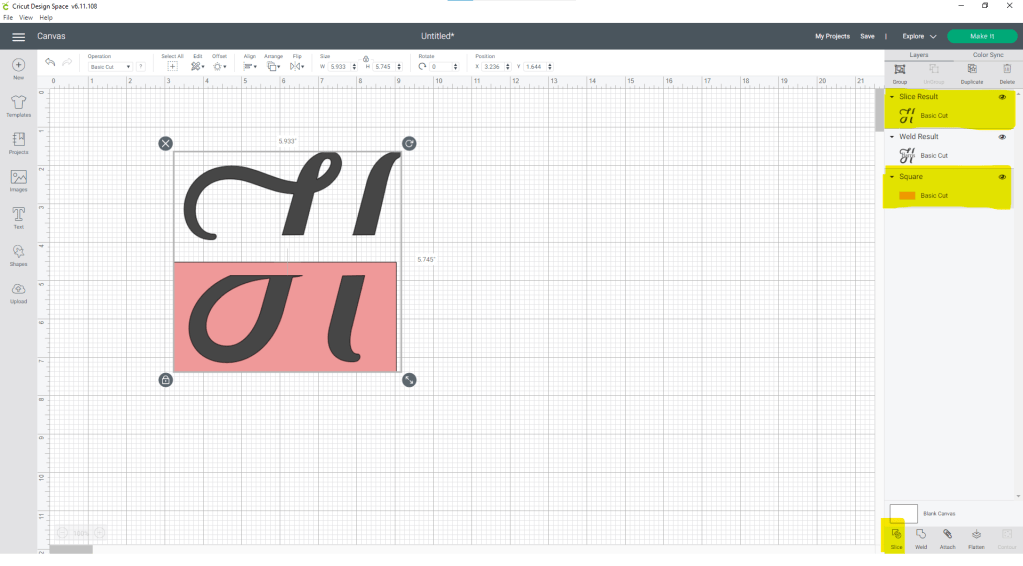
“Slice” out a piece of the middle of the letter.
Once your font is right and your letter is the correct size you’ll need to add a square which you’ll use to slice your letter in half. On the left task bar click “Shape” and choose the square.

When the square appears, select it if it isn’t already, and click the lock button on the bottom left of the shape. This will allow you to change the width and height separately. If you don’t do this, you won’t be able to make it wider than it is tall. It will remain a perfect square.

Using the arrow button on the bottom right of the shape drag the square into a long, thin rectangle. You want it to be wide enough to take out part of the middle where the name will go. This is where my tutorial differs from most. Most people make the letter as tall as the need it in the end, then take out a square that is big enough for the name to fit in. I don’t really like that look; I feel like too much of the letter is missing like that. So I cut out a smaller portion, then make the letter two parts that can be moved independently. You can see I made my rectangle 1.056″ tall. Place the shape over the part of the letter that you want to remove to place the name in.

Once your rectangle is over your letter, select both pieces by clicking on each while holding down the shift key. At the bottom right of the screen you will see buttons that say slice, weld, attach, etc. Click the “Slice” button. When it’s sliced, you’ll have many pieces. You can delete all of them except the top and bottom of the H.

“Slice” the letter into two pieces.
This is the second step that I do so that I have two pieces of the letter that I can move up and down, separately around the name. I just think it looks better than having tiny pieces of a letter sticking up from top and bottom of the name. If you prefer, you can just complete the above step, make your rectangle the size you want your name, and move to the next step. However, I feel like this extra step makes your design look so much better!
Now add another square just like you did above. This time, make it the same size as the bottom half of your letter. Do that by putting it over your letter and dragging the arrow from the bottom right of the shape until it covers the entire half. You can put it over your letter and make it go behind it by clicking “Arrange” in the top task bar, then click “Send to back.” That way you can see the letter and make sure the square covers it.

Select both pieces just as you did before, and click slice. You will again have many pieces as you see below. Delete everything except the top and bottom of your letter.

Now you can freely move each half of the split letter monogram.

Add Name to the Split Letter Monogram
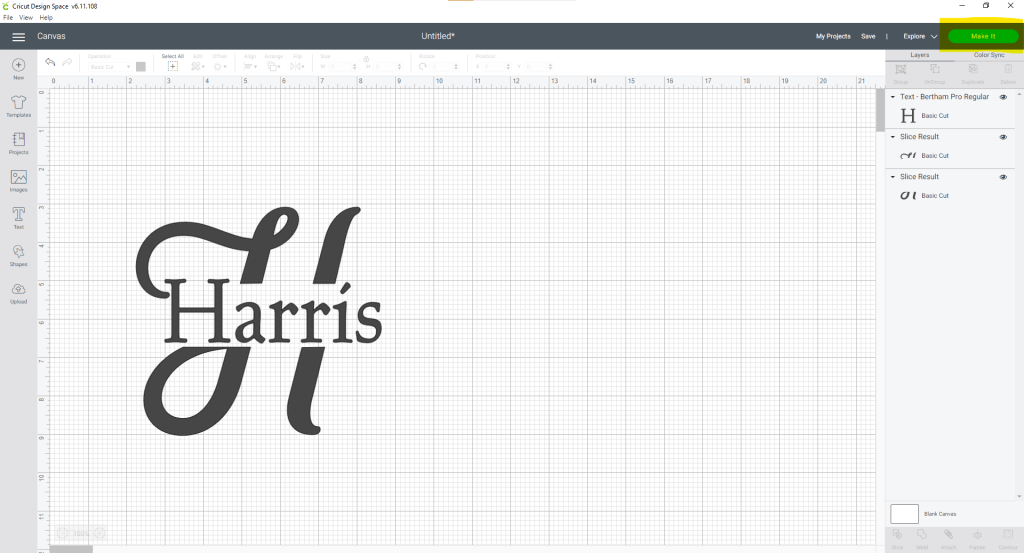
The letter is split, so now it’s time to add the name to it. Click the “Text” button on the left side of the screen and enter the name in the text box.

The font will be the same one used for your letter, so we need to change it. Since I used a script font for my letter, I changed the name into a more simple font. You want to use fonts that are different, yet compliment one another. I chose Linotype Rowena Pro Medium for my name. Change the font just like you did for the letter; select the text, click the font box, scroll until you find your chosen font and select it.
Move the name into the middle of the split letter monogram. Move the top and bottom of the letter until you are happy with the distance between them and the name. I chose a font with the cross bar in the H in Harris high up so that I could have the beginning of the name almost right against the loop-back of the H. That’s another reason I like to cut the letter into two pieces, because had I not, I wouldn’t have been able to control exactly where those loops went.

The final step in creating your split letter monogram is to weld both the pieces together. Select the letter and the name and click “Weld” button at the bottom right of the screen. If you’d like to change the size to use for different projects or if it’s just not the size you want, you can use the arrow on the bottom left of the design or entire the dimensions in the size box.

Make It
Now your design is complete, and it’s time to cut it out. Click the green “Make It” button on the top right of your screen.
If you’re cutting your split letter monogram with anything other than heat transfer vinyl (HTV), like regular vinyl or cardstock, place your medium on a cutting mat. Turn the dial on the machine to whatever your cutting and click the green “Continue” button at the bottom right of the screen.
If you are using HTV, there will be one more step to complete before clicking continue. On the left of the screen, under the preview of the mat, click the toggle button under “Mirror.” This will cause the Cricut to cut the design backwards. If you don’t do this, when you iron it on your project, it will be backwards. I’ve wasted vinyl a few times by forgetting to mirror the design!


Place the mat into the machine by sliding it under the tabs on each side of it and click the flashing arrow button while pushing forward with gentle pressure on the mat. Cut the flashing “C” and the machine will begin cutting. When it is finished, the arrow will begin flashing again. Press it and your Cricut will eject the mat.

Project Complete!
Your split letter monogram design is complete and your image is cut. If you need a tutorial on how to weed and apply your design, stay tuned! I will be posting a tutorial on how to make a sign as a back to school gift for your child’s teacher tomorrow. Actually the sign can be used for anything: as a gift as wall art or other home decor.
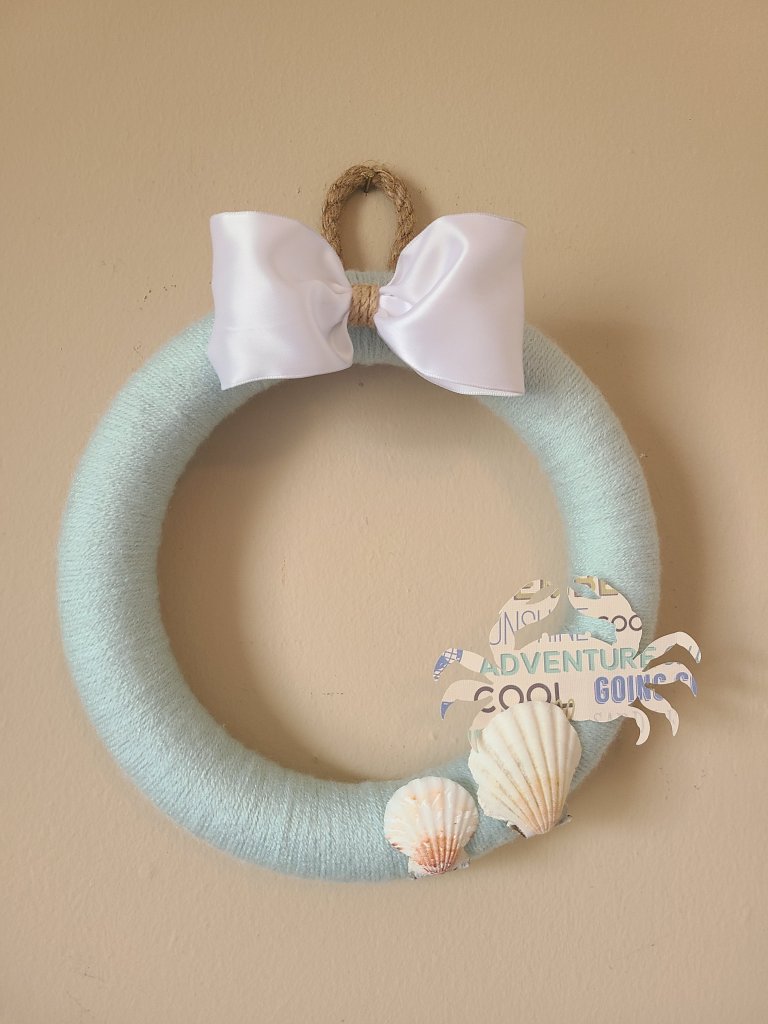
You can check out this post for a tutorial and free SVGs, one for “Maverick” and one for “Goose,” to make matching Top Gun shirts for two special people in your life. I made them as matching father/son shirts. That tutorial will show you how to use HTV on clothing. This “Prayer in Progress” sign will show you how to use regular vinyl on a sign. If you’re planning on cutting cardstock or another type of paper, this post on creating a yarn wreath with paper embellishments decorating it will teach you how to do that. You can make this large farmhouse style sign with your Cricut for $2 if you already have vinyl or cardstock! Dollar Tree now carries vinyl and packs of cardstock now, so you could easily make it for $4 if you have nothing!


Make sure you don’t miss the sign tutorial for using this design by entering your email in the box in the sidebar so that you get an email each time I upload a new post. You will never get junk mail! Use the buttons at the bottom of the page to follow me on social media and to share this Cricut tutorial. I’m just now trying to grow my site’s social media, so I’d love a follow. Let me know in the comments if you do, and I’ll give you a follow back!
If you’re one of my blogger friends, make sure you submit your family friendly posts to our link parties, Happiness is Homemade, You’re the Star Blog Hop, and Traffic Jam Weekend. Not a blogger? Make sure you check out those posts to find tons of great ideas and inspiration for things like wreaths, DIYs, crafts, home and seasonal decor DIYs and ideas, family tips and ideas, recipes, fashion, gardening, Dollar Store projects and much more!


The split letter monogram came out really cool. You are so creative and very talented, Niki! Thanks for linking with me!
Shelbee
http://www.shelbeeontheedge.com
Aww, thanks Shelbee!
Great tutorial! This is something I’ve been meaning to try. Thank you for sharing at Party In Your PJ’s.
Thank you! I’d love to see your project if you try it!
I am so happy to have this post featured! Thanks for hosting & featuring me Barbara!
Hi Niky! I have a Cricut and still have yet to really use it much… I LOVE the split monogram and it’d be fun to make something with a “C” and maybe Christmas for the horizontal. Of course I saved your post! And I did share it at last week’s Share Your Style #314. I just didn’t get back over until today to say hello.
Hope you are enjoying this final month of summer as we head into fall,
Many hugs,
Barb 🙂
Thanks Barb! I did see the feature & I shared your party on social media. I think I may have tagged your page on Facebook. At least I always try to tag when I share them. I always share the parties with the features. Thanks for coming by to let me know and again for featuring my tutorial!