
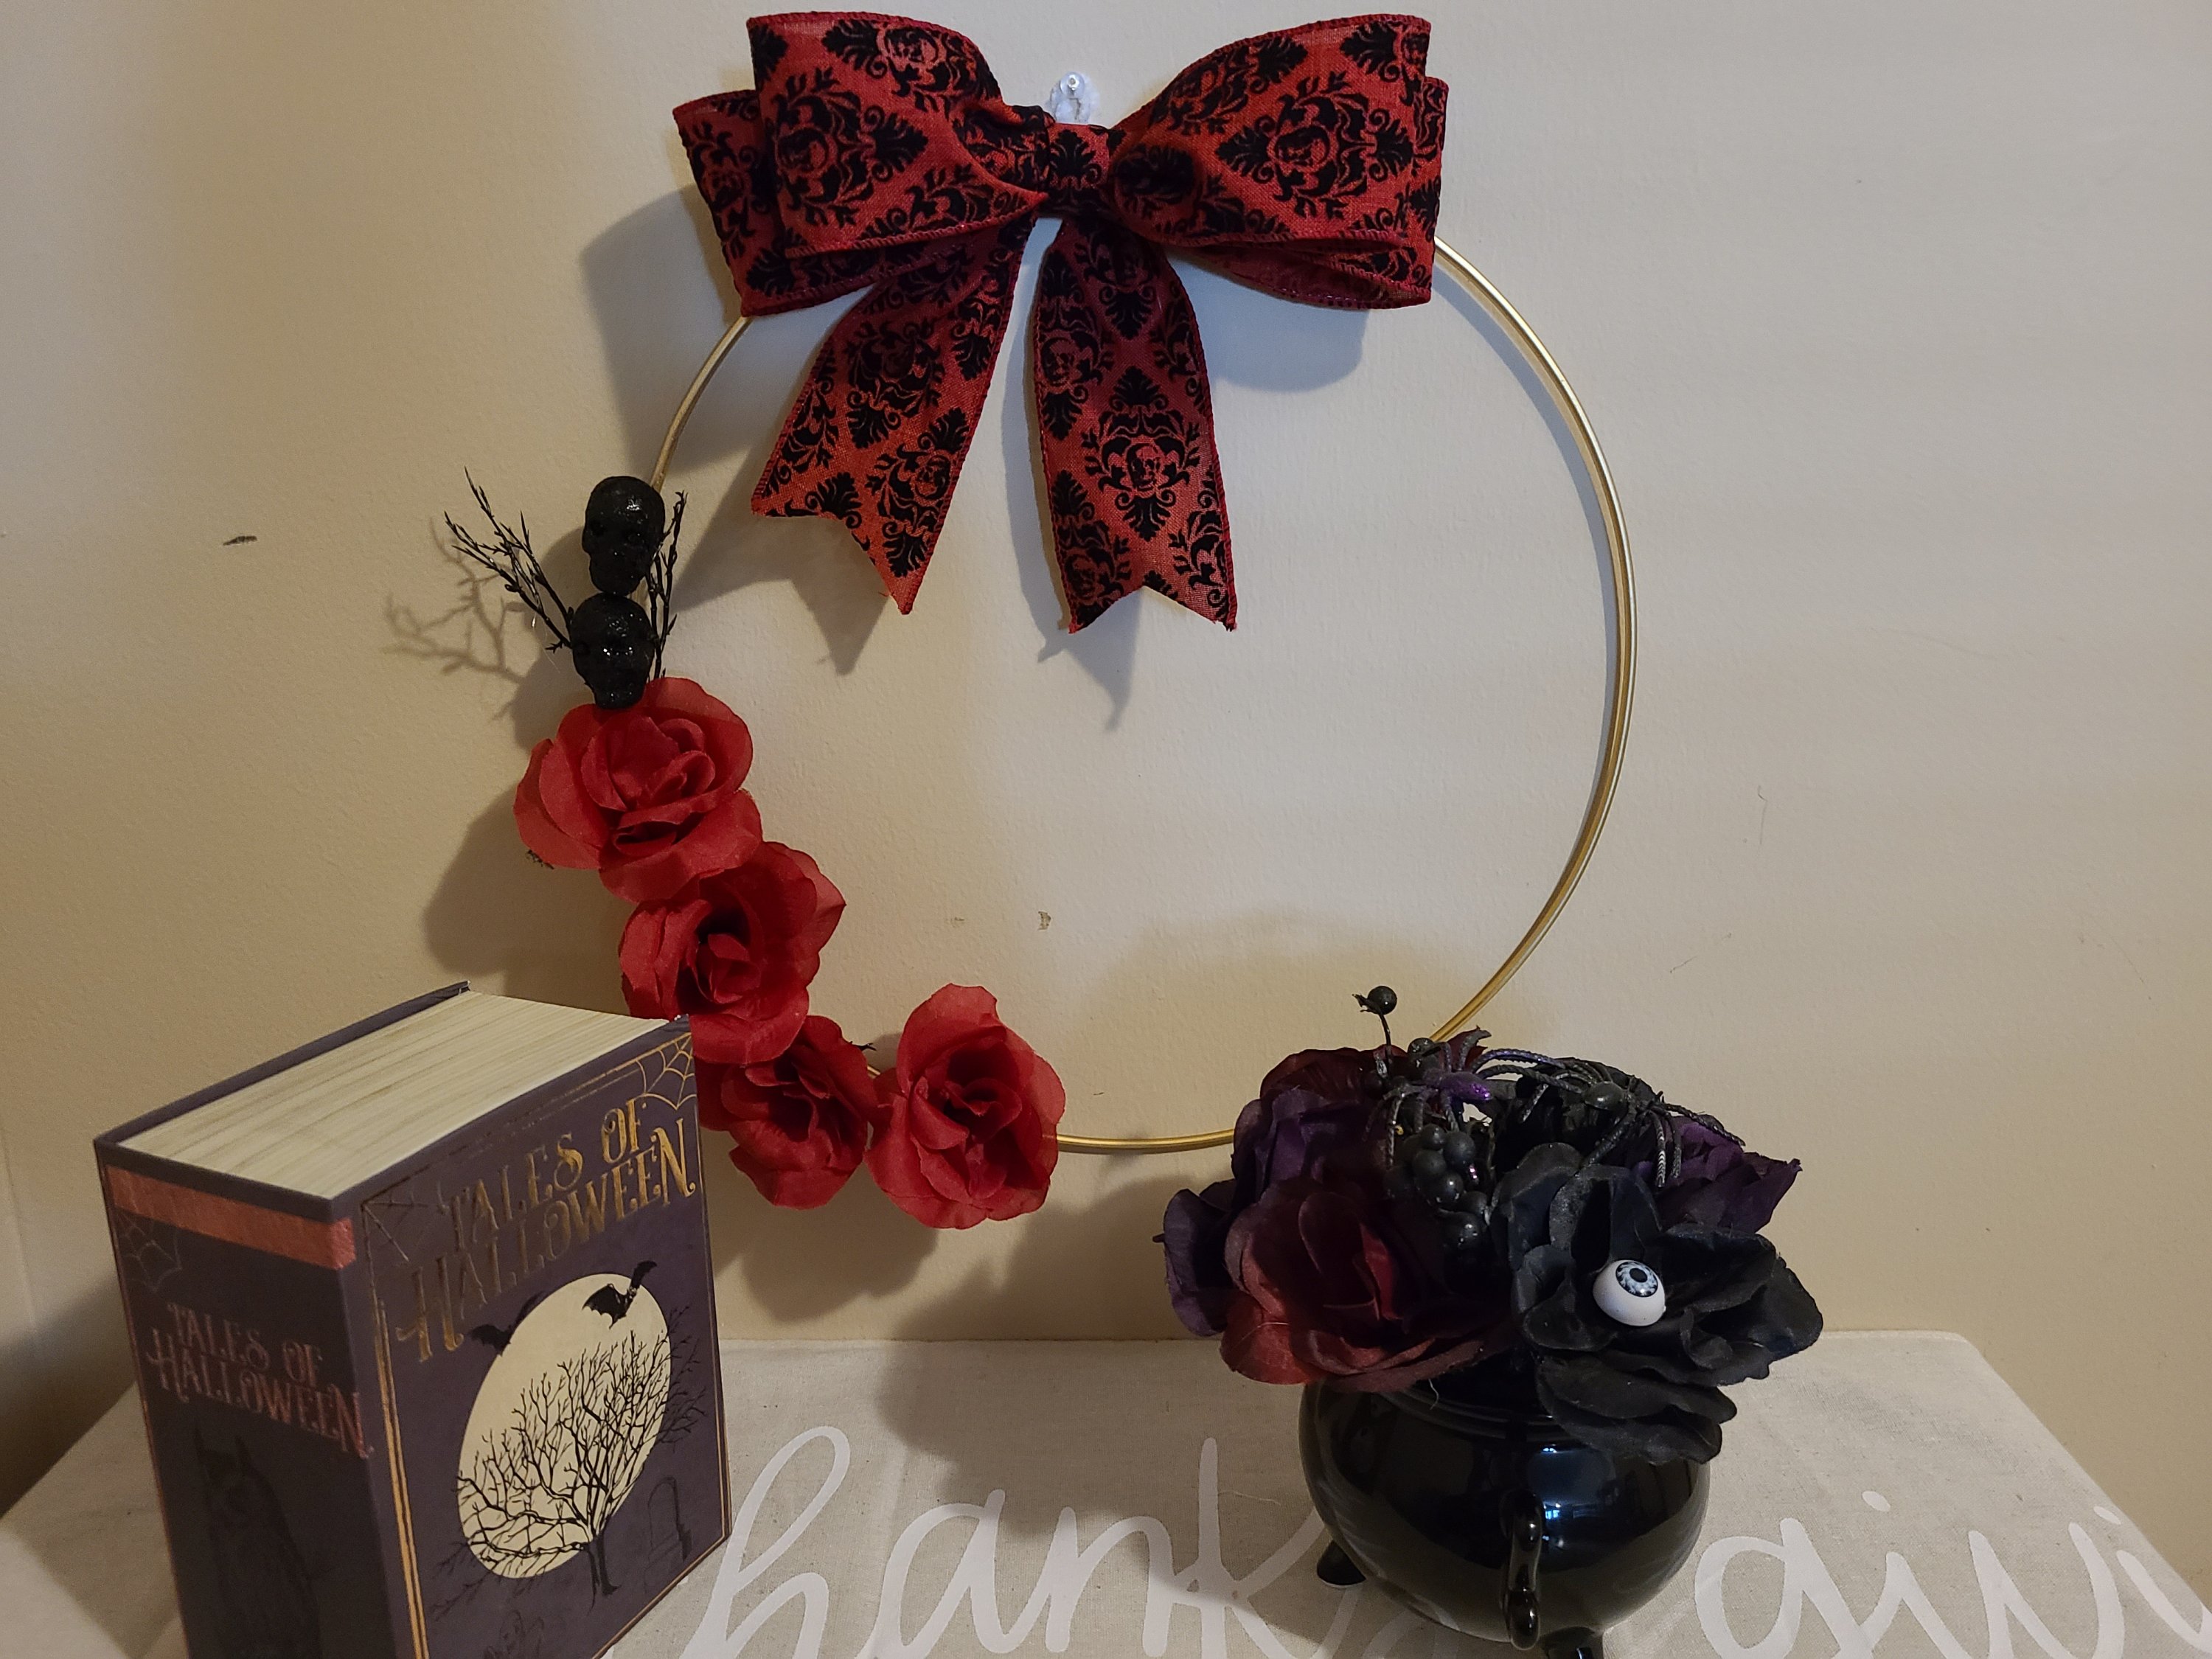
I have seen so many hoop wreaths on Pinterest, and I have been dying to make one. This year I am going with a burgundy, black, and gold for the dining room. I’m basing it on a burgundy ribbon with black velvet skulls with embellishments around it. I made this beautiful and elegant Halloween hoop wreath, and today I’m sharing with you how to make it. This is perfect for an adult Halloween party!
To make your own Halloween hoop wreath you need:
- 14″ gold hoop wreath- I got this one at Michael’s along with a 19″ one.
- 1 stem of burgundy roses (they look to be a mix between burgundy/scarlet.) from Dollar Tree. I bought 2, but each stem has 4 roses and 2 black glitter skulls, and that’s all I used on this.)
- 2.5″ wired ribbon to match the roses- I used burgundy with velvet skulls and embellishments on it from Michael’s.
- hot glue gun and glue
- scissors

Add Flowers to the Hoop
To start you’ll need to remove the sticker label on the roses. Mine pulled off pretty easy and I just scratched off any extra stickiness with my finger nail. Decide if you want to leave the wire “stem” or just pull the flowers off of it. At first I tried leaving the stem and using a pipe cleaner to attach it to the hoop. That did NOT work out at all. The wreath is very slick so the stem kept sliding around, up, down, any way it could go. So after many failed attempts, I pulled the flower off the tip of the stem.
It’s really easy to pop the flowers right off the stem. Place a dab of glue on the form where you want to start the floral arrangement. I wanted mine to end about 2 inches from the bottom center, so I glued my first flower at eight o’clock on the circle. Put the glue closer to the inside of the ring than the outside. To determine where to put it, hang the loop from anything and hold the flower on it. You want to make sure it’s not too far in or out. You want to see the flower alone, not the bottom of the flower and all the glue. Placing the glue on the wreath form worked better than putting the glue on the bottom of the flower. Continue putting the flowers on, making sure to cover any blank spaces between them.

Add the Skulls
On the picture above the skulls are already glued on while I glued the rest of the flowers. That’s only because I pulled everything apart a few times before I liked the results. Perfectionism is a pain! Once you’re done with the flowers, slide the black branches that are on the stem with the skull to about 3/4″ from the skull. Now cut just below the branch. Add a dab of hot glue on the junction of the branch and stem to hold it in place.
Place the skull where it meets the top of the petals of the top flower. Glue the stem to the hoop, making sure to hold the skull and stem in place for about 30 seconds while it dries. Next cut the other skull from the bunch, but not the branch. You have to cut it because the skulls aren’t attached the same way as the flowers. Put a dab on the back of the skull and place it where the bottom of this skull meets the first one. I made my skulls face is slightly different directions, and I think it looks great.

Make & Add a Bow to the Halloween Hoop Wreath
For the final touch, make a bow with your ribbon. For this wreath I make a double bow, a bow with four loops. I left 4″ tails on it, but I think I would leave them a little longer if I made another one.

All that is left now is to decide where you want your bow to go. I kept holding it at the top, then the bottom, back and forth trying to decide what I liked best. That went on for about a solid 5 minutes, ha! With this type of bow, putting it on the top looks best. Put some glue on the center of the back, and press it on the hoop. Diagonally from the top of the skull to the exact middle of the bow is about 9″ on my wreath. You can adjust it accordingly on yours.
Halloween Hoop Wreath Complete!
Now you have the most gorgeous Halloween hoop wreath you’ve ever seen! And no, you’re not biased because of your hard work!

Halloween & Fall Decor
If you are a huge fan of decorating for Halloween like me, you will probably like these tutorials: this Halloween cauldron centerpiece, this Halloween pumpkin wreath, this DIY creepy gravestone, and this upcycled Dollar Tree sign. You can also take a look at my Halloween master bedroom decor.


You might like these other fall decorations & wreaths: Dollar Tree pumpkin wreath, Dollar Tree fall doormat, burlap & lace pumpkin wreath, & this beautiful fall door hanger pair, wreath & hanger.


I hope that you’ve enjoyed this tutorial and that you’ve found DIY decor that you love. Make sure to pin the posts for when you’re ready to make your wreath or other decor. I would love for you to follow me on social media using the buttons in the sidebar. You can make sure you keep up to date on what’s going on here on Life as a LEO Wife! Enter your email address below to make sure you don’t miss a post. Get an email when a new tutorial, free printable, or other great post is added!
If you love posts on crafts, recipes, fashion, home decor, DIYs, gardening, & family check out our three link parties that are co-hosted here every week. If you are one of my blogger friends make sure you come by each week and share your family friendly posts on Happiness is Homemade, You’re the Star Blog Hop, and Traffic Jam Weekend. Share for a chance to featured on next week’s party and to reach a wider audience!


One thought on “Halloween Hoop Wreath DIY”