I made two yarn wreaths to match my spiral deco mesh wreath for my balcony. They looked a little bare in the middle, so I added a beachy quote to each one on a banner. I’m sure you’ve seen tons of banner garlands on Pinterest, and today I’m going to show you how to make your own using your Cricut. This will be a step-by-step tutorial with pics, screenshots, the works! Here’s the best part: I created a design for you to use in Design Space. You’ll find the link for it in this post below. Don’t have a Cricut? That’s ok, through the tutorial I’ll give you some tips on how to make a garland without a cutting machine.
This banner was made to go in the middle of a wreath and will say “Life is a beach.” The wreath is on a 10″ styrofoam form from Dollar Tree. The middle of it is about 8″ across, so we will make the garland to fit that. You can make your banner/garland as big or as small as you’d like if you’re not using the same form. For this project we will use cardstock and twine, but you can also make banners from other items like ribbon, baker’s twine, fabric, vinyl, etc. Making a banner is so easy, and once you learn how to make one you can make them to use in all kinds of decor and at events like birthdays, baby showers, in Christmas and Halloween decor, etc.
Supplies you need to make a banner with a Cricut:
- Cricut or other cutting machine
- cutting mat, blade, and Cricut pen
- cardstock
- twine
- scissors
- hot glue gun & glue
- glue or glue stick
Create Triangles in Design Space
Open Cricut Design Space to a new project. Click the “Shapes” button, then click the triangle.

Highlight your triangle, and find the size section on the top bar. In the H box, change the number to 1″. This will have the machine cut a 1″ tall triangle which will allow you to have enough triangles in the middle of the wreath for each letter in the quote. If you want to make a large banner to use for a birthday party or baby shower, just enlarge each triangle. You can cut up to a 12″ triangle with a regular Cricut mat or up to 24″ using the larger mats.
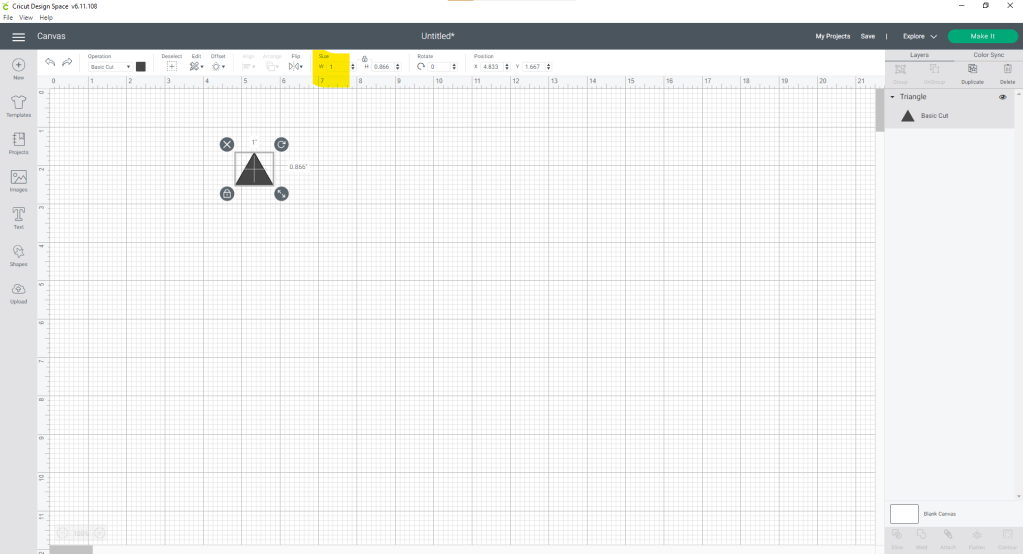
Spin the triangle using the arrow that’s curved into a circle. You’ll see it when you click the triangle, it’s on the top right side of the shape. Turn it so that the point of the triangle is facing down; you’ll have an upside down triangle.
For this banner we will need 12 triangles, one for each letter of “Life is a beach.” In the panel on the right side of your screen you will find the “duplicate” button underneath the “layers” section. Highlight your triangle and hit the duplicate button 11 times so that you have 12 triangles including the original one.

Once you have all of your triangles for your “banner with a Cricut,” it will help you to line them up the way they will be on the wreath. I lined up four triangles in a row on top for “life,”, two below that for “in” with one next to that with a little gap for the “a,” and five in a bottom row for “beach.” This isn’t necessary, it just helps you to visualize things a little better.
Add Letters to the Design
Next it’s time to add the letters that will make up the quote. Click the “text” button found on the left side of the screen. Type “L” in the text box.

Click the down arrow next to the font to open a drop box with all of the font choices. You’ll see the font section on the left side of the screen. Your Cricut will probably type your L in the font that you last used, so you’ll need to change it. Scroll down to the S’s and select “Segoe Print.” Two sections over from “font” you’ll find “font size.” In the box, change the font size to 17.37″. Of course if you’re making a larger banner and made larger triangles, correct the size to fit them.

With your L still highlighted, change the operation. That is where you choose to either cut, draw, or score a design. On the top row, next to the undo and redo buttons, you will see “operation” with a drop box under it. Hit the down arrow and choose “Pen” in the “Draw” section. The L will be open like a bubble letter if you’ve done it correctly.

Continue this process for the other letters. You will have to do them all separately so that you can place each one in its own triangle. You won’t have to worry about changing the font each time, so that’s a plus! However, you will have to change the font size each time. They really should fix it so you don’t have to do that!
Attach Letters to the Triangles
Line up all of your letters with one centered on each triangle. You will end up with something like this:

Now it’s time to attach each letter to its triangle. Select a letter and the triangle at the same time by clicking on the letter then holding down the shift key then clicking the triangle. Once everything is highlighted, click the “attach” button that’s in the right side panel at the bottom.

Ok- don’t freak out! When your letter is attached it will disappear. Don’t worry, it will still cut out and draw properly. I don’t know what Design Space’s deal is but when you attach something drawn to something that is to be cut, the drawn item disappears. I’ve done everything I can think of to resolve the issue, but I can’t. It still cuts and draws correctly, so, so be it. I’m sharing this design with you, so when you pull it up and see only triangles, it’s ok. The design is complete, you can see in the side panel the letters and triangles.
Cut the Design for the Banner with a Cricut
When all of your letters and triangles are attached, click the green “Make It” button on the top right side of the screen. In your Cricut machine you will find two holders. One in holder “B” is your blade. You will place your pen in holder “A.” Open your pen, insert it into the slot and close the clamp.

Place your cardstock on a standard grip mat and load it into the machine. Press the “C” button and the machine will begin to cut and draw the design. Once it is finished you will have this:

Remove the excess cardstock and each triangle from the mat. Since the letters come out like, what we called as teenagers, “bubble letters,” you’ll want to fill them in. Use the same pen used to draw the letters on the banner with a Cricut to fill them in so they look solid.

Assemble the Banner
Line up your letters in the order they will go on the banner. That will help you glue them on the twine a little easier.

Unroll some of the twine from the roll and stretch it across the back of the yarn wrapped wreath form. Cut three pieces that will stretch across the back to be glued on each side.

Next we’ll attach the triangles to the twine. Since my twine was wrapped in a ball, it was a bit curved so I put a glass on one end and my ear bud on the other. Don’t judge me, they were close ha! I used an Elmer’s glue stick to glue my triangles to the twine. You can use liquid glue too, but hot glue might burn you since the triangle is so small. Put a bit of glue along the top of the triangle and press it on to the twine where the word will be centered on that piece.

Continue to glue the entire word “life” on one piece of twine. On the second piece glue “is,” then leave a space and glue the “a.” Finally glue “beach” in the middle of the third piece.


Attach the Banner to the Wreath
You have completed making your banner with a Cricut! It is now time to glue it to your wreath. I decided to add mine a little diagonally in the pattern you see below.

Squeeze a little hot glue under each side of the twine pieces and hold them down for a second while the glue dries a bit. Make sure to pull the twine tight when you glue the second half of each piece of twine.

Links for the banners in Design Space
If you would like to use my pre-created banners, you can use these links! You are so welcome!! However, it helps to save and Pin this tutorial for when you need to make a banner for any reason. Use it for wreaths, a cake topper, blow it up and use it for parties or as garland for holidays.
This link is for the banner with the Segoe font on the triangles which is completely free.
This link if for the banner with the Felicity font. I have the Cricut Access subscription and that font comes with it. So if you have the pass, this design is free as well. If you don’t, you can get it for $7.99/mo or purchase the font for $4.99.
You’ve finished making your banner with a Cricut!

If you would like to make your own yarn wreath, check out this tutorial. I just love the way it looks. I will be posting this one’s mate, which is its opposite with turquoise yarn & coral starfish, soon. It is going to go on our balcony with this summer spiral deco mesh wreath.

I’m also making some tables and other decor for the balcony, so make sure to check back for it. Better yet enter your email in the box on the sidebar or at the bottom of the page and you will get an email whenever I upload a new post. You can also follow me on social media using the buttons below to get up to date info on what’s going on on the site.
For my blogger friends, make sure you upload your posts to one of our three link parties for a chance to be featured the next week. If you’re not a blogger you need to check out those parties, Happiness is Homemade, You’re the Star Blog Hop, and Traffic Jam Weekend (returning July 28), for all kinds of ideas. DIYs for home and seasonal decor, crafts, recipes, gardening, Dollar Store decor, upcycling, re-fabbing and more!


Brilliant project Thank you for entering our Anything Goes Challenge atThrough The Craft Room Door this week. Looking forward to see you again next challenge. Good luck Ginny
My Blog As I do Rodos
Thank you! See you there!
Thank you! See you next week!
So cute! You are so talented and so very creative. I am very inspired! Thanks for sharing and linking with me.
Shelbee
http://www.shelbeeontheedge.com
Aww, thanks girl!
Looks nice. Thanks so much for linking up with me at the Unlimited Link Party 31. Pinned!
Thank you!