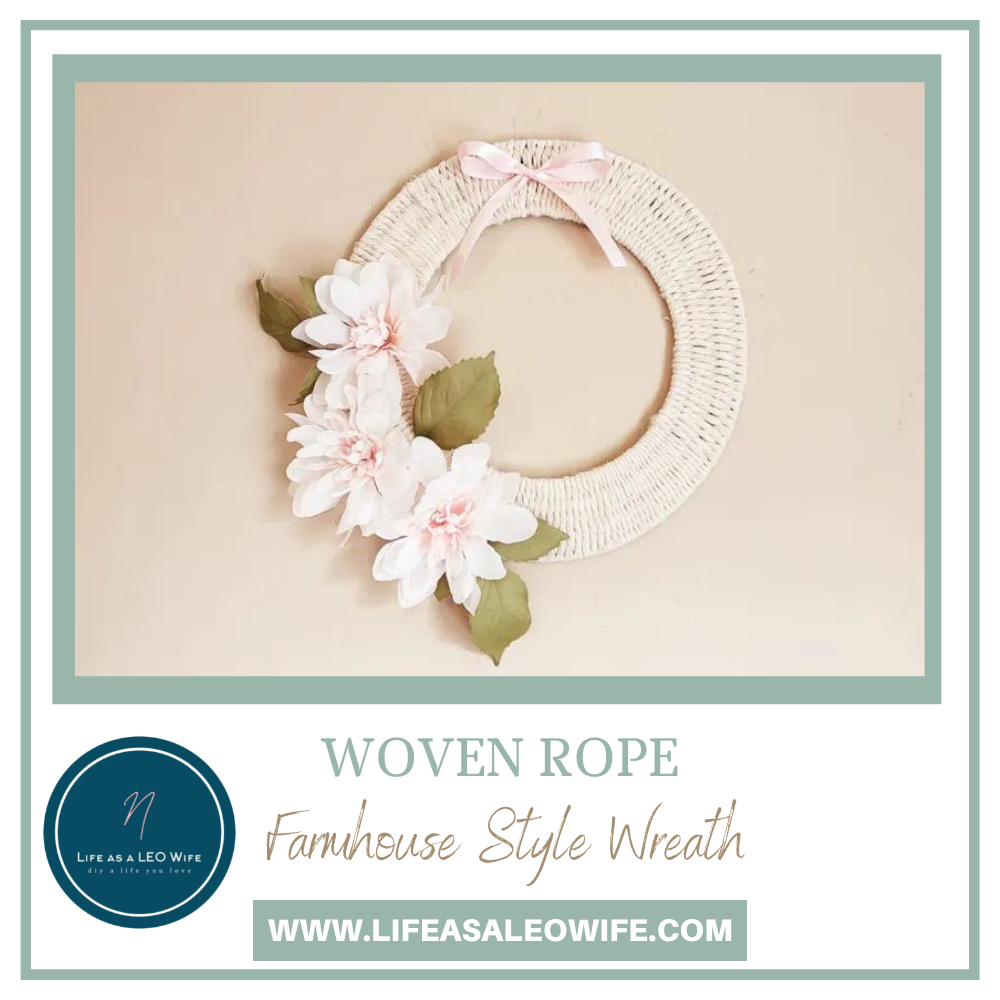
Welcome friends! It’s been quite a busy week for the Life Wife family! We closed on a new home, packed, and moved our entire house, just me and the hubby, in two and a half days. My calves have never hurt so bad in my entire life! I feel bad that my husband had to carry most of the heavy stuff, and thank God for his brother who swooped in and helped him lift some of our heaviest furniture on the last evening of moving. Then our Dollar Tree Craft Challenge (where I shared a tutorial for a woven rope wreath) and Under $10 on the 10th fell on back to back days. It’s been insane, but I did manage to create a fantastic tutorial for creating a farmhouse style outdoor plant stand. Let’s get into this!


Under $10 on the 10th is our monthly blog hop where I join a group of lovely ladies and we come up with a project that can be made for less than $10. It is hosted by Tammy of Patina and Paint. This month’s theme is “outdoors,” and I know that the ladies in the hop have created some amazing ideas to share with you all! Stick around after the post and visit the other blogs to see projects that you are sure to love! The outdoor plant stand that I’m sharing is adorable and can be made for about $7.50! With today’s economy and inflation rate, it’s so important to be able to create a beautiful home for less.
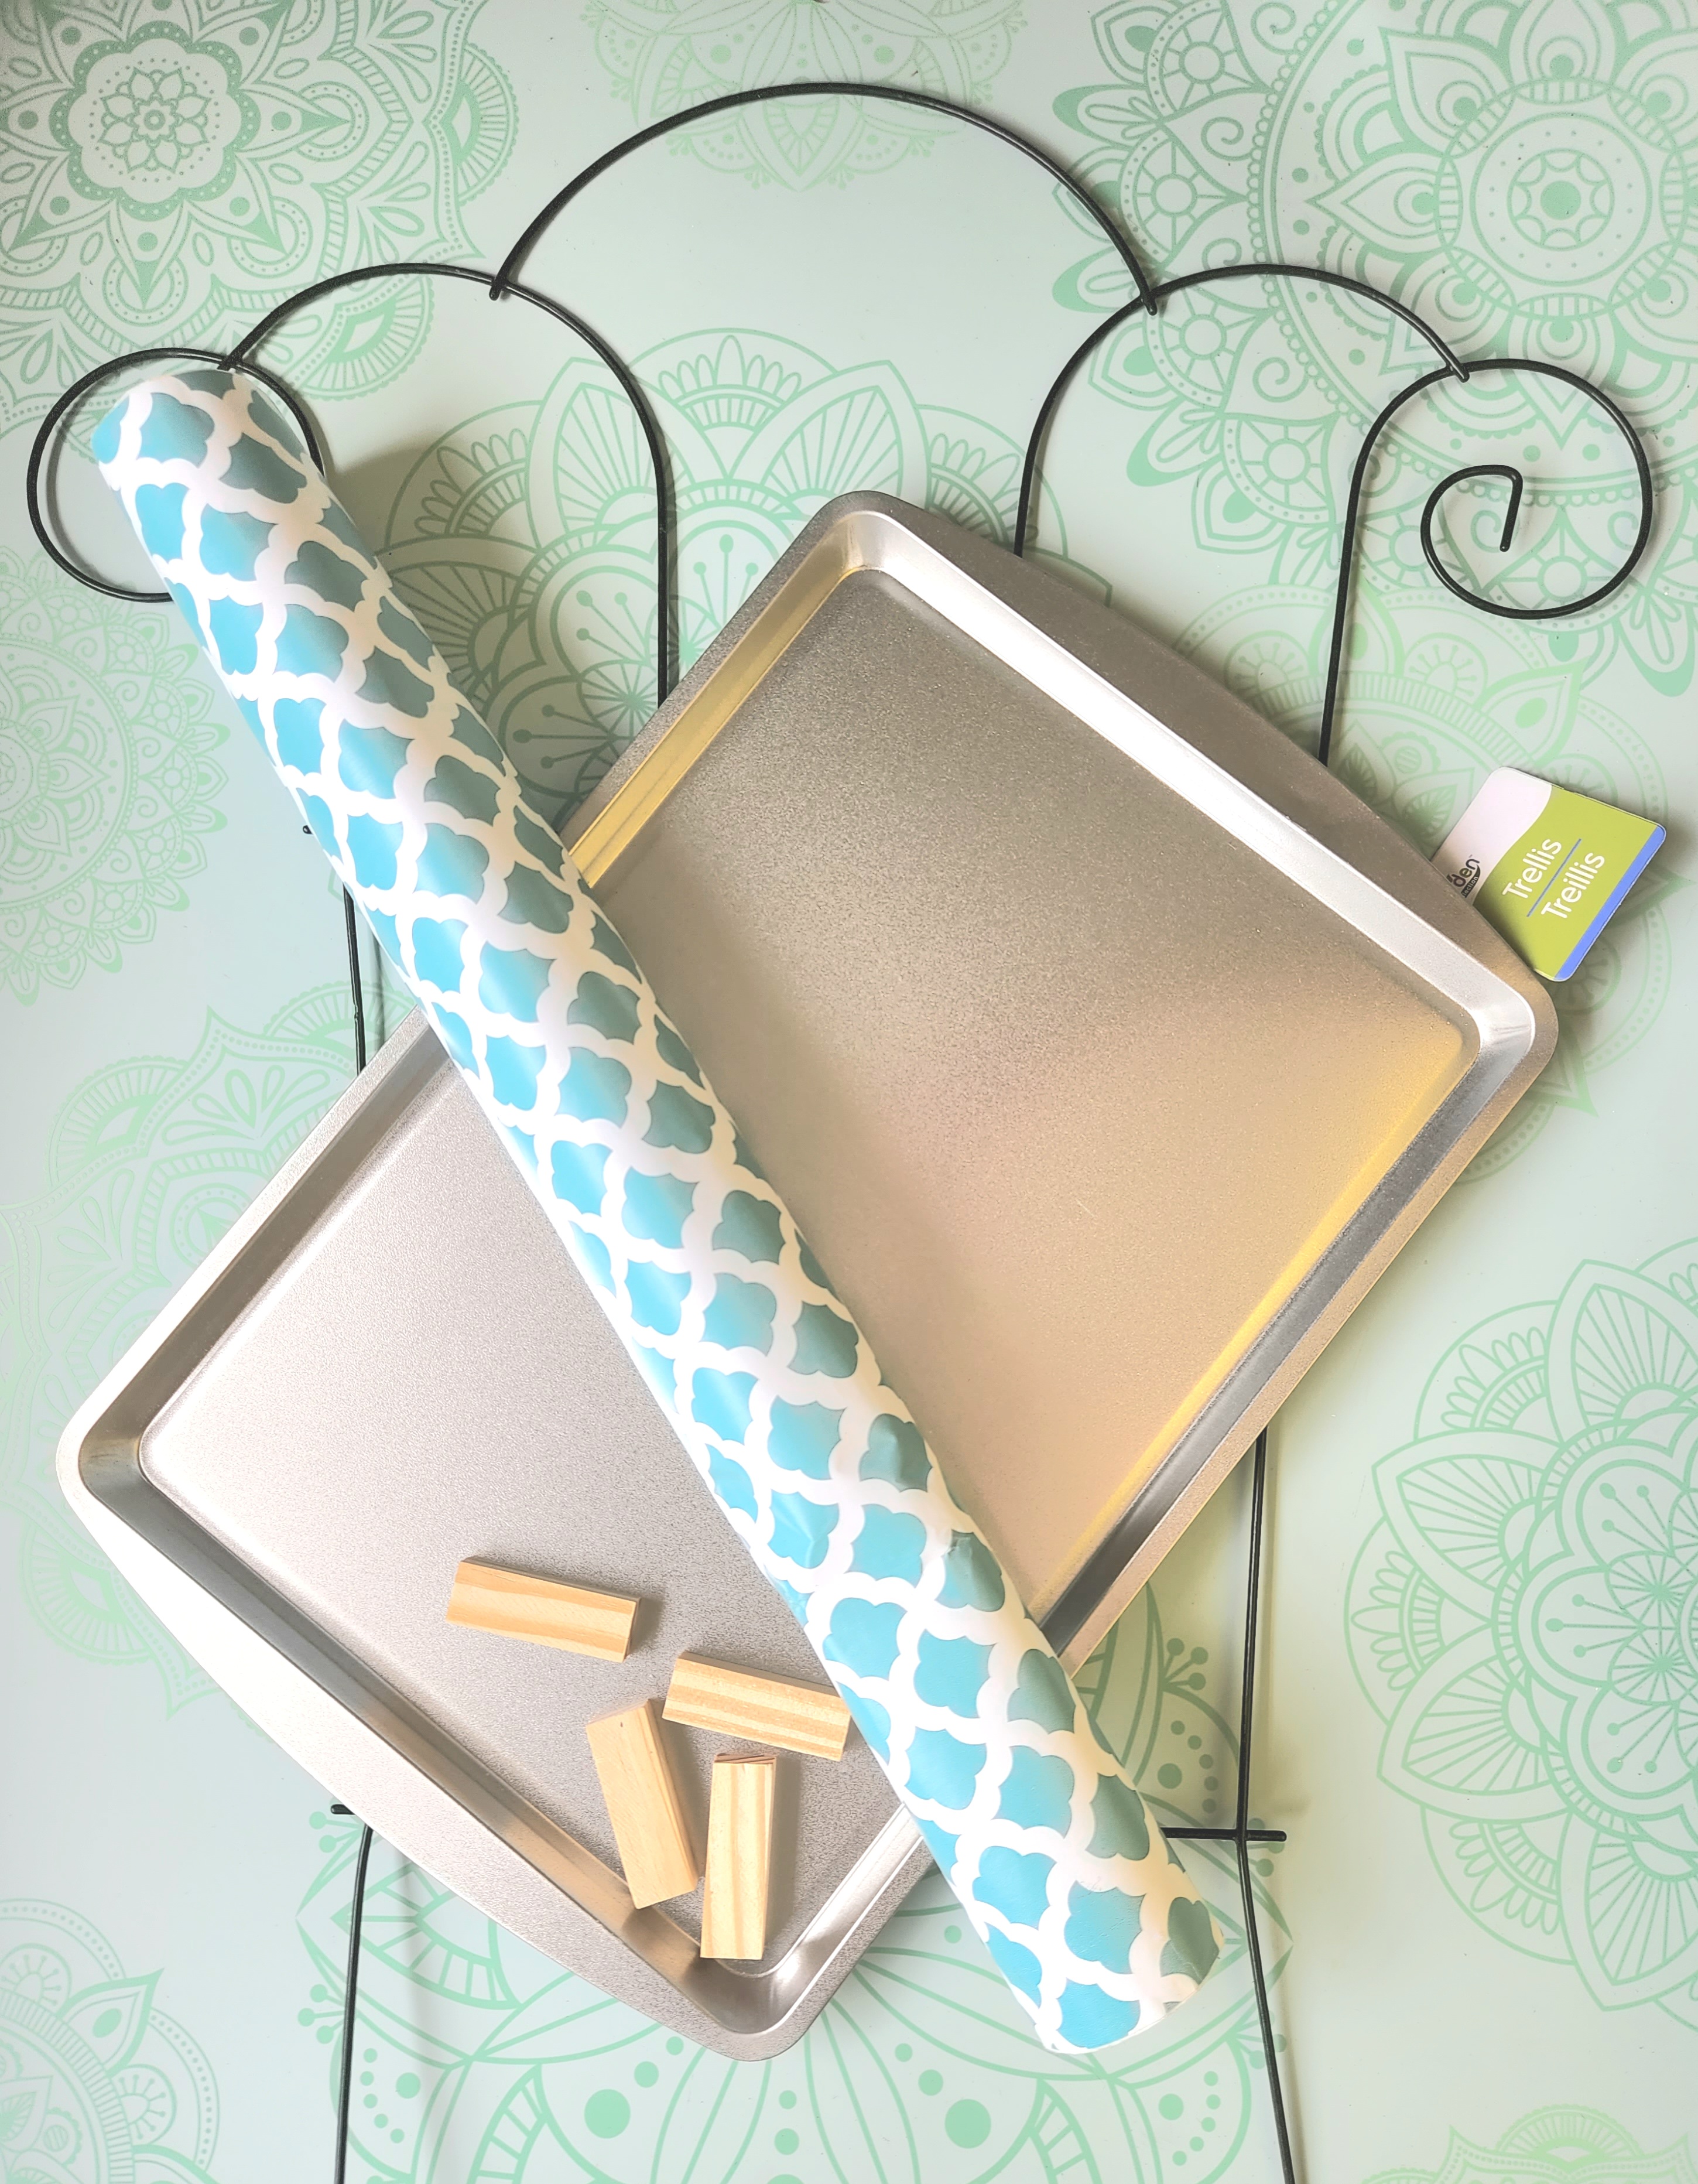
Outdoor Plant Stand Supplies:
- wire trellis
- baking pan or DT rectangle sign
- contact paper
- scissors
- E6000
- 2 12″ wood pieces
- handsaw
- cotton rope
- sandpaper
- white paint
- paint brush

Cut Wood
I got all of the supplies that I used in this project from Dollar Tree. They carry 12″ pieces of wood in the craft section that you’ll use as the legs for this plant stand. Cut them in half, creating four 6″ legs.

Sand the ends and any rough areas.

More Wood & Outdoor Decor
There’s so much you can do with Dollar Tree wood and other items. If you love to decorate for less, you might like this DIY tea towel ladder, this indoor/outdoor lantern (I guarantee that you’ve never seen this version!), an easy crate shelf for small items.
Bend the Trellis into a Seat
Use pliers (or your hands) to bend the wire trellis into a chair shape. Begin to bend the wires into a 90 degree turn at the second crossbar.


If you’re using a baking pan from Dollar Tree like I did, you will need to bend the two wires that extend out of bottom toward each other. Move them into a bit of a triangle shape so that the arms support the pan. If you keep them straight out, they will extend past the pan.


Paint the Plant Stand Pieces
I would really have preferred to spray paint my metal trellis because it’s much harder to paint it with acrylic paint. However, I couldn’t find the box that contained all of my spray paints, so acrylic paint it was. I used a $.50 bottle of white paint on the trellis as well as the wood legs.
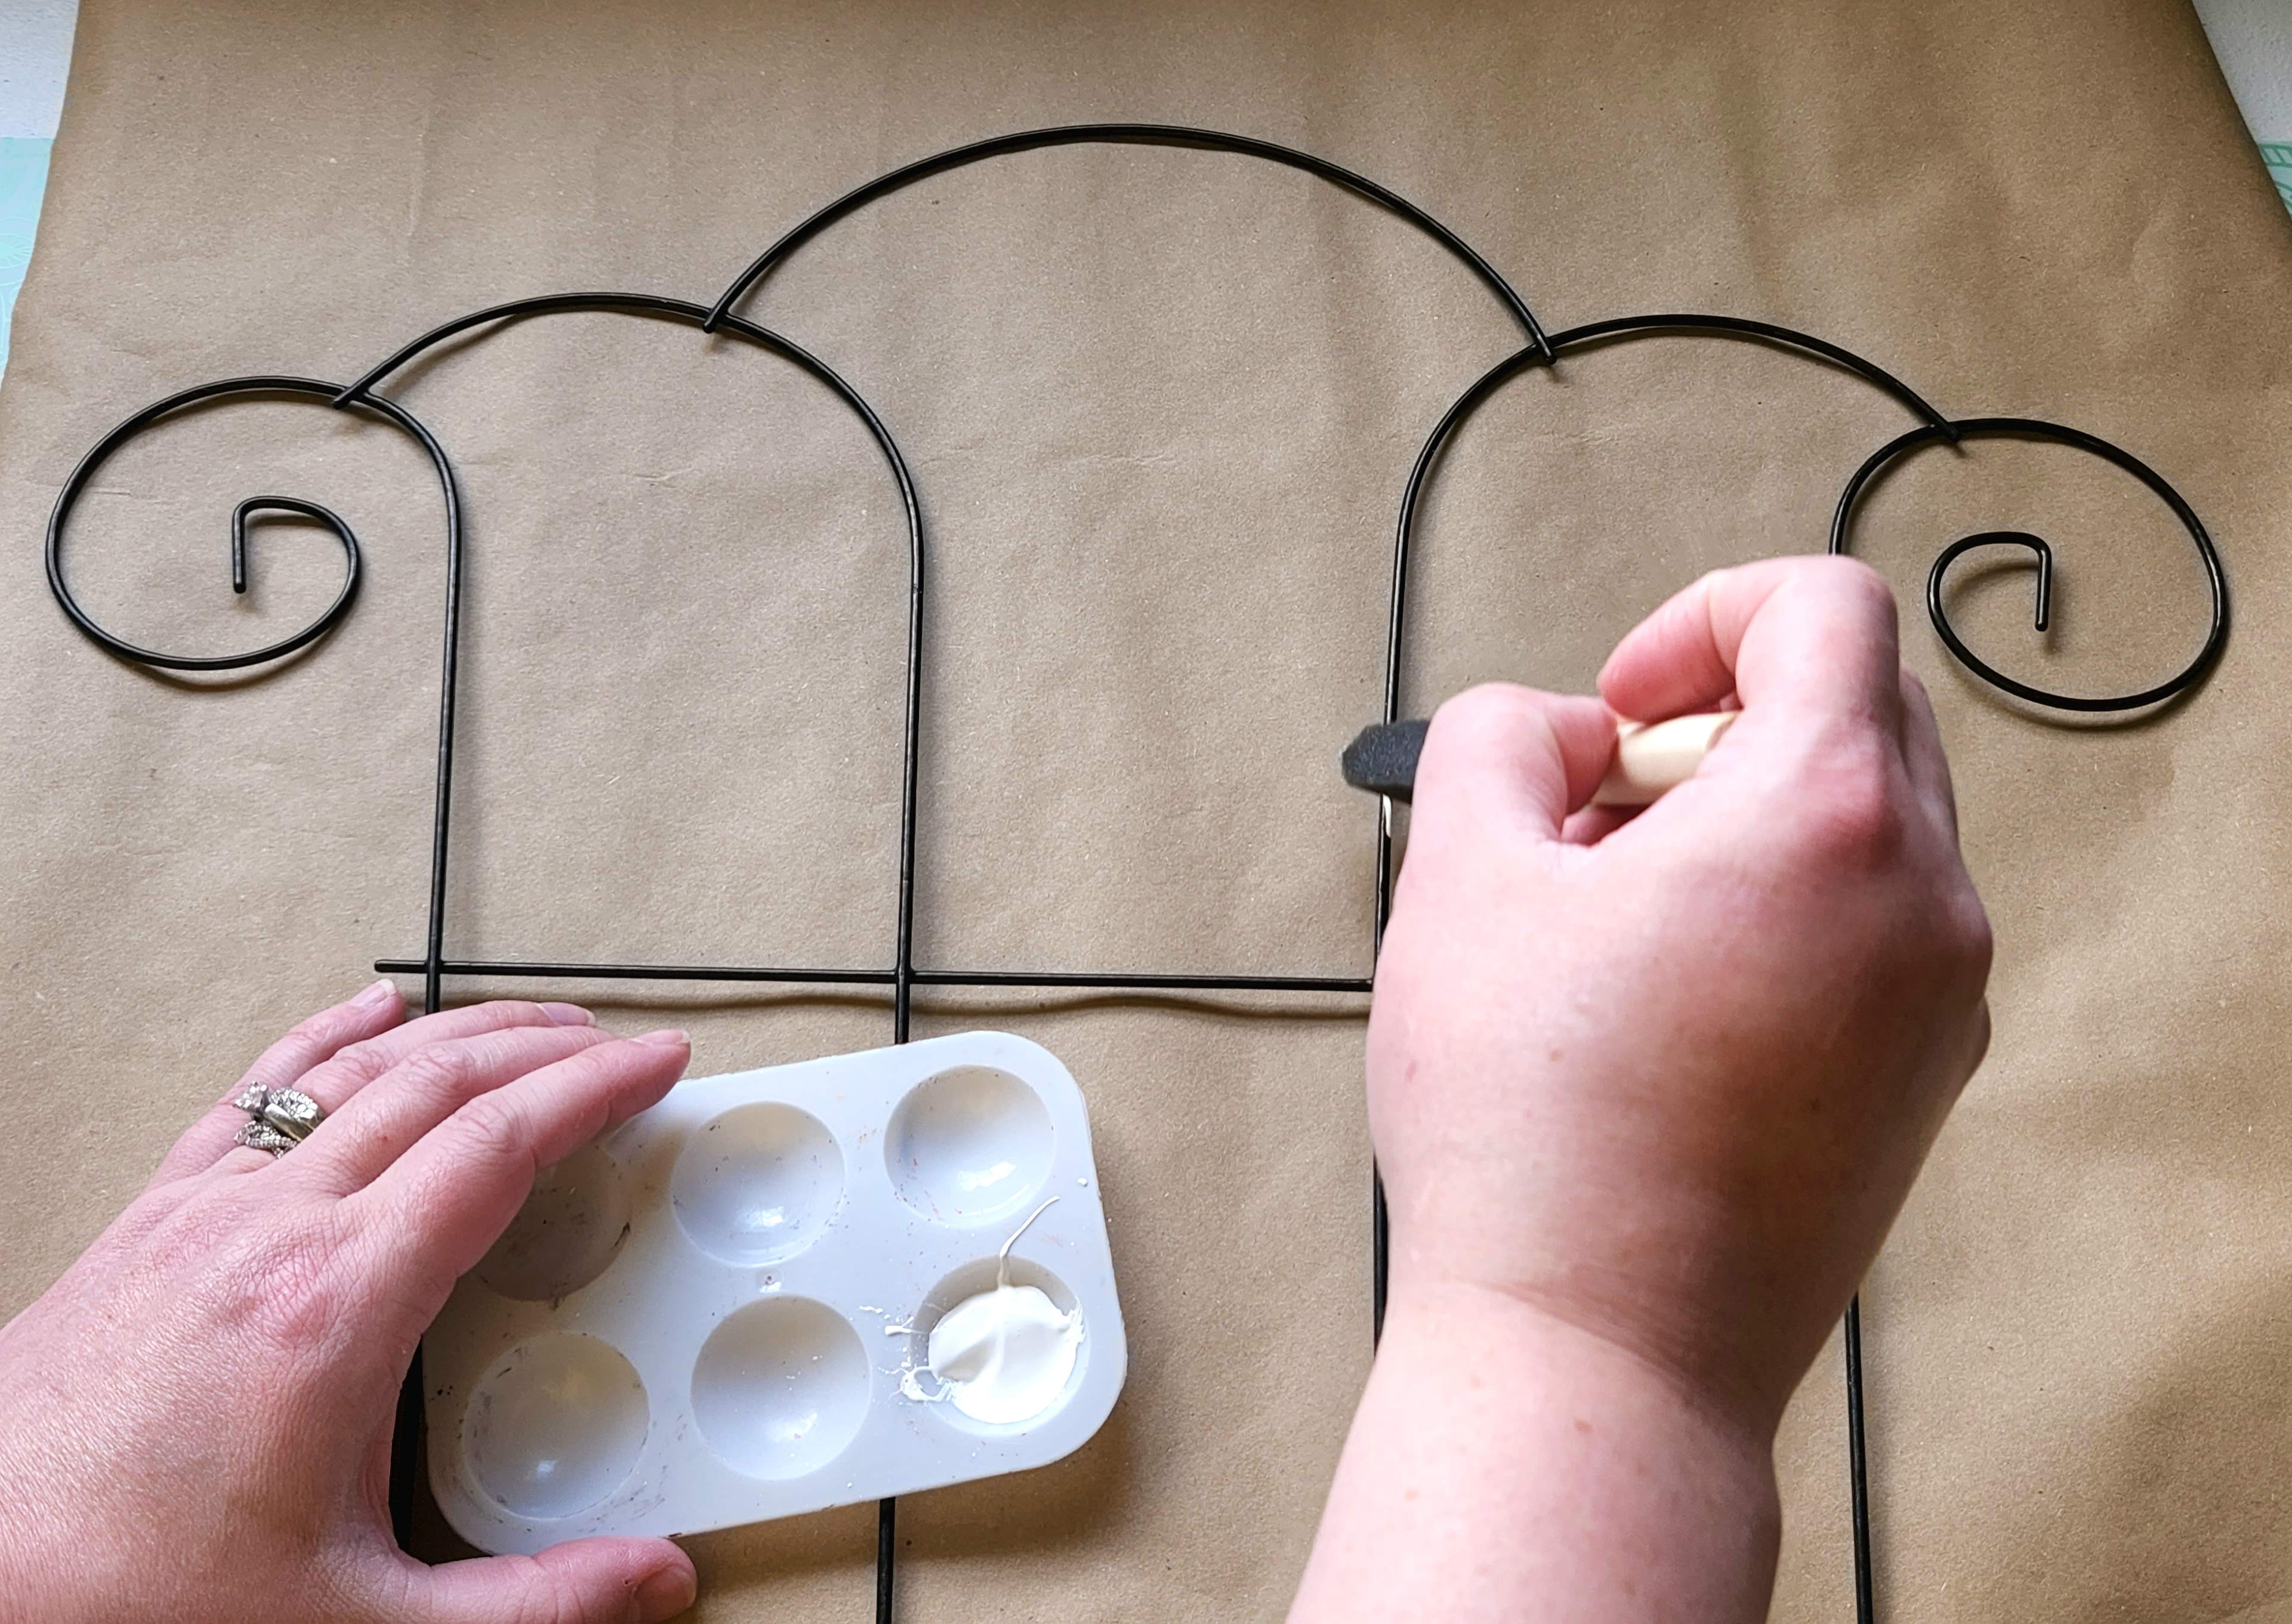

Once the paint dries, sand small areas on the wood legs and the trellis.

Cover the Pan with Contact Paper
Dollar Tree carries many different prints of contact paper. I was going to cover my baking sheet with the teal and white paper that I covered my DIY outdoor side table with but decided on the same print in gray and white at the last minute. I felt like it went with my farmhouse style a little better.
Lay your pan or sign on the back of the contact paper and cut around it, making sure to leave enough to cover the edges.
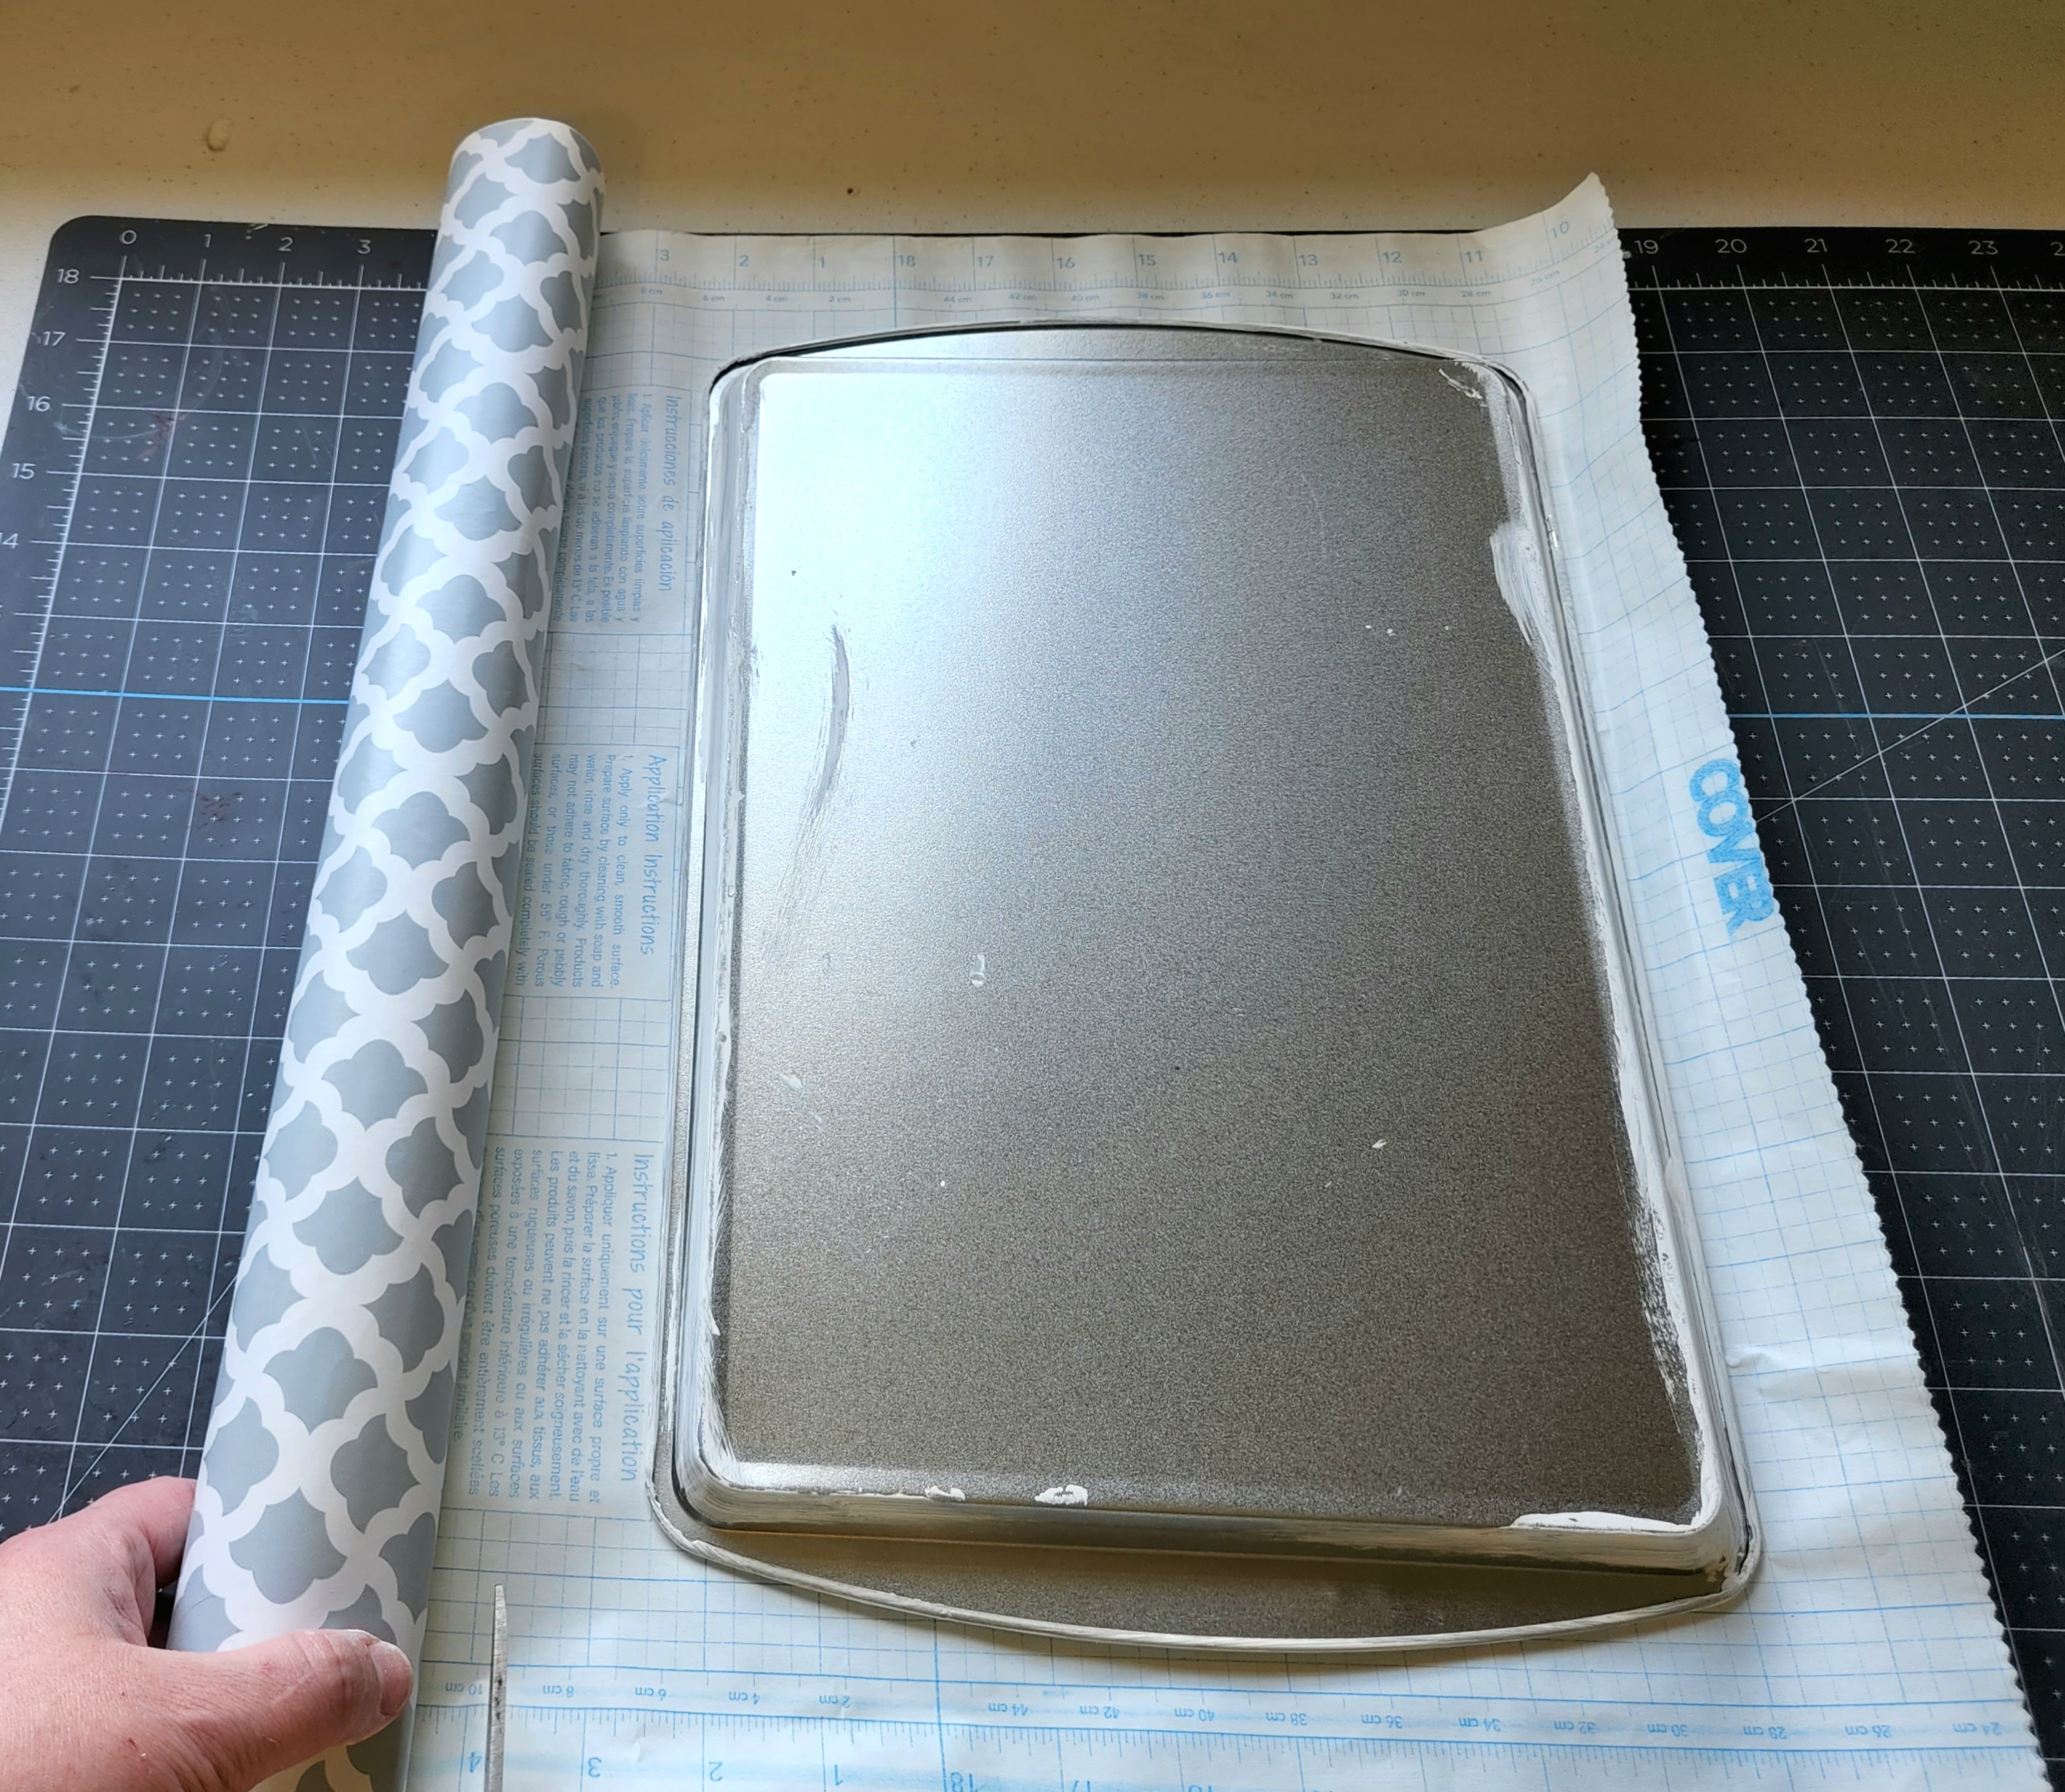
Remove the backing from the contact paper carefully apply it to the pan. You will need to make small cuts at the corners to allow the paper to lay flat.


If you’d like, you can cut a piece of cardstock to the shape of the pan to glue on the bottom and cover any jagged edges of contact paper. I didn’t do that because I didn’t have time, but it would look better. The bottom won’t be seen at all, so it’s up to you. I may eventually cover the bottom with paper if my legs fall off (that may happen because I had to put this together so quickly so I couldn’t let the glue cure overnight).
Add Rope to the Pan
I decided to add some white cotton rope to the edges of my baking sheet. That covered the corners where I had to make small slits in the contact paper to fit the pan. Place hot glue in one of the corners on the top edge of the pan and place the rope on it.

Glue the rope around the entire edge of the pan and back around the wider part at one end of the pan so that that end has two rows of rope. Cut the rope, add tape to the cut end to avoid unraveling, and glue it to the edge of the pan.

Now you need to add a second row of rope to the opposite end of the pan. Cut a piece of rope to fit, taping both ends, then hot glue it on to the pan.

Finally add a round of rope to the side of the pan. Squeeze hot glue on the corner edge of the pan and place the rope on it. Continue around the pan then cut, tape, and glue the end of the rope in place.

Glue the Legs onto the Baking Sheet
I glued the baking sheet onto the trellis before I glued the legs on. That was absolutely the wrong way to do it! Learn from my mistakes and glue your legs on first. Squeeze E6000 on the ends of the wood and place them on the bottom of the baking sheet. You can use a ruler to measure 1″ from the edge and mark those spots with a marker first if you’re unsure you can glue them on evenly.

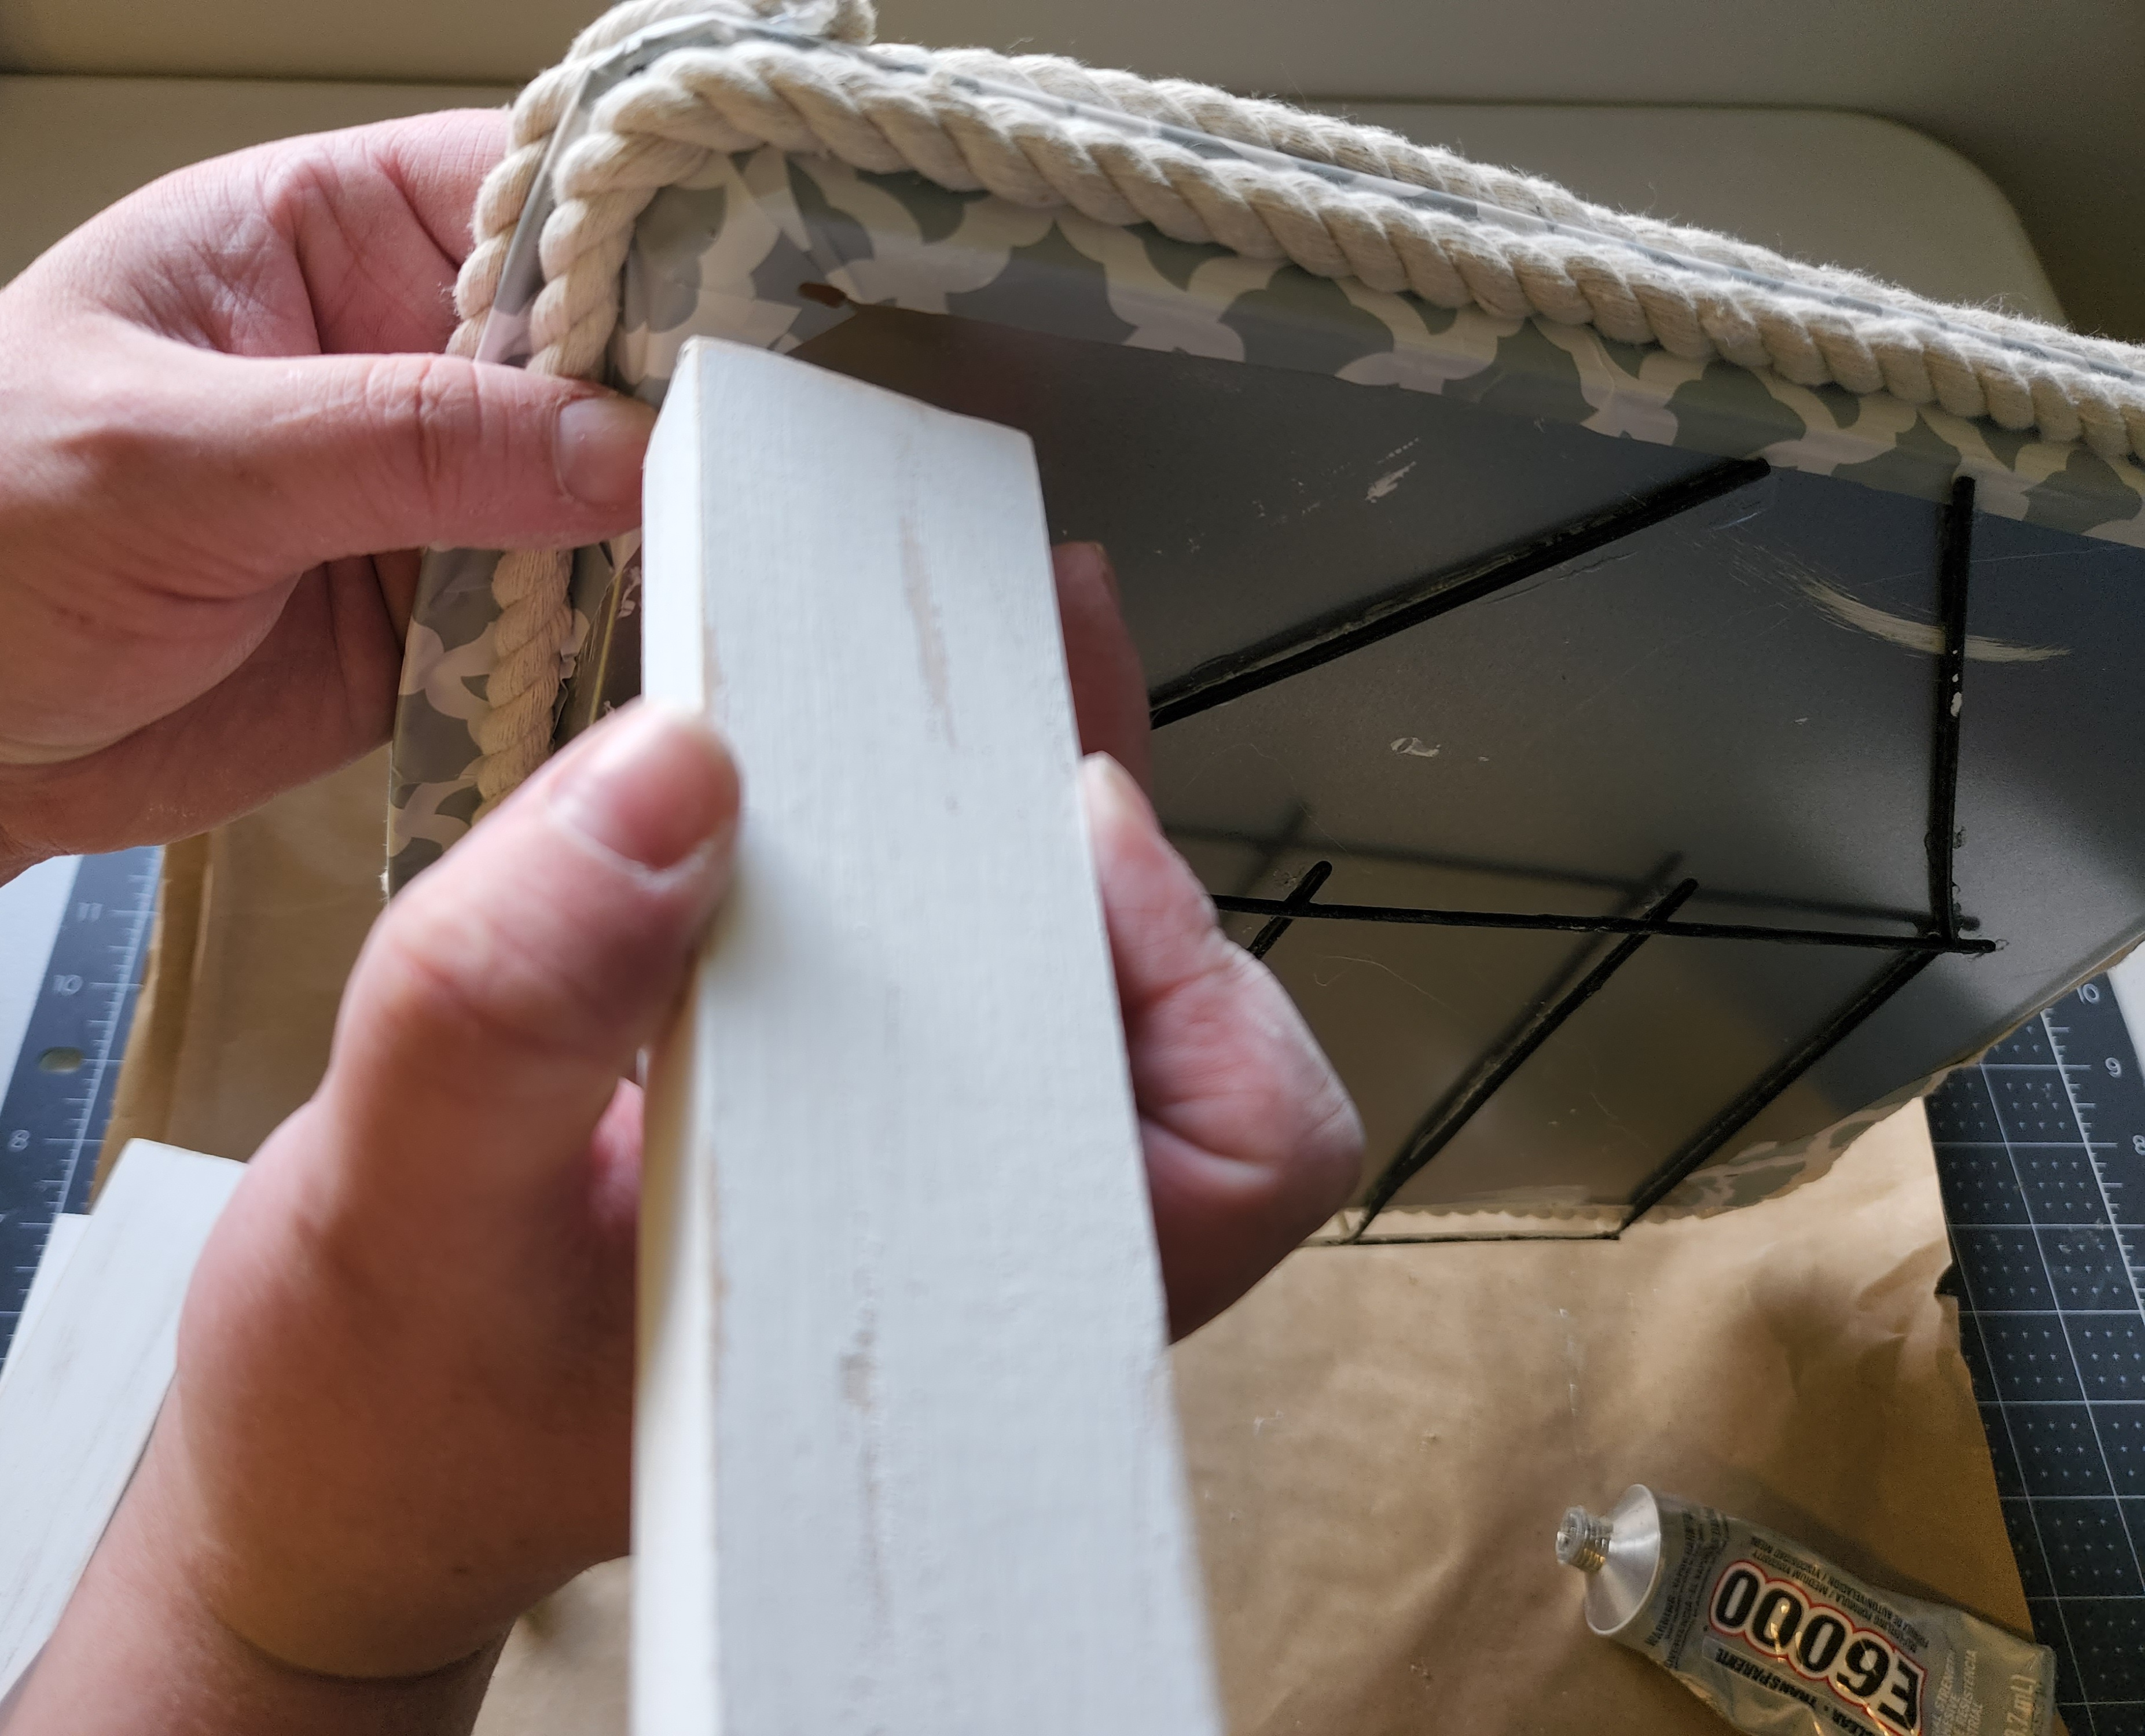

Place something heavy evenly on top of the pan to allow the glue on the legs to dry in place.

Glue the Metal Trellis to the Outdoor Plant Stand
Squeeze E6000 on each wire of the bent section on the metal trellis.
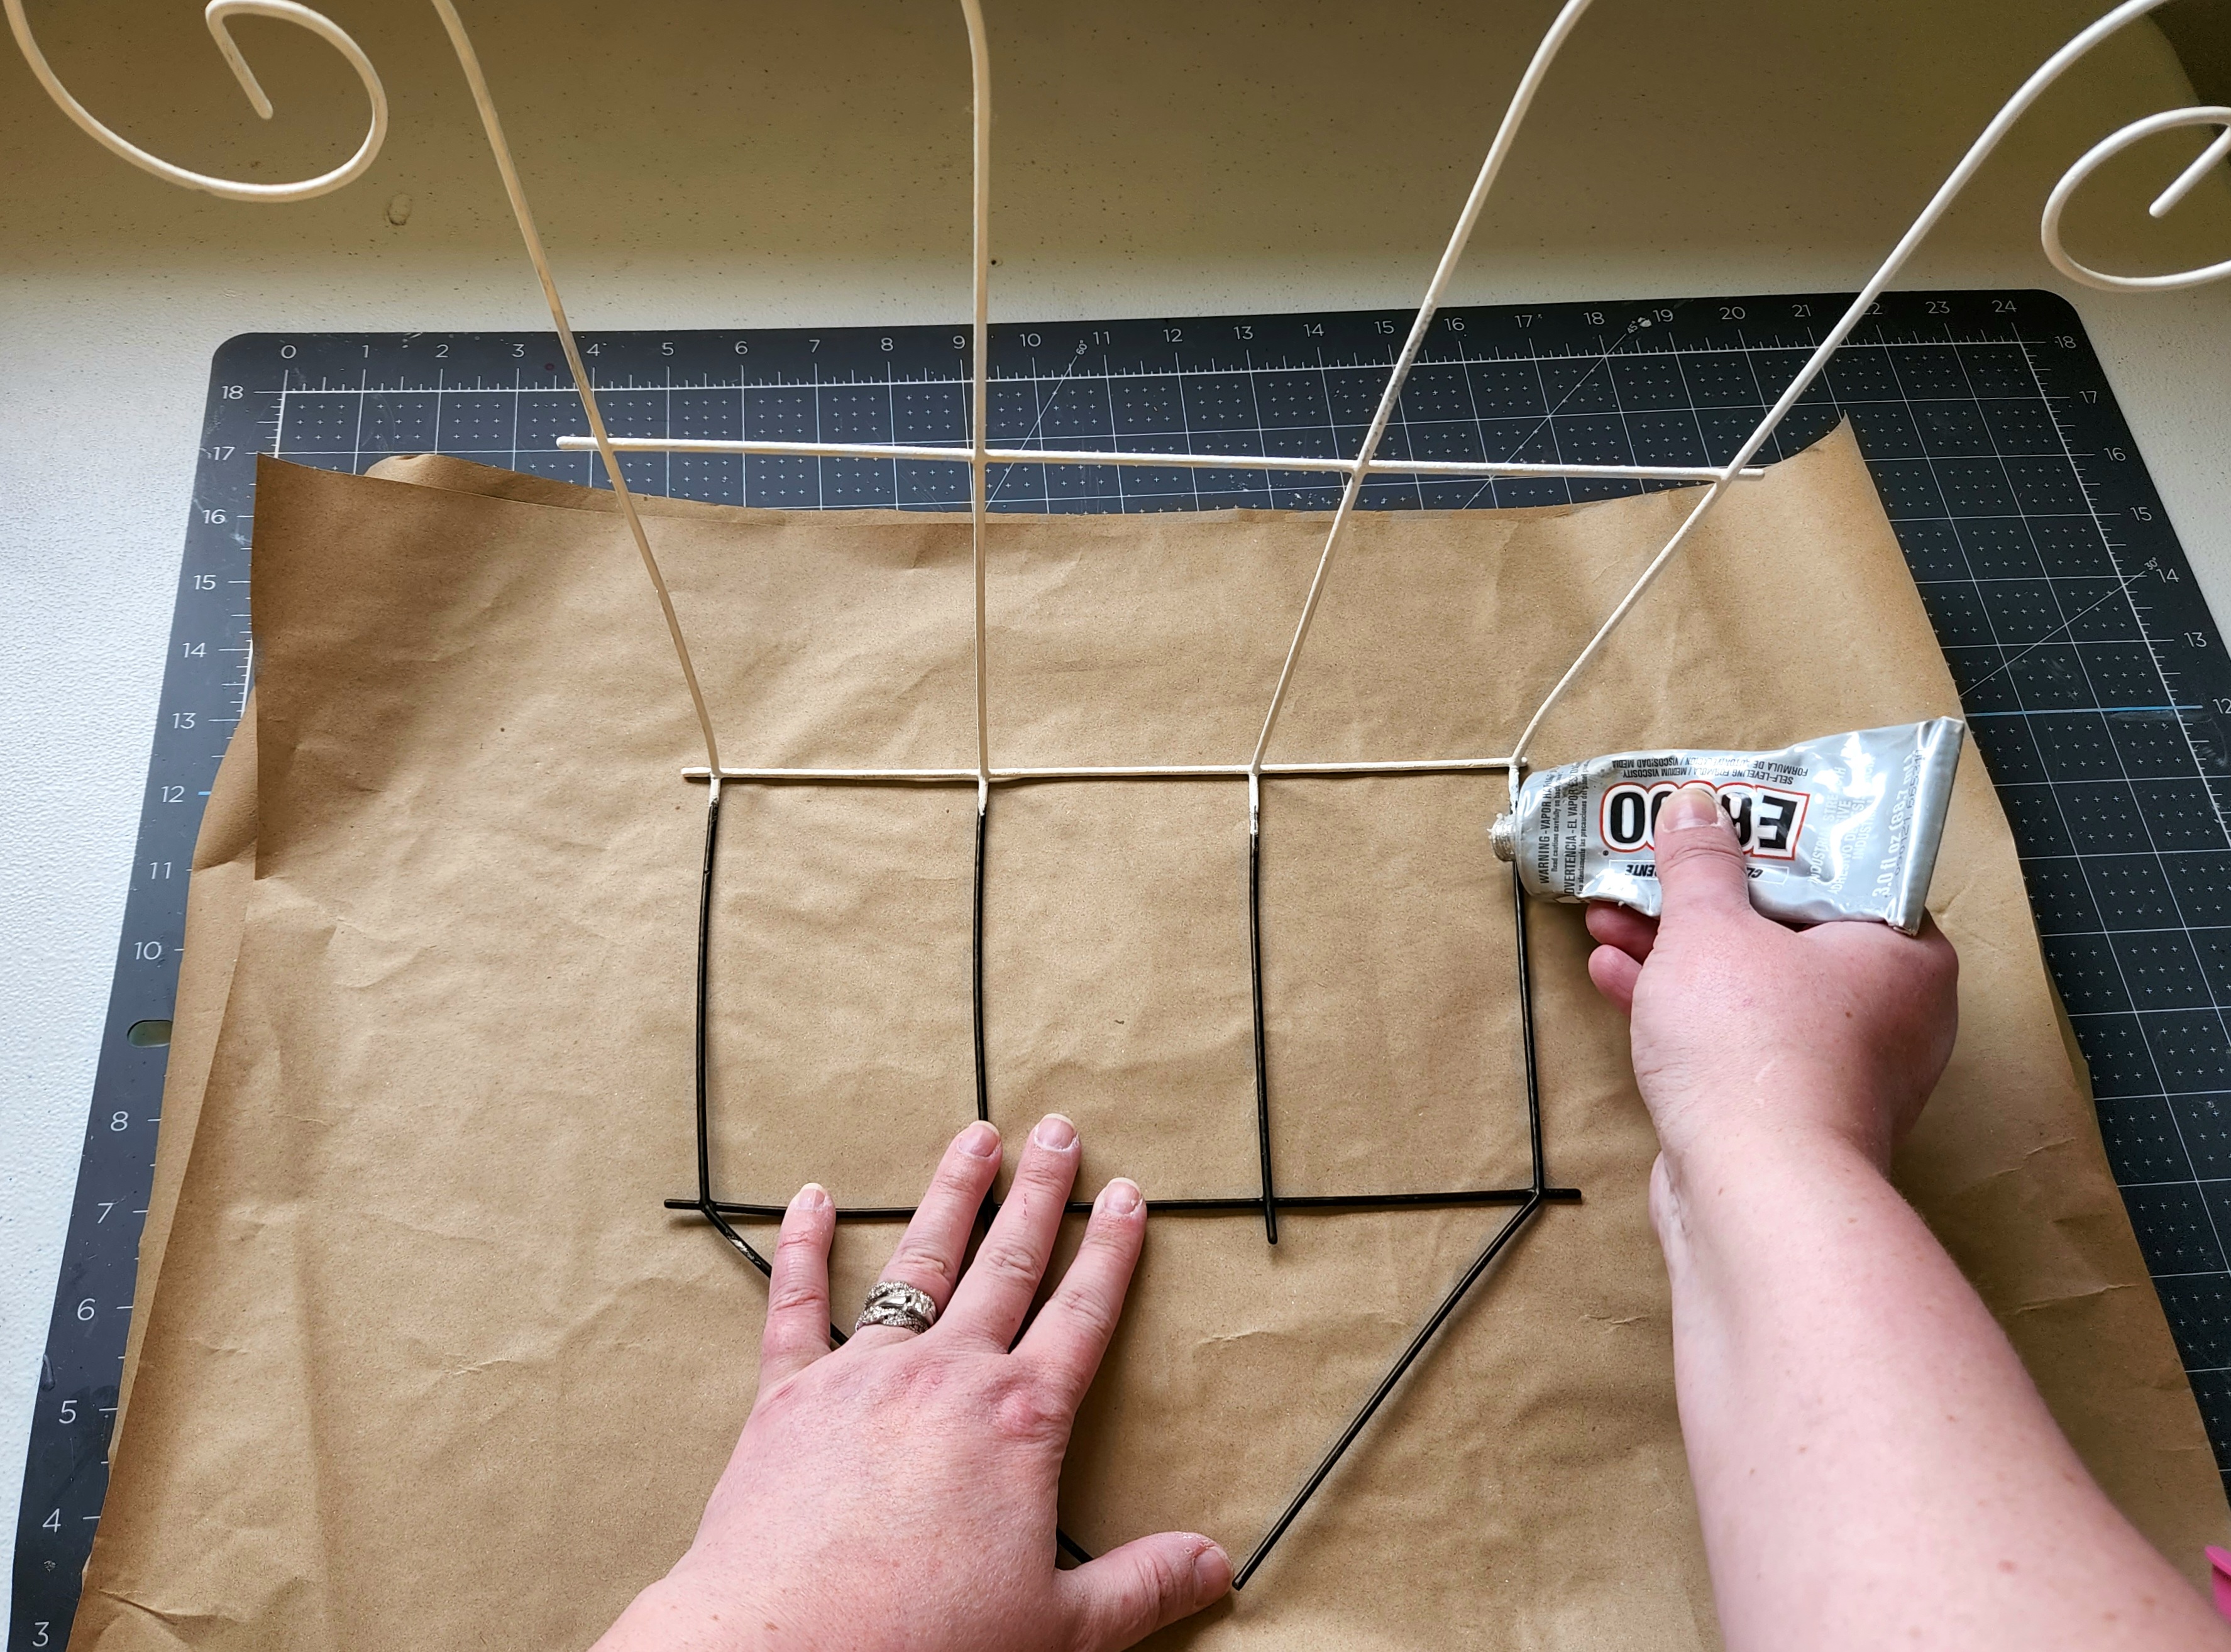
Turn the baking sheet, with the legs already glue on, upside down. My pictures will look different than you will have to do it because I glued this part on first. It will probably be easiest to place the pan upside down at the edge of a table. Turn the trellis over and place the glued side on the baking sheet, allowing the tall side to hang off the table. I was able to just place the baking sheet on the trellis since I glued the legs on first, but, trust me, it’s not worth the extra work!

Place something heavy on top of the trellis on the pan just like you did while the legs dried.
Optional: Add Embellishments
After I placed my plant stand on my porch with plants on it, I decided the front of the trellis needed something extra. I plan to create a welcome sign to place on it, but I had a small farmhouse style framed sign from Dollar Tree that I added for the time being. Place a pipe cleaner or floral wire on the back of the sign so that you can attach it to the outdoor plant stand without glue. That way you can switch it out for the season.

Wrap the pipe cleaner around the wired trellis. I hung mine from the top for now, but I plan to move it down a bit when I have time and can find more glue sticks!

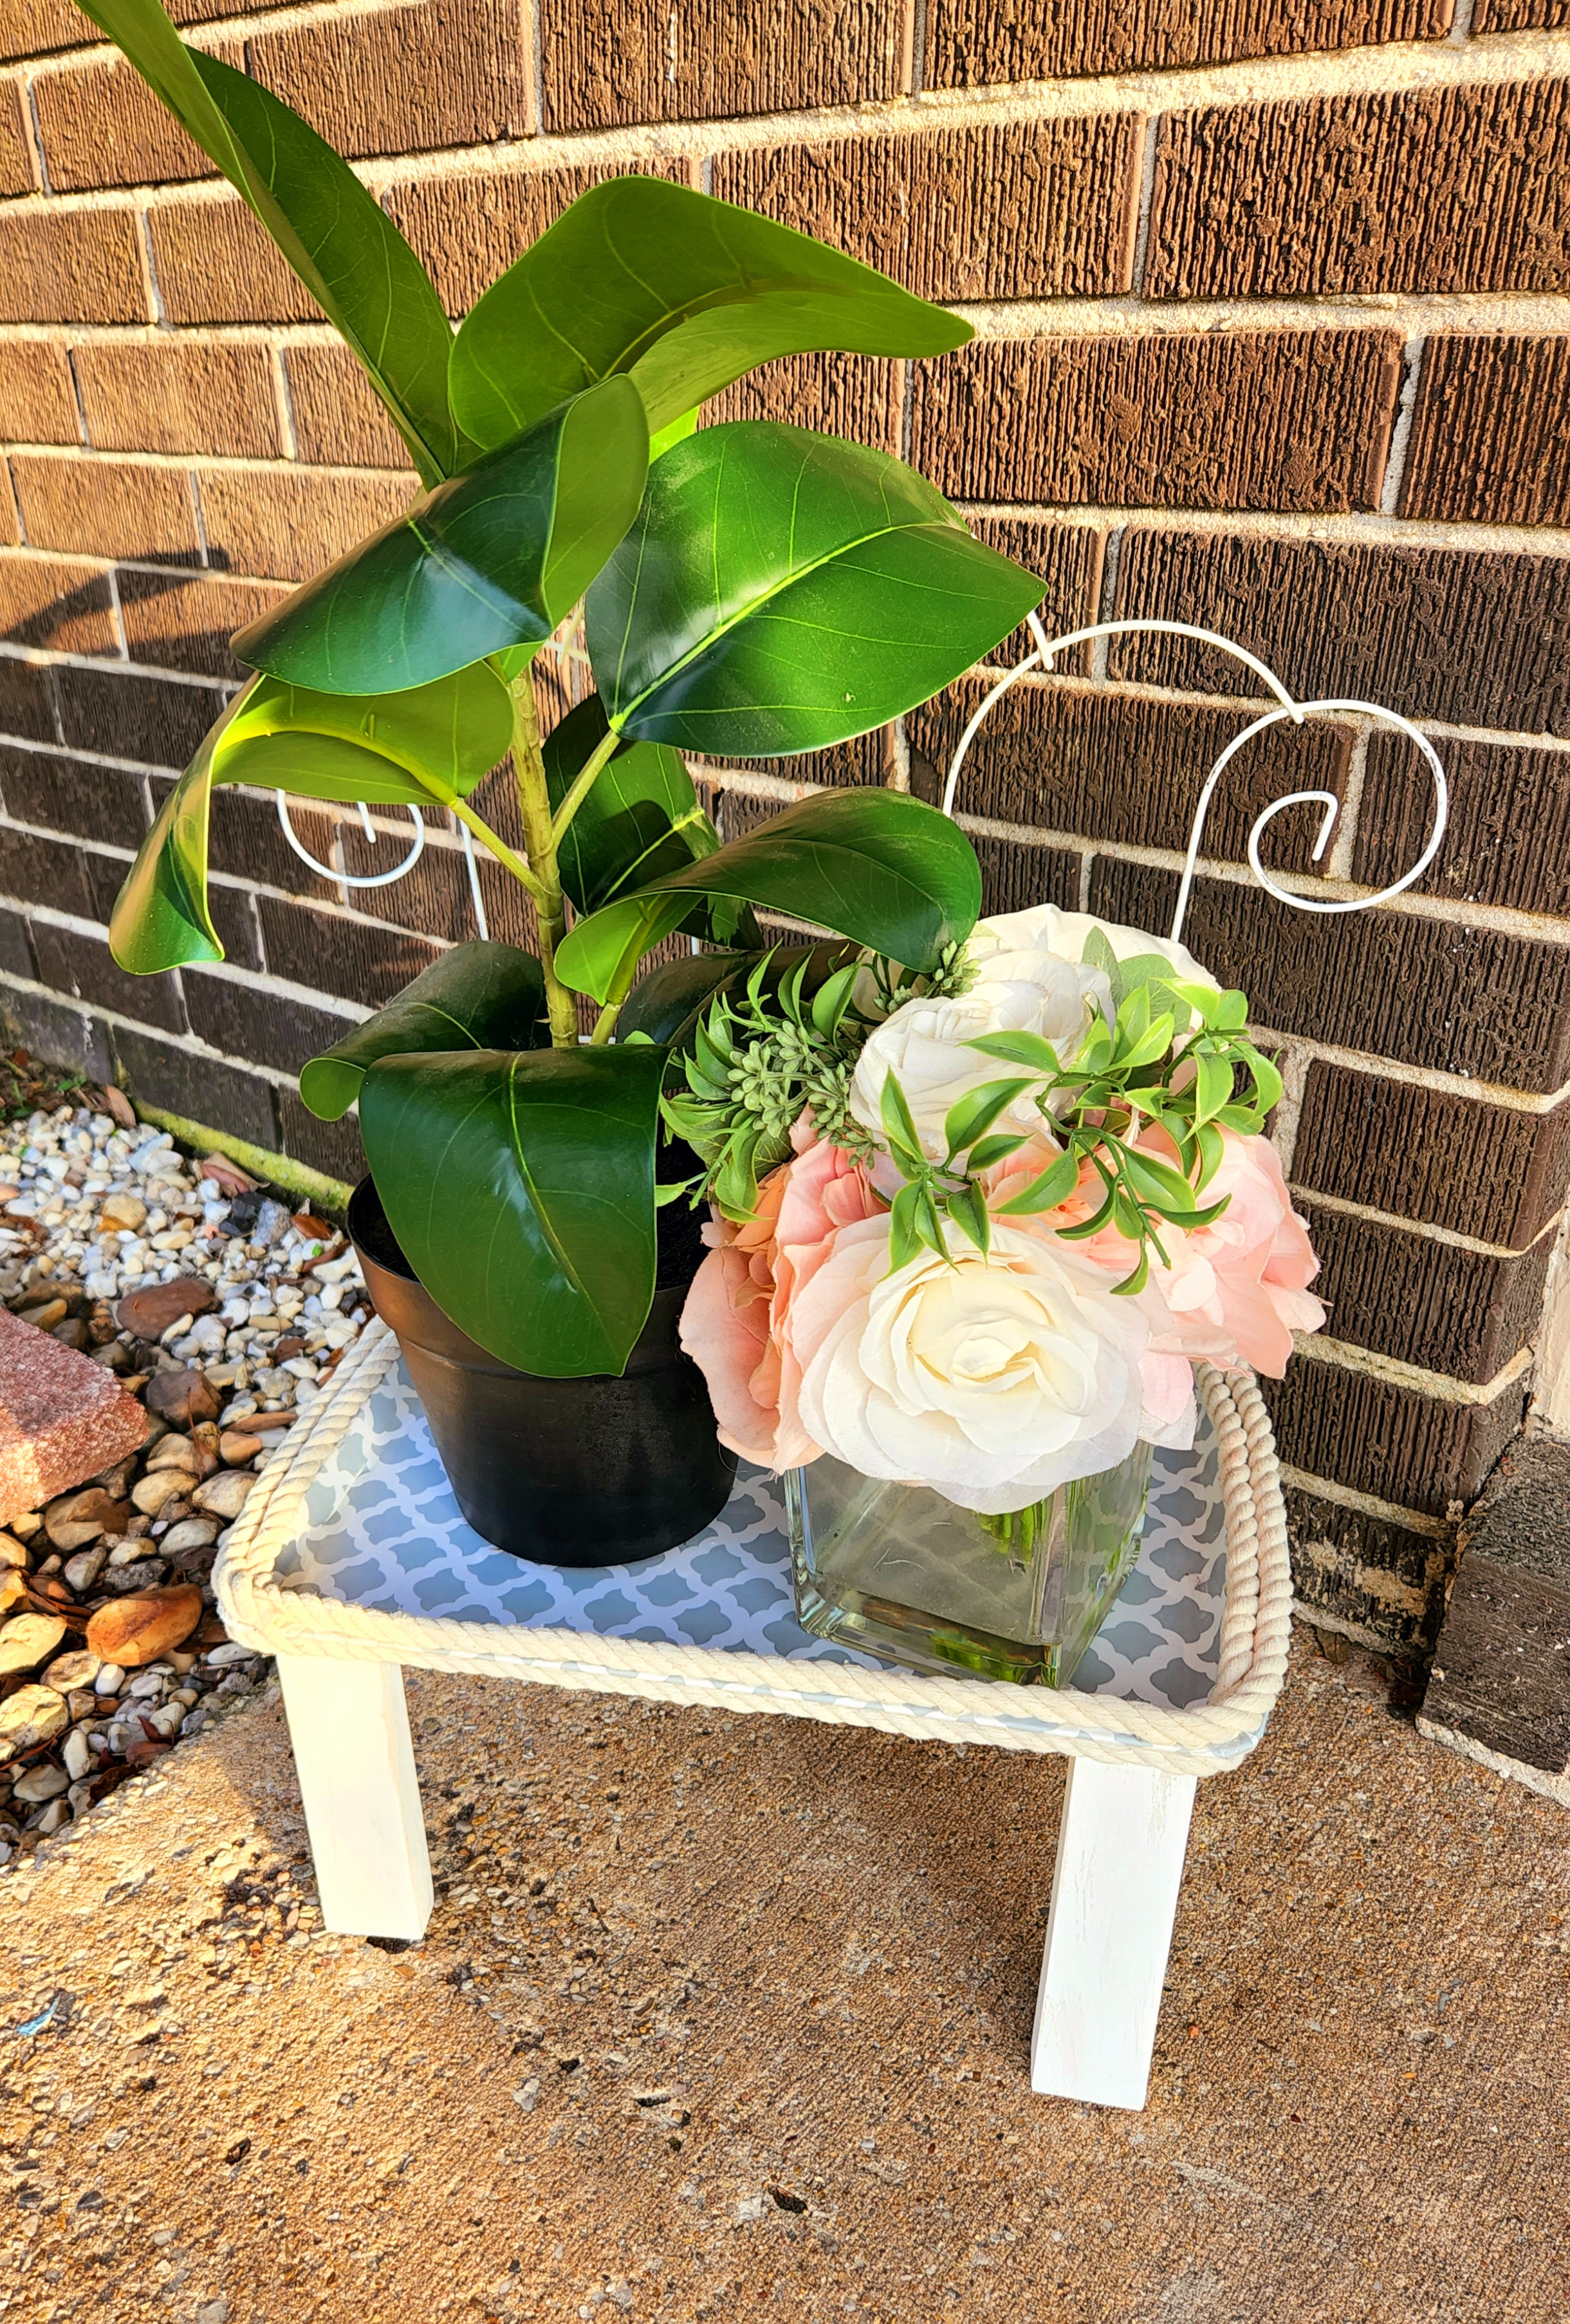
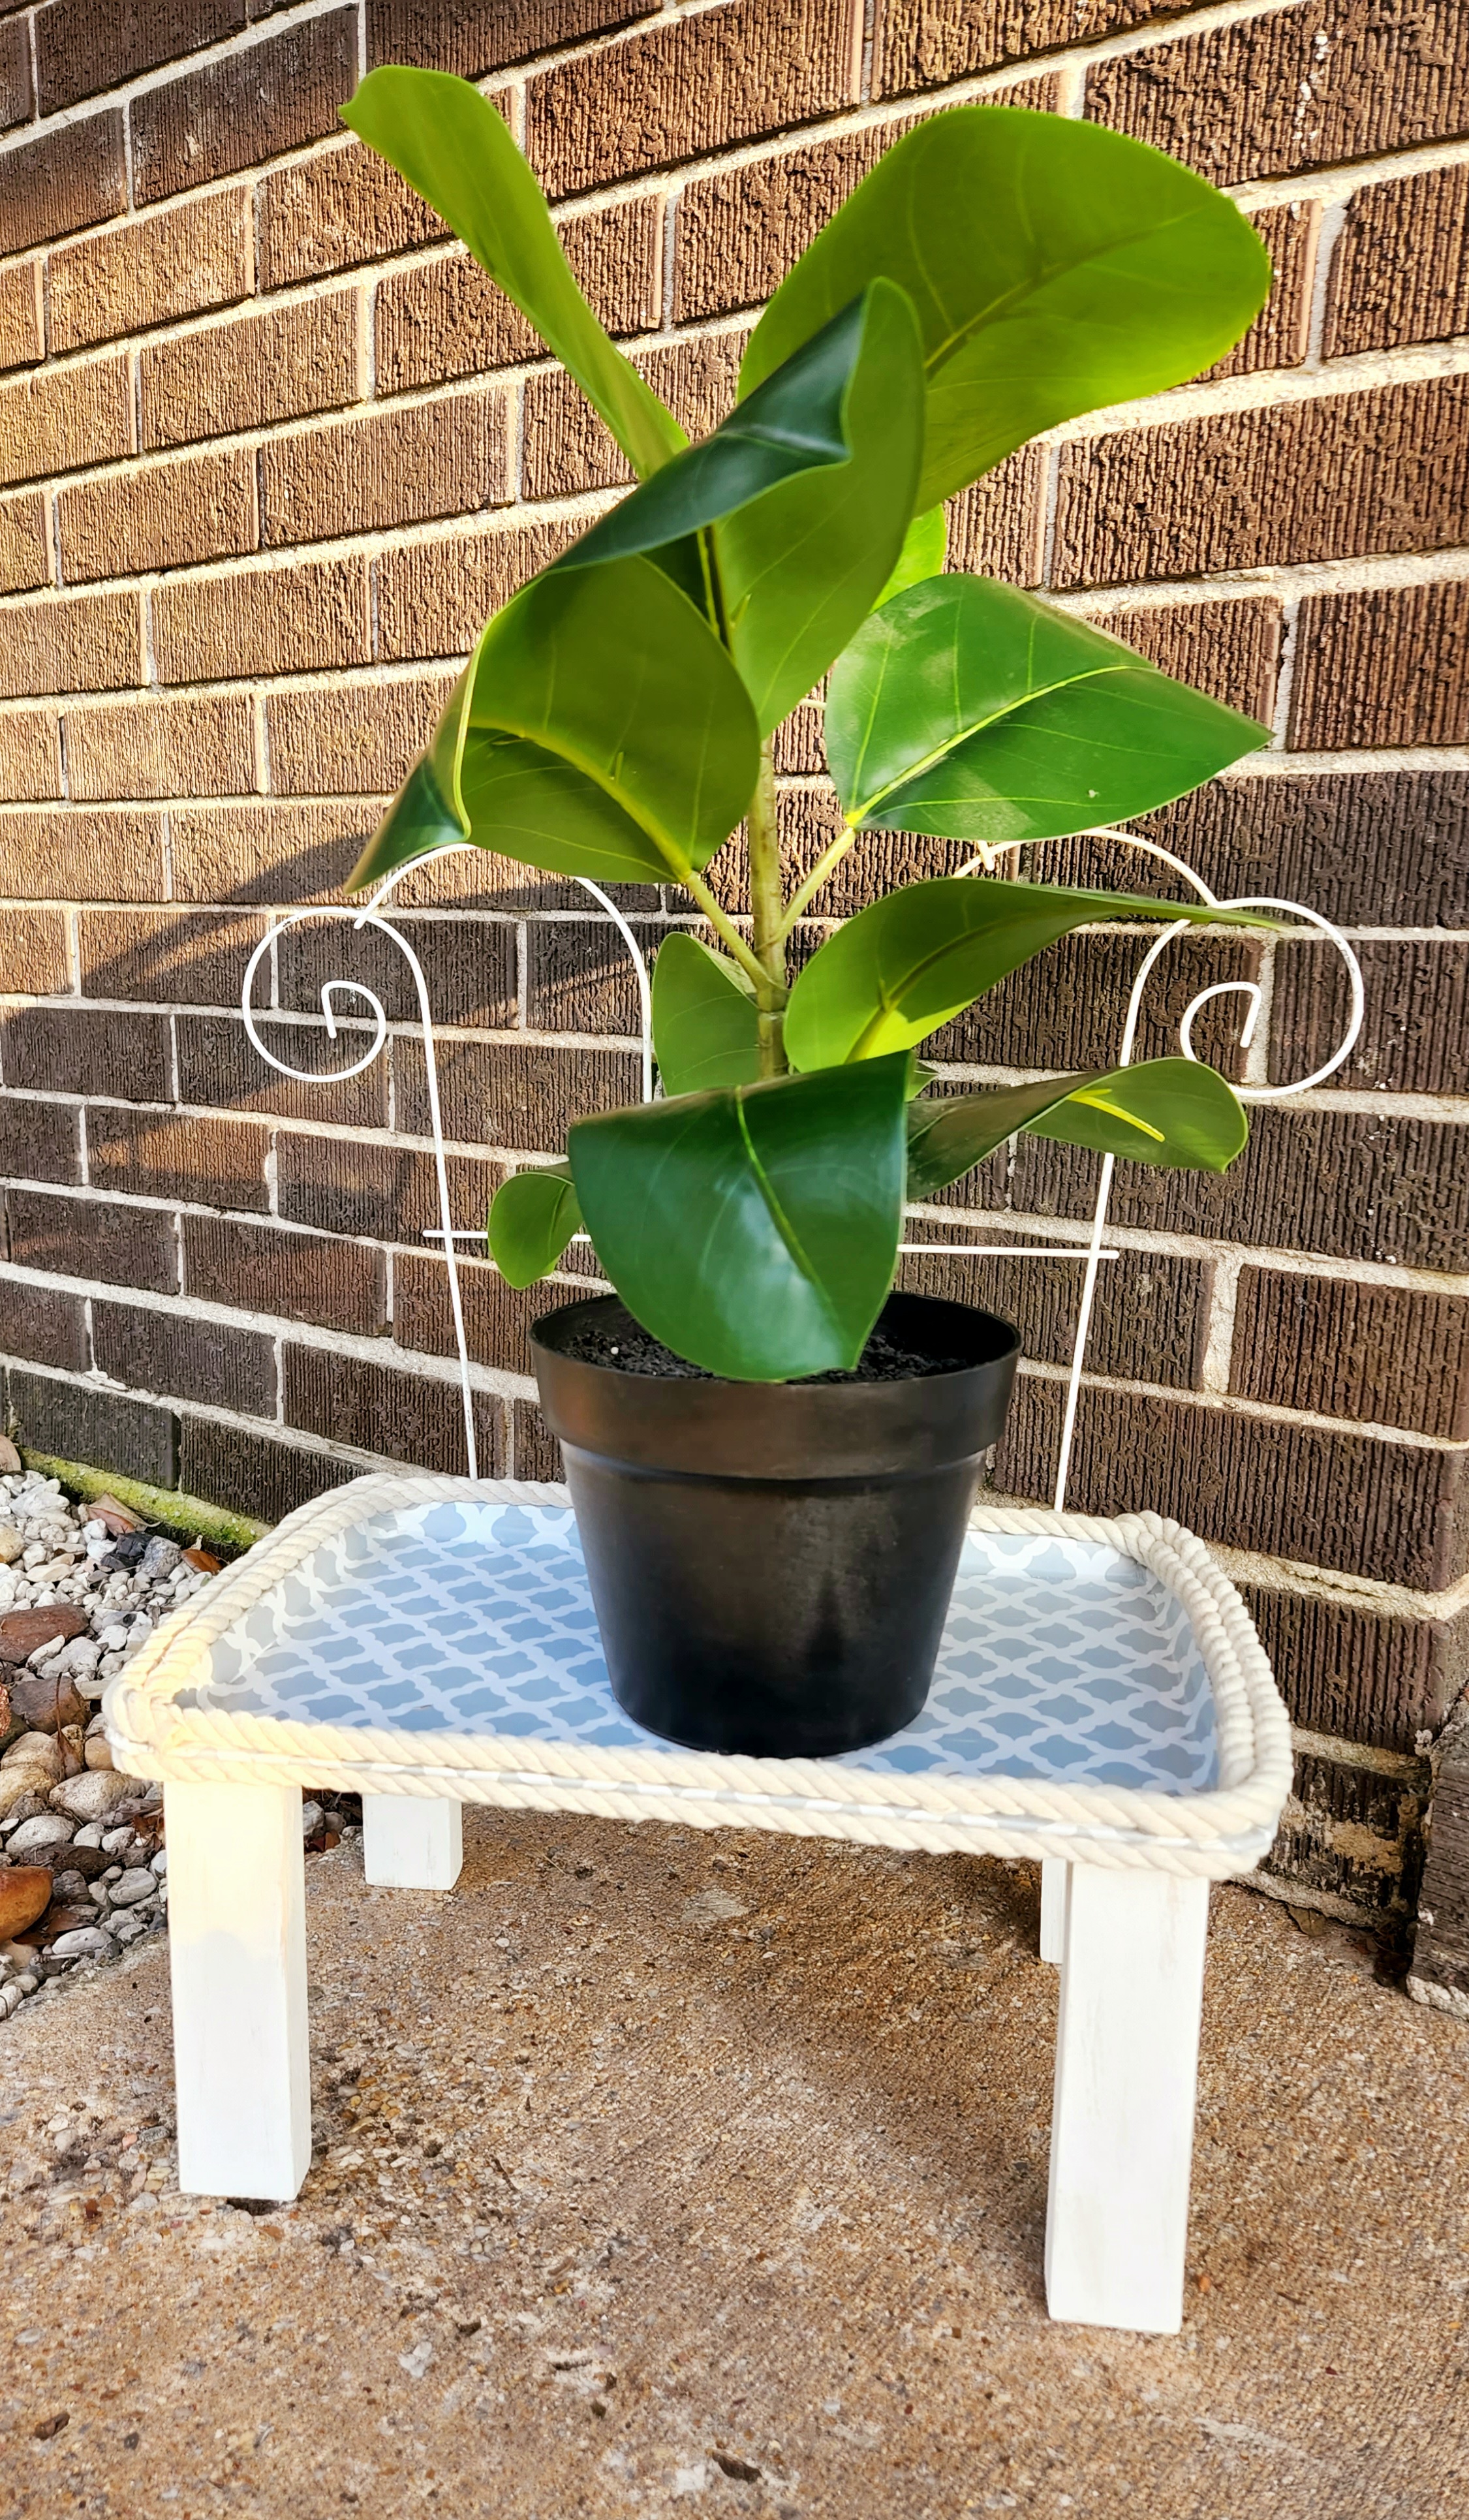
Place your plants on your outdoor plant stand and display it proudly!
These pictures are from before I added my sign, so I’ll try to get some pictures with the sign on tomorrow. I like the way my stand turned out, and I can’t wait to add a long sign with our street numbers behind it!

Remember to pin the image below or share this post with the buttons on the left side of the page so you can find it when you’re ready to start your project! Also, follow me on Pinterest for new ideas added weekly! Be sure that you never miss a great tutorial for decor like wreaths, signs and other home decor, free printables, crafts, and other fun posts! Enter your email address below to be notified of new posts! Use the buttons below to follow me on social media for other great content.

Don’t go yet! There’s more to see!
There’s plenty more to see here on the blog! If you’re looking for something specific, use the search box in the sidebar to look it up. If not, you might enjoy these ideas. Don’t have time to read them all now? That’s ok, just click over to the posts using the pictures and pin them for later. You can also add Life as a LEO Wife to your favorites and check back for new ideas and free printables and SVGs every Wednesday, as well as link parties with tons of shared ideas on Sundays!


This DIY coastal farmhouse flag looks like it was taken of the showroom floor! This is a tutorial you don’t want to miss. You can make it for about $7.50!! Looking for more summer decor, you might like these last two tutorials as well.


Do you like free printables, SVGs, & PNGs? You will love these projects with free SVGs or printables!


Under $10 on the 10th
I know you can’t wait to see what the other lovely ladies in the hop have cooked up this month! I know I can’t!
Tammy – Patina & Paint (main blog)
Terrie – Decorating & More with Tip (main blog)
Teresa – Through a Vintage Door (main blog)
Follow me on Pinterest for new ideas added weekly! And don’t forget to link up to our weekly link parties on Sundays and Thursdays. Happiness is Homemade is open until Thursday, and Crafty Creators will open for new submissions Thursday at 6am CST. You can find the newest party each week on my Link Parties page.


Niki this is absolutely adorable. I love the addition of the trellis. You have such a creative mind AND to get all of this done in the middle of a move – girl you are super woman! You can make me one of these any day! Thanks so much for sharing your talent and creativity with us.
You’re too sweet! When I get it perfect, I’ll make and send you one lol! I’m so glad I pulled it off. It was a 11pm-working-on-the-blog kinda night, but I’m so glad I did it!
What a cute plant stand, your tutorial was easy to follow. Thanks for sharing, enjoy your beautiful creation.
Thank you! I’m so glad I could join you all this month!!
Amazing, and so creative! It turned out beautifully, who would ever guess that is a cookie sheet!
Thank you! I’ve got to make some updates to it, and then I’ll be perfectly happy with it lol!
Now that is just adorable, absolutely love how you put it all together! It turned out beautiful.. I would love to try this myself. Good job!
Teresa
Thanks Teresa! I saw your chair on FB. I couldn’t get to it on your blog, but it looks great!
Niki, this is a BRILLIANT IDEA!! Love it!!
Thank you!