Designing Devotion Edition
I am so excited to join a lovely group of ladies for a DIY Blog Hop! This month we are all doing a “mini makeover.” At the beginning of this year I organized my craft room, and I shared how to do that easily and cheaply in another post here. Over the past year I’ve noticed that I used some things more than others, and I needed some things closer than where I had them. So I did a complete re-haul and did another craft room makeover! In this post I’m going to show you how I kept things organized and made them beautiful with very little money!
Before Pictures
Below is how everything was before the craft room makeover. To the left you can see the edge of the secretary desk that was there. Right up against the secretary was a white shelving unit with a small TV on top. On the other side of the room there’s a twin bed where my husband’s daughter can sleep when she visits every other weekend. I didn’t get the in the picture because it’s just not part of my craft room.


Things I used in my craft room makeover:
- 4×6 & 5×7 picture frames- Dollar Tree
- 5 shelves- Dollar Tree
- 3 pieces of wall art- clearance at Kirkland’s for $2.99 each
- wall art calendar- clearance at Kirkland’s for $5
- gold baskets- 2 square, 1 round, & 1 rectangle from Dollar Tree
Basis for the Makeover
Let me explain how I ended up with the items I used to base this craft room makeover on. I am so frugal. My Maw Maw (dad’s mom) was a bargain shopper, and she made sure she taught my mom and I how to do it! Once she bought like a thousand wax vampire teeth after Halloween. My Granddaddy asked her why in the world she did it and what in the holy heck were they going to do with them. She looked at him like he was insane and said, “They were a PENNY!!” To this day I don’t know what she did with those suckers. I bet a lot of kids got a handful of wax vampire teeth the next Halloween. Ya’ll these were not poor people! That makes it even funnier!
About two years ago my husband gave me a Kirkland’s gift card for Christmas. Card in hand, I headed for the store. There were so many beautiful things that I saw, and could’ve gotten with that card. I’d look at the back for the price, and set those beautiful things back on the shelf, lol! After picking up a few items, I made a bee-line for the clearance section. I ended up with about 15 items for less than $125, with 3 of those things being large, take-up-a-huge-chunk-of-the-wall items!
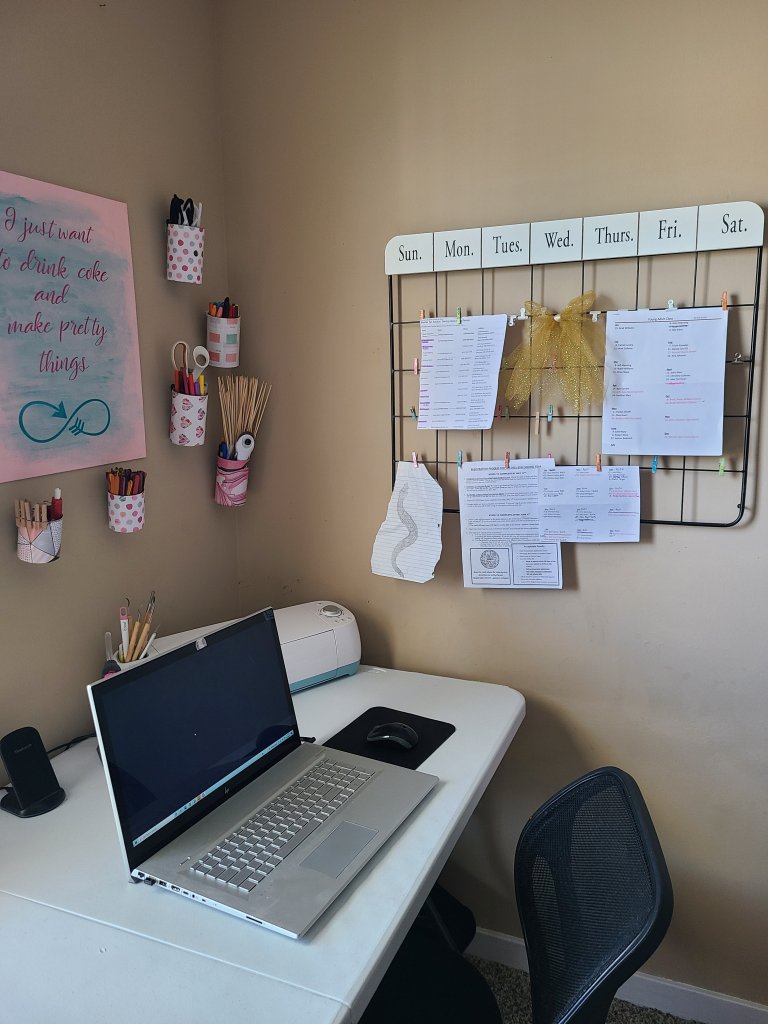
Gold Rim Wall Art & Wall Calendar
I got a large wall calendar that you can clip your monthly to-do’s on, and that has been hanging on the wall for a while. In addition I picked up three glass pieces of wall art with gold chains and purple or aqua designs. Those are what I decided to base the room around. They matched some bins that I’ve already been using and the cans that I use to organize & decorate. You can see those in the links from the beginning of the post.


Organize the Supplies
When you start to organize or revamp your craft room, you need to gather all of your smaller items and place them in a larger bin. This will help you get to the larger things that you need to move. If you have smaller bins that you’re going to put things and they will remain there, go ahead and fill those now. As you place things in, write them down on an index card or something like that. You want to have a list so that you don’t have to tear bins apart to find things. I cannot describe to you how helpful this is and how much time it’s saved me. You can tape this on the top or front of the bin or just place it inside on top of everything.
Remove anything that’s on top of the furniture you’re going to move and place it in an out of the way area.


Re-organizing & Beautifying During the Craft Room Makeover
Cricut Area
I had a table next to the twin bed in the room, and I moved it next to my desk/table. It is perfect for my Cricut. I added a white blanket on top of it before I added the Cricut to it, so that I could place the things that I need and use with it, underneath. The blanket hides the bins that hold my cutting mats, extra blades, vinyl, pens, etc. so that everything still looks neat. I also put in a few self-healing mats, paper slicers, and a fewer large items like that. Even when things are in bins, it can look cluttered, so adding a blanket, a sheet, or other fabric to tables is a great way to make your craft room look neat and organized because the bins will be hidden.


Adding Shelves Above the Cricut
Before the craft room makeover I had decoupaged cans hanging on the wall that I used for organization and storage. They hung on the wall on either side of the window. This is a great way to keep your craft supplies organized and is such a cute way to decorate the walls. I am working on re-decoupaging the cans now to match the new decor in the room. You can check out how to do it in the first two craft room makeover posts (here & here).

I got the shelves from Dollar Tree. They have shelves! Not just in the Dollar Tree Plus stores. I got these before they even started opening them in my area. I got four of them, and I already had a pack of three from Five Below. The ones from Five Below were different and came with three different sizes. I used one from that pack, and the other four around them. I will be doing a tutorial on how to hang shelves and other things easily and evenly soon, so make sure to follow me on social media. More importantly enter your email below so that you get an email when a new post is added!
Get notified of new tutorials, free printables, & other great posts!
Adding Embellishments to Items for Shelves
After adding some gold circle washi tape to the top and bottom edges of some of the original cans, I placed them on two of the shelves. I wanted gold running through the room to tie in with the purple, teal, and gold wall art. I placed glue sticks, my favorite Fiskars scissors and rotary cutter, and a few pens in the cans. On one shelf I placed a round vase that I added the same washi tape to and in it I put my Cricut tools like my scoring tool, different shaped tools I use for weeding, and some of my crochet hooks. On the middle shelf I placed a vase, again with the added washi tape, with a white and gold flower bouquet in it and two small glass candle votives. I also placed a few more gold decor items on the shelves.
I highly recommend using washi tape when you’re upcycling items, or even if you’d like to make something match an area in your home like I did here! It brings gold to the shelves and that side of the room.

Shelving Unit
I moved my white shelving unit near the table that I use as my desk and crafting space. In the bins I added the crafting supplies that I use with just about every project since it’s so close to the table. When you’re doing a craft room makeover you want all of the things you use the most often near where you use them. You also want them easy to get to and easy to put away. In those bins I put supplies like my small glue gun and glue sticks, pipe cleaners, zip ties, felt, items from Dollar Tree that I have imminent plans for, stencils, etc. On top of it is a very small TV for my husband’s daughter when she visits. Actually I’m so busy with my blog at this point that she doesn’t get to get in the room much!
Decor for the Shelf & Cubbies
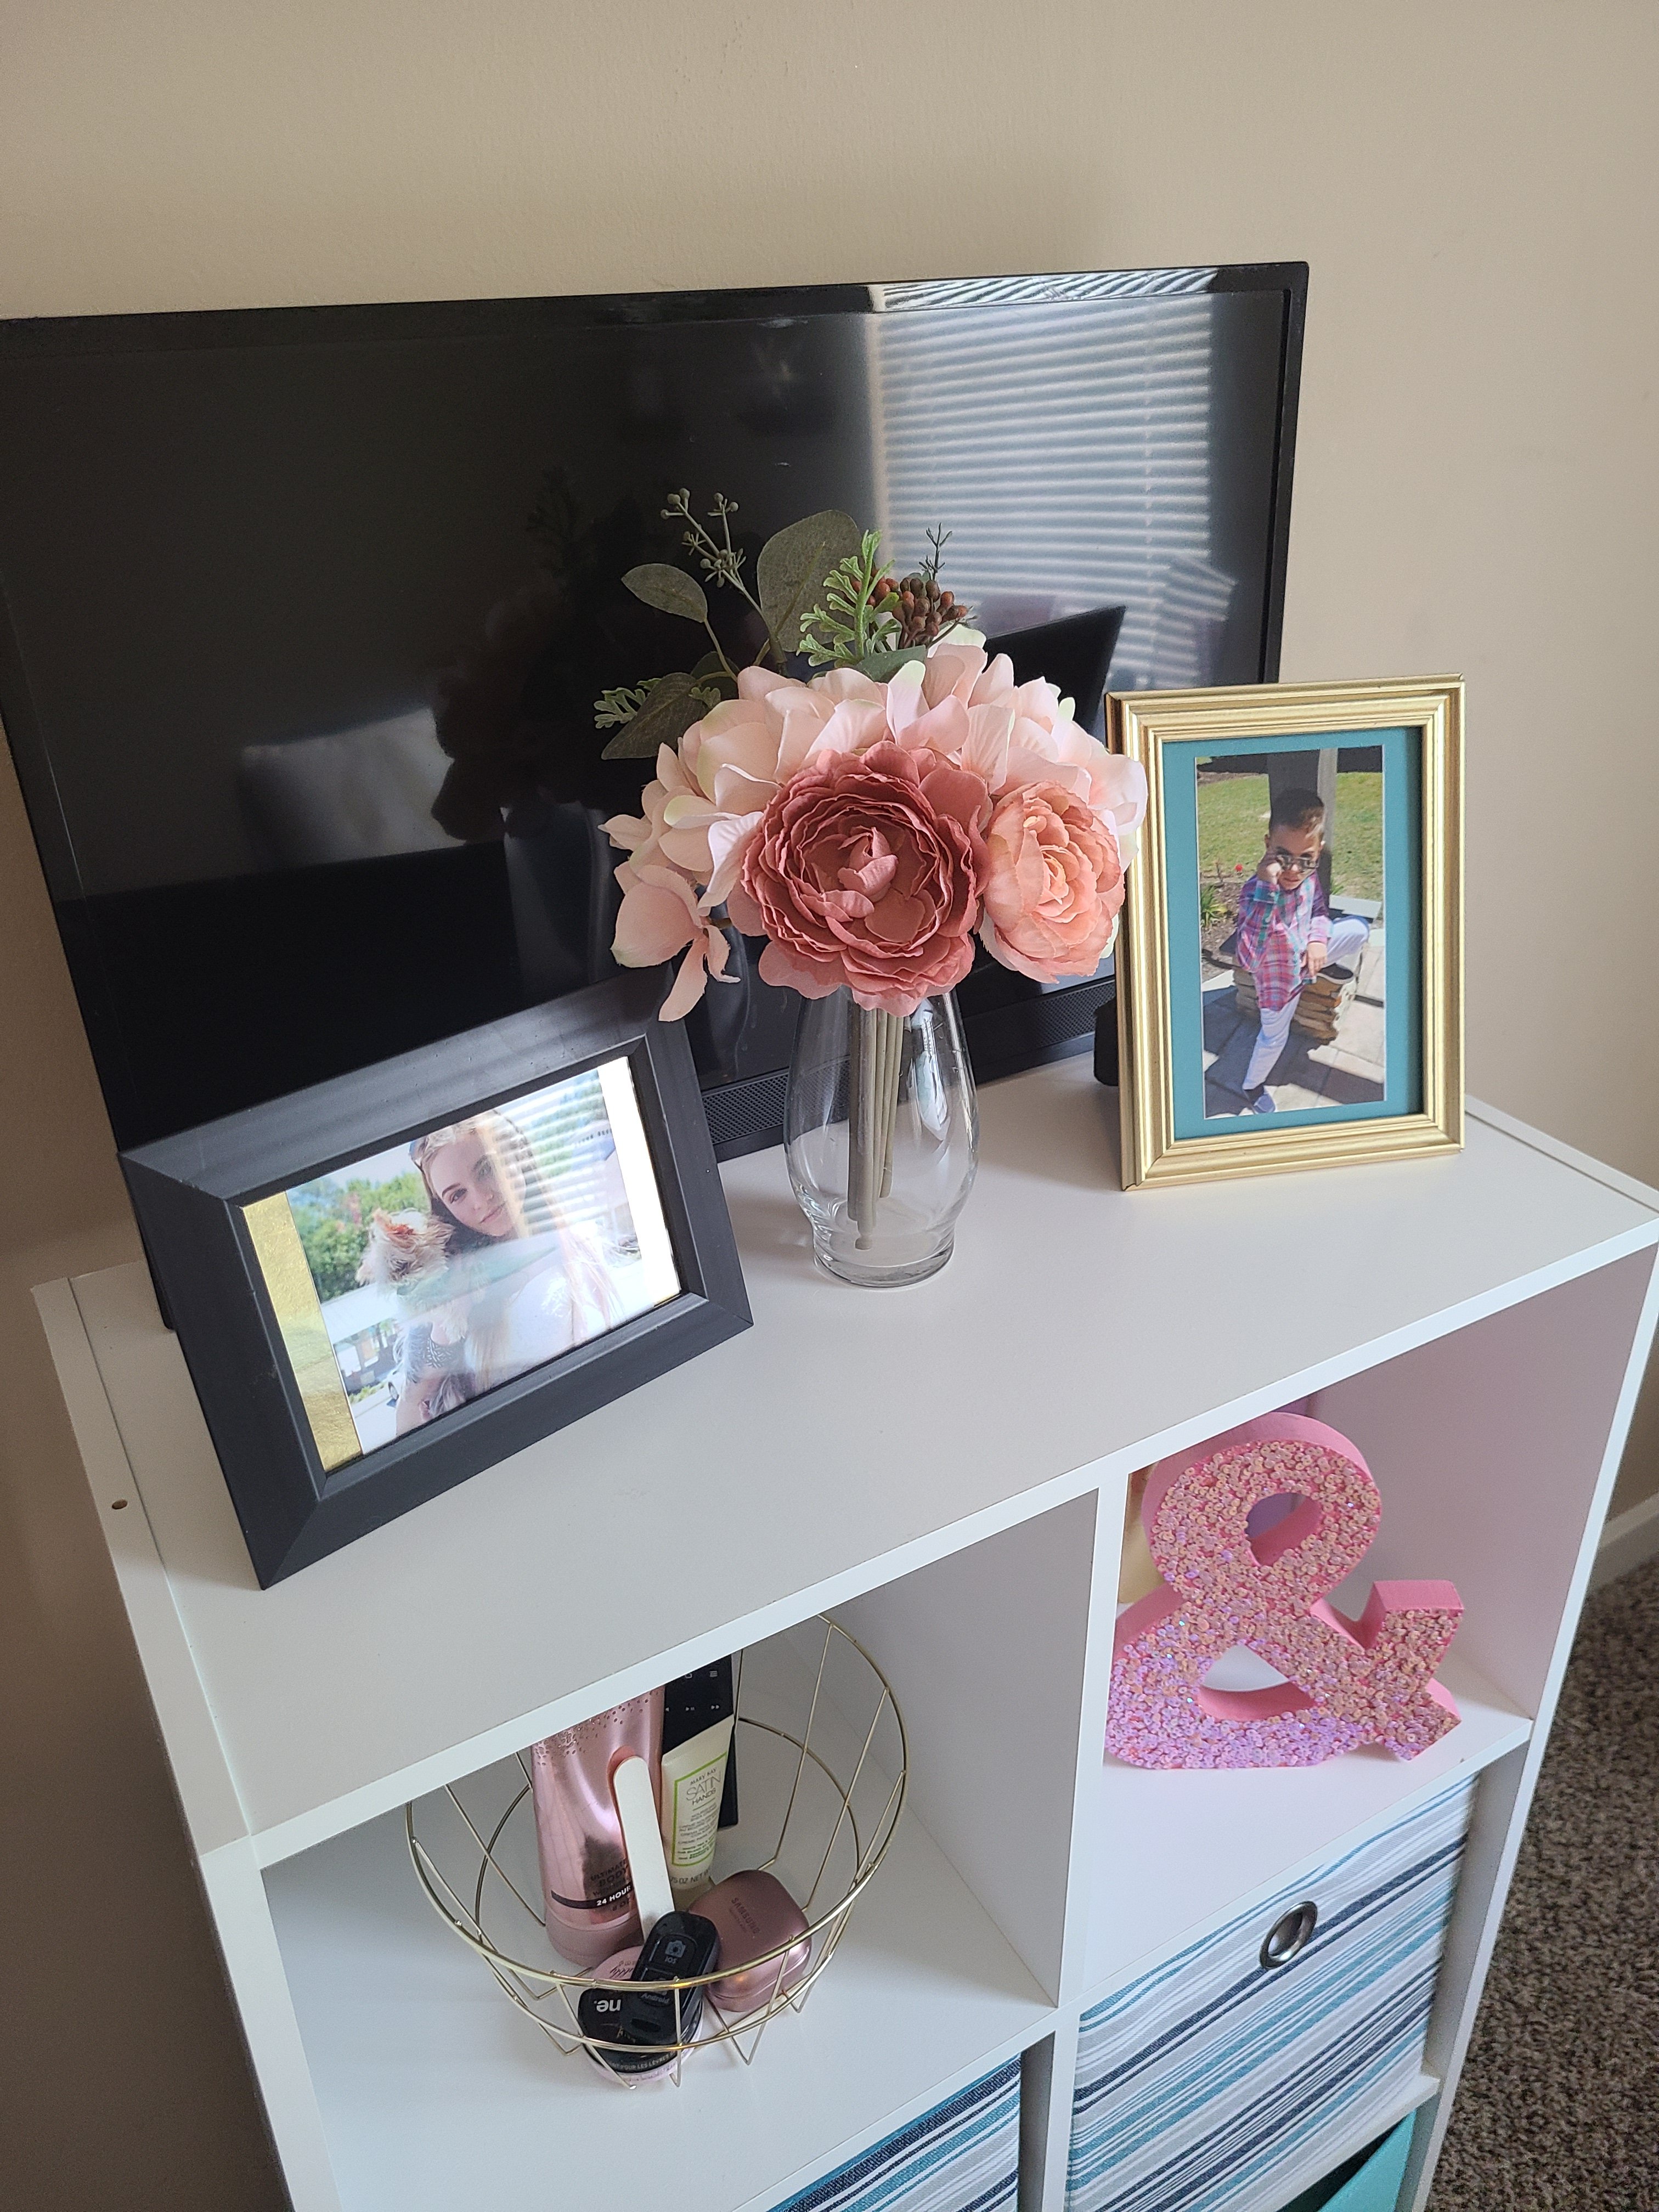
I have bins in four of the cubbies and two are empty. I had books in one of the cubbies that were just kind of shoved to the back before. In front were some random items that I had pushed in there. I found a new home for the random things and used cardstock paper that matches the glass gold wall art to cover the books. They look so cute, and makes the cubby look organized and beautiful. In the other cubby I placed a gold basket filled with the things that I use while in the room, like Motrin, Bath & Body Works lotion, nail file, mints for when my blood sugar gets low, remote for the TV and for my tri-pod, and my ear buds.
I printed out a few pictures of my son and daughter and placed them on top of the unit in front of the TV. Between them I placed a vase filled with a premade bouquet from Michael’s that I got years ago.

My beautiful babies!

Desk & Craft Area
Computer/Work Side
I moved my computer all the way to the left side of my desk. My super handy phone charging cradle is next to it. I added a gold basket next to that, and it contains the notebook that I write everything in everyday and one of the cans I used to organize on the wall that holds my pens and pencils. The wall calendar now hangs on the left wall so that I can get up from the computer and easily clip my appointments and tasks on it. Under that is the little shelf that holds my tape, Mod Podge, different types of glues, rulers, chalk, etc. When I’m not at the desk, I roll my chair into the corner, out of the way.
I highly recommend having everything that you use when you’re working on your computer close, but organized. A craft room especially gets cluttered and messy so quickly and easily. Keep things in a specific place and make sure you put it back exactly where it belongs every time you use it. It never fails that if you don’t, you’ll have to end up destroying your crafting area to find it!

Under the desk I put a storage ottoman where I can keep things I need a lot, but it’s not under there just for that. My heart has recently decided not to pump properly so I am swelling very bad. It’s everywhere, but especially from my knees down. My doctor recommended that I keep my feet up as much as I can, so the ottoman does double duty. I don’t notice keeping them up working, but whatever, lol. And yes, I am on meds for that too. It’s a brown ottoman, so I’m going to have to recover it or something. If you have any ideas for it, let me know in the comments.
Craft Side
The right side of the desk is where I do my crafting. I have a Cricut brand self-healing cutting mat that is beautiful! It has a grid ruler on the back and a pretty teal and light teal print on the front, so I leave it out all the time. I added a family picture in the corner of the desk with my stapler, large hot glue gun, and electric scissors. You may get a laugh out of our family picture! I chose it because it has all of us in it, including my husband’s daughter. You’ll definitely be able to tell which ones are mine and which one is his lol. For some reason the picture printed and chopped my husband’s head off! I used it anyway because, well, ink is really expensive! I told you I’m frugal, a miser you might say!
Under the right side of the desk is my rolling craft bag. I keep a lot of my heat transfer vinyl in there. If I ever have to take supplies somewhere, I can use this to easily bring all that I need. You can see in the middle is a dog bed that matches the room. The little photo-bomber you see there is Miss Bella. She is our little 2.5lb Morkie (a mix of a Yorkie and a Maltese). They are usually small, averaging 6-8lbs, but she’s a “micro-teacup” Morkie. She’s not even a baby. She will be 5 next month!


That’s my craft room makeover!
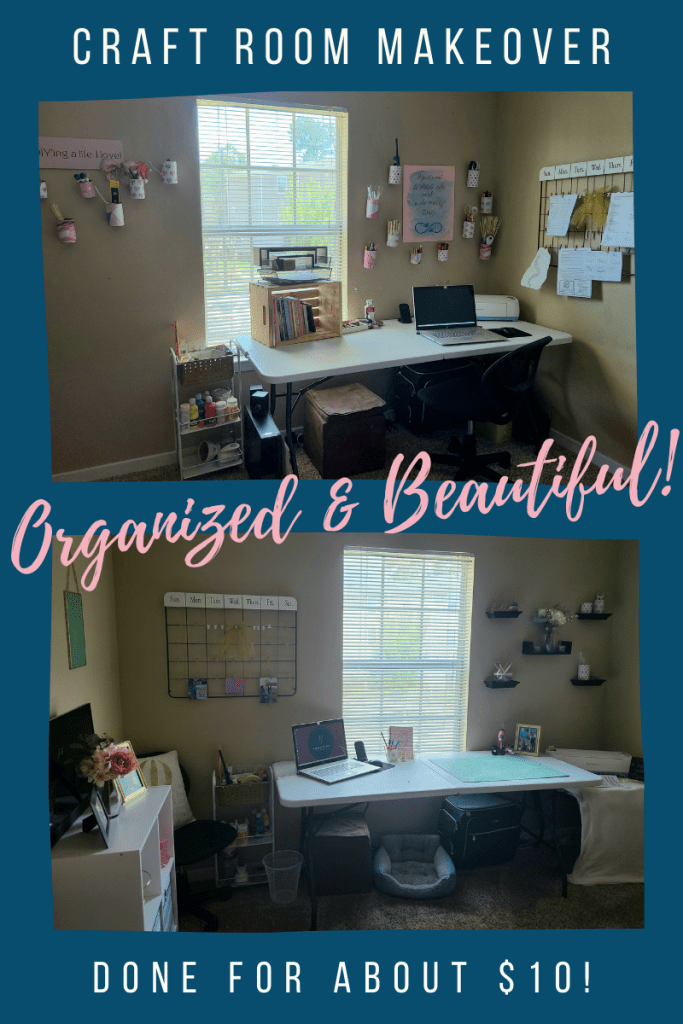
I hope that you enjoyed seeing my makeover and that the tips that I’ve given you along the way help you organize and makeover your craft space! Here’s a look at the whole space.


I am so happy to be joining some lovely ladies for a DIY Blog Hop that will occur on the first Sunday of each month.
This month’s theme: Mini Makeover

Tarah from Grandma’s House DIY – Corkboard & Key Caddy Makeover

Niky from The House on Silverado – Laundry Room Refresh

Chas from Chas’ Crazy Creations – Awesome & Easy DIY Fall Tree Branch

Lynne from Thrifting Wonderland – Fall Entryway & Lantern DIY

Amy from Health, Home, & Heart – How to Cheaply Update Wall Art
Thank you for joining us today for our mini makeovers! I hope that you check out the tutorials from my friends in the blog hop. Make sure to pin this tutorial and their tutorials for creating adorable and cheap craft room organization from the other posts!
Designing Devotion- Transformation
In this post we have seen the transforming power of a makeover. We want our homes and spaces to be neat, clean, orderly, and as beautiful as possible. In the same way we, who are children of God, are expected by Him to be set apart and acceptable to Him. We don’t want the “junk” of the world entering our hearts and minds, contaminating the same place where the Holy Spirit resides!
Paul says in Romans 12:1-2 ESV, “Do not be conformed to this world, but be transformed by the renewal of your mind, that by testing you may discern what is the will of God, what is good and acceptable and perfect.”
Sometimes we need a complete makeover of our heart! We have to take a moment to inventory our lives just like I did when I was reorganizing my craft room. “Ok. As a daughter of Christ does this thought belong in my mind? Does this show belong on my TV? Did what I just say to my friend reflect the fact that I’m a child of the living God?” We all get swept up in the world sometimes. God knows that we are human and that we sin. Jesus died to cover those sins. He’s standing beside the Father who heard me gossip, and He says, “Yes, Father. She did wrong. But I paid for that, remember?” Of course God remembers; it was His perfect plan after all.
So this week, let’s take stock of what we’re hiding in our hearts and what we’re allowing to build up in them. Pick up the mess, reorganize the thoughts and actions, and let’s all have a heart makeover! Let’s not be conformed to this world, but be transformed in Christ into the person that God wills us to be!
Thanks for Visiting!
I would love for you to follow me on social media. I am finally (after a year!) trying to grow the blog’s social media presence. Let me know when you follow me, because I’d love to follow back! Let me know what you think about my craft room makeover in the comments. I’d also love to hear if you have any tutorials that you’d like me to share with you.
If you’re decorating your home for fall I think you may like these tutorials: these reversible faux books to use for fall & Halloween, these reversible Dollar Tree pumpkins for fall & Halloween, and this super cute DIY fall centerpiece made with Dollar Tree items. Another great Dollar Tree DIY fall decor pieces are these word decorations.


If you are wreath lover, might like these DIY wreath tutorials that you can customize for any season: this spiral deco mesh wreath, this bubble burlap wreath, this braided nautical rope wreath, and these adorable yarn wreaths.


Hi Nikki,
I’m quite envious of your great makeover and a room dedicated to crafts. It looks super and I imagine you can create some really special things in your new space.
Lynne, Thrifting Wonderland
Thank you Lynne! It’s a bittersweet kind of space. I love having it, but only got a whole room when my oldest graduated & moved out! Shhh…. don’t tell anyone I’m old enough to have an “adult” child (she’s 18).
Hi Miss Bella, great to meet you! Fabulous make over too Niki!
Thank you Mel. Bella says hello, straight from my lap lol! Spoiled thing!
I love the makeover, Niki! I, too, am very frugal and ALWAYS head straight for the clearance section of any store. Ha! I also am constantly organizing, and then re-organizing. I’m sure my husband loves it… lol! I love the Dollar Tree shelves and the clip on calendar. Thanks for sharing!
Thanks Amy!
Hi! I’m popping in from Julie’s party and have loved seeing your redo of your craft room! I have a sewing/craft room and I’m always excited to see what other people do! Hope you’ll pop in to see me sometimes.
Be a sweetie,
Shelia 😉
Thanks for visiting Shelia! I’ll be by to check out your blog! Feel free to link up your posts on Happiness is Homemade, You’re the Star Blog Hop, & Traffic Jam Weekend.
Wow it looks fantastic, now I’m inspired and need to dig into mine.
Thank you Chas! I just have to keep it this way!
Your craft room is so pretty and so organized! I have an office/craft room, but I keep all my crafting things tucked in the closet in there. I wish I had more room to spread out like you!
Niky @ The House on Silverado
Thank you! I have tons of bins in the closets too lol!
The makeover looks great! Thanks so much for linking up at the Unlimited Link Party 33. Pinned!
Thank you! I love sharing with you & your readers!
Love how this turned out, glad to be hopping with you!
Thank you! I’m happy to be joining you talented ladies!
I enjoyed seeing your creative ideas in action. Thanks for sharing, Niki!
~Lisa, Visiting from Grammy’s Grid Unlimited Link Party #33 (I’m #88)
Thank you Lisa!
Love your mini makeover and laughed at the story of the wax teeth. You me nostalgic for the days when I did a lot of crafting and had my own craft room (now my home office). Thanks for linking at #WowOnWednesday
Thank you for visiting!
Your room looks great, you are very organised! I love the story about the halloween teeth, my nan was the same, very frugal, she grew up with very little and then had war time rationing to deal with. She would buy yarn if it was a bargain, whether she needed it or not, knowing it would come in for something!
My craft space is also my daughter’s room after she moved out. It is bittersweet isn’t it? I’m lucky that she only lives 15 minutes away so I can hug her often still!
Mine can walk to my house thankfully. Not that she does a lot, ha. She has her friends & work & is getting ready to head back to school. I had my children really far apart, so she does pick up her little brother & takes him to do stuff a lot. So sweet. It’s great to have them near isn’t it?! I can’t imagine how parents feel when they move far away!
I like the colors of your craft room. And the gold adds a nice touch. Like the idea of the Wahabi tape. The story of the teeth is funny.
Thanks Theresa!
Doesn’t it feel good just to tackle a project? I always feel better when I’ve organized. It doesn’t happen too often, but when I do, I feel great!
So glad you’re offering cheap solutions. Our lives don’t always have to be lavish to be organized and pretty. Thanks for this reminder.
Blessings to you!
Laurie
Ridge Haven Homestead
Found you at the Homestead Blog Hop!
Thank you Laurie! I am so glad that you stopped by! I hope you’ll continue to visit & see all of my other fun tutorials!