About two months ago I visited a Dollar Tree that has a large craft and decor section. They had so much stuff that I wanted (and bought, ha!). I found these really solid words that are like table-top decor. They’ve been in my craft room and during my recent room makeover I rediscovered them. I decided to upcycle them and make them match my early fall decor. Here is the tutorial for a fall Dollar Tree DIY decor piece.
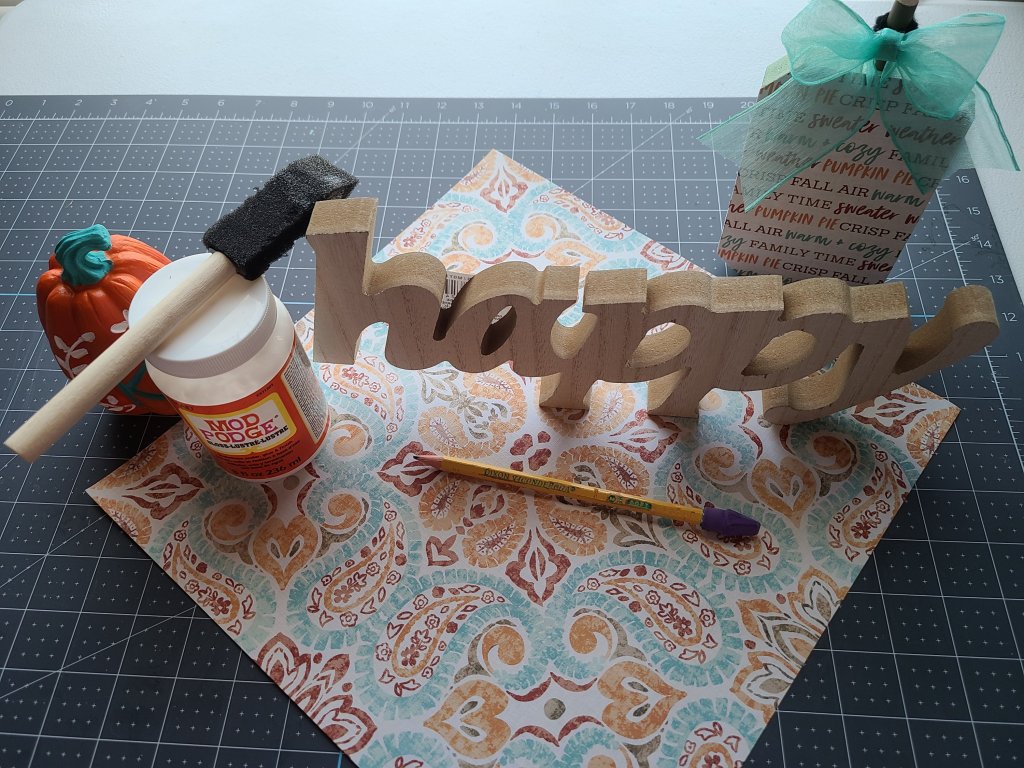
For your fall Dollar Tree DIY decor you need:
- wood word- I used “happy” & “family.”
- fall pattern paper- I used a pack from Michael’s.
- pencil
- scissors
- Mod Podge
- foam brush
- acrylic paint & paint brush
Paint Wood Word
If you’ve seen my other early fall decor, you will know that the theme, if you can call it that, is aqua, orange, and white. It is way too hot where I live to go with the darker colors of fall. The heat index each day is still over 100! I just really like the colors together! I got a plaid ribbon in those colors from Hobby Lobby two years ago, and the pack of fall cardstock paper matched so it was just meant to be!
Use your acrylic paint and paint the top and bottom edges of the word. If your piece will be seen from the back, go ahead and paint that too. The back of mine won’t be seen, but I painted it anyway because I never know where I’ll put it next year. You may need a smaller paint brush to paint inside letters like a or e. I painted “happy” aqua and “family” orange. I gave my words two coats each. Allow it to dry. It took my words like 15 minutes to completely dry.


Trace the Word on Patterned Paper
Once your fall Dollar Tree DIY decor piece is dry, you will trace the shape on the cardstock or other paper type. Turn both your paper and word upside down. Lay the word on the back of the fall patterned cardstock and use your pencil to trace around the word. Make sure to trace inside your letters as well.

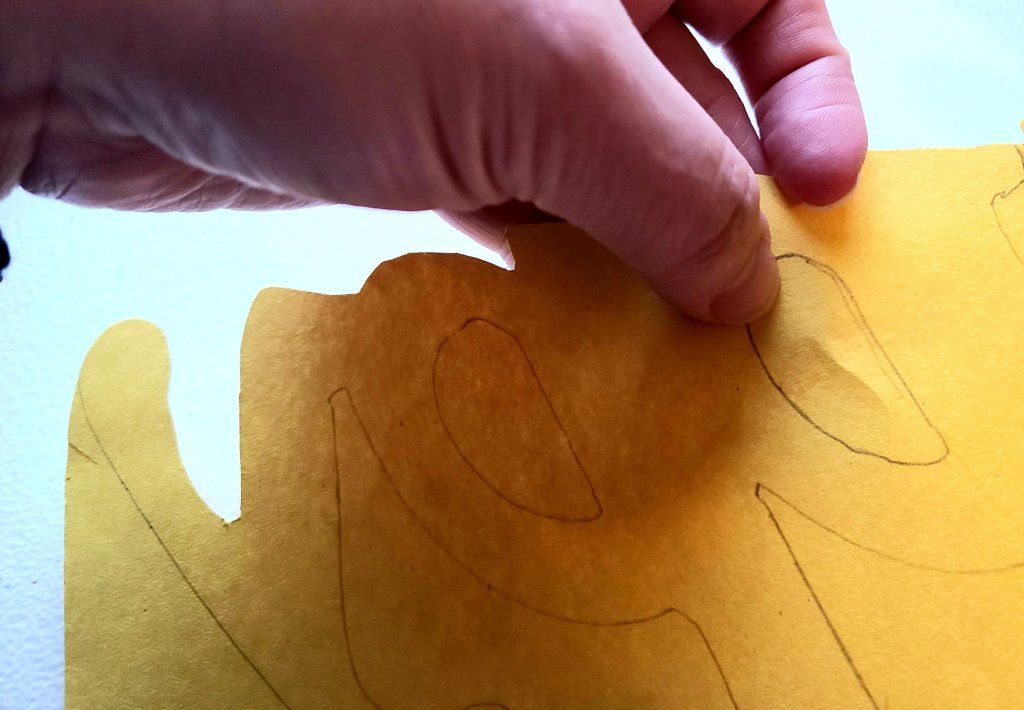
Cut Out the Word Shape
Very carefully use your scissors to cut out the word from the cardstock. While cutting, I cut just barely inside the pencil line. That will make the paper fit the word perfectly. I didn’t get a picture cutting the original cardstock, but I did a re-do on this construction paper so you can see how you should cut.

Cut just inside the outline. Here you can see where I pulled the paper away from the letter H showing that I cut inside the outline. You can see here that I cut just inside the traced line.


When you need to cut inside a letter like “a,” fold inside the “circle” (or whatever shape the letter makes). Do not make a crease or see-able fold to anything outside of that circle. Use the tip of the scissors and snip the tiny fold. This will allow you to place the scissors inside the cut and cut around the letter-line.


Mod Podge paper to the fall Dollar Tree DIY decor word.
Brush a layer of Mod Podge on the front of the wood word and a thin layer of it on the back of the cardstock.

Carefully lay the cardstock cut-out word on top of the wood. Make sure that is even on all sides then smooth the paper out over the wood. Press the paper down and push out any wrinkles or bubbles.

Brush another layer of Mod Podge on top of the cardstock to seal it. Allow it to dry, and that’s it!
Your fall DIY Dollar Tree decor word is complete!
Here is what my words look like!


I originally painted the edges of my “family” white, but it blended in with the cardstock too much. To fix this I went back over it in orange which allows it to pop more.
I hope you enjoyed this super easy, super cute tutorial! Make sure you pin it for when you’re ready to make your adorable fall word art. Use the buttons at the bottom of the post to share on social media (and then I’ll love you forever lol).
If you love fall decor as much as me, you will probably like the pieces that match these wood words: these reversible pumpkins for fall then Halloween and these reversible faux books for fall then Halloween. This very cute DIY fall centerpiece is so cute and goes perfectly with farmhouse decor. If you do have a farmhouse fall theme, you will definitely love this DIY burlap wreath and this bow made with burlap farmhouse truck print ribbon. Both of those are easy to follow tutorials with plenty of pictures to help along the way.


Make sure you don’t miss a post by following me on social media and enter your email address below so that you get an email when a new post is added! If you head over and follow me on social media, let me know in the comments or on that platform and I will follow back.
Get new content delivered directly to your inbox.
If you are one of my blogger friends, make sure you share your family friendly posts with us on our three link parties: Happiness is Homemade, You’re the Star Blog Hop, and Traffic Jam Weekend. Not a blogger? Make sure you check out those posts because you will find tons of great ideas and inspiration for things like home & seasonal decor, recipes, DIYs, gardening, crafts, fashion, family ideas and much more!


How pretty, looks nice! Thanks so much for linking up at the Unlimited Link Party 33. Pinned!
Thanks Dee!
Thanks for the idea! I have one of these word signs that I have been holding onto for nearly a year now because I really wasn’t sure what I wanted to do with it. Pinned.
I’m glad you like it! When you upcycle yours, I’d love for you to tag me on social media. I love seeing everyone’s creativity!
Wow! You really elevated this with your good work!
Thank you Michele!
This really looks pretty and I so admire the creative skills of others!
Thank you Joanne! I didn’t get creative until maybe 5 years ago. I was always the brainy kid, lol!
Lovely project. I love your your colour combos. Hope to see your pretty art work back here again soon at Through the Craft Room Door. . Judy DT
Thank you Judy! I’ll be there!
I am honored to be featured! Thank you!
I love the Dollar Tree. It’s a great way to make simple changes without spending a ton. Good for cheapskates like me. 😉
Thanks so much for coming over and sharing this at the Homestead Blog Hop last week! Please come back and share more ideas! We all need practical solutions!!
Blessings,
Laurie
Ridge Haven Homestead
Thanks Laurie! I think by now the Dollar Tree employees should know my name, ha!