Not too long ago I found white cotton rope at Dollar Tree. My second most popular post of all time is my braided rope wreath tutorial, so I knew I wanted to make another one with the white rope. I definitely didn’t want a repeat of the same tutorial, so Valentine’s Day was the perfect excuse to use my white rope a little differently! Today I am sharing a tutorial for making a beautiful heart rope wreath that you can use for Valentine’s Day. It also works well in girls’ rooms after the holiday! Just add a bow in colors that coordinate with her other decor. I thought it would be as easy as wrapping a rope around a heart, but it was not. Luckily, you get the benefit of me figuring out all of the tricks first!


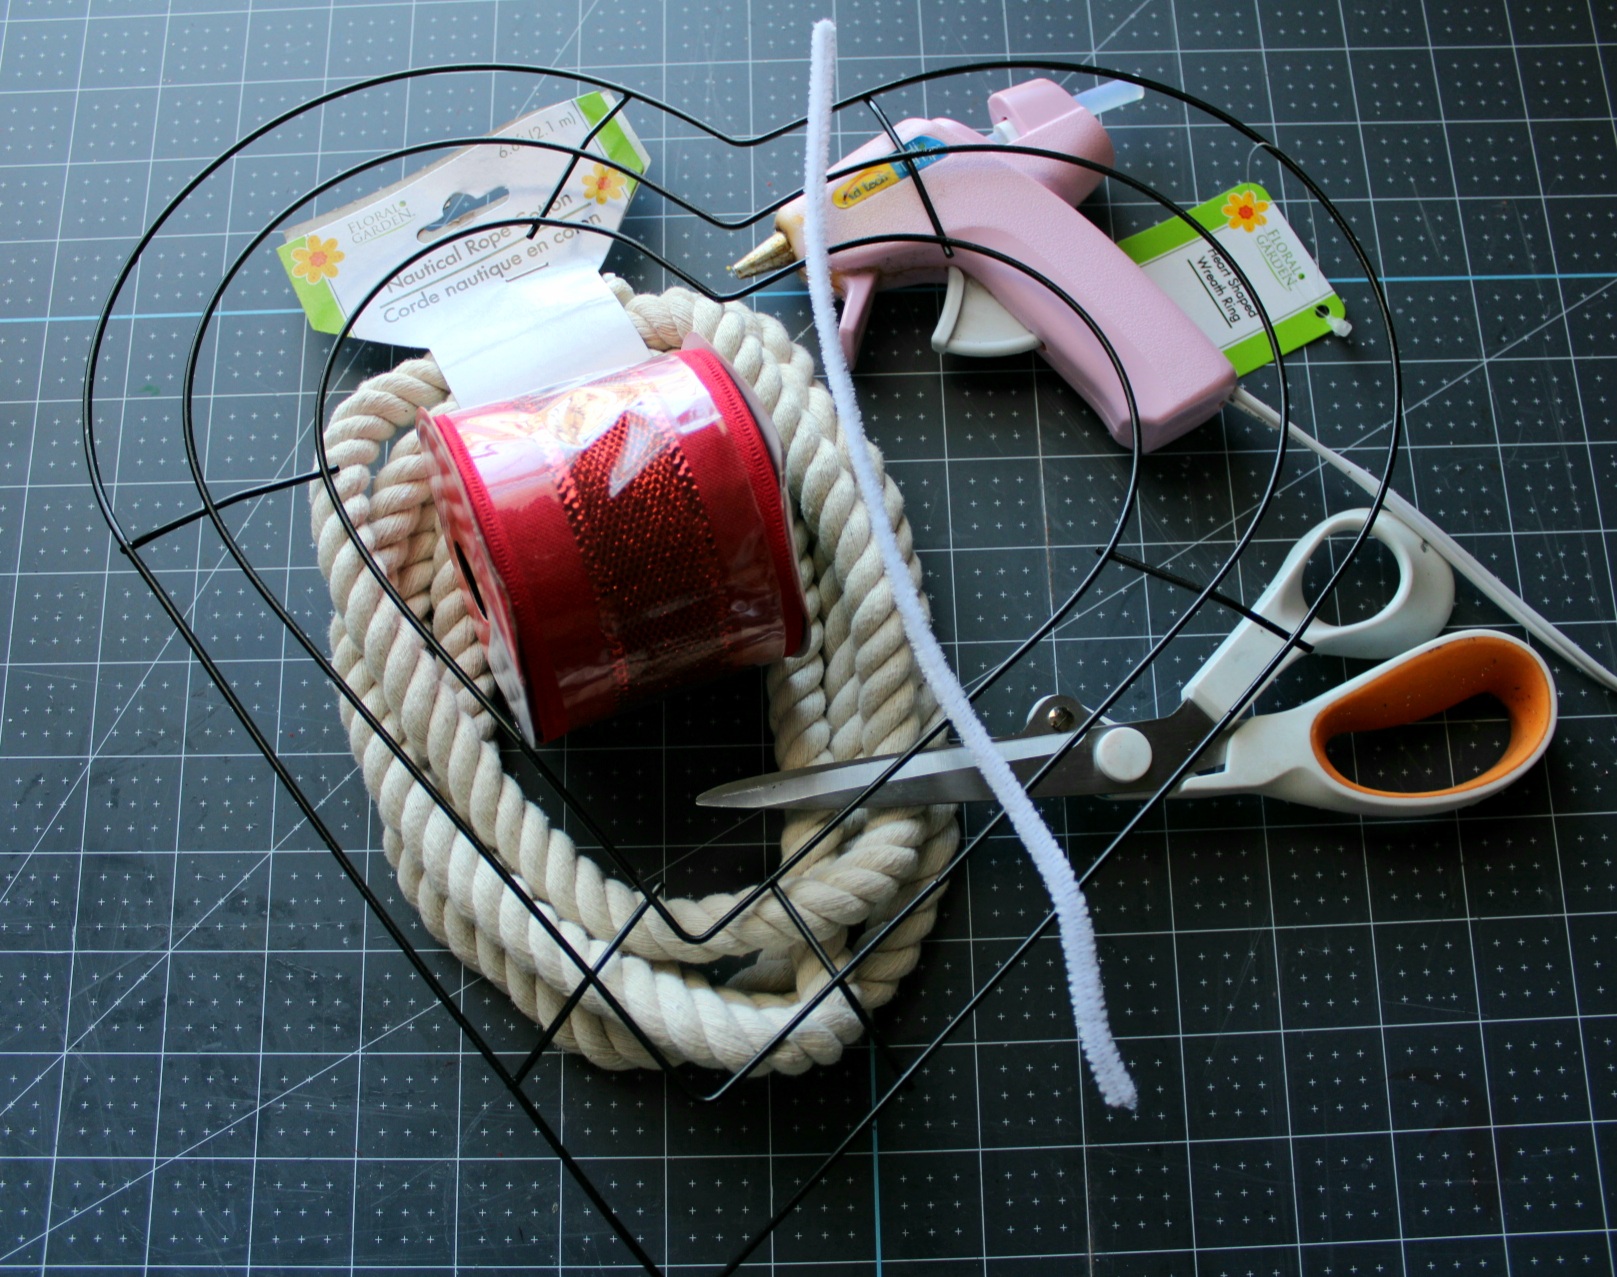
Supplies for a Valentine’s heart rope wreath:
You can get all of these items from Dollar Tree.
- 4 packs of white cotton rope- 11.2ft per pack
- hot glue gun & glue
- wire heart wreath form
Begin Wrapping
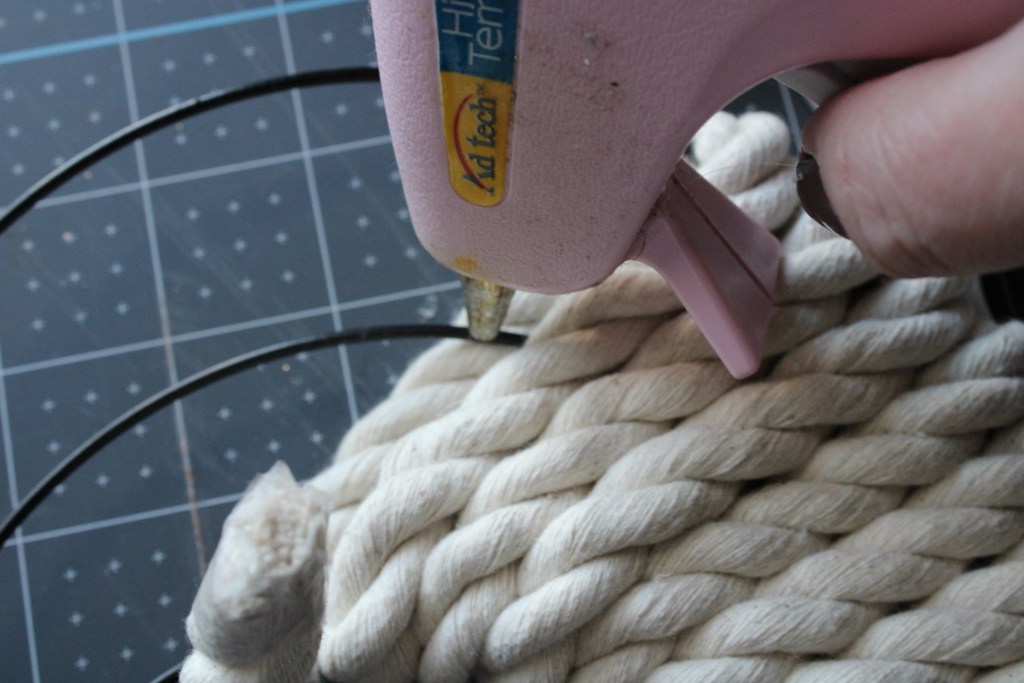
Place a bit of hot glue on the end of the cotton rope where the tape is, then wrap the end of the rope around the outer ring of the wreath at the top. Pinch the rope with the glue against the rope that’s around the wire.

Now begin to wrap the rope around the entire wreath form.

Since the heart goes up and is a bit round, you may need to add some hot glue to the outer wire in some places. That will keep the rope where it’s supposed to be.

Continue wrapping the rope and gluing where it’s needed. I pulled mine pretty taunt as I wrapped.


Starting a New Rope
My first rope ran out about half-way through the first arch. When you reach the end of the rope, place hot glue on the end, and press it to the back of the wreath, on the middle wire. If the rope ends where it would be glued to the front of the wreath, you’ll need to cut it. Turn the wreath over and cut the rope where it will hit the middle wire.

The rope will begin to fray quickly. Tear off a piece of transparent tape and wrap it around the cut portion to keep it from fraying. Keep the piece of rope that you cut off and tape the cut end. You will need it later.


Place hot glue on the middle wire of the wreath form (or on the taped end of the rope) and press the rope onto it.
Open a new package of rope and glue the end to the back of the form, against the rope you just glued to the wire. Wrap a few more rounds.


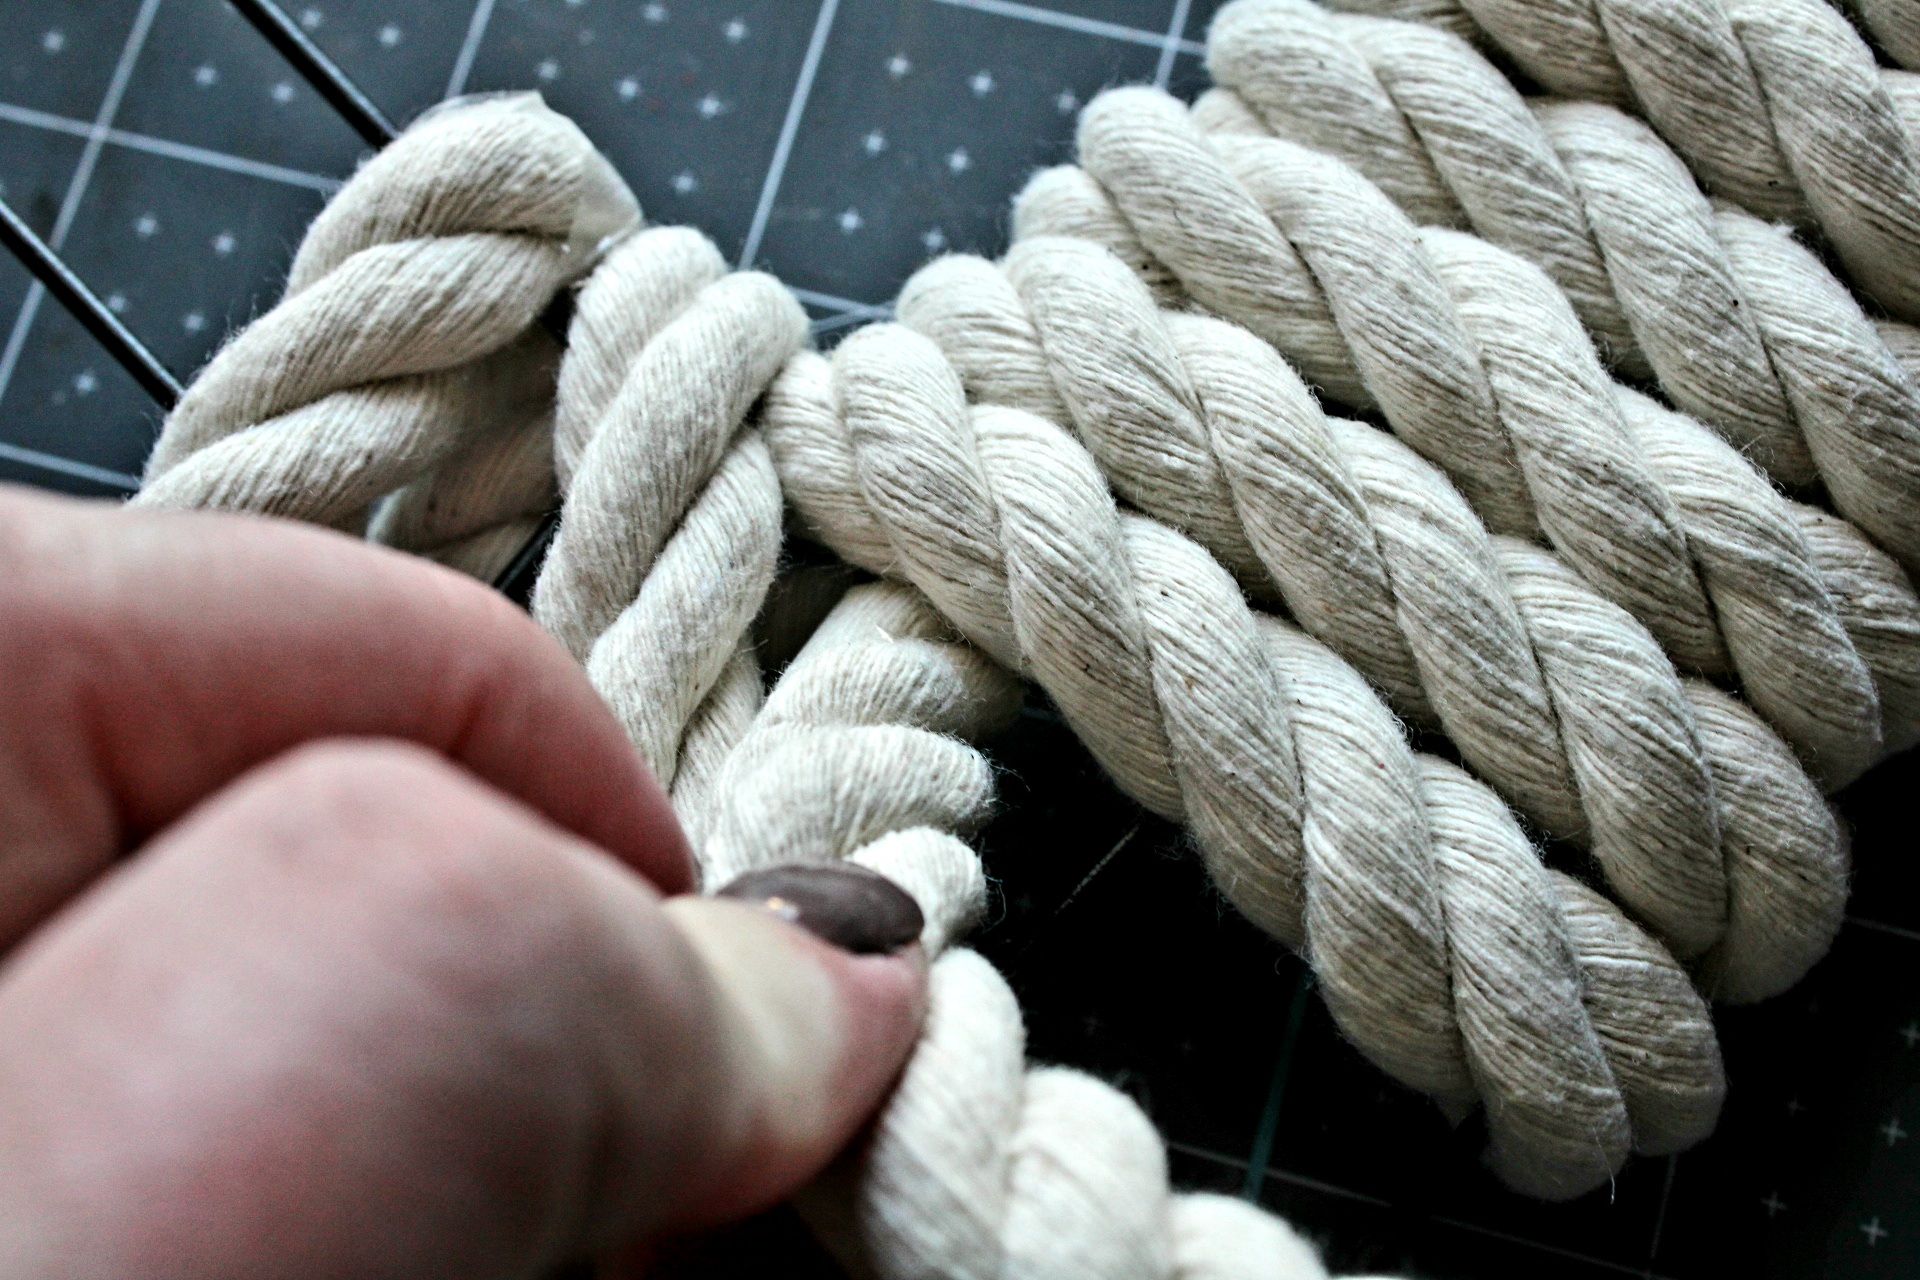
Skipping Spots on the Heart Rope Wreath
Due to the shape of the wreath, you can’t just wrap the Valentine’s wreath with the rope in a continual manner. If you did, you would end up with the rope overlapping many times inside both top arches so that you could wrap enough rope around the form to cover the outer, wider parts of the arches. The same thing would happen in places at the triangle shaped bottom. When you get just past the mid-point of the arch (the part that goes up, around, then down) you’ll notice that the rope on the inner portion starts to want to overlap, whereas the outer arch won’t be as covered. That’s where you’ll start leaving open spots on the wreath.
Once you’re starting to see that overlap, leave about 2-3″ of space on the outer part of the wreath uncovered. Then wrap the rope around the form 2-3 more times. The bottom of the 2-3 wraps should end just before the form starts to take its diagonal track down to the tip of the heart. In the photos below, I waited one round too many to skip a space. After I took these pictures, I ended up moving that last round of rope down to join the two, making it a section of three.
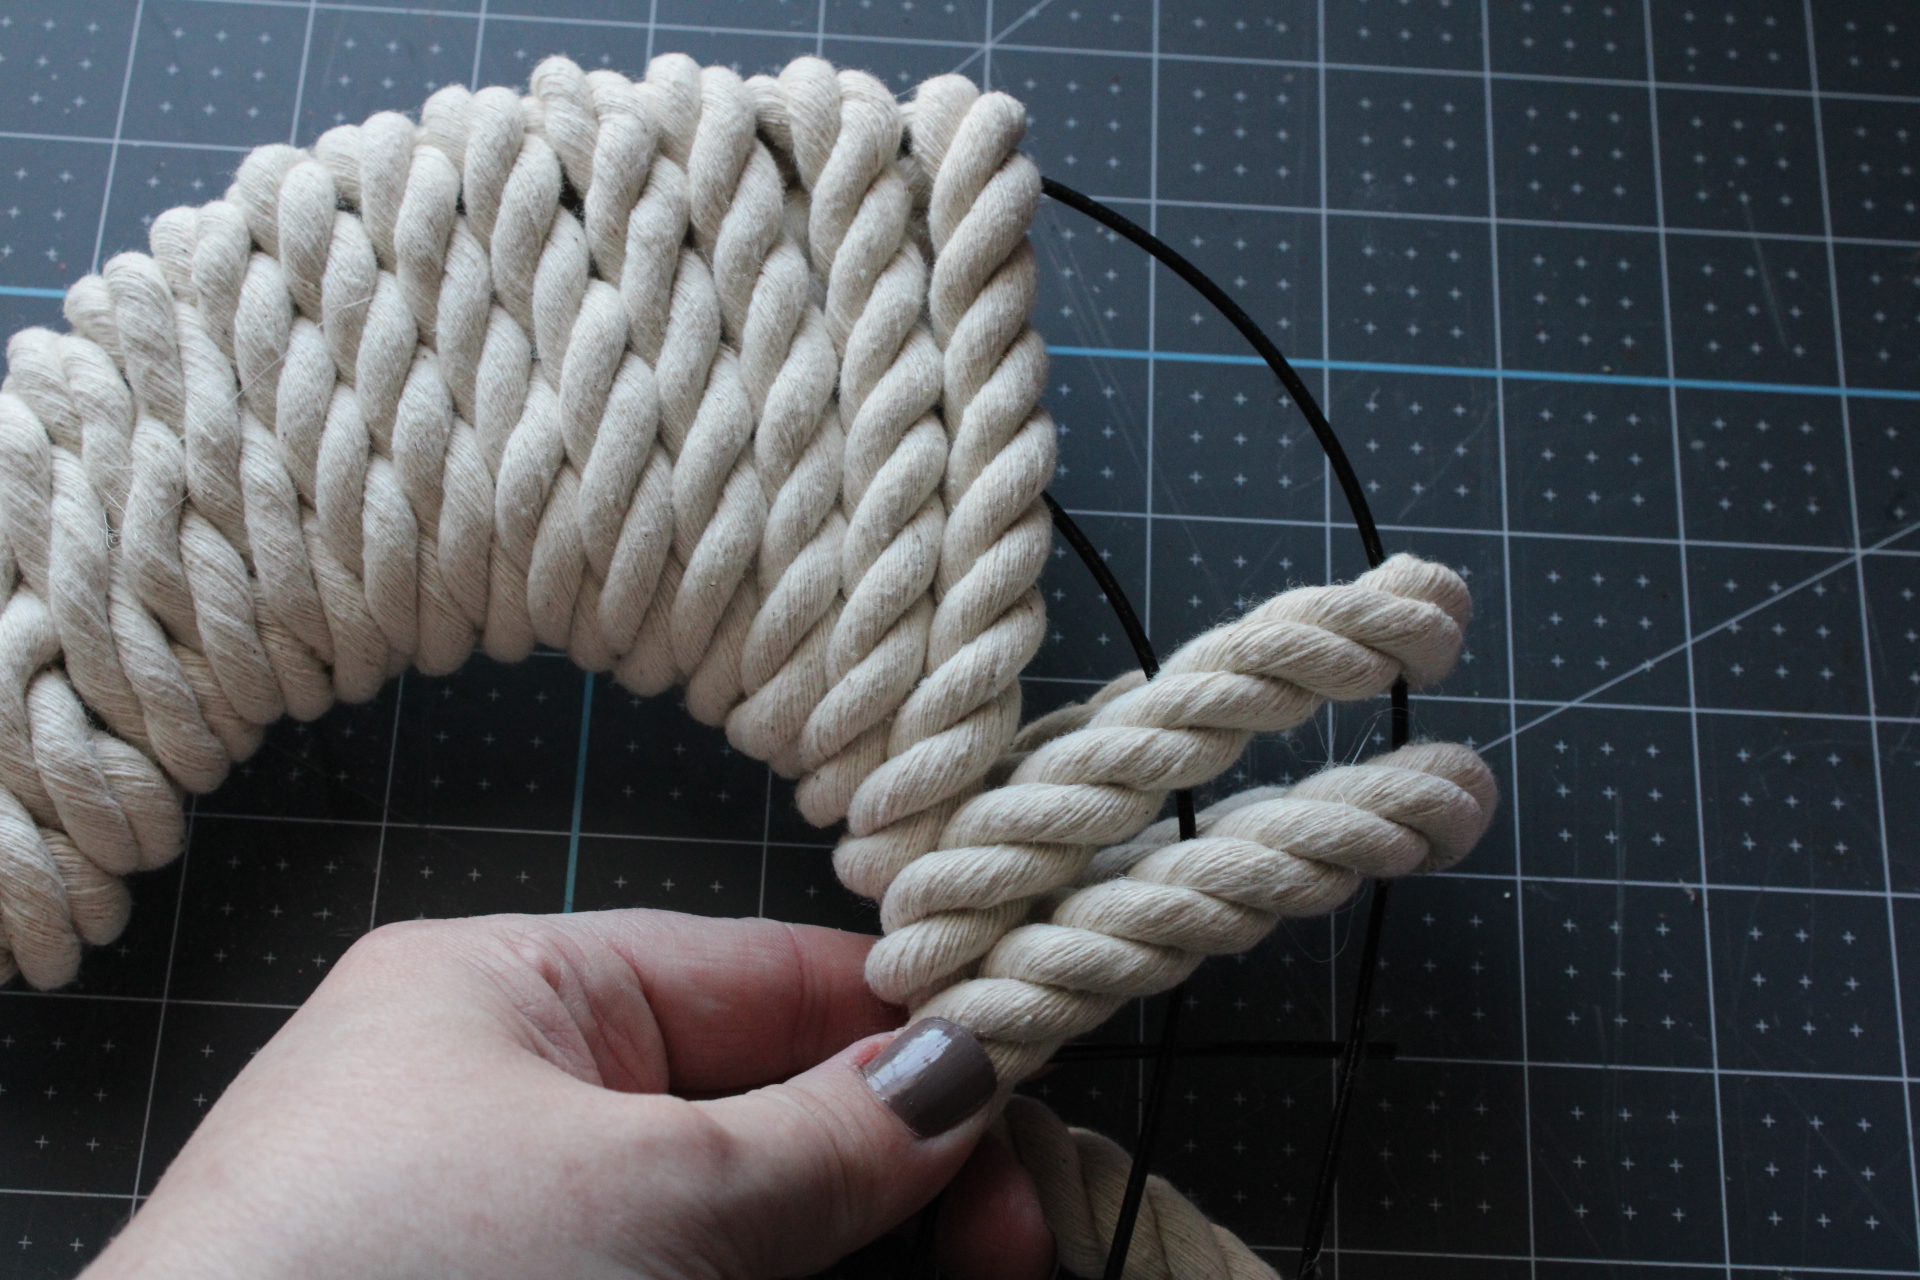

You’ll start to see where you need to skip now. Skip another 2-3″ then start wrapping again. Just as you see in the pictures above and below, the ropes will meet each other on the inside of the wreath. You’ll only be missing sections on the outside.


Continue Wrapping & Skipping
Continue wrapping until you reach the inner V at the bottom of the form. As you wrap, pull the rope taut. It will pull the wires together a bit, which I really liked the look of. Wrap one round of rope around the outer V, then skip the same amount of space as you did between the inner and outer V you just did and begin wrapping again.


When you run out of rope, add new pieces just like you did in the beginning. Keep the pieces that you cut off. Wrap the rest of the wreath, skipping the same sections on this side of the heart that you skipped on the first half. When you get back to the top center, cut the rope, remembering to tape the end, and glue it to the back of the wreath. I didn’t get a full picture before I started to fill the bare places, so this is the best I can show you lol.
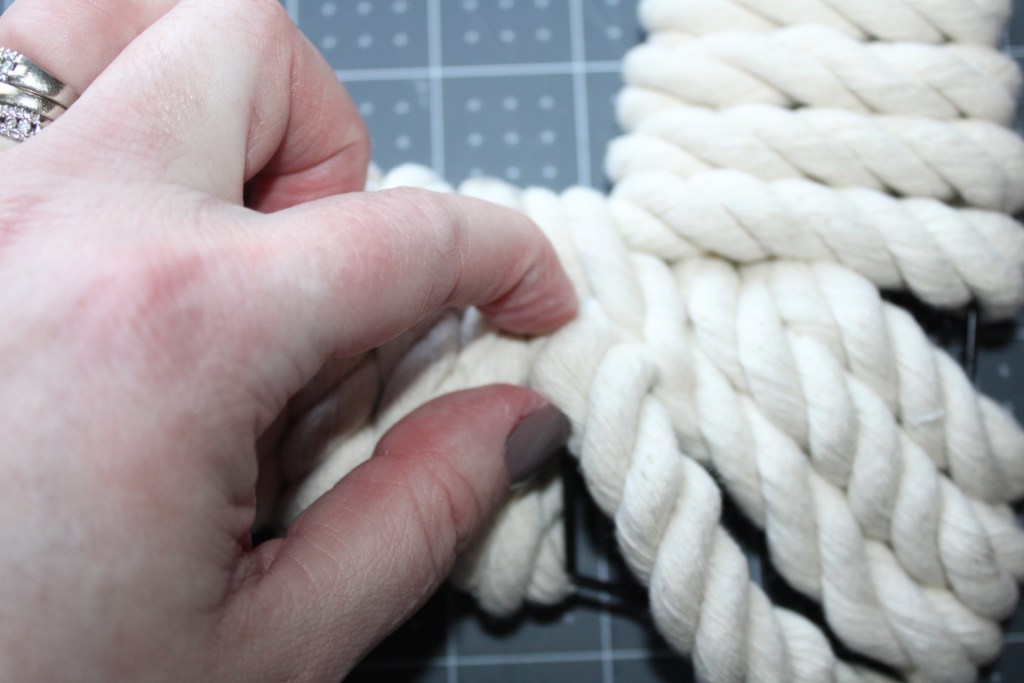
Fill in Bare Sections of the Heart Rope Wreath
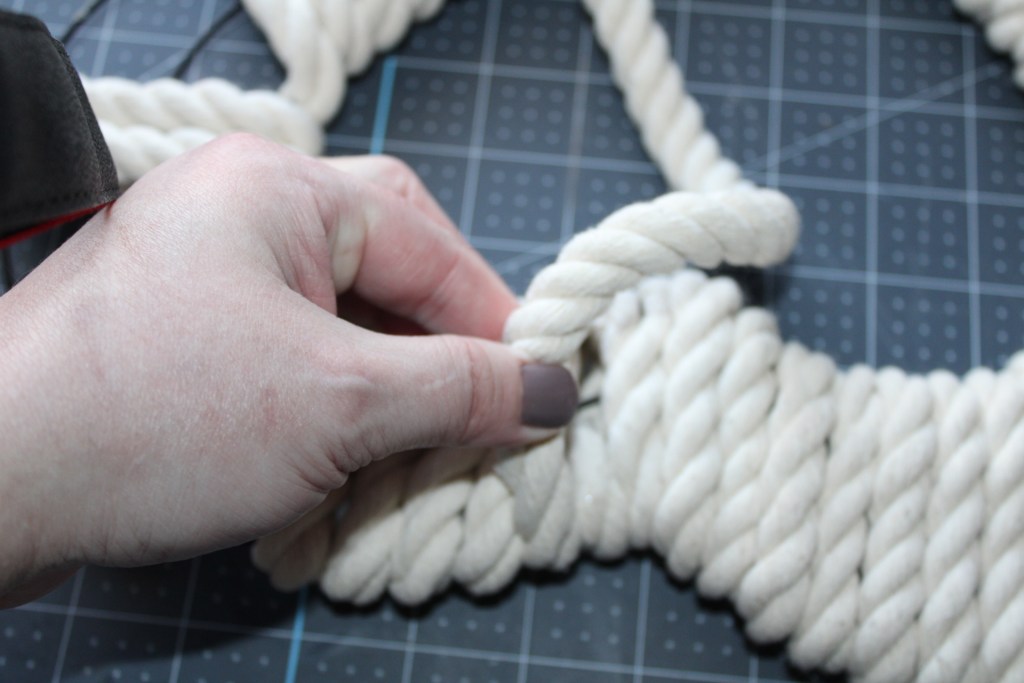
Now it’s time to use all of those pieces that you cut off from the ropes. You will also need to cut pieces to size as well, when you run out of those. I chose to start filling my heart in at the bottom. Choose a piece that will fit and slide it into the wreath from the front. Position the taped part behind the other ropes so it doesn’t show on the front. Turn the wreath over and pull the piece through to where it needs to be.

Place hot glue on either the taped part of the rope or on the place where you want it to stay then press the rope on it. Whichever option is best for your wreath is where you should put the glue. In different places on my wreath, I went with different options. Put glue on the end of the rope and wrap it around the outer wire.


In some places you won’t be able to fit a piece of rope from inner wire to outer wire. In those cases you will push the rope through the open spot, but you’ll need to glue the ropes together in the front. Then you will glue it around the outer wire just as you did above.


Here are a few more pictures of the ways I filled in the Valentine’s heart rope wreath.


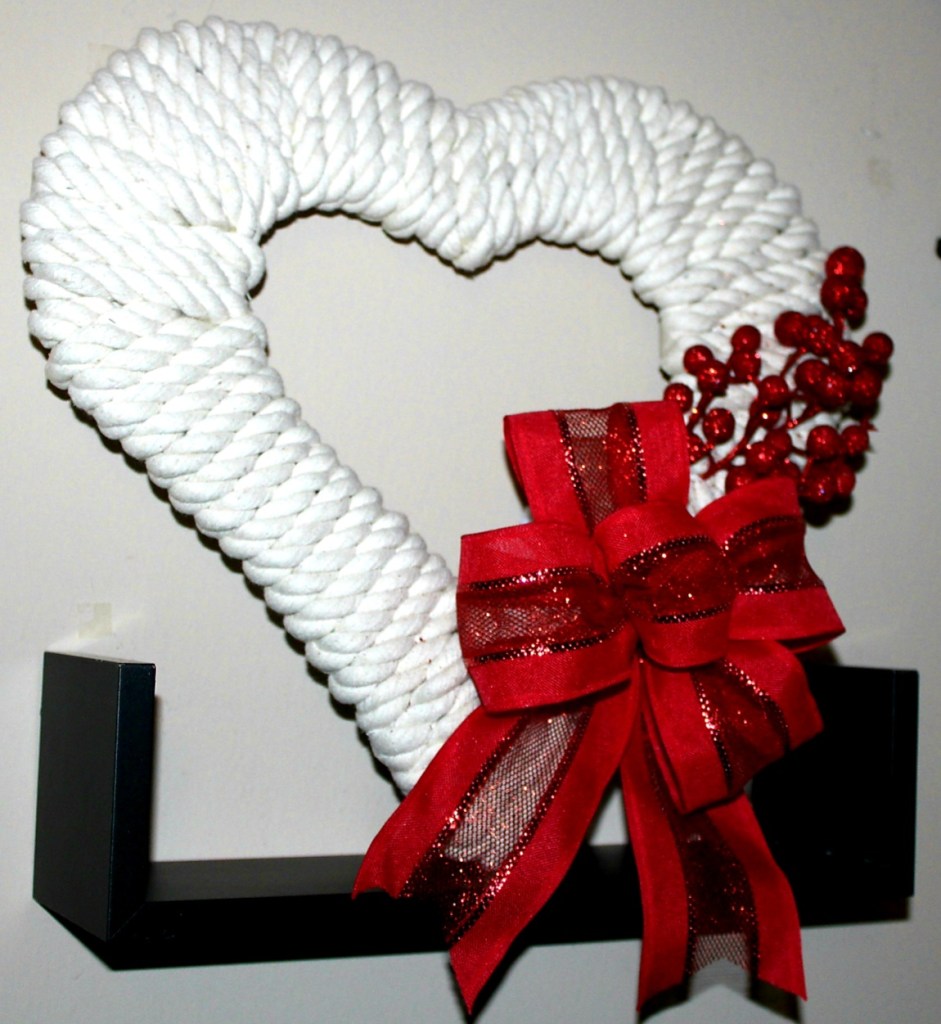
This is how the Valentine’s heart rope wreath will look when complete.

Looking for some more quick and easy Valentine’s Day decorations? Print, frame, and hang this set of free printable Valentine’s wall art. You can hang your heart rope wreath in the middle of the set for the perfect backdrop for a romantic at home date night or a fun-filled family Valentine’s dinner!
Finishing Touches
The final step is to make and add a bow and a few embellishments to the Valentine’s rope wreath. For my wreath I made a simple four loop bow. You can make your bow as elaborate or as simple as you’d like. If you want a loopy bow but can’t manage to hang on to all of it, you can use this tutorial for a bow that’s so easy my son can make it. Here is another bow tutorial that’s simple, but you make it with one piece of ribbon, unlike the first tutorial.
Once my bow was made, I decided to spread out the loops instead of having the loops one behind the other. When I had done that, I cut a small loop and glued it in the middle. Use the full-length pipe cleaner to secure the bow in the middle.

At this point I attached the bow to my wreath on the upper right side. Just wrap the pipe cleaner around the wreath and twist it together in the back. Here are some pictures.


After looking at it for a while (like six hours) I decided that I wanted to add a little something extra to it. I used some faux fir branches on my Valentine’s Day tiered tray (check out that post for a tutorial on how to make 6 pieces for a tray), and they had red berries on them that didn’t match the tray. They were just sitting in my craft stash, and I thought they would make the perfect addition to this wreath.
Each year I like to change up my decor for each season or holiday, so I like to make my wreaths as flexible as possible. If you do as well, take your flowers, picks or greenery, and simply slide them underneath the ropes. I moved my bow to the lower right side and slid the berry picks behind the bow, extending up the side. You can choose to add yours wherever you’d like: top, bottom, left, right. The possibilities are endless! If you don’t think you’ll change your wreath next year, you can use hot glue to attach whatever you’d like.

The heart rope wreath is ready to go!
Now it’s time to hang your masterpiece! Or you can place it in a vignette or on a shelf or in a, well you get it. What do you think? Does it look better with the berries or without?

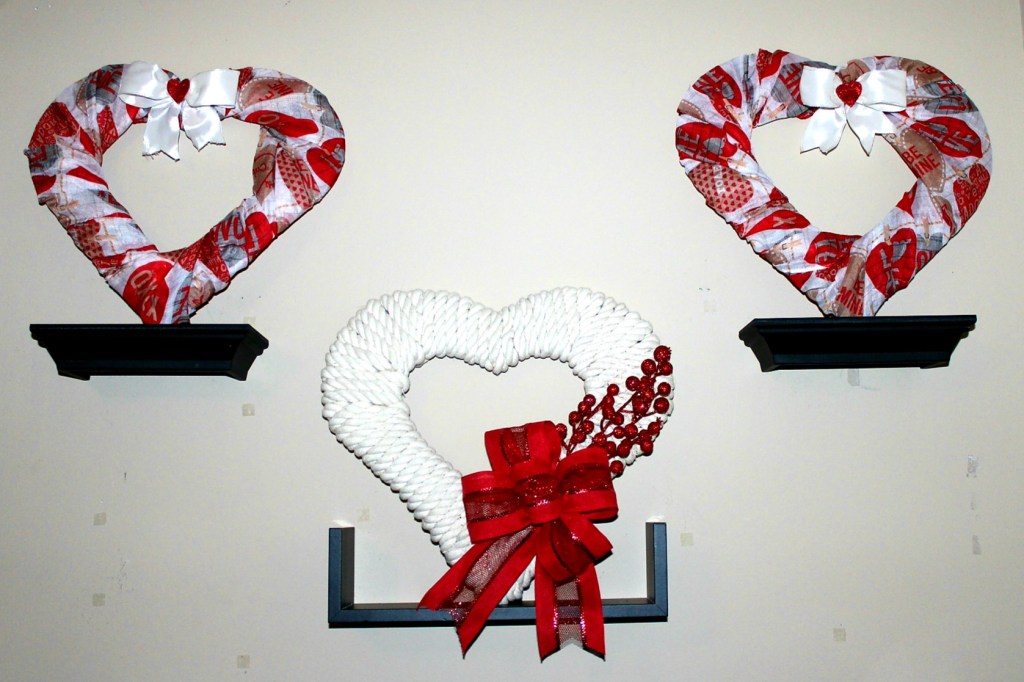

If you like the two Valentine’s heart wreaths on the shelves above this one, you can get the tutorial here. You can make two for under $5!
Remember to pin the image below or share this post with the buttons on the left side of the page so you can find it when you’re ready to start your project! Also, follow me on Pinterest for new ideas added weekly! Be sure that you never miss a great tutorial for decor like wreaths, signs and other home decor, free printables, crafts, and other fun posts! Enter your email address below to be notified of new posts! Use the buttons below to follow me on social media for other great content.

More Great Valentine’s Posts!
If you’re looking for more ideas for this Valentine’s Day, there are plenty of them here on the blog. There’s also something for just about every holiday and occasion including everyday home decor ideas as well. I hope you’ll stick around and check them out! Here are a few things you might enjoy, including love notes that you can print out every day leading up to Valentine’s Day and fill in for you kids and your hubby. If you need some quick and easy V-day decor, check out my free printable wall art!


Niki,
I love this sweet wreath!! So pretty!!! You asked about the Snow Buddies…They were Collectibles made by Enesco and have been discontinued for many years now…You may be able to find them on Ebay if you are interested…Thanks so much for all your visits and kind words…
Hugs,
Deb
Thank you Debbie. I’ll look for the Snow Buddies.
How cute!!! I LOVE it! What a creative idea!
Thank you!