
Valentine’s Day is over which means it’s time to add a little luck to your home decor with some St. Patrick’s Day decorations. Last year was the first time I created and added some to my home because I’ve never wanted tacky bright green pieces sitting out in my house. Today I’m going to show you how to make a farmhouse style St. Patrick’s Day shamrock garland that’s very simple and far from tacky.
It’s time for our first Creative Craft Hop of the year! If you’re coming over from our host, Sara from Birdz of a Feather, welcome. Her tutorial for removing rust from metal will definitely come in handy at some point, won’t it?! Stick around after this post where I’ll send you to the next stop of today’s hop. You’re going to want to check out all of the projects shared by the talented ladies in our group!
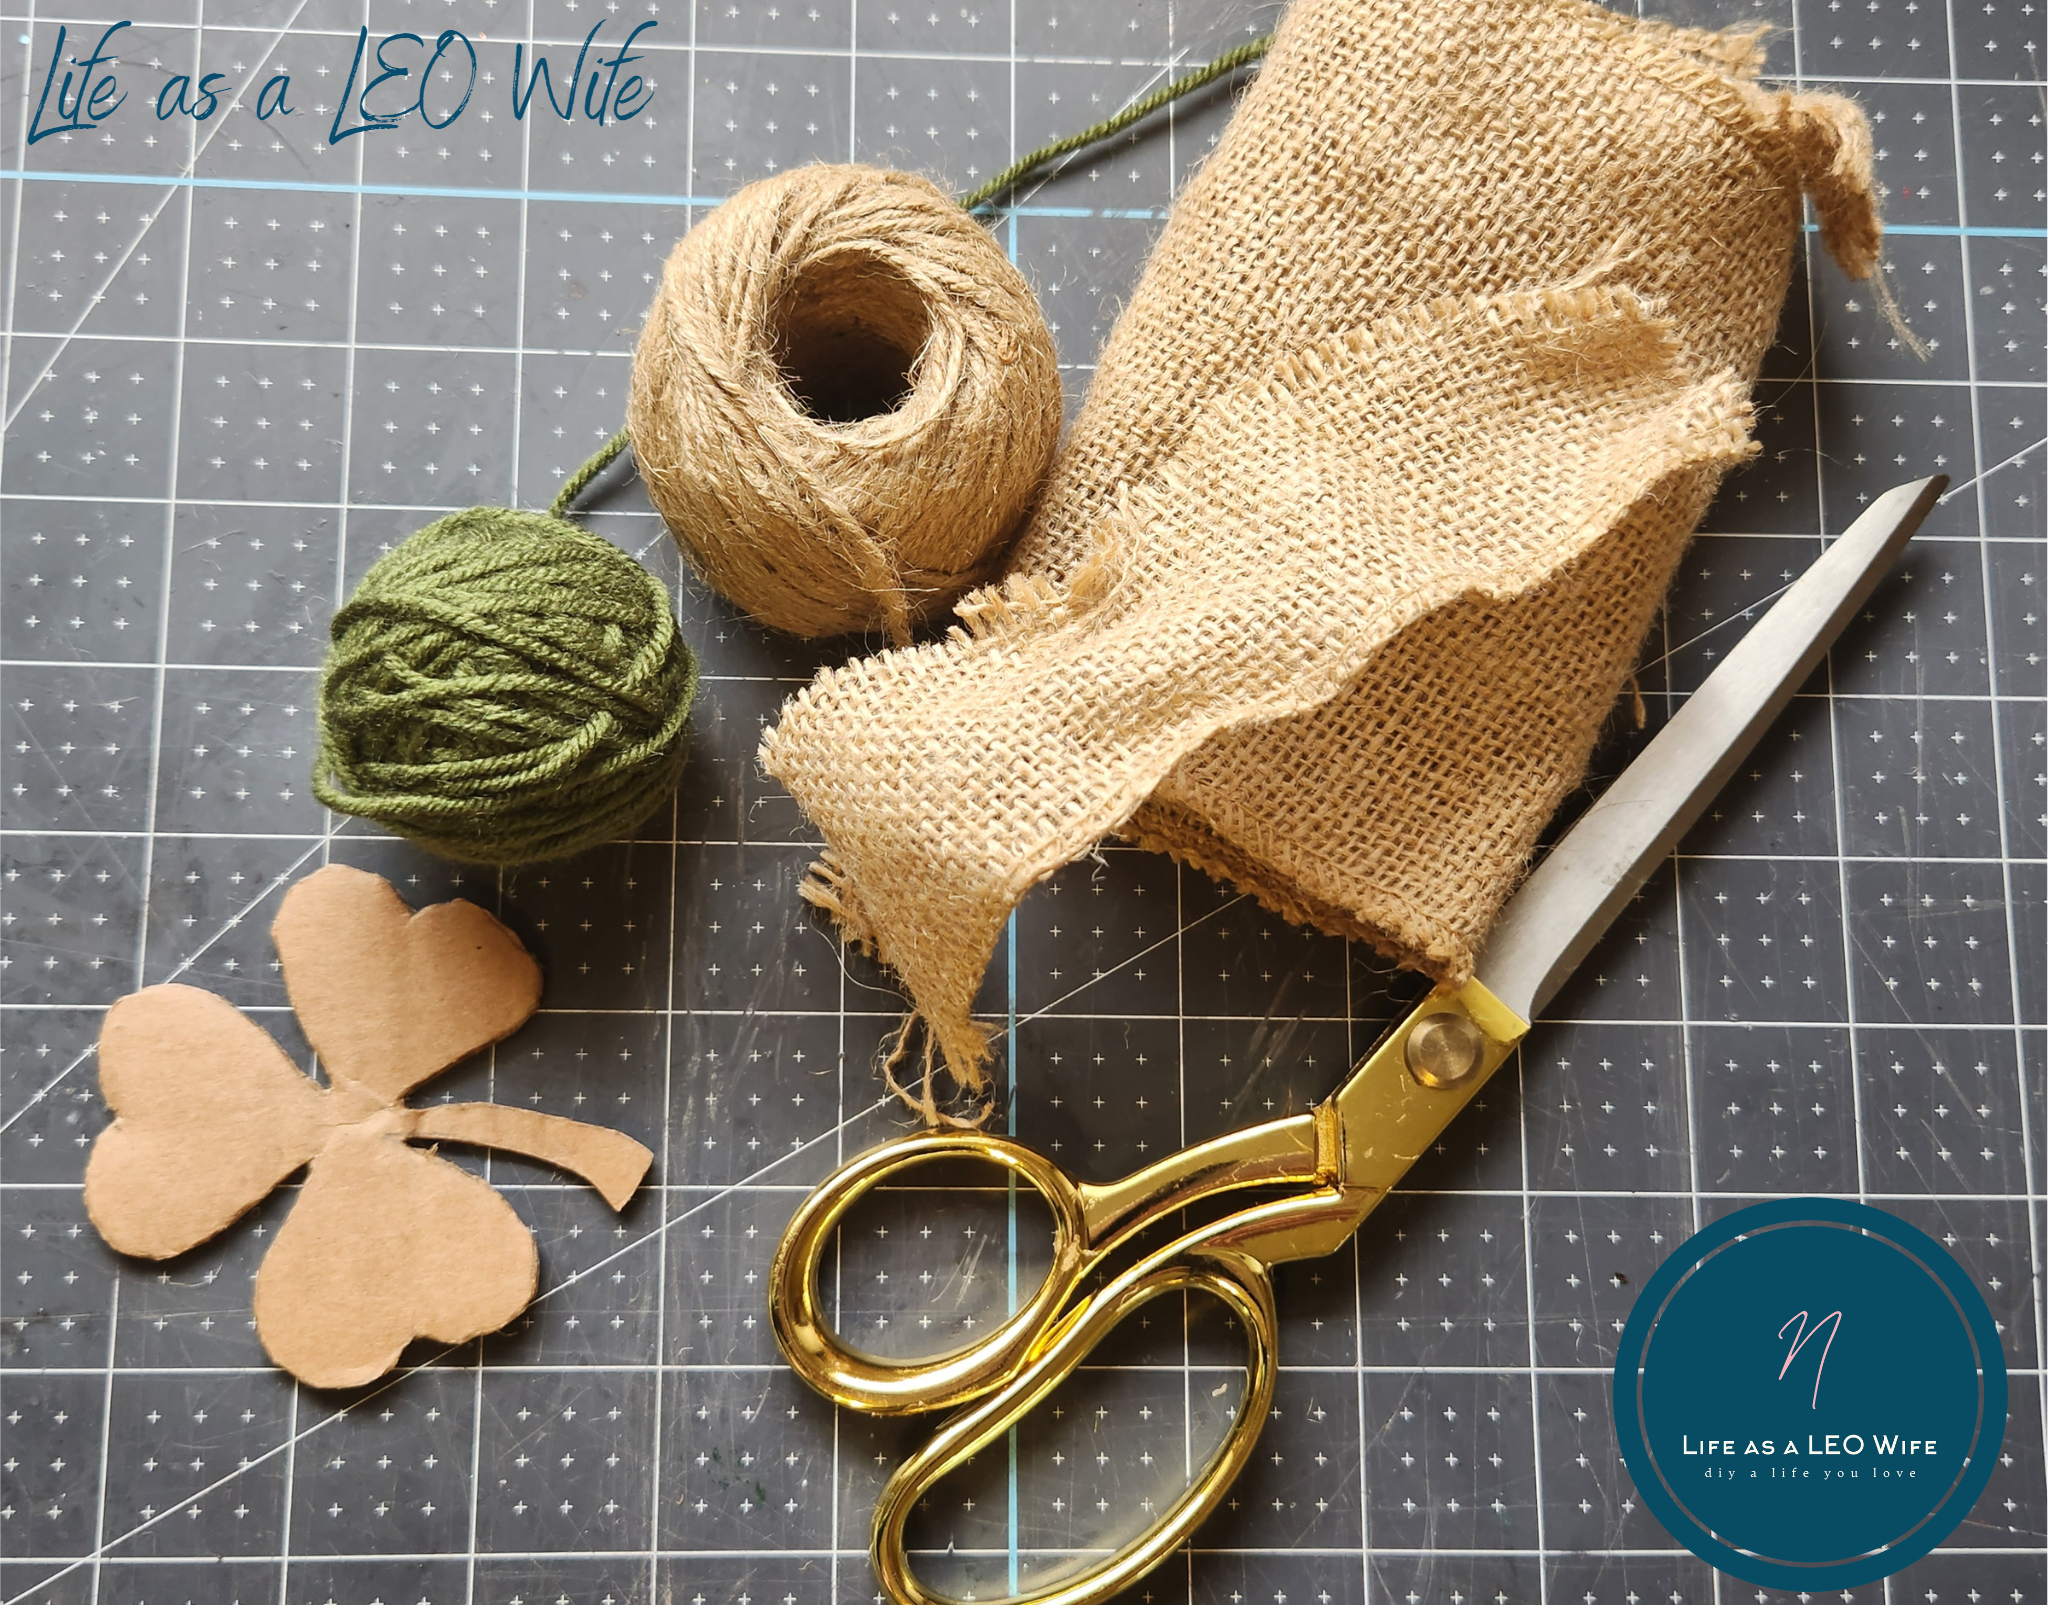
St. Patrick’s Day Shamrock Garland Supplies:
- twine
- green yarn- I chose to use the moss shade that I got from Dollar Tree because it doesn’t seem as tacky added throughout the home as a brighter green (at least with my home decor). Choose the shade that will go best with your style. This dark green tea leaf or this light green tea leaf would be pretty if you just want to shop from home.
- hot glue gun- This cordless Surebonder cordless hot glue gun has great reviews & is available for an amazing price!
- scissors
- my shamrock template
- burlap for two bows (optional)- You can use the original color or olive green. Or order this pack that has 2″ burlap ribbon, 2″ green burlap ribbon and twine for less than $10. It’s available with orange burlap (great for spring and my carrot wreath), black, and red as well.
Disclosure: I am a participant in the Amazon Services LLC Associates Program and the Dollar Tree Affiliate Program, affiliate programs that allow me to link to the products that you can use to make this project quickly and easily. If you purchase any of these products I may receive a very small commission at no cost to you! That commission helps me continue to bring these great decor DIYs, free printables, and all of the other goodies on this site to you. Thanks so much for your support!
Shop this post:


Print & cut the shamrock template.
What’s so great about this St. Patrick’s Day garland is that you probably have everything you need to make it. If you don’t, you can buy what you need for $2.50! Amazing price for home decor, right?!
Begin by downloading and printing this shamrock template. The shamrock is 3″, and the image was designed to print on regular 8.5×11 paper.

Use scissors to cut it out.

Trace the shamrock on cardboard.
You don’t have to go out and buy new cardboard for this St. Patrick’s Day garland. For mine I used pieces of scrap cardboard that came from Amazon boxes that I had previously cut pieces from. You could even use cardboard from food packaging that you were going to just throw away. See? I told you this was a super affordable project!
Lay the shamrock onto a piece of cardboard and trace around it.

Next, cut out the cardboard shamrock. It’s a bit tough to hold the paper shamrock down and trace it without moving it slightly, so after you cut the first one out you can just trace it for the others.

Trace and cut out nine shamrocks. I hung mine across a 12′ window, and nine worked well with a bow at each end of the St. Patrick’s Day garland. You may need to adjust the number you need for the space that you’re hanging it.
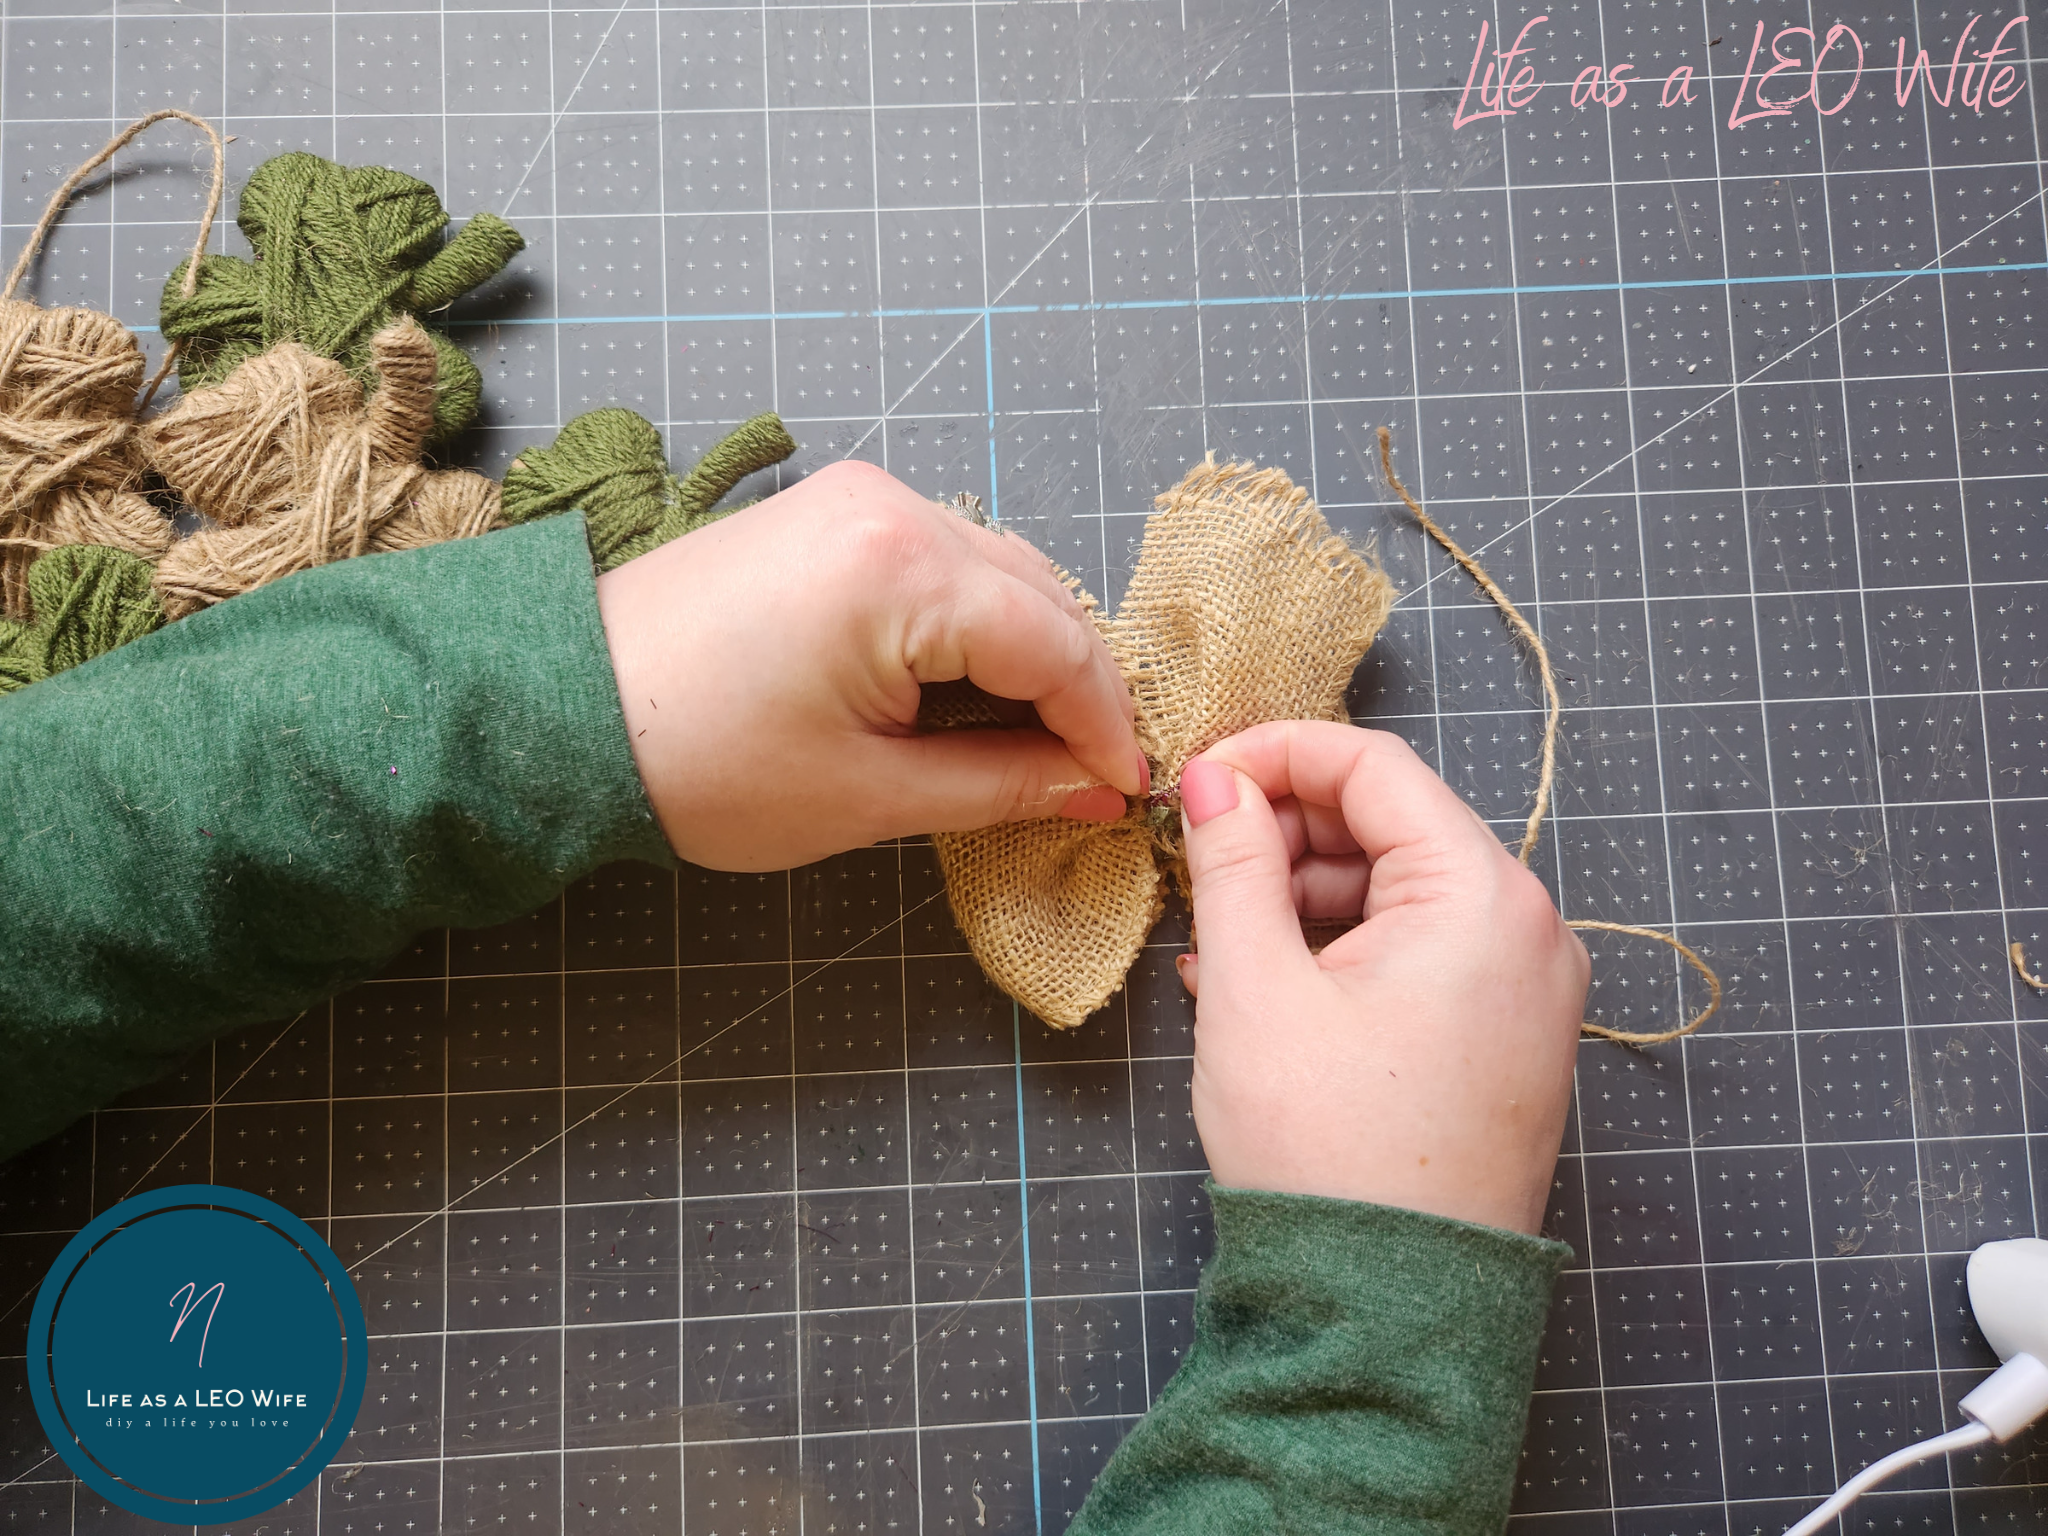
Wrap the shamrocks with yarn.
I made a large yarn heart for my tabletop Valentine’s decoration, and I found that I really liked the look of it with my decor. So I wanted to continue that with the few pieces of St. Patrick’s Day decorations that I put out. This shamrock garland gave me the opportunity to do that.
I used both yarn and twine for this project, but feel free to use all yarn or all twine and to mix the colors to fit your decor. I tried white chenille yarn on a few shamrocks and regular white yarn. The chenille was too big, and I just didn’t think the white looked good. The white yarn I had was old, so that could be why. That’s why I opted for twine instead. It’s much more farmhouse chic like that anyway!
Glue the end of the yarn (or twine) to the cardboard shamrock. For some of mine I started at the stem and some I started in the middle. Whatever you prefer works.


Begin wrapping the shamrock with yarn.

Continue wrapping until you’re happy with the amount of coverage and thickness, then cut the yarn and glue the end in place. Somehow, I managed to not get a picture of finishing up the moss green shamrock, so this twine one will do for an end photo, ha! You can see the full process in the video tutorial at the end of the post.

I wrapped five shamrocks in the moss green yarn and four with twine so that I could start and end the St. Patrick’s Day garland with a green shamrock.
Make burlap bows for each end of the shamrock garland.
Lately I’ve been trying to use up supplies from my craft stash because it’s ridiculously huge. I had a piece of burlap in there, so I thought that would be perfect to add to the St. Patrick’s Day garland. You could use burlap, ribbon, or even make tassels from yarn or twine.
The pieces or burlap weren’t that long, so I cut it down the center to be able to make two bows. Make a simple two loop bow and secure it in the center with a piece of pipe cleaner or floral wire. Leave the wire long enough to use it to attach the bow to the garland.

String the shamrocks onto the St. Patrick’s Day garland.
When you have all of your shamrocks ready to go, string them all on twine. I found it easier to string the shamrocks on the twine after they were completely wrapped than to wrap them while they were on the twine. Just push the twine through a few rounds of yarn at the top on the back of the shamrocks. Move them around until you’re happy with the spacing. You can always move them more once the garland is hung.

Attach a bow to each end of the garland. I left about 6″-8″ between each shamrock and the last shamrocks and the bows.
Leave at least 12″ on each end of the shamrock garland to hang it from, then cut off the excess.
St. Patrick’s Day Shamrock Garland Video Tutorial
Here’s a quick video tutorial. If you need to see anything more closely, you can slow the speed with the buttons.
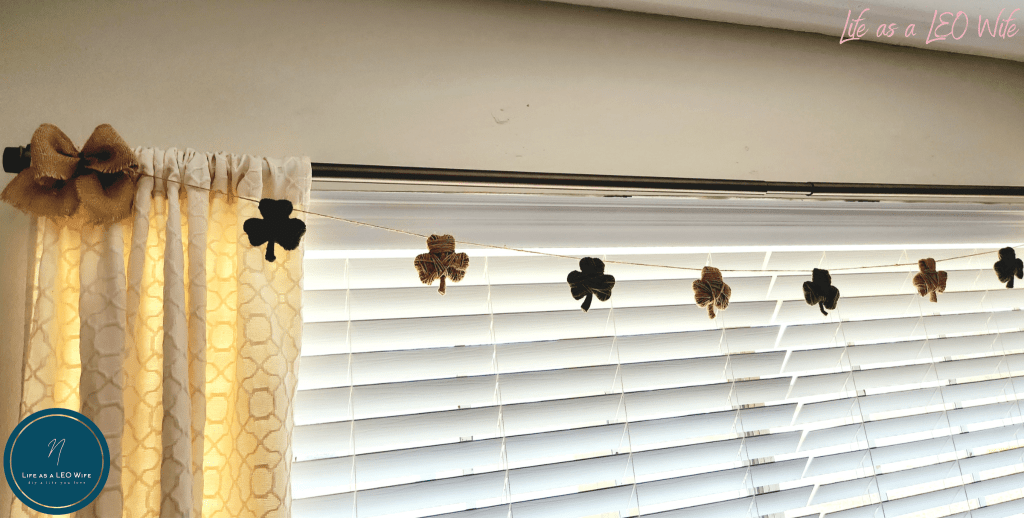
Your shamrock garland is ready to hang!
My husband helped me hang my garland across our front window which is about 12′ wide. He wrapped the twine ends around the curtain rod. Easy peasy. If you’d like to hang it on a shelf or mantle, you can attach a Command hook sideways on each side and twist the twine around them.

Remember, this is a blog hop, so keep reading to see what the other ladies have to share today!
I love the way it looks on the window! What do you think?


Remember to pin the image below or share this post with the buttons on the left side of the page so you can find it when you’re ready to start your project! Also, follow me on Pinterest for new ideas added weekly! Be sure that you never miss a great tutorial for decor like wreaths, signs and other home decor, free printables, crafts, and other fun posts! Enter your email address below to be notified of new posts! Use the buttons below to follow me on social media for other great content.

Creative Craft Hop
Next up on the Creative Craft Hop is Leeanna from Pretty DIY Home. You’re going to love her spring bunny decoration for the mantle! After that, be sure to visit the other ladies because they are all so talented.
Lee Anna – Pretty DIY Home | Spring Bunny Mantel Decoration
Tammy – Patina & Paint | DIY Riser
Carol – Blue Sky at Home | 2 Cute DIY Planters for St. Patrick’s Day
Cecilia – My Thrift Store Addiction | Mini Mushroom Garden Sign Makeover
Terrie – Decorate & More with Tip | DIY Texture Bunny Wall Plaque
Gail – Purple Hues & Me | Flower Leaf Cord Wrapped Basket
Allyson – Southern Sunflowers | Easter Photo Frame Craft with Bunnies
Jenna – The Painted Apron | Spring Bunny & Ribbon Carrot
Donna – Modern on Monticello | Tile Marbled Magnets using Nail Polish
Sara- Birdz of a Feather | How to Remove Rust from Metal
Don’t go yet! There’s more to see!
There’s plenty more to see here on the blog! If you’re looking for something specific, use the search box in the sidebar to look it up. If not, you might enjoy these ideas. Don’t have time to read them all now? That’s ok, just click over to the posts using the pictures and pin them for later. You can also add Life as a LEO Wife to your favorites and check back for new ideas and free printables and SVGs every Wednesday, as well as link parties with tons of shared ideas on Sundays!


So easy to make, but such high impact; I love your shamrock garland (and who doesn’t need more luck) :)!
Right?! Thank you!
How adorable and festive is this garland, Niki! Making these is a fun way to gather up the family and create these lovely wrapped shamrocks. Who doesn’t like wrapping just about any type of seasonal items!
Thank you! When my husband helped me hang it he asked how long it took me to wrap each one of those shamrocks. I told him about 15 minutes each. He did the math and said there was no way he could’ve sat and did that for that long lol!
This garland is such a cute decoration to use anywhere in your home. Your tutorial is very easy to follow. Thanks for sharing!
Thank you!
I love your yarn wrapped shamrocks and they make such a cute garland–pinned! Blessings, Cecilia @My Thrift Store Addiction
Thanks Cecilia!
How cute is this? I love all of the color and texture. So cute and perfect for ST. Patricks Day. Thanks for sharing!
Thank you!
This is so cute Niki! How clever to create shamrocks with a cardboard shape wrapped with yarn! I love the burlap bows at each end too, it looks so festive!
Thanks Jenna!
This is adorable for St Patrick’s. Just a little bit of decor to celebrate the day. Its even a great kids activity.
Thank you! It would be great for older kids!
I love banners and this is a really cute one. I’ve done something similar with hearts and it’s a great projects. On to shamrocks! Thanks for the idea.
Thank you!
I love the mixture of the burlap and yarn textures together and the natural vibe for the shamrocks is a nice change of pace for St. Patrick’s Day! Pinned.
Thanks Allyson. I like it too. My 11 year old son is being a hater lol! He wants me to swap out the twine shamrocks for ones with white yarn 😂. What does a tween boy know about home decor?!