
Hello friends! You’re going to love the project I have to share with you today, I know I do. Valentine’s Day is just around the corner and if you’re like me you like to add a few decor pieces around the house to decorate for the season of love. My DIY Valentine’s centerpiece is just the item you’re looking for to add a little farmhouse V-day to your home!
I’m so glad you’re here today because it’s time for our monthly Creative Craft Hop hosted by Sara of Birdz of a Feather! Each month we join together to bring you a great new project. If you’re coming over from Leanna over at Pretty DIY Home, welcome! Isn’t she so creative?! Stick around after the post where I’ll direct you to the next blog on the tour.

If you’re looking for more Valentine’s decor on a budget, this V-day centerpiece also pairs well with my DIY Valentine’s sign and farmhouse yarn wreaths.
Valentine’s centerpiece supplies:
- 18″ sign wood sign from Dollar Tree
- pack of 3/8″ wooden dowels
- drill
- heart template of foam heart from DT
- polyfil
- hack saw
- hot glue gun & glue
- 2-3 assorted fabrics: a fat quarter is plenty
- yarn (use if you only use 2 fabrics)
- sandpaper & an electric sander (optional)
- acrylic paint or wood stain: I used Rust-oleum’s weathered gray stain & polyurethane in one.


Prep & Stain the 18″ Sign
First, you need to sand the 18″ Dollar Tree sign to remove the paint and design that comes on it. It’s easiest to use an electric sander. You can get one on Amazon or at Walmart for about $18. If you don’t want to buy one, sandpaper will work, it just takes a long time! Another option is to buy an 18″ piece of wood that’s about 4″x4″.
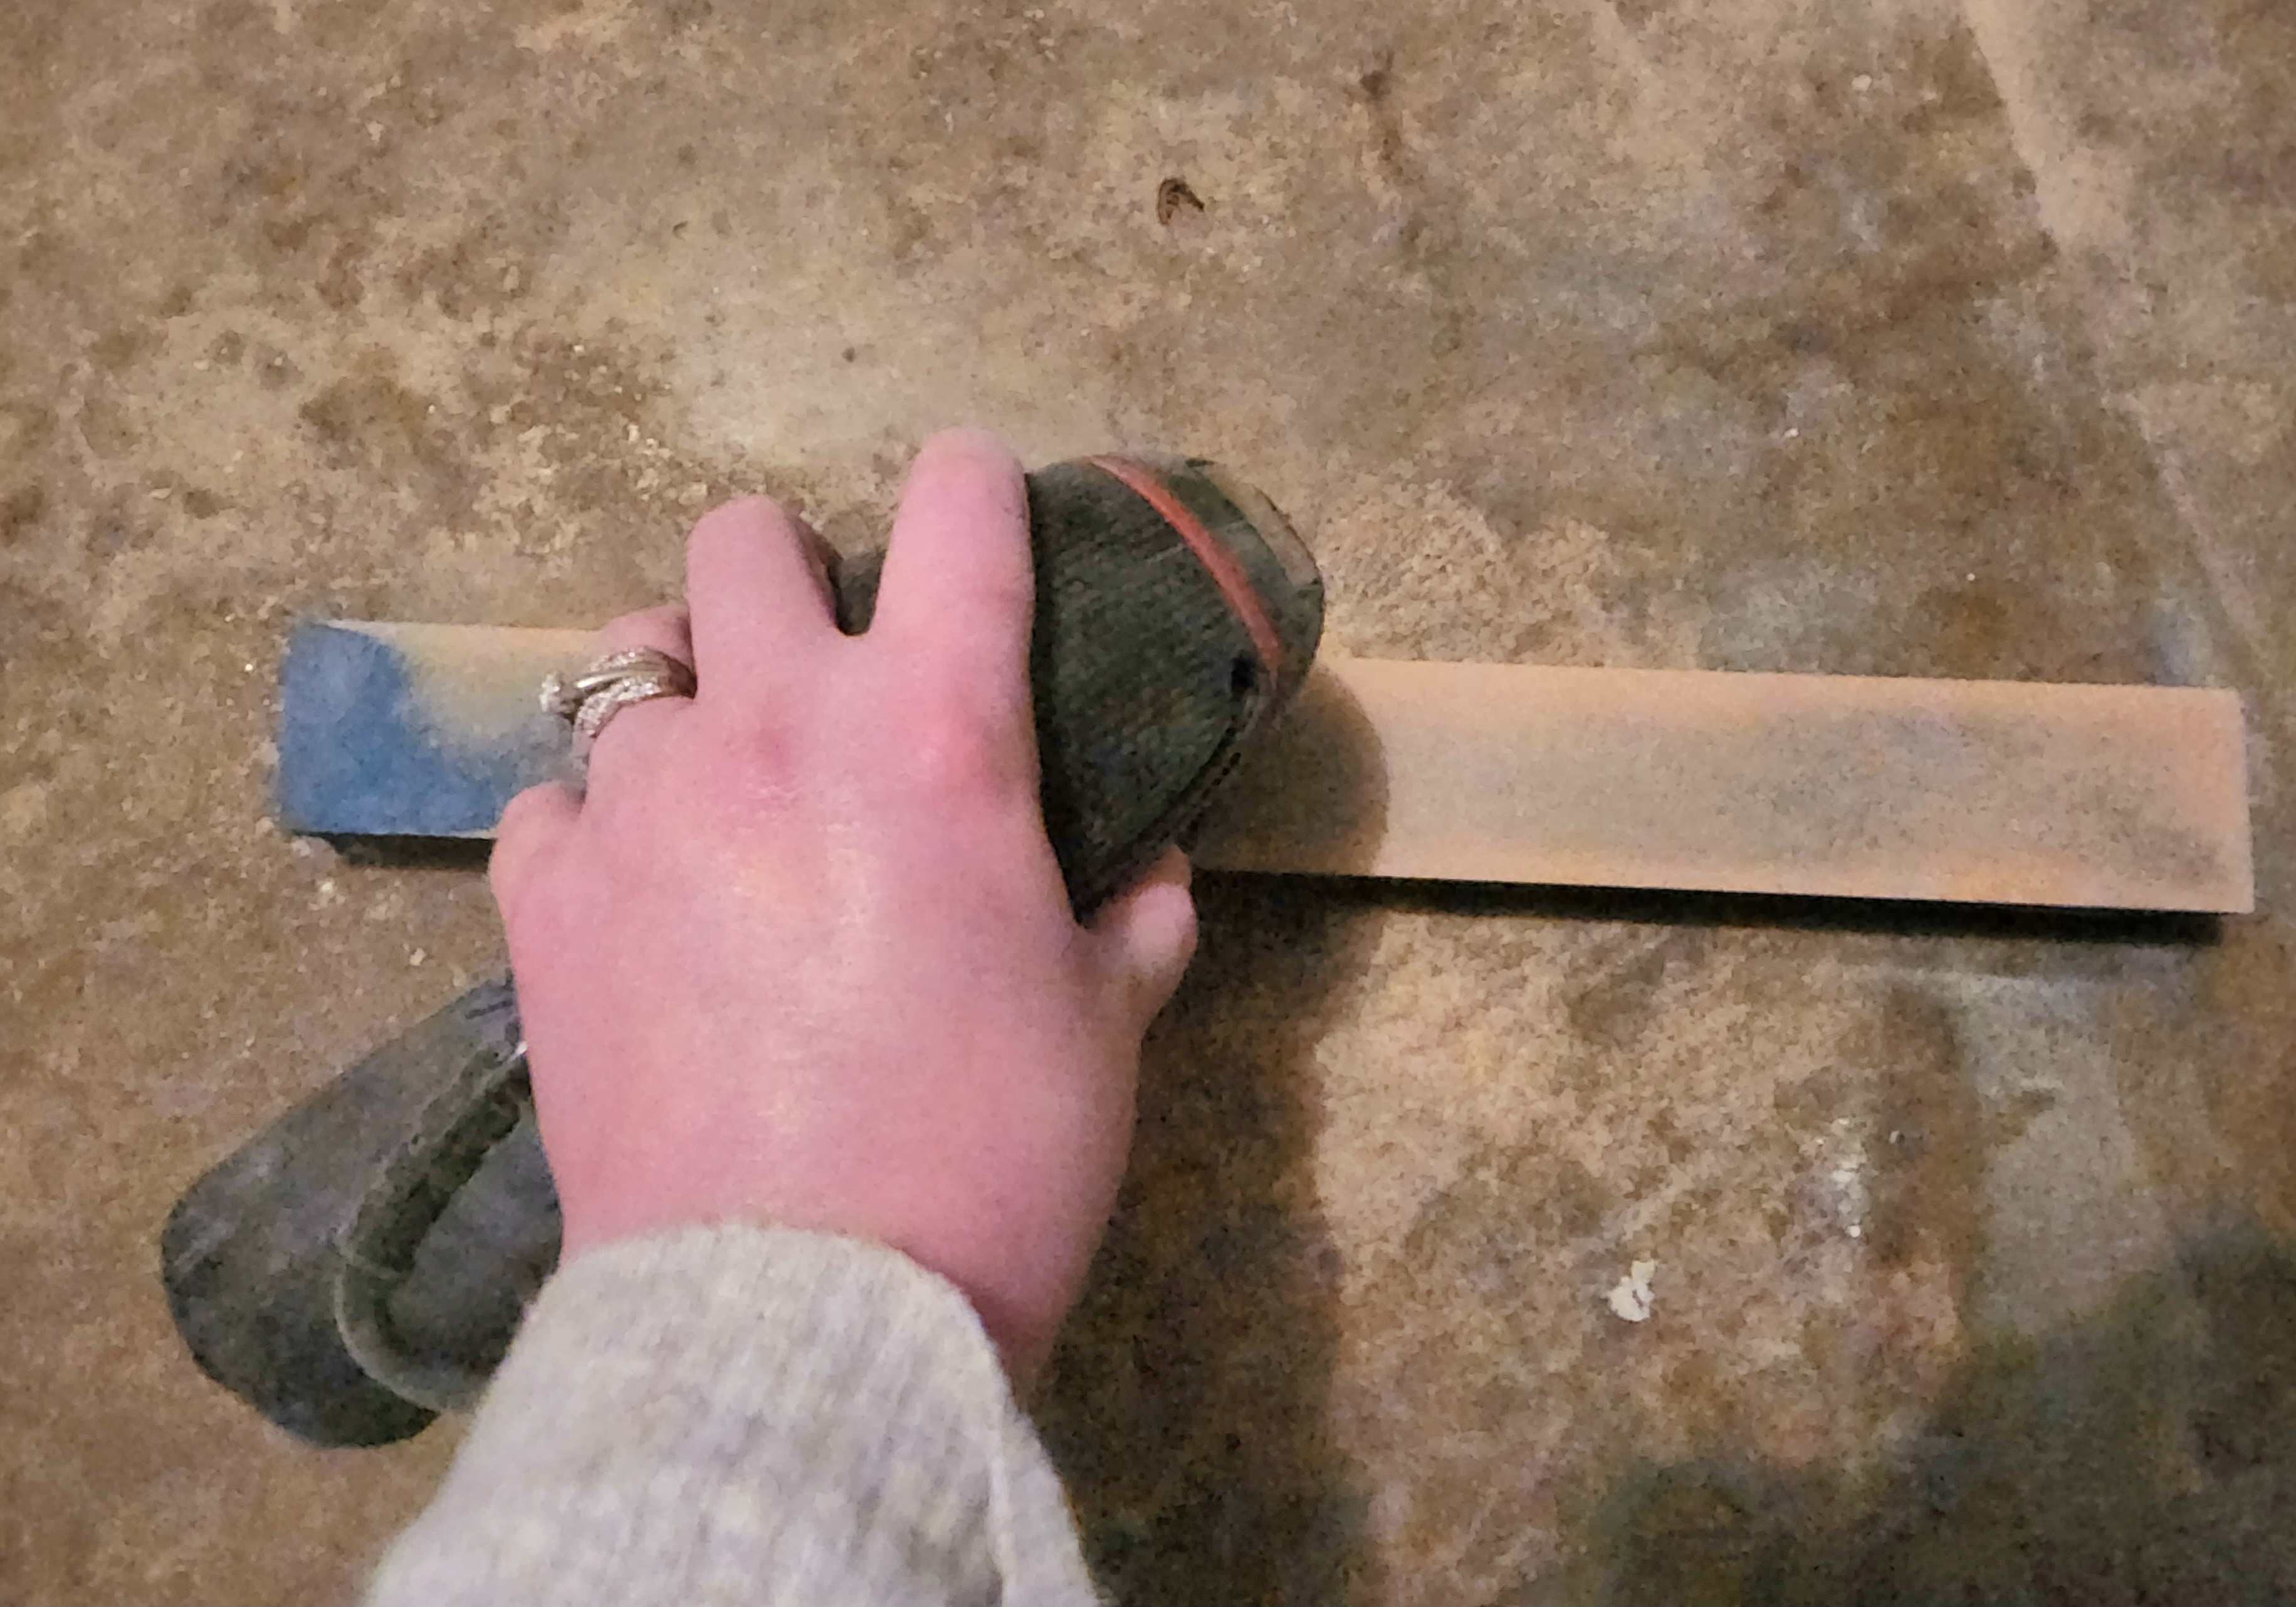
Next, paint or stain the sign and three of the wood dowels.


Trace Hearts
For my project I used two hearts of fabric and one yarn heart. All my husband could find at Walmart on short notice was a Pepto pink, so I decided to use the dusty pink yarn that I used in my farmhouse Valentine’s wreaths for one of my hearts. You’ll need two large hearts and one smaller one to fit in the middle hole on the base. I chose to use the pink yarn on the smaller center hole.
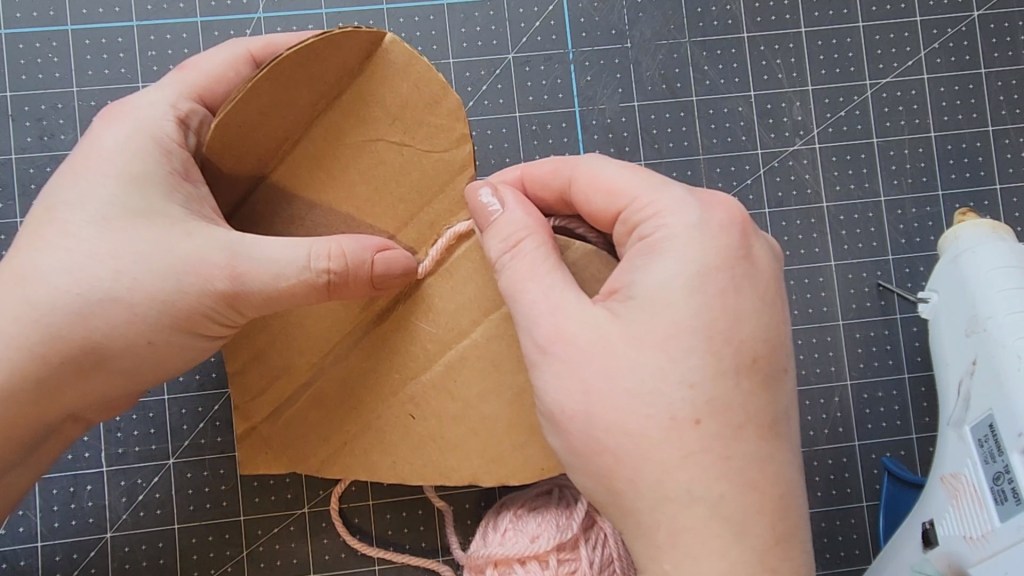
To create a yarn heart you need a heart base that’s sturdier than the foam heart from Dollar Tree that I used as the template of my other hearts. You can either download a heart template that’s about 7″ tall or use the foam heart and just cut it down as you’re cutting the cardboard. That’s what I did.
Place the foam heart on a piece of cardboard and trace around it. I used an Amazon box leftover from Christmas.

Cut the heart out and continue cutting it down until the heart is about 5″ tall. This heart will go in the middle of the Valentine’s centerpiece.

Next, you need to trace the 7″ foam heart onto the fabrics you’re using. I was thinking that I was going to place the cardboard into the fabric, but later decided to stuff the fabric hearts. In the photo I’m tracing a 7″ cardboard heart, but you can just use the foam heart. I traced about 1″ from the cardboard to give myself a bigger heart for stuffing.

Fold the fabric so that you can cut two layers at once, pin it in place, and cut the heart out.


Repeat with your second and fabric and a third if you’d like to have three fabric hearts. If you’re making three fabric hearts, you will need to use the 5″ heart template for one of the fabrics.
Create a Yarn Heart
My Valentine’s centerpiece looks so good with the yarn heart. I’m so glad I decided to make this a mixed media project! I completely recommend it.
First, add hot glue to the point of the cardboard heart and place a dowel on it. I added the dowel after I started to wrap it with yarn, but quickly realized I would need to cover the dowel with the yarn. I placed the dowel about 2″ above the bottom of the heart. Add a bit of tape over the dowel to secure it firmly.


Add a bit of hot glue in the middle of the cardboard heart and place the end of the yarn on it. Begin wrapping the heart with the yarn in a random pattern.


Continue wrapping until the heart is covered. You’ll have a thick heart. Wrap the yarn down to the bottom of the heart and cover the dowel 1-2″ from the bottom of the cardboard, then hot glue it in place.


Since this heart will be in the middle of the centerpiece, it will need to be smaller than the other hearts. Cut the dowel down to 2.5″ from the bottom of the yarn ending point.

Assemble the Fabric Hearts
You need two more hearts to fill the Valentine’s centerpiece if you made the yarn heart.
Flip the fabric so the right sides are out and then pin them together again, with the pins at least an inch from the edge. Lift one side of the fabric and squeeze a line of hot glue 1/4″ from the edge. Press the fabric together. Leave the bottom point open about 2″ for stuffing. If you’d rather, you can sew the two pieces together. I’m not good at sewing curves yet since I’ve only sewn 3 patterns! Plus, I wanted to distress the edge of the fabric for the farmhouse look.


Next, begin stuffing the heart with polyfill. I’ve used cotton balls from Dollar Tree in a pinch. It will need to be filled pretty tight so that it will stand up in the centerpiece.
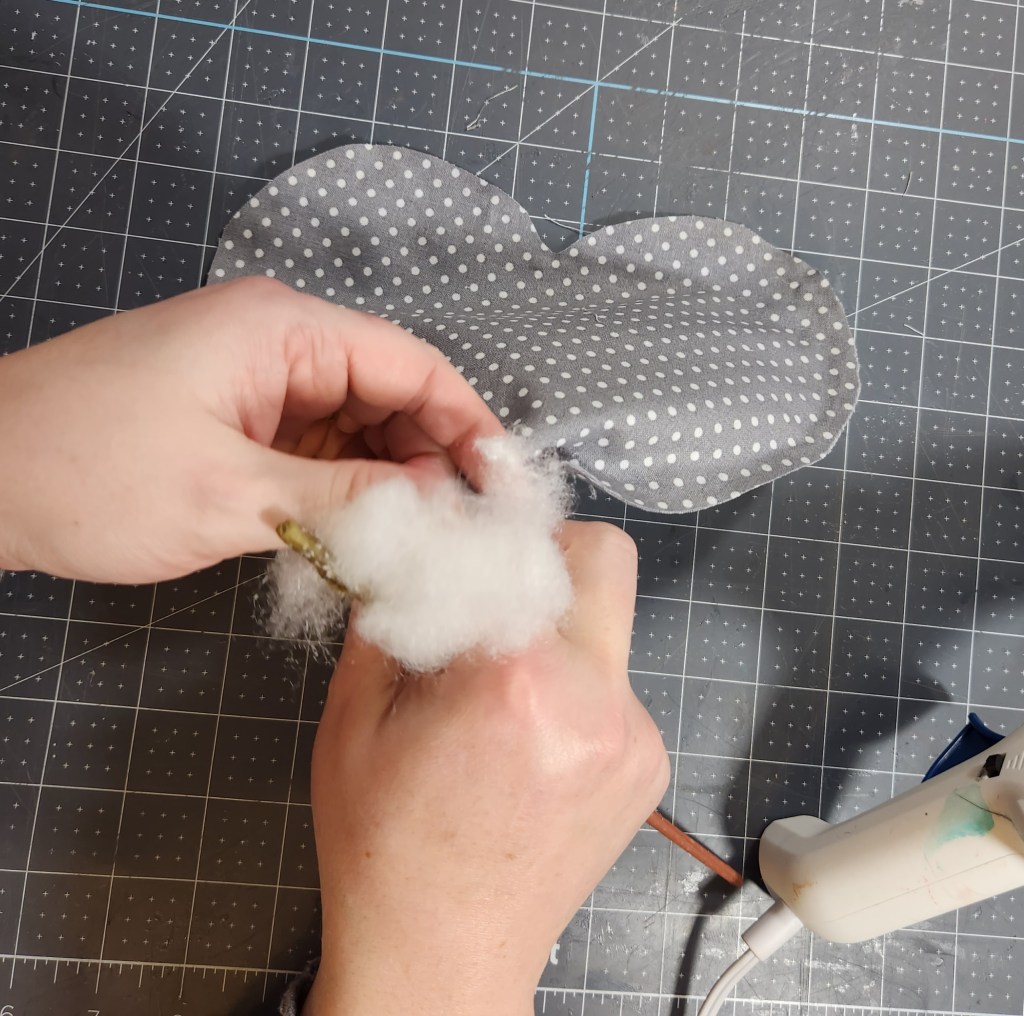

Once the heart is filled enough to stand, place the dowel in the bottom of the heart all the way up. Glue the fabric edges together and add glue to the dowel under the heart’s fabric point as well.


Next, cut the dowel down to the size you’d like. I wanted to be able to put this on our console table under our mounted TV, so I cut it down to 4.” I used my first heart as a template to cut the second down to the same size.

Pull on any loose threads to distress the fabric hearts a bit. That look is big in farmhouse style decor.
Repeat the process on the second fabric heart.
Drill Holes in the Centerpiece Base
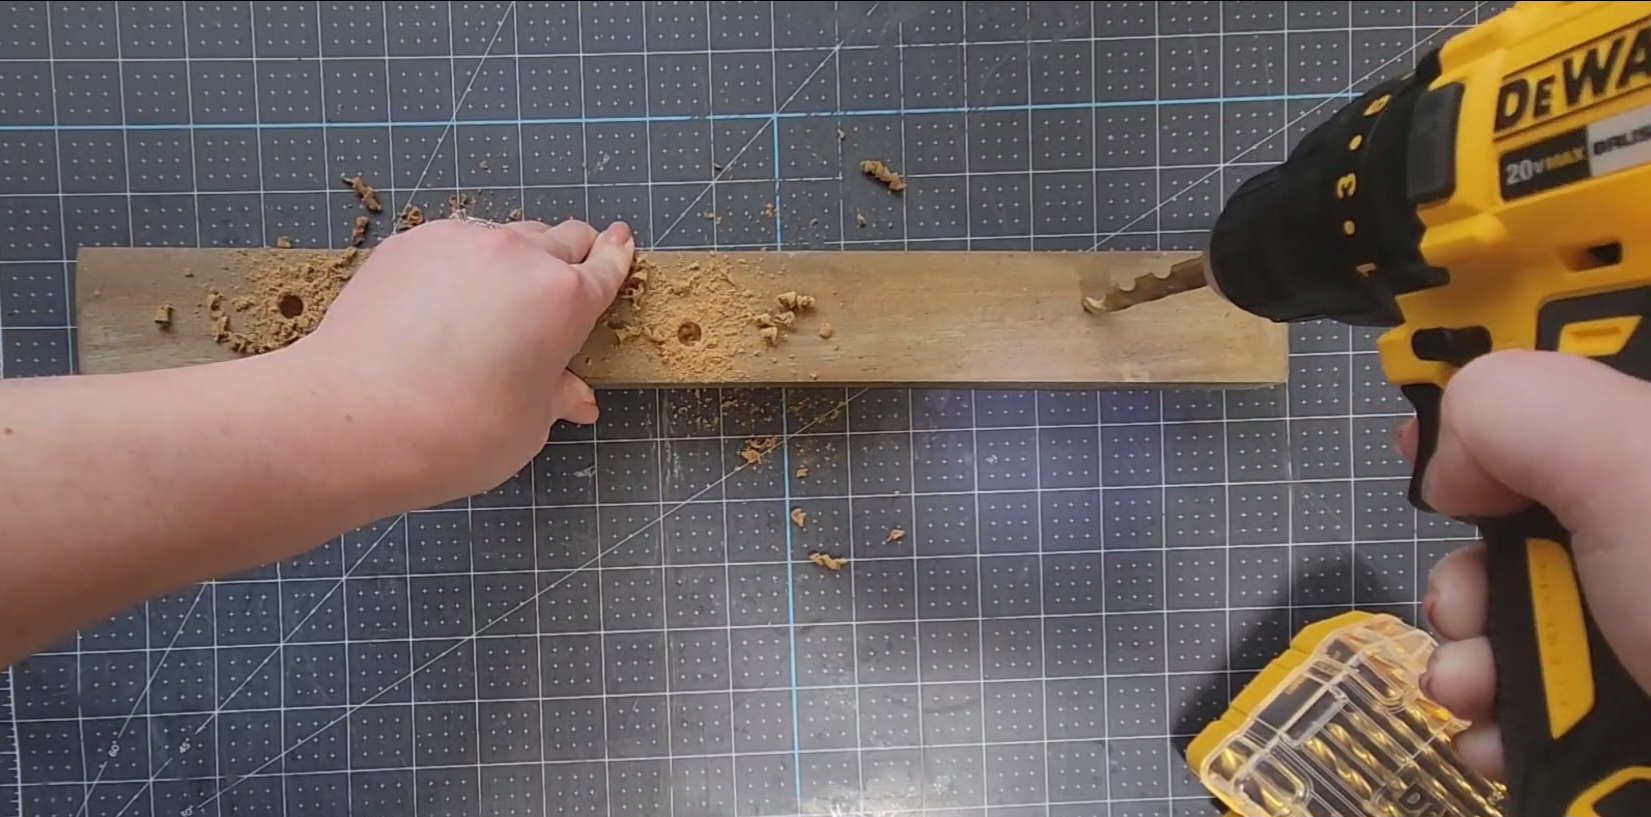
Now you need to drill holes in the 18″ sign.
Measure 3″ from each end and mark the spot in the middle of the base with a pen or pencil.


Next, place the end of a 12″ ruler on one of the 3″ marks. That will place the 6″ mark of the ruler in the middle of the centerpiece base. Mark it with a pencil, but this time closer to the front of the base. That will allow your smaller yarn heart to be in the front of the other two so you can see all three clearly in the Valentine’s centerpiece.

Drill a hole using a 3/8″ bit in all three marks. You don’t need to go all the way through, just about ½”.
Assemble the Valentine’s Centerpiece
All that’s left to do is assemble your Valentine’s centerpiece. Place the hearts, mounted on the dowel, into the holes that you drilled into the 18″ base. Your smallest heart will go in the center and the two of the same size in the outer holes.

Valentine’s Centerpiece Video Tutorial
Now just display your Valentine’s centerpiece for everyone to see! It can be displayed to view from both sides!

This is a blog hop to keep reading to see the other projects on the hop!
Remember to pin the image below or share this post with the buttons on the left side of the page so you can find it when you’re ready to start your project! Also, follow me on Pinterest for new ideas added weekly! Be sure that you never miss a great tutorial for decor like wreaths, signs and other home decor, free printables, crafts, and other fun posts! Enter your email address below to be notified of new posts! Use the buttons below to follow me on social media for other great content.

Creative Craft Hop
The next stop on our Creative Craft Hop is Sara over at Birdz of a Feather. I’m sure you’re going to love her sling water bottle!
Valentine Gifts for the Cook or Chef
Framed Vintage Valentine Upcycle
DIY Dollar Tree Valentine Door Hanger
Valentine’s Day Gift Idea and Valentine Cards
Don’t go yet! There’s more to see!
There’s plenty more to see here on the blog! If you’re looking for something specific, use the search box in the sidebar to look it up. If not, you might enjoy these ideas. Don’t have time to read them all now? That’s ok, just click over to the posts using the pictures and pin them for later. You can also add Life as a LEO Wife to your favorites and check back for new ideas and free printables and SVGs every Wednesday, as well as link parties with tons of shared ideas on Sundays!


Great project, Niki – especially for those who don’t want to sew. With all the choices of fabric, the possibilities are endless!
Thanks Ann!
Awesome centrepiece Niki! I just left a comment for Ann that I don’t do nearly as many fibre art projects as I should. You guys are really inspiring me to do more!
Thank you! I rarely do too. I think this will inspire me to do more!
How cute, creative and fun Niki!
Thanks Gail!
Wow Niki, this is so cute and super creative! I love the different fabrics and the contrasting texture of the yarn heart in the center. I like the soft colors too and so pretty with your Valentine frame piece! Adorable 💕
Thank you!
Super cute Valentine’s craft. I love how you can customize the colors to match your decor. Thanks for sharing.
Thank you!
This is such a cute way to make hearts and to display them for the holiday. Thanks for sharing it.
Thanks Donna!
How cute! I love this idea and the colors you used–pinned! Blessings, Cecilia @My Thrift Store Addiction
Thank you!
A really pretty, easy to make Valentine’s craft. The twine wrapped Valentine is my favorite. Pinned.
Thanks Leanna! I was happy I was forced to use the yarn because it looks so much better with it breaking up the two fabrics!
Your centerpiece is so pretty! I love the pink and gray color scheme and that you mixed your fibers of yarn and fabric.
Thank you!
FABULOUS tutorial, Niki!!
Make sure to join us over at the Creative Crafts Linky Party every Wednesday through Sunday
https://creativelybeth.com/creative-crafts-linky-party/
Followed and Pinned!
Creatively, Beth
Thanks Beth! I’ll be there!