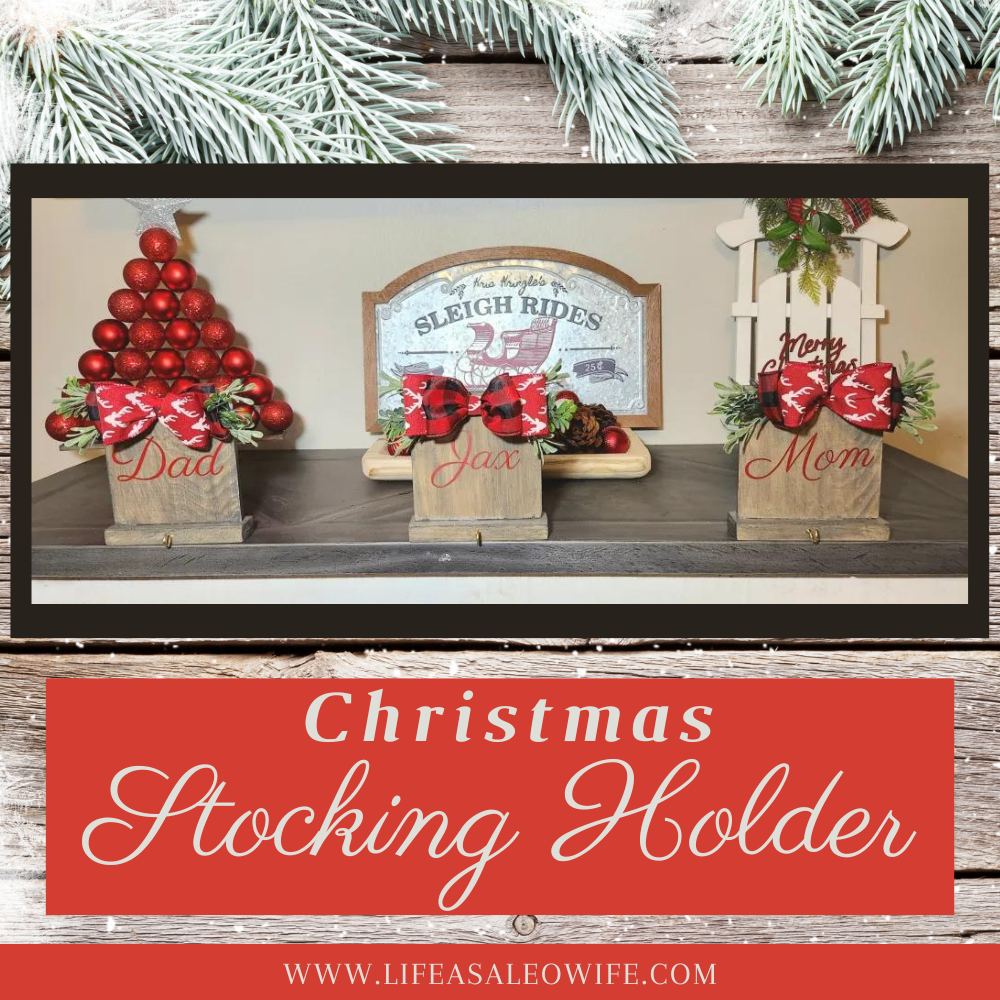
Welcome friends! I’m glad you’re here because it’s time for our Christmas Blog Hop hosted by Beverly from Across the Blvd! We’re getting together again this month to bring you Christmas decor and crafts that I know you’re going to love. Today I’m going to share a tutorial for making an adorable and extremely affordable Christmas stocking holder that you can make for less than $3 in supplies from Dollar Tree. Let’s get into this!

Be sure to stick around after the Christmas stocking holder tutorial to see what these lovely ladies have to share with you this month!
Beverly | Across the Blvd
Niki | Life as as LEO Wife
Marci | Stone Cottage Adventures
Gail | Purple Hues and Me
Michele | Coastal Bohemian
Julie | Sum of Their Stories
T’onna | Sew Crafty Crochet
Vicky | Vicky Myers Creations
Allyson | Southern Sunflowers
Christmas stocking holder supplies:
- 12″ piece of wood (or a 6″ if it’s available)
- hack saw if 6″ piece wood isn’t available
- 5.5″ wood square
- 2.5″ wired ribbon- I used two, one black and red buffalo check and a red one with white reindeer heads.
- vinyl or paint for personalization
- E6000 or Quick Grip
- hot glue gun & glue
- hook
- greenery


Be sure to enter my Joy of Giving Giveaway for your chance to win a $175 Etsy gift card! Come back each day to for daily entries!

Cut Wood
The Christmas stocking holders are made with a 5.5″ square piece of wood mounted on to a 6″ piece of wood. I had four 6″ pieces cut from a previous project, so they were ready to go for this one. If Dollar Tree doesn’t have any 6″ pieces, just cut a 12″ piece in half. I made three stocking holders and will make one more for my stepdaughter as soon as I find the square piece of wood that I put down in my craft room. One second, it’s in my hand, the next it’s poof! Gone into thin air lol. Everything is ready to go for it so it’s just a matter of assembly.
If you don’t have a saw, you can get a hack saw from Dollar Tree that will work to cut the wood in half. Mark it with a pencil at 6″ and cut it with the saw.
Stain or Paint the Wood
I used Rustoleum’s weathered gray stain for my wood. I have been using it for my Christmas decor for this year, on this farmhouse Christmas tray and this ornament tree. If you don’t have stain you can paint the wood or create a faux stain with watered down paint, like I did with this DIY tea towel ladder. Once the paint is dry you can sand the edges of the wood and random spots to create a rustic farmhouse look.

Add Name to the Stocking Holder
Now it’s time to add names to the square wood. In addition to the kids’ names, I added mom and dad, but you can choose to add your first names instead if you’d prefer. I used my Cricut to cut the names on matte vinyl in holly (red).
If you don’t have a cutting machine, you can use the carbon copy method to transfer the names onto the wood, then paint the with a color that coordinates with your ribbon. This tutorial will show you how to do that. You may need to use chalk to transfer the names instead of a pencil if you stained your wood. Pencil will show up fine on painted wood.
If you’re using a cutting machine, I’m sure you don’t need a full tutorial for how to cut and transfer the vinyl onto the wood. I will add that you will need to place the name a little lower than center on the stocking holder. That will give you room to place the bow and greenery at the top.


Attach a Hook
Before you assemble the Christmas stocking holder you need to place the hook in the 6″ piece of wood. I used simple screw hooks that I got for $2 for a six pack at Lowe’s. You can use Command hooks if you don’t have a drill. My screws were 3/4″ so I used a drill bit just a little smaller to predrill a hole in the wood.
Measure 3″ from the edge of the short side of the wood and mark it with a thin marker.

Next, use a drill bit just a tad thinner than your screw hooks and drill a hole through the mark you made.

Now screw the hook into the hole.

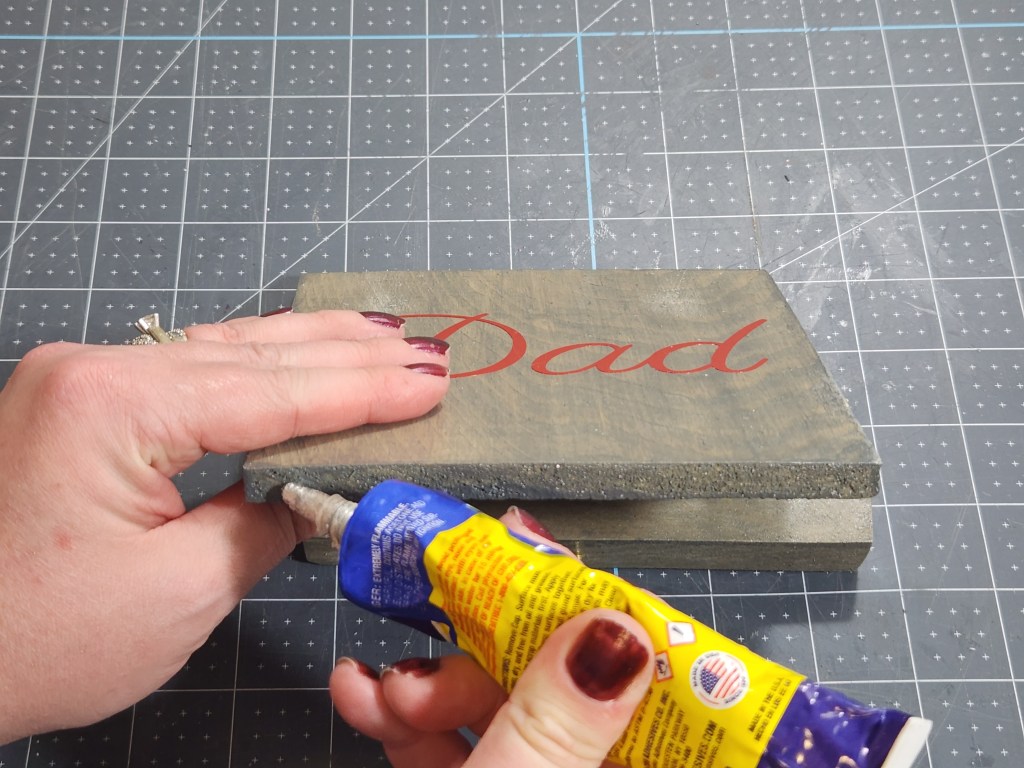
Assemble the Christmas Stocking Holder
I used Beacon Quick Grip to glue the 6″ piece of wood to the square piece. It dries so much faster than E6000, but you can use whatever you have on hand.
Add glue to the bottom edge of the square piece of wood and place it on the 6″ piece a little less than halfway from the front edge. If you’re using Quick Grip, place the wood down then lift it up 3 or 4 times. That helps the adhesive dry and adhere faster.

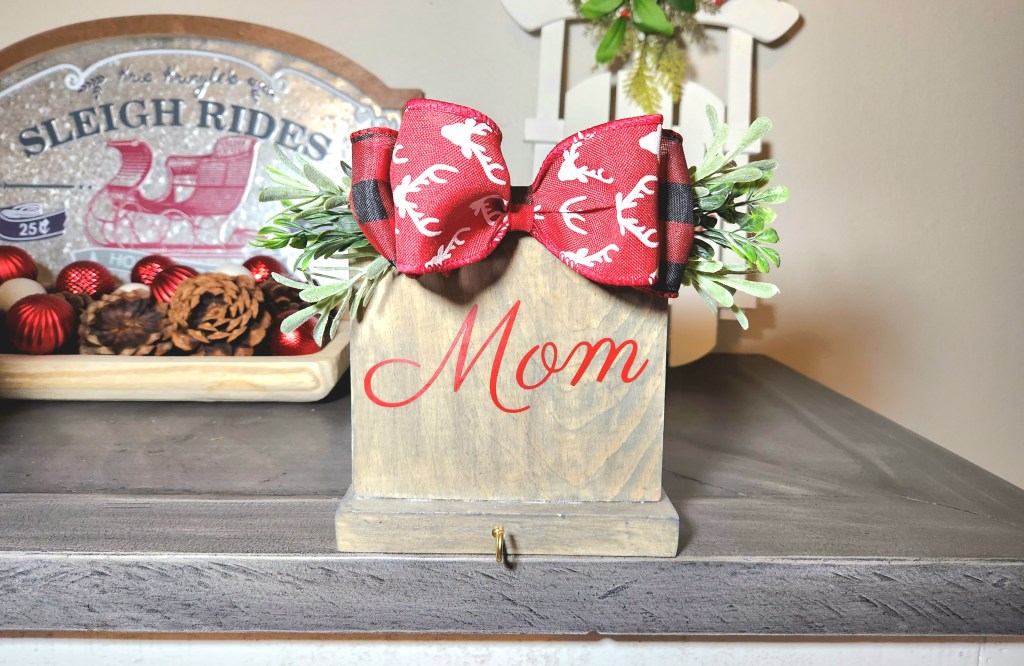
Add a Bow & Greenery
Make a bow with wired ribbon to add to the top of the Christmas stocking holder. I used two 2.5″ ribbons, making two simple 2-loop bows, one just a little bigger than the other. I layered them on top of one another and secured them with a pipe cleaner. You can just use one ribbon if you’d like. The bows are easily removed if you use hot glue, and you can change the ribbon out to match your decor theme each year.
Next, cut pieces of greenery off the stems. I used frocked rosemary and frocked boxwood pieces. Glue them together in a bit of a fan, then glue the bunch onto the top of the Christmas stocking holders above the name.


Finally, hot glue the bow between the greenery.

This is what your Christmas stocking holder will look like.

Christmas Stocking Holder Video Tutorial
Here’s a quick video tutorial for making a Christmas stocking holder. Click the speed and slow the video down if need be. I didn’t video cutting the 12″ piece of wood as I had done that months ago for another project.
That’s it! Display your Christmas stockings on the holders and admire your handiwork!
I love the way these turned out. Probably even more so since I started this project in eighty different ways, ha! What do you think?


Remember to pin the image below or share this post with the buttons on the left side of the page so you can find it when you’re ready to start your project! Also, follow me on Pinterest for new ideas added weekly! Be sure that you never miss a great tutorial for decor like wreaths, signs and other home decor, free printables, crafts, and other fun posts! Enter your email address below to be notified of new posts! Use the buttons below to follow me on social media for other great content.

On to Our Christmas Blog Hop

Beverly – Across the Blvd | Christmas Wreath Personalized Place Cards
Marci – Stone Cottage Adventures | For Cocoa Lovers
Gail – Purple Hues and Me | Glitter Foam Circles Christmas Tree
Michele – Coastal Bohemian | Shabby Chic Door Hangers
T’onna – Sew Crafty Crochet | Christmas Gnome Scarf
Julie – Sum of Their Stories | Easy Watercolour Christmas Cards
Allyson – Southern Sunflowers | Chinoiserie Ornaments DIY Designer Knock Off
Don’t go yet! There’s more to see!
There’s plenty more to see here on the blog! If you’re looking for something specific, use the search box in the sidebar to look it up. If not, you might enjoy these ideas. Don’t have time to read them all now? That’s ok, just click over to the posts using the pictures and pin them for later. You can also add Life as a LEO Wife to your favorites and check back for new ideas and free printables and SVGs every Wednesday, as well as link parties with tons of shared ideas on Sundays!


Oh my, Niki! Your stocking holders are very unique and creative! I love how you personalized them and of course, adding the bows!
Thank you!
The bought milk glass salt and pepper shakers.
I’m sorry, I’m not sure what you mean.
These are lovely, this way you can have beautiful stockings on display as decorations all through the Christmas holidays 🙂
Thank you! I’ve already sent my husband out to buy us new matching stockings lol!
Your stocking holders look awesome! I like the unique variety between the three. Pinned.
Thank you! I was alternating putting the buffalo check and reindeer ribbon in front. My stepdaughter’s will have the buffalo check in front like my son’s.
Those stocking holders are super cute! I love the stain and bows you chose! Thank you for the step by step directions. pinning for later -Marci @ Stone Cottage Adventures
Thank you!
You did a great job creating these stocking holders! The deer bows are so cute, and I love the font for the names. I definitely could use something like this for my Christmas decor!
Thank you! It was so easy & cost less than $3 per holder!
The design is so great . The bows are so perfect and they look pretty in your display.
Thank you! Most of my Christmas decor is still put away in the back of our storage room in the garage so I had to use the items I’ve bought over the last few weeks and things in my Christmas craft bin to place some items behind the stocking holders lol!