Welcome everyone! It’s time for our monthly blogger collaboration, so you picked a great time to stop by! For this hop some great bloggers join together to bring you great projects, and this month’s theme is Christmas in July. My summer home theme is coastal, so I thought why not make some coastal Christmas decor that you can use in warm climates (like mine) or if you live in a coastal location (like me!). Then I just had to figure out what to make! I had a wood spoon and spatulas from Dollar Tree that I’ve been wanting to customize for a while, and my new etching pen came in the mail a few days ago. Boom! This etched wood spoon set and free designs were born (well at least one spoon was)!


Here are the other ladies who are going to join us on our blog hop today. You can check out their projects at the end of the post.
Beverly | Across the Blvd
Gail | Purple Hues and Me
T’onna | Sew Crafty Crochet
Marci | Stone Cottage Adventures
Niki | Life as an LEO Wife
Looking for more Christmas in July? Check out my coastal seashell Christmas trees that I shared yesterday! There are two different designs, therefore tutorials, shared in that post.
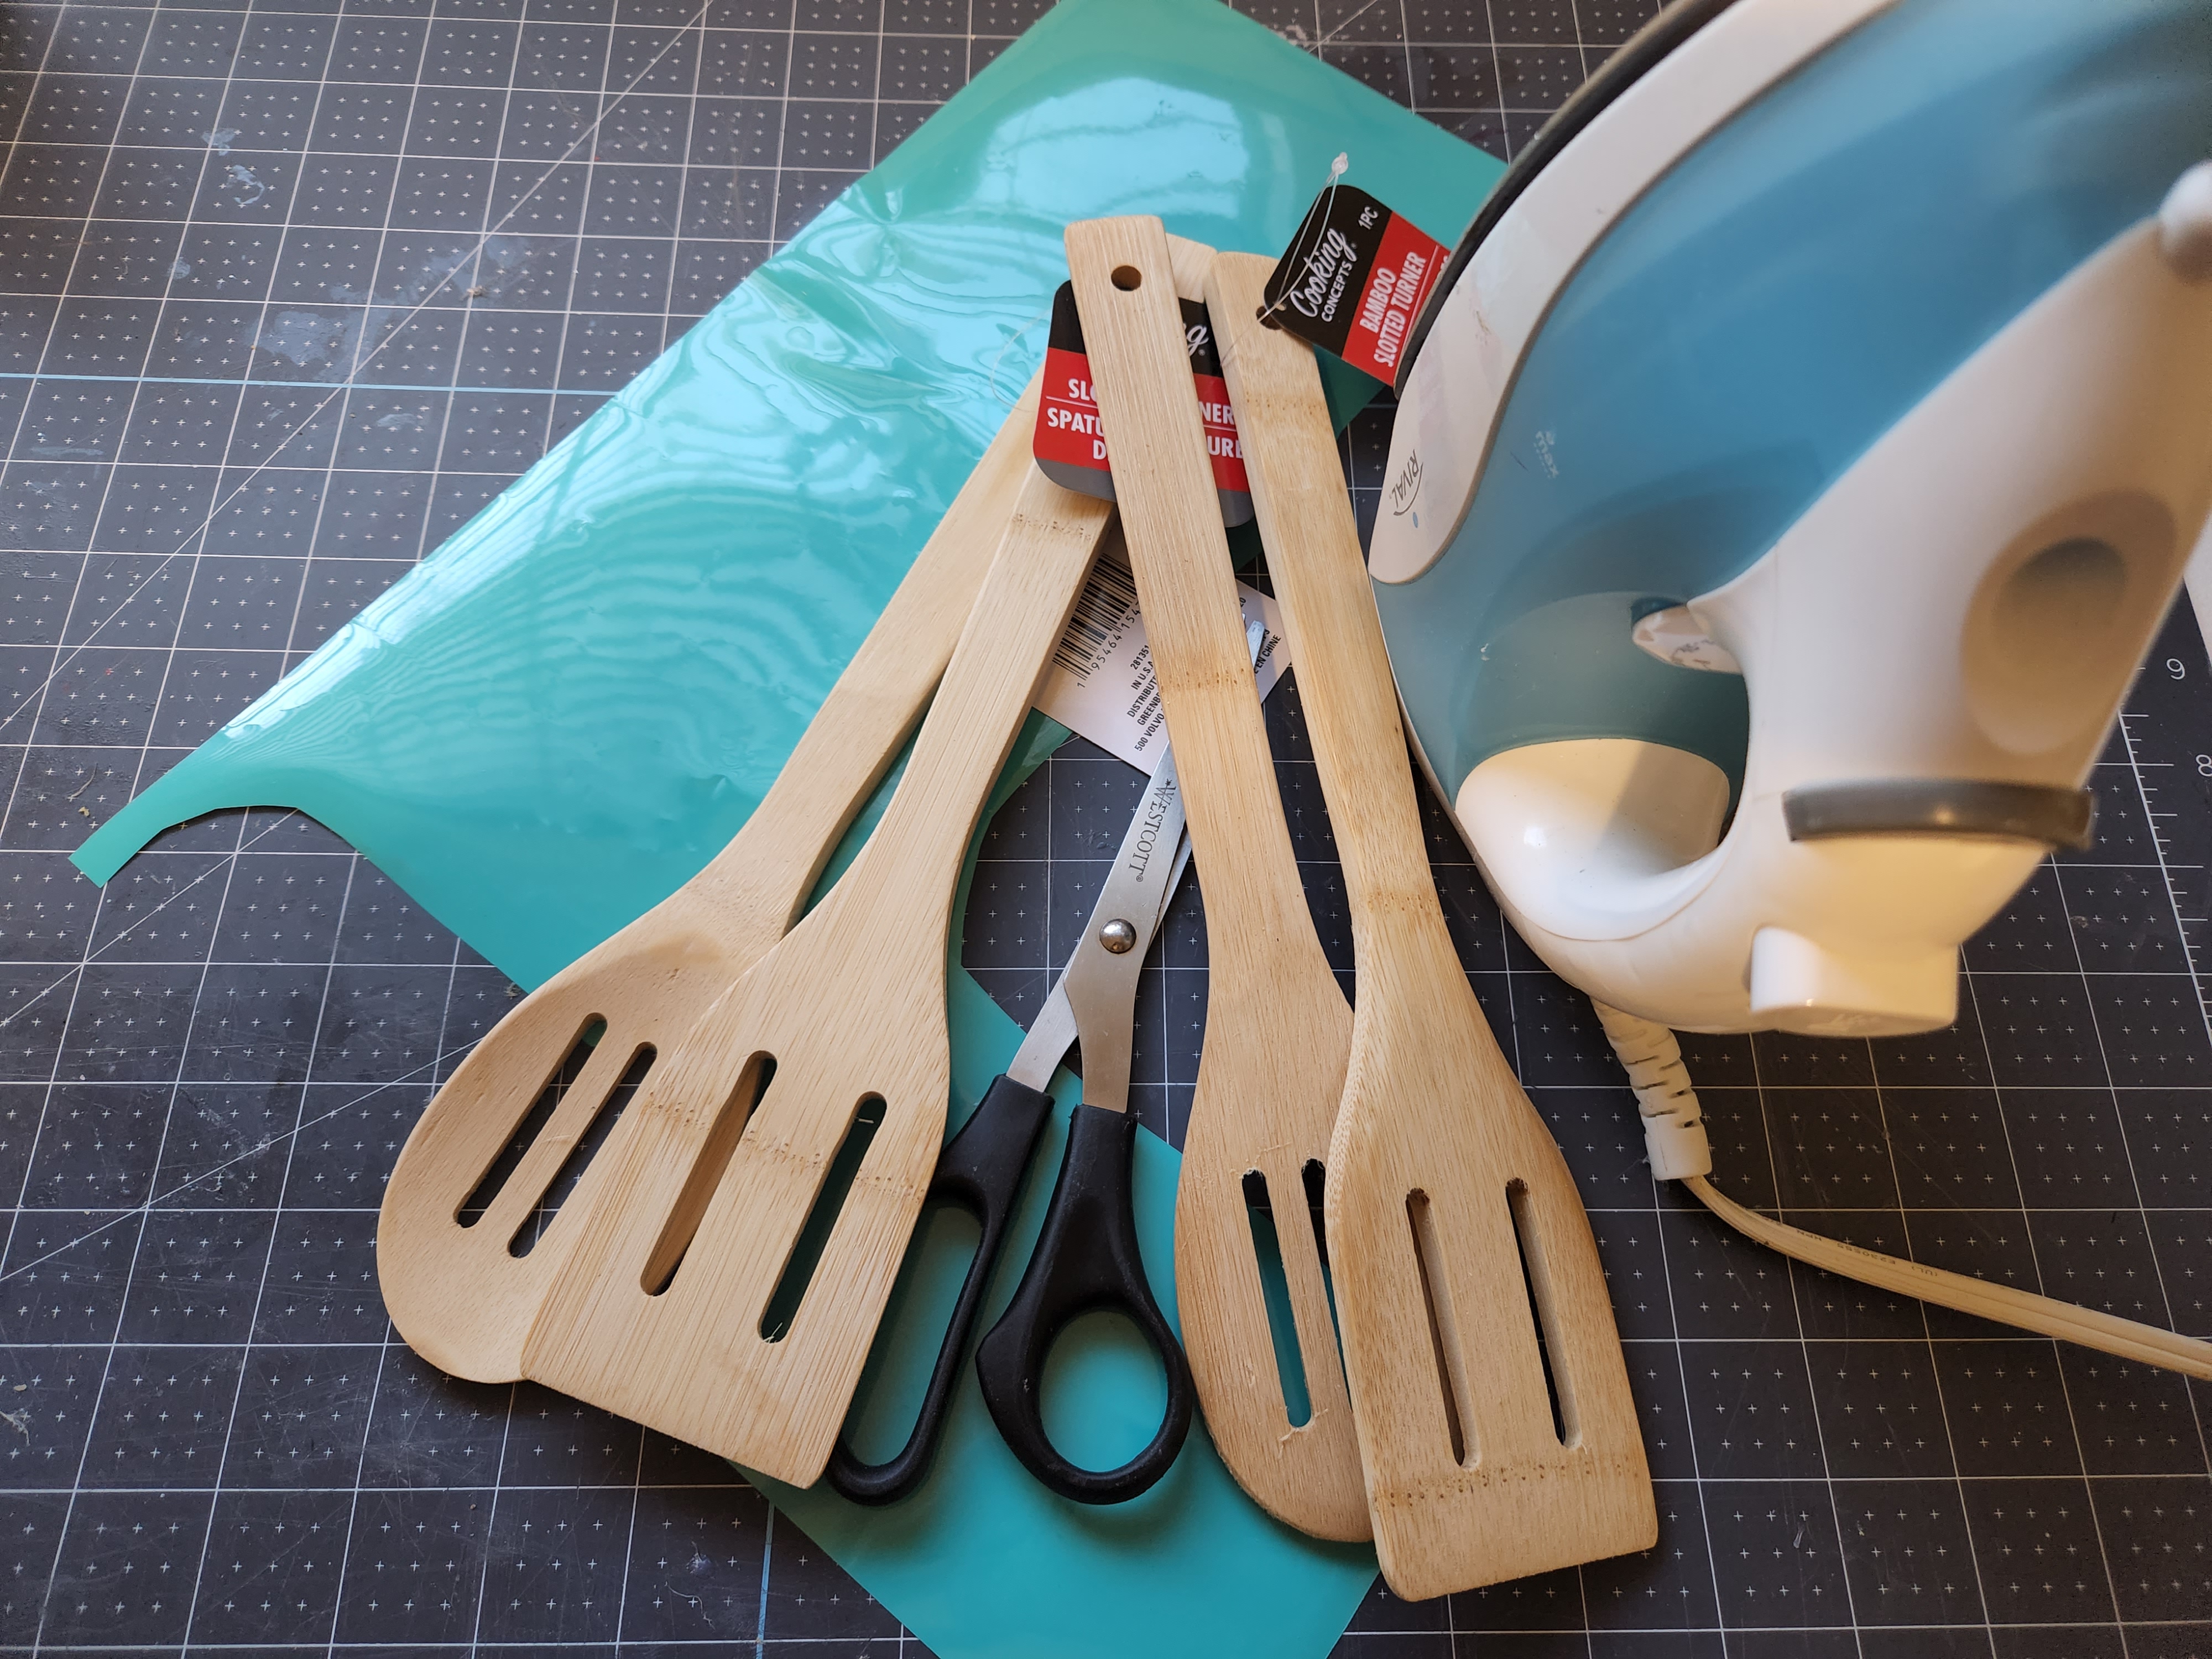
Supplies for Etched Wood Spoon (No Dremel? Use the other supplies listed):
- wood spoons or spatulas
- pencil
- scissors
- free printables or PNG design (mine or one of your choice)
- etching pen or Dremel
If you don’t have one use:
- vinyl/HTV or
- acrylic paint
for further decorating your utensils (optional)
- acrylic paint
- twine
- seashells
- wood beads


Somewhat Successful Etching
This project was my first attempt at any kind of etching. Why not use Dollar Tree items to practice on, am I right? I was somewhat successful at it. Somewhat. I wish I would’ve filmed it for y’all because you probably got a pretty good laugh at my aggravation with it not being perfect lol! Let me share my first foray into etching with you.
In order to etch my wood spoon, I needed to get my design onto the spoon. I went with the age old carbon copy method. You can use carbon copy paper, but why waste money when you can use a pencil?! Here are PNGs (which are used exactly like SVGs if you’d like to use them with your cutting machine). You can print them all or you can download the individual designs to upload to your cutting machine. That way you can resize them to fit any project you’d like to use them on.
Free PNGs & Printable Designs
For personal use only. All of my free printables & cut files are copyrighted material. Feel free to download these free designs and print them or use on your Cricut projects for your own use at home. They are not for commercial use, not to be placed on items for sale. That helps me keep these printables, SVGs, and PNGs coming to you for free! Another note: you will not my logo overlay on your downloaded design. It is there to keep people from downloading the images straight from Google, or others from stealing them to use on their site. Thanks for understanding! Feel free to share this post for your friends and family to make their own projects with this design!
As always, my logo will not appear on your downloaded version of the designs. This just prevents anyone from stealing the designs from Google without coming to the blog. The download with all the designs in one is an 8.5×11 and each designs are all 1/2″ wide to fit the utensils handles.
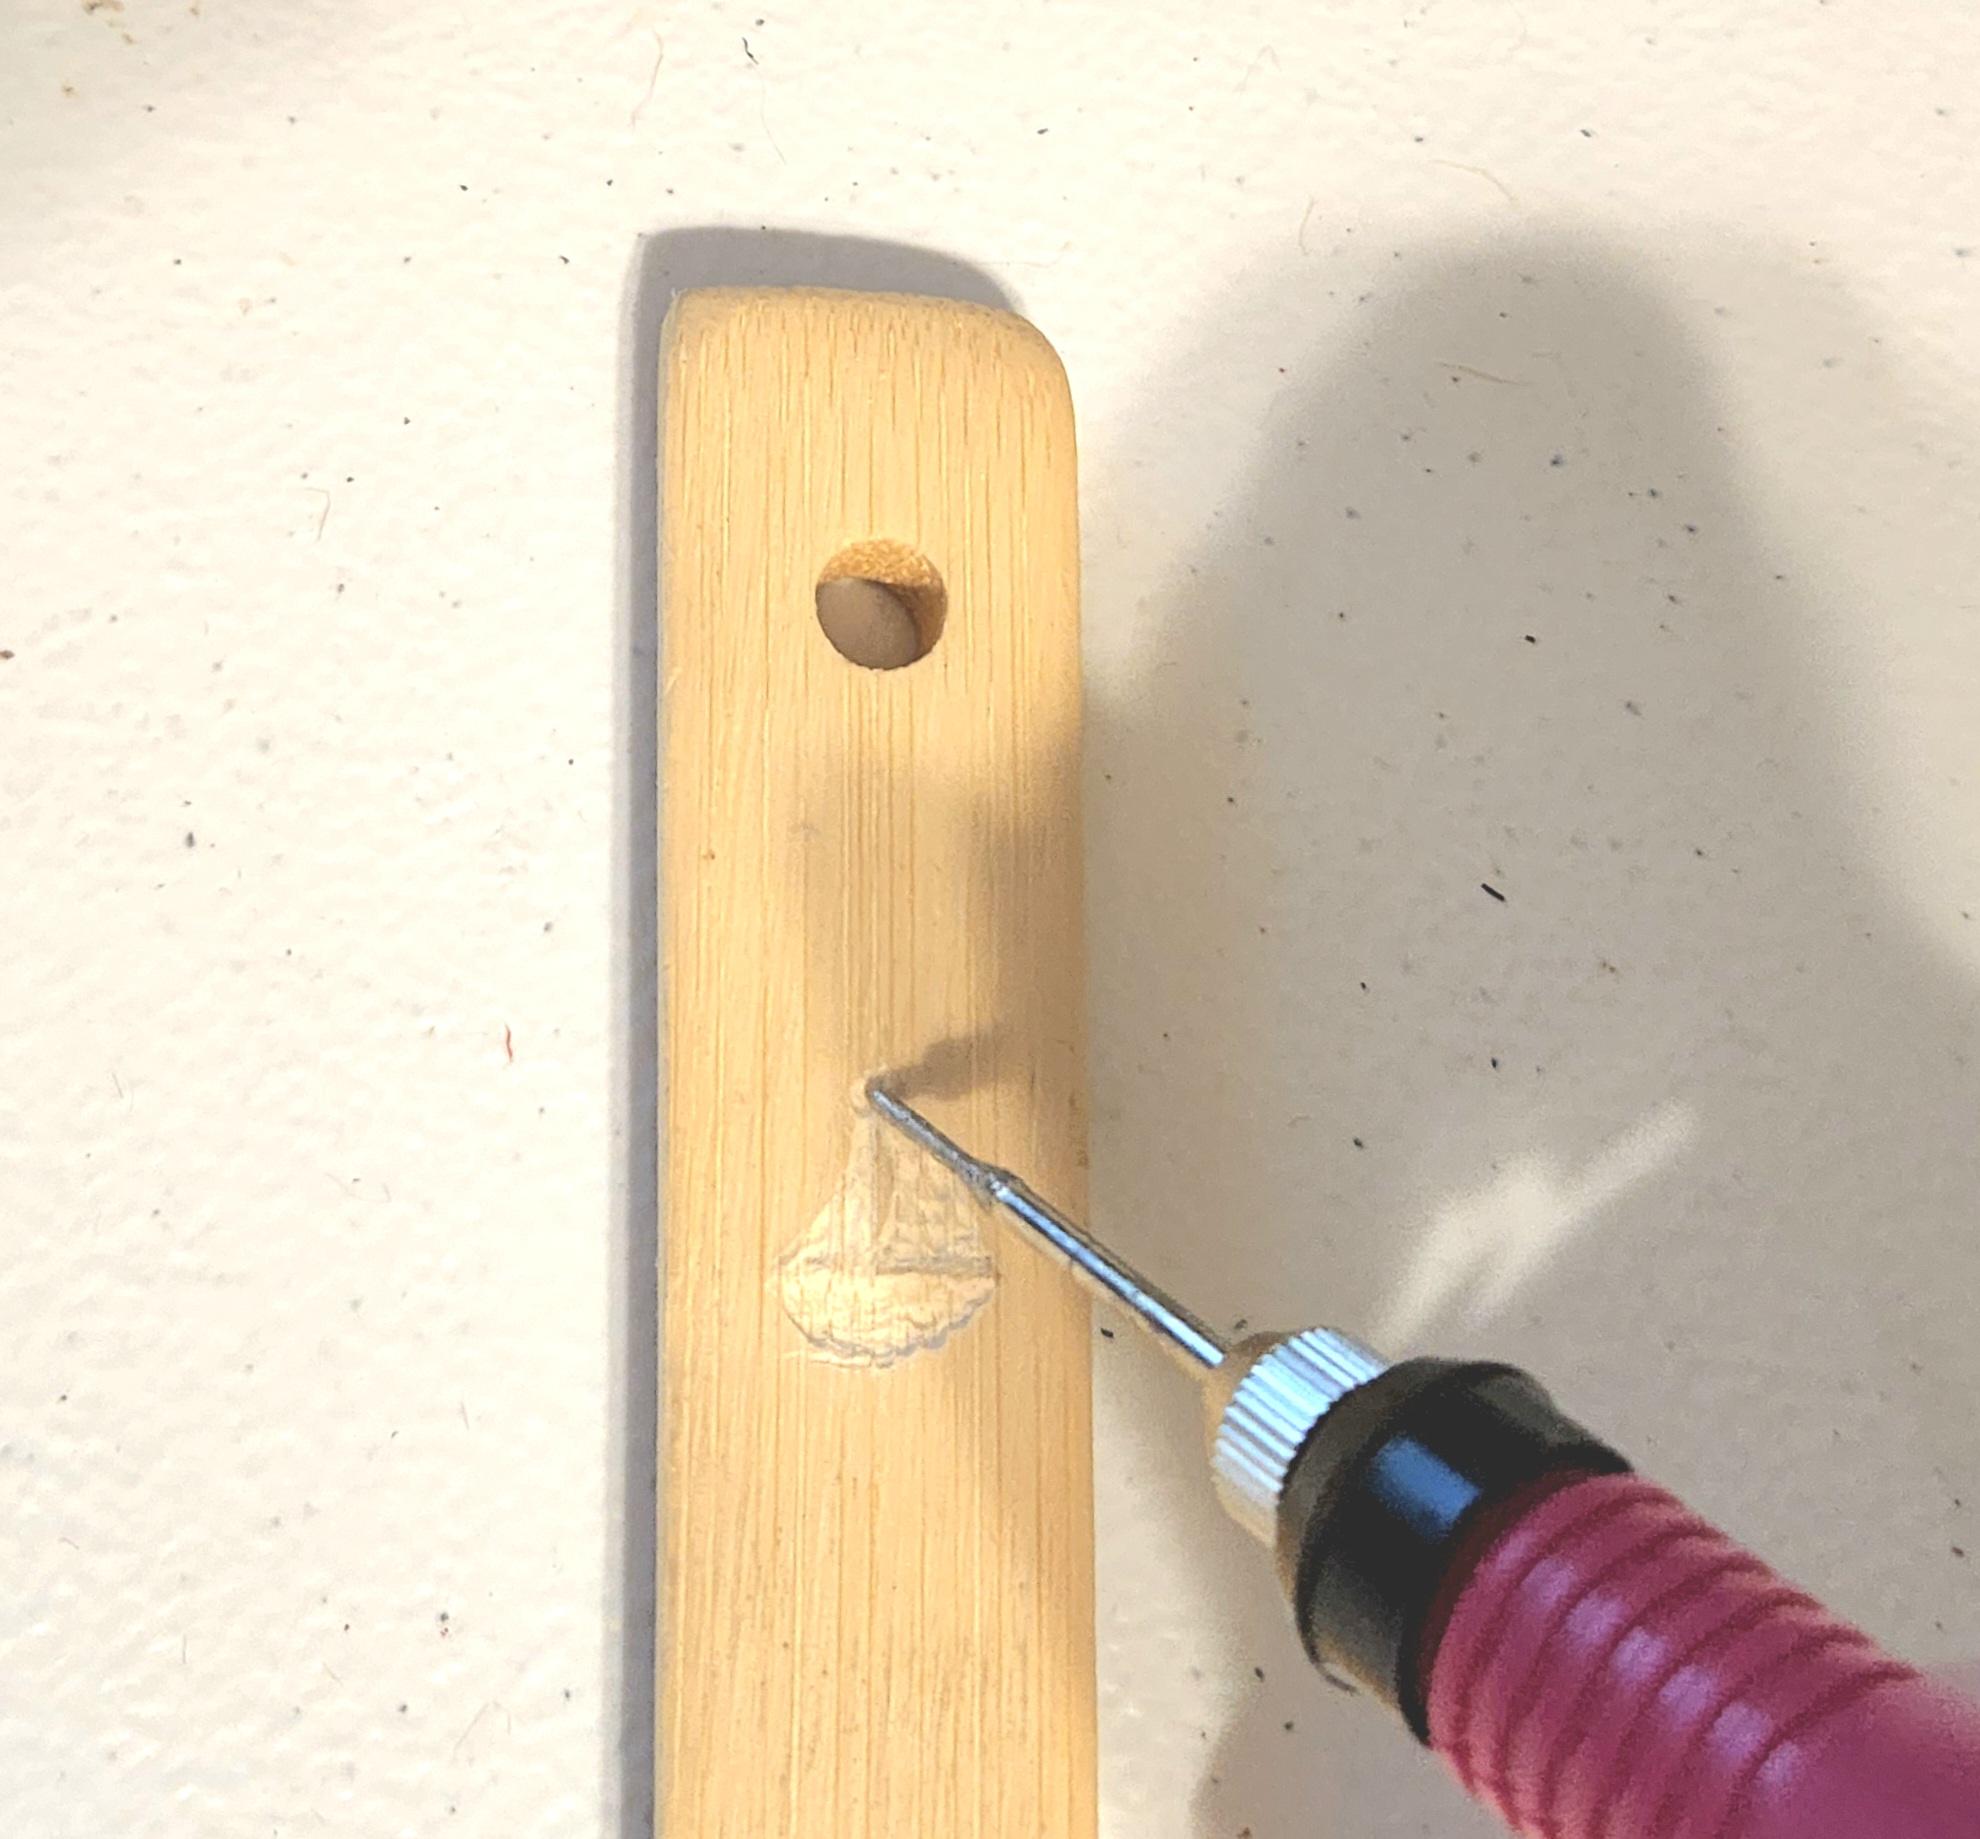
Carbon Copy Designs onto Wood Spoon
Once you’ve printed your design (if printing), cut them into strips so that you have the one you want to use and/or have one for each spoon.

Scribble on the back of the designs with pencil. I go over mine in several directions to make a buildup of lead on it.

Tape the design onto the handle of the spoon.

Trace over a design with a pencil.


Lift up the design to make sure it’s completely transferred onto the spoon. If not, trace the areas that need it again. If so, remove the paper. Need more of a tutorial for this then for painting the design on? Check out my carbon copy tutorial.

Trace design with Dremel to create an etched wood spoon.
I just got my etching pen, so again, this was my first go at it. The sailboat seemed like the easiest to do first, so that’s what I got a picture of me tracing. I switched and did the “Seas & Greetings” one right after I completed the first boat. However, I didn’t get a picture of me with the etcher on that design, but it’s the same thing. You just go over the whole design, pushing down slightly, just like using a pencil. It was so easy, but it’ll take a few shots for me to make the depth the same over the whole thing lol.
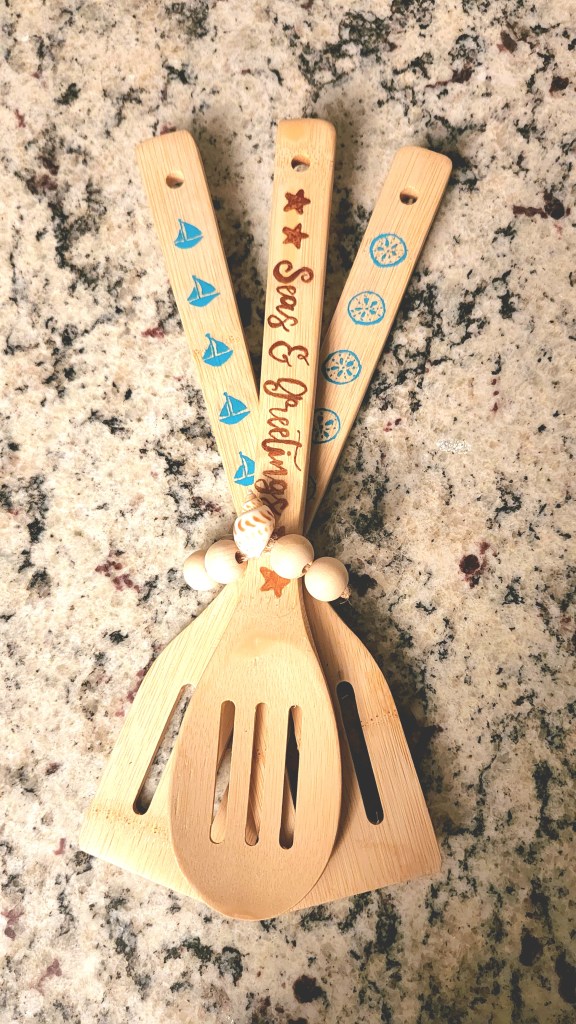
Paint the Design
I decided to make my “Seas & Greetings” design more visible on the etched spoon with a little bronze paint. I didn’t go as deep with this etching since I wanted to add paint, so you can see some lead left.

After painting, I erased any lead you could still see.

You can do this exact same process minus the etching pen. You can carbon copy the design, then paint the spoon. That was the technique I used on the sailboat and sand dollar spatulas. My patience was tested too much with the first spoon!
Other Option: Vinyl
You can also use HTV or regular vinyl on the wood utensils. I cut and ironed aqua HTV on the sailboats and anchors on another spoon. It worked like a charm. I got a picture of me laying the wax paper over the design, but not the finished project. The pictures are way too dark with shadows (it’s almost midnight, the light is long gone), so tomorrow I’ll add a finished picture.

Embellish the Set (optional)
I jazzed up my set of utensils a little by lying them on top of one another and securing them together with twine.

Next, I threaded four wood beads on the tails of twine and glued a seashell on the tied part.

The coastal Christmas etched wood spoon & spatulas are complete!
I think I’ll leave my sailboats and sand dollar spatulas as decor on my stove for the summer, then bring them back out with my coastal Christmas spoon in December! (Keep reading after the pictures to check out what the other ladies on the hop have to share today!)


I hope you enjoyed this DIY front porch sign tutorial! Remember to pin the image below and share on social media using the buttons at the end of the post or on the left side of the screen so you can get back to it when you’re ready to make it. Be sure to follow me on social media and via email so you never miss a great tutorial, free printable, or other amazing posts!

Don’t go yet! There’s more to see!
There’s plenty more to see here on the blog! If you’re looking for something specific, use the search box in the sidebar to look it up. If not, you might enjoy these ideas. Don’t have time to read them all now? That’s ok, just click over to the posts using the pictures and pin them for later. You can also add Life as a LEO Wife to your favorites and check back for new ideas and free printables and SVGs every Wednesday, as well as link parties with tons of shared ideas on Sundays!
Christmas in July Blog Hop
I’m so excited to see what the other ladies on the blog hop have to share! They’re all talented, so I know you’re going to love their ideas! With all of my blog hops, I share their main blog page on the left with their name and the link straight to the project on the right with its name.
Beverly from Across the Blvd. | Christmas In July Dollar Store Plate Decor
Gail from Purple Hues & Me | Tattoo Clear Ornaments DIY
T’onna from Sew Crafty Crochet | Christmas Scarf Hat
Terri from Our Good Life | Garden Plate Flower
I hope that you enjoyed today’s projects! If you’re looking for more Christmas ideas to pin, you might enjoy these (or use the search box in the sidebar):


This is so cool, Niki! And a great idea for decorating wooden pieces. I’ve never tried this technique before but it’s on my ‘to do’ list! Thanks for sharing!
Thank you! Hopefully I get better at it quickly lol!
I love the coastal designs you put on these wonderful utensils. As a navy wife, I’d like to see the anchors. 🙂 And “Seas & Greetings” is cute!
Thank you! I can’t take credit for the “Seas & Greetings” idea, but I thought it was so cute. I’m a navy daughter & a law enforcement wife (obviously with the site name lol), so thank you for your & your family’s sacrifice to stand behind your man & your hubby for his service! You are all so deeply appreciated!
These turned out so great, Niki! I love the coastal look. I’ve tried wood burning, but not etching. This is a great idea. Happy to have you joining us for the blog hop.
Thank you! I really enjoy hopping with you all!!