
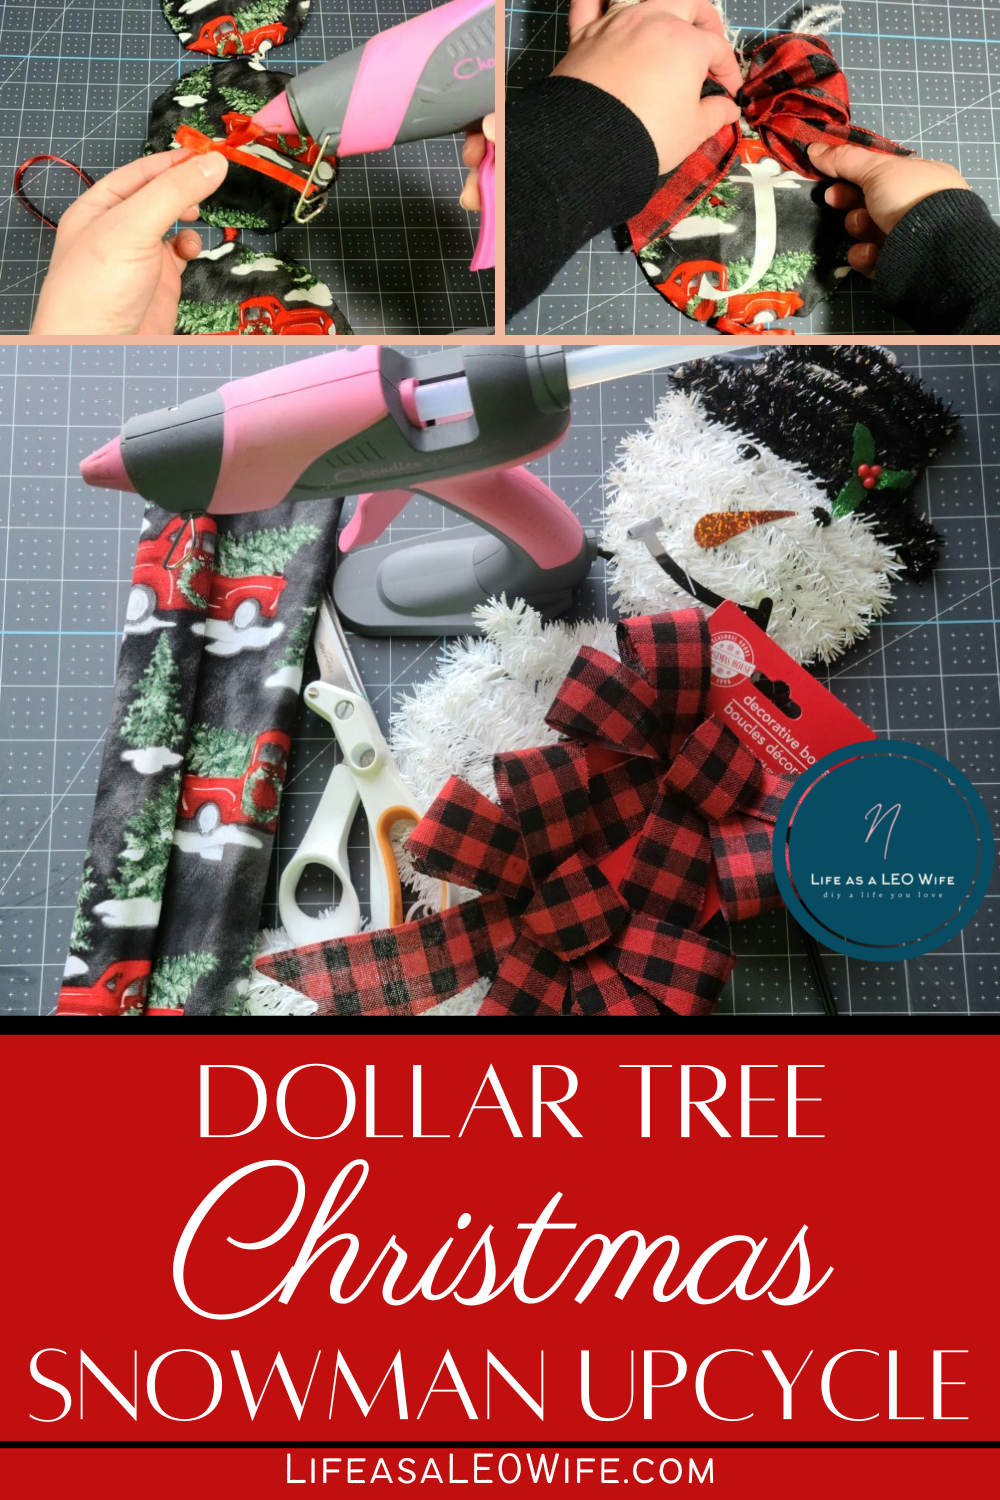
Did you know that Dollar Tree now has fabric?! Yes, yes they do! I was at one of the stores the other day and found some adorable farmhouse truck Christmas fabric and some black and white buffalo check that I bought. My Christmas kitchen decor is red and black buffalo check, so both fabrics will fit in perfectly. I also found a three piece snowman hanger, and I instantly knew what I wanted to do. I took that Dollar Tree snowman and upcycled it into a three piece “JOY” sign.
To turn a Dollar Tree snowman into a JOY sign you need:
- snowman hanger
- fat quarter of Christmas fabric
- scissors
- wire cutters
- 1/8″ red ribbon or color of your choice
- 5/8″ black ribbon (optional)
- 1.5″ buffalo check wired ribbon (or your choice pattern)
- hot glue gun
- floral pick
- vinyl, stencil & paint, or vinyl letter stickers
- or HTV, wax paper, & an iron

Prepare the Dollar Tree Snowman
Remove the Garland
The hanging snowman from Dollar Tree is made with garland over a plastic form with some little gems on it. To get it ready to add the fabric you need to remove those items. They’re easy to take off. First pop off the little gems that are the snowman’s buttons and nose. You can keep them for a later project.

Start at the bottom side of each circle and unhook the garland from the plastic hook-edge. Then continue to unhook every layer. When you remove all of the garland on one circle, move on to the next until even the black hat garland is removed. Try to keep the ribbon hanger at the top if you can. For some reason mine slipped off, so I had to add a new one to hang my sign with.


Cut off Un-needed Plastic
Since we aren’t re-creating a snowman with a hat, you need to cut the plastic that forms the brim of the hat off. Cut off both sides.
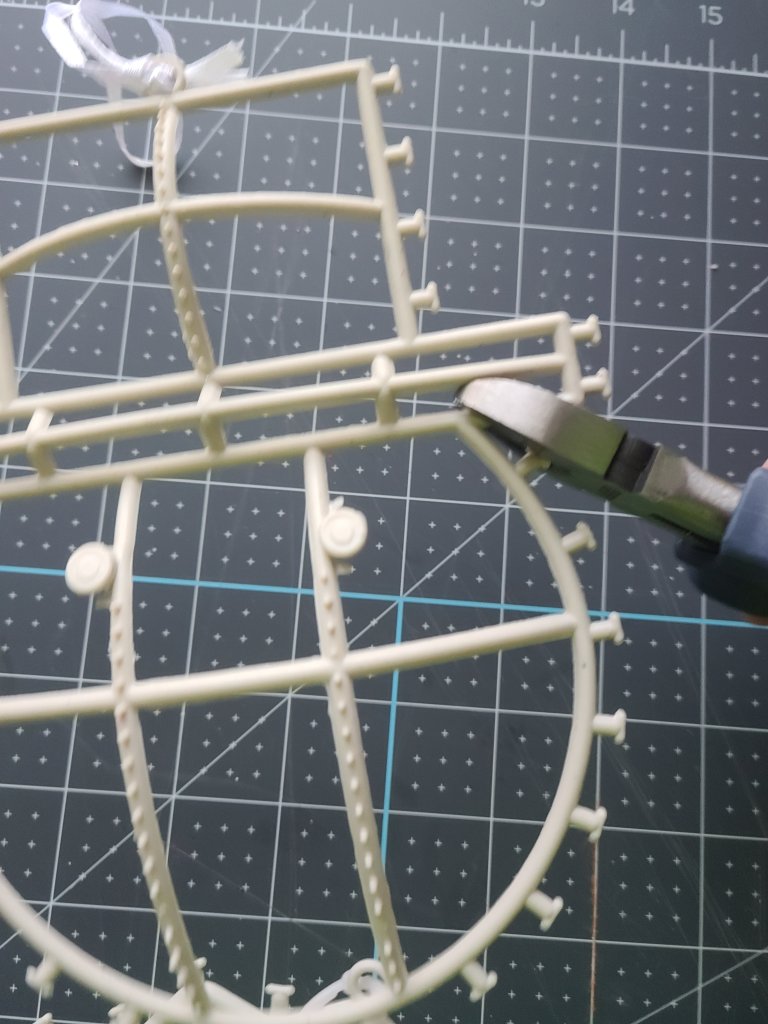
You need to remove part of the plastic that forms the middle of the hat because it won’t allow the fabric or ribbon to lay flat on it. In the middle of the hat is an kind of t-shaped piece. Use the wire cutters and cut that piece out of the snowman’s hat. You’ll need to make four cuts, on the top, bottom, right, and left.


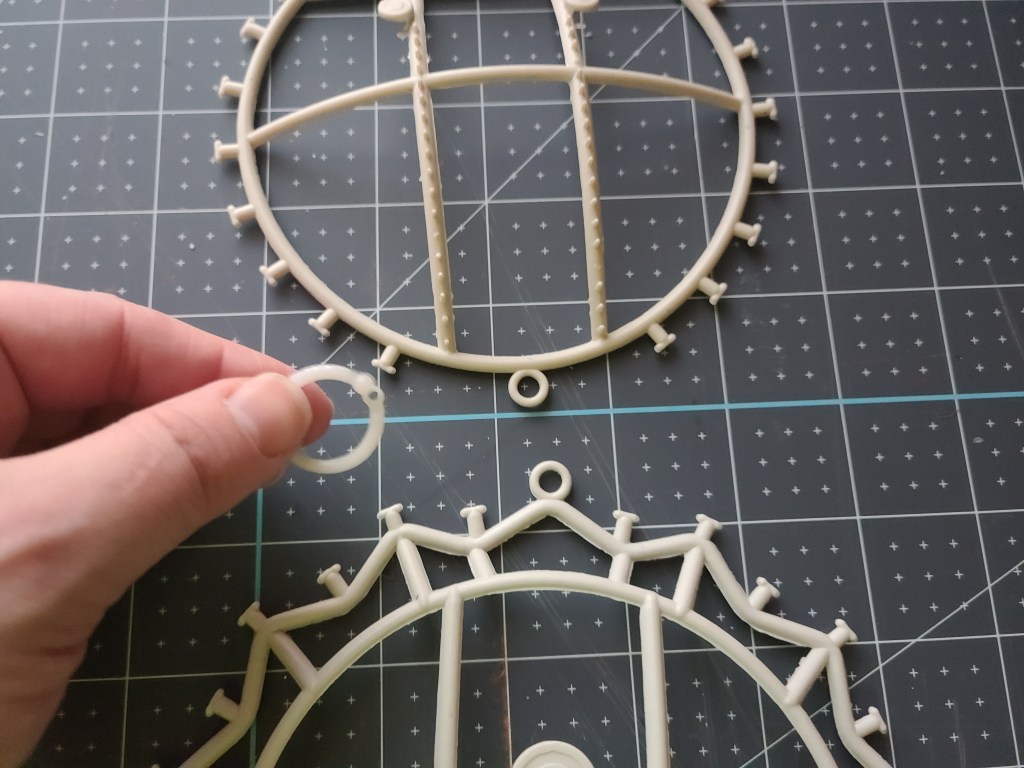
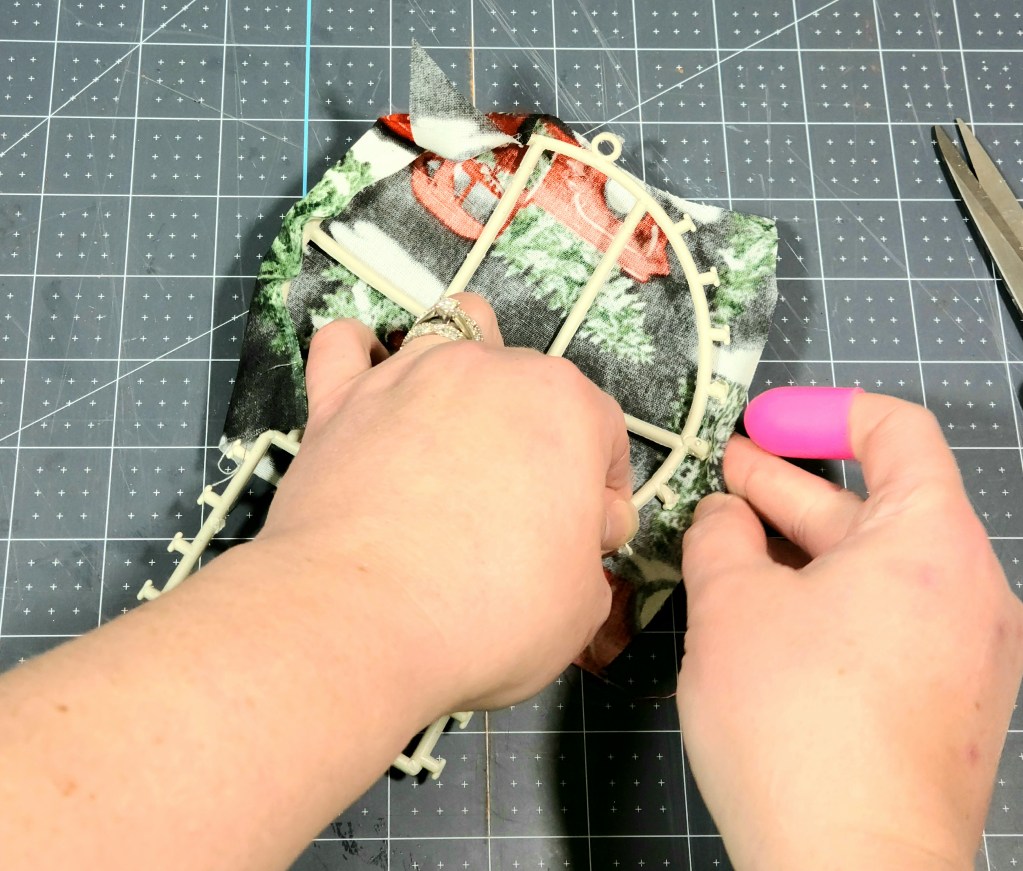
Remove Plastic Rings Holding the Pieces Together
Since the circles are held together by rings that are perpendicular to the sign, you need to remove them. I tried to leave them on, but it’s impossible to cover them with ribbon to make it look not so cheap with them on. They have a little clasp that you can just unhook, then remove the ring. Take both of them off so that the circles are free from each other.

Cut the Fabric
I did this kinda backwards when I made mine. I had to remove everything more than once. You get the benefit of me figuring everything out on the fly! Ha! I laid my snowman on top of the fabric, then glued the edge along one side of the largest circle at the bottom. I did that so I could cut the fabric to the perfect size without having a lot of extra which would be wasted. Since I only bought one fat quarter of the farmhouse truck fabric, I wanted to cut each circle as small as possible so I could use it on other things. I did glue it on, but then removed it to add the HTV letters J, O, and Y.
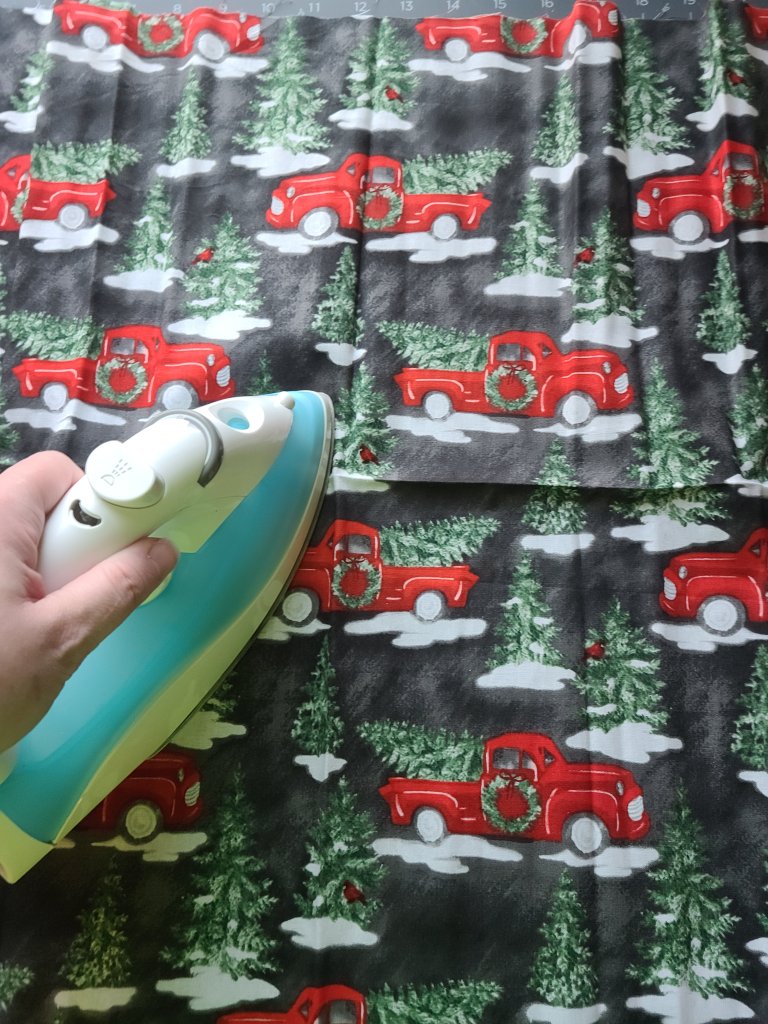
The fabric comes folded and rolled up, so you’ll need to iron it before cutting it.
Lay the bottom circle on the fabric, close to the edge. Bring the fabric up around so that it overlaps the back just a little, noting how much you’ll need. Cut around the circle (well kind of a circle, you’ll have the edges of plastic jutting out kinda like a snowflake).

Now do the same with the middle circle. You won’t cut the full shape of the head of the Dollar Tree snowman. The hat section will be covered by the 1.5″ ribbon, so you will only need to cut around the round bottom and sides, then cut straight across where the bottom plastic straight piece is.

Add Letters to the Circles of the Dollar Tree Snowman
Letter Options
You can create the letters, JOY, for the sign in several ways. There are large letter stencils you can get at DT and paint them in the middle of the fabric circles.
Another option is to create letters in a program like PicMonkey or Word to print and cut to make a stencil paint. You could also cut around the letter that you printed, then trace them on DT vinyl that you can then cut out and place on the circles. If you have a white colored pencil or a pencil used in sewing, you can use the carbon copy method using this tutorial.
DT also has large vinyl stickers for the wall in a lot of different fonts. All you need to do is cut out a J, O, and Y from those stickers and put them on the fabric.
If you choose these options, you can reverse the next two steps, adding the fabric to the circles first, then add the letters so they are centered.
Adding HTV Letters
I used heat transfer vinyl that I’ve had for a long time and cut the letters with my Cricut. And since I did use HTV, I had to add my letters before gluing the fabric. If you like my sign and want to duplicate it, I used the font American STD. I’ve talked about this font and it’s extremely unfortunate name before on the blog. Every single time I type it, it’s a palm to forehead slap moment! When you’re using HTV, remember to “mirror” your image before cutting it. Cut around the letters and remove the excess vinyl from around them. Tear off a piece of wax paper to place over the letters while ironing.

Center the letters on the fabric circles. The J will be on the top, smallest semi-circle of fabric, the O on the middle circle, and the Y on the largest. Lay the wax paper on top of the HTV and iron over it until it is transferred onto the fabric.

Glue the Circles to the Snowman
Now if you aren’t using HTV, remember, you can actually glue the fabric on to the snowman before putting the letters on so that they are centered. Turn the fabric facedown and lay the snowman circles facedown on it, making sure the letters are centered if you used HTV or if the letters are already on the fabric. Add a dot of hot glue on three of the plastic pieces that jut out then wrap the edge of the fabric around and press it on the glue.


Pull the fabric tight and place dots of hot glue on the other side’s plastic pieces. Press the fabric on to it again.


Continue pulling the fabric tight and gluing it on. Don’t place hot glue or the fabric on the rings that will hold the circles together. You will just fold the fabric there and tuck it under because you need those rings to be uncovered to link the whole thing back together.

When you’re working on the snowman’s head, glue around the round sections just as you did above. If it’s holding tight when you have the edges glued, don’t worry about gluing it to the straight bar on the front. Some fabrics allow the glue to show through, so if you can avoid placing glue on the front, do that.


Top the Dollar Tree Snowman’s Head with Ribbon
I thought that my red and black buffalo check ribbon was perfect for the top of the JOY sign. I used the 1.5″ ribbon to decorate my kitchen last year. You can see the burlap candy cane wreath here, the matching buffalo check wreaths here, and the upcycled Dollar Tree “merry & bright” wood sign here.
Lay your ribbon down with the top of the sign on it. Cut the ribbon to the correct size, with enough to cover the front and to wrap around the back sides where you’ll glue it on. Put some hot glue on the back of the sign along the edge of the top then press the end of the ribbon on top of it.

Now add hot glue along the other side and the top (on the back) and press the ribbon onto it.

Attach the Circles & Wrap Them
Connect Circles with Floral Wire or Pipe Cleaners
You are going to see that my fabric isn’t on the circles when I attached them in the following pictures. I realized later that it was so much easier to attach them and the ribbon once the fabric is already on. So I’ll be giving you directions on how to make this Christmas sign in the easiest way (which is to connect the pieces with the fabric on).
Cut about an inch of floral wire or pipe cleaner. I used a pipe cleaner. Form it into a kind of U shape. Lay the middle circle just below the head so that the plastic connector rings are touching. You may have to hold them up a little if you can manage. Hook one end of the pipe cleaner through the top ring on the middle circle.

Then hook the other side through the ring on the head and twist both ends together. Try to make sure the twist is in the back. You will want to have a bigger piece of pipe cleaner than I did. In these pictures I had already trimmed off the extra pipe cleaner with wire cutters when I put the pieces together earlier.


Do the same thing to connect the bottom circle to the rest of the body.
Wrap the Connections in Ribbon
I used a red 1/8″ ribbon to cover the pipe cleaners and plastic rings. I did all of this in different orders, multiple times (ha). So you will see that I have no letters on the fabric that’s on the snowman when I added the ribbon.
Add a dot of hot glue on the end of the ribbon and press it on the back of one of the rings connecting the two circles. You can do either one first, the top to the middle or the middle to the bottom.
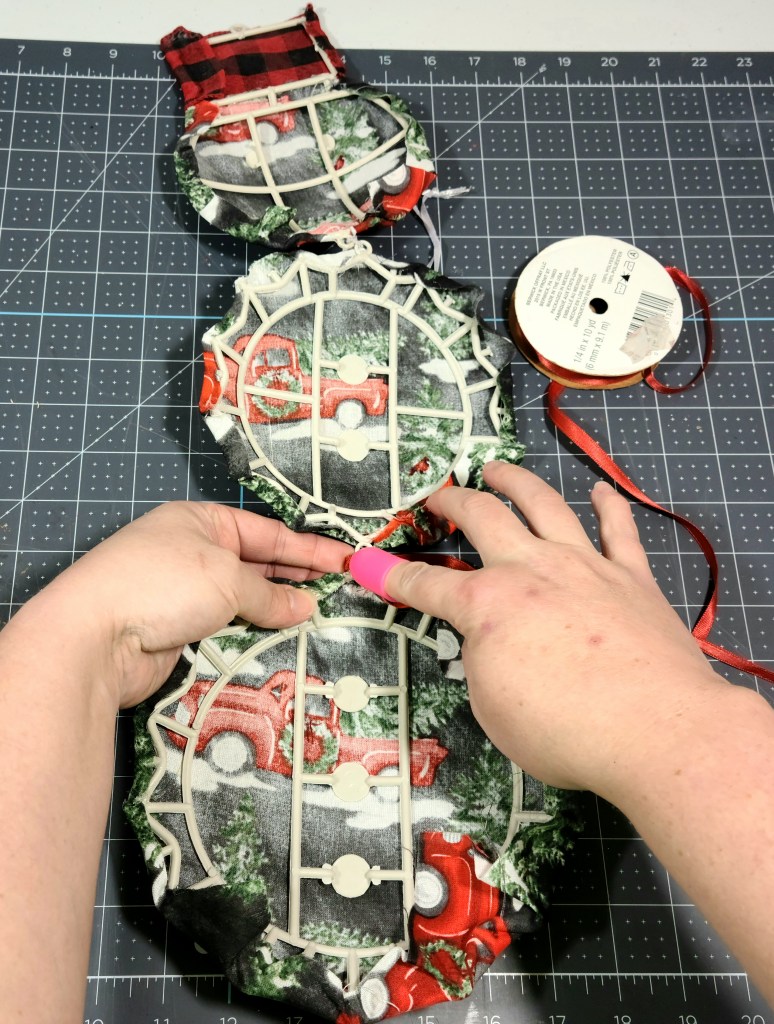
Wrap the ribbon around the connection until it’s completely covered by the ribbon. Cut off the excess and glue the end to the back.

Make & Add Tiny Bows
Make two simple little bows with the 1.8″ ribbon, then add a little hot glue to the back.

Press the bow on the middle of the ribbon that you just wrapped around the rings. Repeat the process and add the second bow to the other connection site.

Make a Bow for the Top
You’re almost finished! Make a bow using the same ribbon that you covered the top of the sign with. I made a simple two loop bow that’s 6″ wide with 4.5″ tails. Dollar Tree has red and black buffalo check bows which you saw in the supplies picture at the beginning of the tutorial. I didn’t use those because I couldn’t make the tails hang wider instead of straight down. With the pre-made bows, the J was covered, so I made one myself. I secured the middle with a pipe cleaner then covered it with 5/8″ black ribbon.
Next cut off some pieces of a floral pick to place behind the bow. I used a $.98 white sequin pick that you might remember from this 2′ Christmas “peace” sign. I cut of three small pieces ranging from 1.5″ to 3.”
If the pieces of your pick need to be glued together, go ahead and do that now. Next put glue on the back of the pick and glue it to the ribbon wrapped around the top of the Dollar Tree snowman.


Now add hot glue to the back of your bow then press it on top of the pick. You want the bow to cover the place where the pick is glued to the ribbon. Then adjust the tails so that the extend off the sides so that the J can be fully seen.


Add a Hanger
To hang the Dollar Tree snowman upcycle you can add a piece of a pipe cleaner or a piece of ribbon. I used the 5/8″ black ribbon that’s on my large bow. There is a ring at the top of the former snowman that the white ribbon was attached to in the beginning. If you didn’t leave that on, you can add another ribbon or pipe cleaner to it. You could also twist a pipe cleaner into a loop and glue it on the back of the 2.5″ ribbon covering the top.

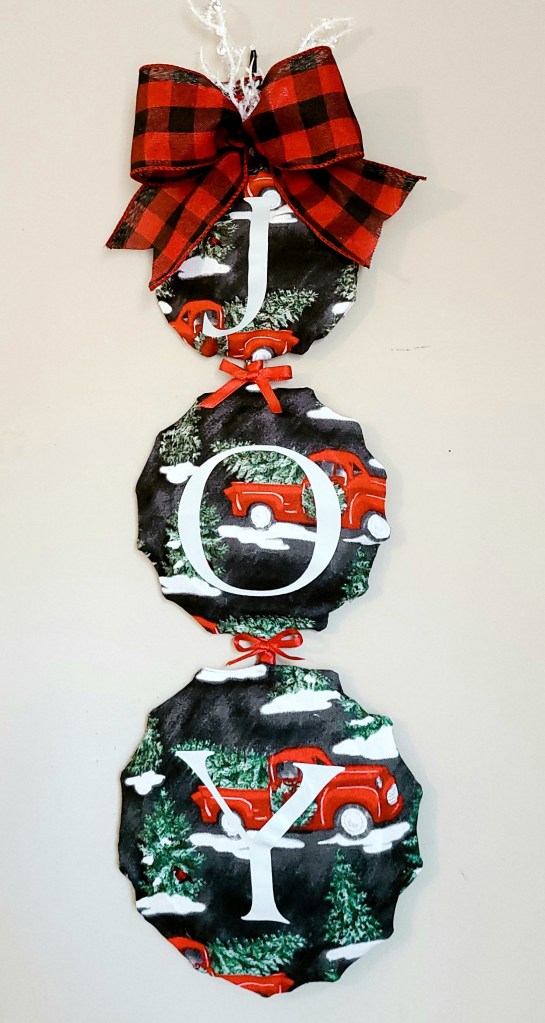
Now proudly hang your Dollar Tree snowman turned beautiful farmhouse JOY sign!
My sign will hang on the pantry door in my kitchen this Christmas. It’s really going to be the perfect addition to my buffalo check decor. Here are a few pictures of it hanging on my craft room wall for now.

Remember to pin the image below or share this post with the buttons on the left side of the page so you can find it when you’re ready to start your project! Also, follow me on Pinterest for new ideas added weekly! Be sure that you never miss a great tutorial for decor like wreaths, signs and other home decor, free printables, crafts, and other fun posts! Enter your email address below to be notified of new posts! Use the buttons below to follow me on social media for other great content.

Don’t go yet! There’s more to see!
There’s plenty more to see here on the blog! If you’re looking for something specific, use the search box in the sidebar to look it up. If not, you might enjoy these ideas. Don’t have time to read them all now? That’s ok, just click over to the posts using the pictures and pin them for later. You can also add Life as a LEO Wife to your favorites and check back for new ideas and free printables and SVGs every Wednesday, as well as link parties with tons of shared ideas on Sundays!


Wow! This is just adorable Niki! I always love your projects but this is just the cutest and no, I had no idea the Dollar Tree had fabric. Thanks so much for sharing such a great idea! Have a wonderful week.
Thank you Denise! They’ve always had kinda crappy fabric until now, at least at the stores near me. I think they started having them about a year or so ago near me. Have a Happy Thanksgiving!