Welcome to this month’s Sustainable Pinterest Challenge! Each month I get together with some wonderful bloggers to bring you a themed project from ideas found on Pinterest. This month’s theme is nature, so of course I had to combine that with fall. Today I’m going to share an easy DIY pumpkin vase that’s perfect for centerpieces or vignettes. Using a carvable faux pumpkin & faux flowers is way more sustainable than having to waste real ones a several times every season!


Stick around after the tutorial to see what all these ladies who are joining the Pinterest Challenge have created for you!
Disclosure: I am a participant in the Amazon Services LLC Associates Program and the Dollar Tree Affiliate Program, affiliate programs that allow me to link to the products that you can use to make this project quickly and easily. If you purchase any of these products I may receive a very small commission at no cost to you! That commission helps me continue to bring these great decor DIYs, free printables, and all of the other goodies on this site to you. Thanks so much for your support!
DIY Pumpkin Vase Supplies:
- carvable pumpkin– I used a small 7″ white one from Michael’s.
- fall themed florals & greenery
- utility knife
- styrofoam block
- BBQ skewer


Cut the Pumpkin
Choose the size pumpkin that you’d like to use for your vase. I used a 7″ white one from Michael’s because it’s what I had on hand. You can use a large one if you’d like to use it as part of a table centerpiece.
Place a circular object on top of your carvable pumpkin. You want to use something that makes a large enough hole to place your flowers in, but not big enough to extend to the sides of the pumpkin. I used a Ball mason jar lid.

Trace around the lid with a pencil.

Cut the Top of the Pumpkin
Cut along the pencil line with an exacto knife. Be sure to push the blade all the way through the pumpkin into the hollow section.
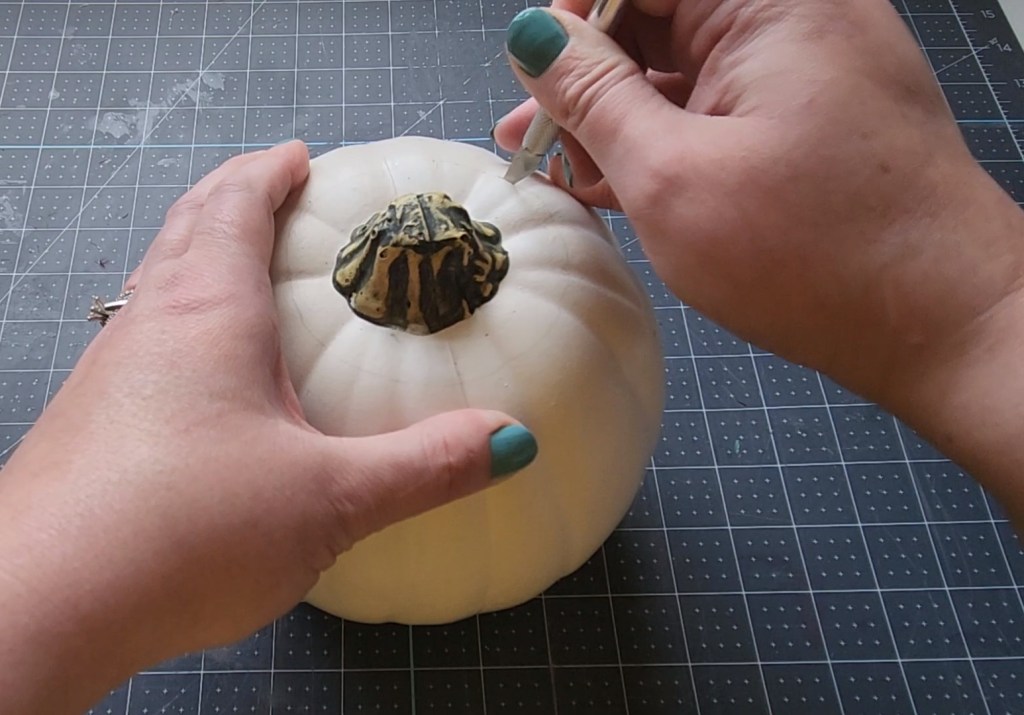

Remove the stem, and now you have a cute pumpkin vase!


Insert Foam into the Pumpkin Vase
To hold the flowers inside the vase, you’ll need styrofoam. You can use wet or dry foam, it doesn’t matter. If you have a small pumpkin like mine, you’ll probably need to cut down the styrofoam to fit inside the pumpkin vase. Wet floral foam is easier to cut than dry. Place the foam into the pumpkin. I cut pieces and filled the entire empty space inside the pumpkin vase.

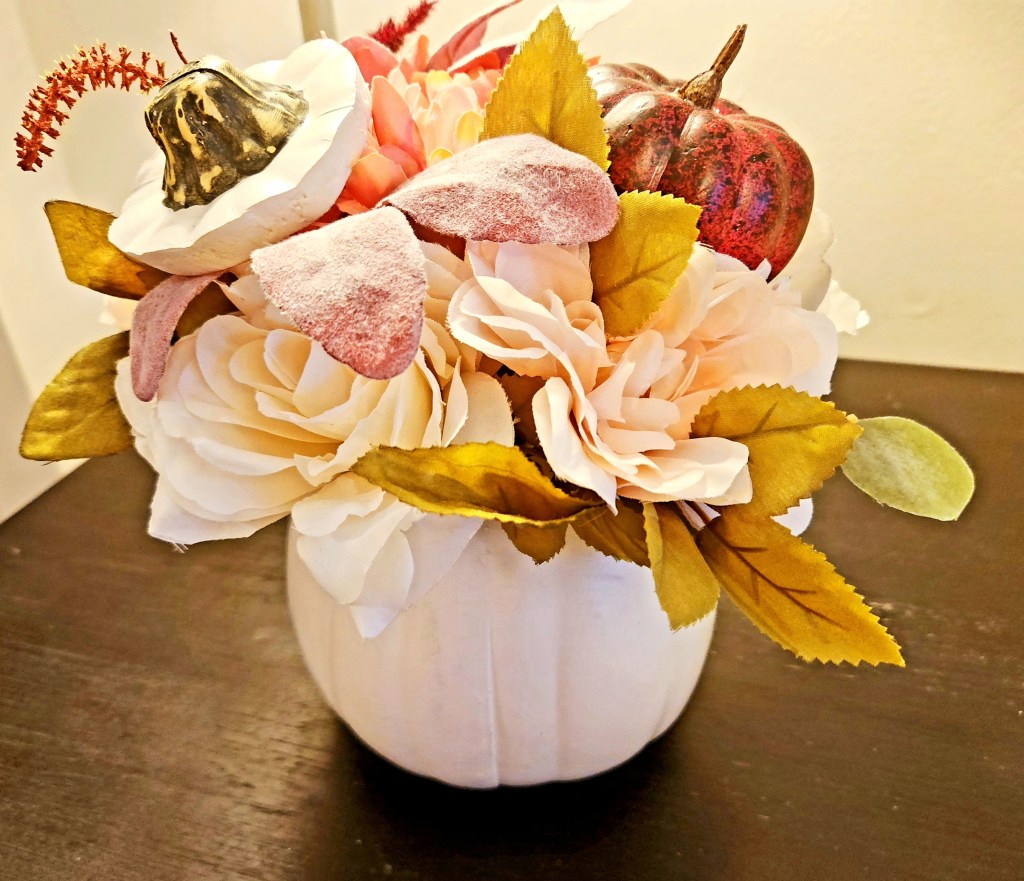
Fill the Vase with Flowers & Greenery
I bought a bouquet of fall florals from Walmart for around $5. They were actually quite pretty, and it was a big bunch for the price. I try not to cut the stems of my flowers too short so that I can use them for different projects. I separated them from the bunch but bent the stems to the height that I wanted for each one.

Begin placing the flowers and other stems into the DIY pumpkin vase until you’re happy with the look. I start on one side and work my way across and around the flowerpot. I’m sorry that the pictures are quite close. I videoed the tutorial for making the pumpkin vase, so I had to use still images from the video.


Add the Stem to the Arrangement (optional)
I decided to add the stem section that I cut from the top of my pumpkin vase back into the centerpiece. Sand the edge of that section until any jagged edges are removed.

Place a BBQ skewer into the bottom of the stem. It will press in the soft surface easily.

Cut the skewer to the length that you need for your pumpkin receptacle.

Insert the skewer and pumpkin stem into the flower arrangement.

Here’s the other side of the floral arrangement.

And now a video of the entire process in case you’re more of a visual learner. Forgive the height of the tripod.
That’s it! Your DIY pumpkin vase is complete!
Just a few simple steps, and boom! You have a beautiful pumpkin vase to use as a centerpiece or in a vignette. It took me all of eleven minutes to make this. Tomorrow I plan to add a bow to the piece, so I’ll update with a new photo then. You can change up the flowers and ribbon (if you add one) to use during early fall, Halloween, and then Thanksgiving! Keep reading to see what the other ladies on the hop have to share.


Remember to pin the image below or share this post with the buttons on the left side of the page so you can find it when you’re ready to start your project! Also, follow me on Pinterest for new ideas added weekly! Be sure that you never miss a great tutorial for decor like wreaths, signs and other home decor, free printables, crafts, and other fun posts! Enter your email address below to be notified of new posts! Use the buttons below to follow me on social media for other great content.

Don’t go yet! There’s more to see!
There’s plenty more to see here on the blog! If you’re looking for something specific, use the search box in the sidebar to look it up. If not, you might enjoy these ideas. Don’t have time to read them all now? That’s ok, just click over to the posts using the pictures and pin them for later. You can also add Life as a LEO Wife to your favorites and check back for new ideas and free printables and SVGs every Wednesday, as well as link parties with tons of shared ideas on Sundays!


On to The Sustainable Pinterest Challenge


Your pumpkin vase is fabulous, Niki! No bow is needed – and I’m a lover of bows, lol! It’s the perfect centerpiece for fall! Well done!
Thanks Gail!
The perfect Fall centerpiece! Very pretty, Niki!
Thank you!
pumpkin vase came out so adorable.
Thanks!
Your pumpkin vase turned out perfect! The flowers look very pretty in the pumpkin. I like the idea of adding the pumpkin top to the arrangement.
Thank you Allyson!
This is so cute! The flowers you chose are so pretty, and I love how you added the stem of the pumpkin. So cute and clever!
Thank you! I didn’t want to waste the stem, ha!
Super cute pumpkin vase! Love the flower arrangement and the pumpkin stem like a hat on top.
Thank you!
Beautiful arrangement! I pulled out my box of pumpkins and have one that is missing the stem (that you saw me use in my own project) and I think this is a great way for me to still use it. Thanks for sharing the idea. Pinned.
Thank you!
So cute Niki! I love that you added the skewer with the pumpkin stem!
Thank you!
I love this so much. I never thought of using one of the foam pumpkins for the vase. I do this with real pumpkins all the time. Sheesh, so much less mess!
Thanks Terri!
Love this Niki. You always come up with the best ideas! Pinned!
Thanks Denise!