Hello friends! I’m so glad you’re here today. This week is jam packed with content, having three blog hops in one week! Today I’m joining up with some wonderful ladies for an Old to New Blog Hop, hosted by Bev from Across the Blvd. I’ve had an old cabinet door that I got from the thrift store sitting around for a few months. I wasn’t sure what I was going to do with it or what it was going to be until this blog hop came along because there are so many ways to upcycle a cabinet door! After going back and forth between making a shelf or a rack with it, I finally decided on a sign/rack to hang by the front door.


Beverly | Across the Blvd
Gail | Purple Hues and Me
Niki | Life as an LEO Wife
Julie | Sum of Their Stories
Cabinet Door Upcycle Supplies:
- old cabinet door
- sandpaper
- spackle
- stencil or cut vinyl design
- vinyl or HTV
- scissors
- decorative knobs
- drill
- screws & hanging hardware


Prep the Cabinet Door
Sand any old finish or paint off of the door. Then fill holes and knicks from old hardware and wear. Once the spackle has dried, sand until it’s smooth.

Clean the surface with soap and water.
Paint with Chalk Paint
Now you can paint the cabinet door. I used Waverly chalk paint in steel. I couldn’t find my white chalk spray paint, so the gray had to do. If you keep the brush damp, the chalk paint goes on more smoothly. Allow the cabinet door to dry, then add a second coat of paint. Repeat until you’re happy with the coverage. You can speed up the process by using a blow dryer between coats.

If you have an inset that you’d like to paint another color, tape off the wood around it with painter’s tape. I added a bit of robin’s egg blue to it because I wanted to distress and have a little of the lighter color showing through in some places.

I painted the inset of my cabinet door English navy, adding three coats.

Place the Design on the Cabinet Door
For personal use only. All of my free printables & cut files are copyrighted material. Feel free to download these free designs and print them or use on your Cricut projects for your own use at home. They are not for commercial use, not to be placed on items for sale. That helps me keep these printables, SVGs, and PNGs coming to you for free! Another note: you will not my logo overlay on your downloaded design. It is there to keep people from downloading the images straight from Google, or others from stealing them to use on their site. Thanks for understanding! Feel free to share this post for your friends and family to make their own projects with this design!
I am sharing the design that I used in case you’d like to use it as well. You can download and cut it with your cutting machine, but if you don’t have one you can still do this project. Simply download and print the design and cover the back in pencil. Then place it on the door and trace the outline with a pencil. After that, just paint, and voila! A beautiful cabinet door upcycle without a Cricut! For a more in-depth tutorial on the carbon copy method, check out this post.
Iron or Transfer Vinyl onto the Wood
I used heat transfer vinyl for this project, so I used an iron to transfer the design into the inset. Use whatever application method is appropriate for the type of vinyl you’re using.
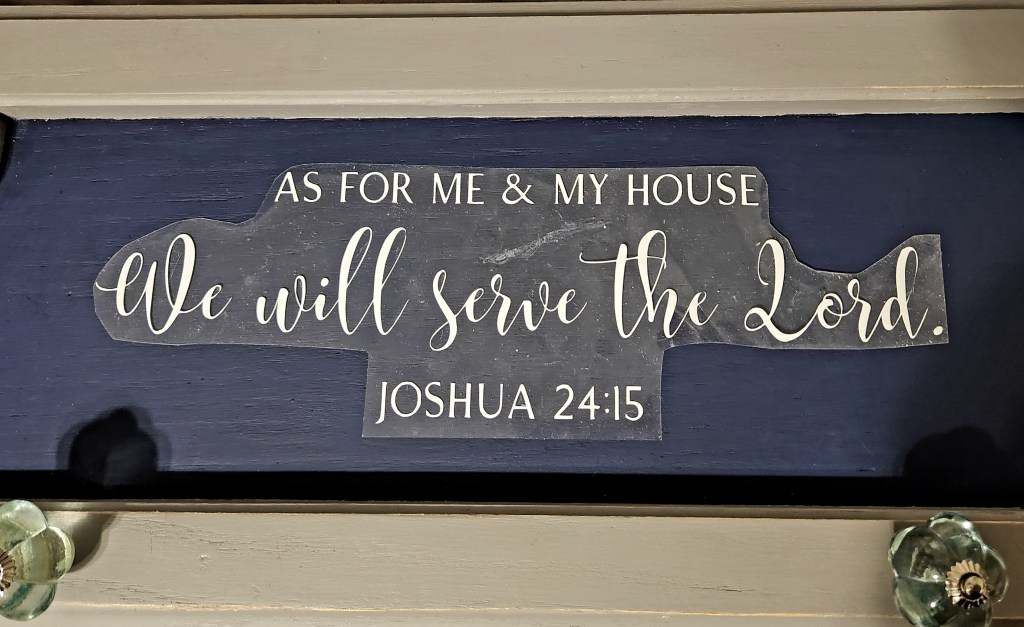
Finally distress the wood around the inset. I also distressed around and over my wording a bit. Some of the vinyl started to move on me because I slid the iron by accident. I was not pleased with myself, but a little sanding and it looks okay. Removing it completely later might be an option.


Add Knobs
Adding hooks or knobs is optional, but I added two that my son can hang his bookbag on as he comes in from school. They’re also good for keys and jackets. Decide where you want the knobs to be and mark the spot or spots with a pencil. Drill holes and install the knobs.


That’s it! Go hang your cabinet door upcycle in its place of honor!
Once I finished my sign I realized I will need to saw the excess screw off the back of the decorative knobs. They are too long (about 4″ total, that’s crazy!) for the door to sit flush with the wall. For now it’s sitting on my sofa table, and it looks great!

I hope you enjoyed this cabinet door upcycle! Remember to pin the image below and share on social media using the buttons at the end of the post or on the left side of the screen so you can get back to it when you’re ready to make it. Be sure to follow me on social media and via email so you never miss a great tutorial, free printable, or other amazing posts!

Don’t go yet! There’s more to see!
There’s plenty more to see here on the blog! If you’re looking for something specific, use the search box in the sidebar to look it up. If not, you might enjoy these ideas. Don’t have time to read them all now? That’s ok, just click over to the posts using the pictures and pin them for later. You can also add Life as a LEO Wife to your favorites and check back for new ideas and free printables and SVGs every Wednesday, as well as link parties with tons of shared ideas on Sundays!
Old to New Blog Hop
I’m so excited to see what the other ladies on the blog hop have to share! They’re all talented, so I know you’re going to love their ideas! With all of my blog hops, I share their main blog page on the left with their name and the link straight to the project on the right with its name.
Beverly from Across the Blvd. | New Life for an Outdoor Side Table
Gail from Purple Hues & Me | Ceramic Candle Lantern Update
Julie from Sum of Their Stories | Upcycle a Pretty Paper Bag into Greeting Cards
I hope that you enjoyed today’s projects! If you’re looking for more home decor ideas to pin, you might enjoy these (or use the search box in the sidebar):


How unique and creative to make a sign out of a cabinet door, Niki! It turned out awesome! And I love the scripture you applied, too Looks beautiful!
Thank you! One of my favorite scriptures, even if it used a lot lol!
I love this idea of making signs from old cupboard doors and drawer fronts. The possibilities are endless! Pinning so I don’t forget the idea! 😀
Thank you!
Beautiful upcycle!
Thank you!
Using an old cabinet door for this is such a great idea. I love the addition of the knobs to make it not only pretty, but functional, too.
Thank you! Something in the middle caught fire while drilling lol! Thank the Lord it went out without damage to anything and only caused the wood to split a little at the back. Guess that’s what you get for getting a cabinet door for $1.99 at the thrift store lol!
Looks great, love it! Thanks so much for linking up at the Unlimited Link Party 79. Pinned.
Thank you!
CONGRATS Niki! Your post is FEATURED at the Unlimited Link Party 80!
Thanks Dee!