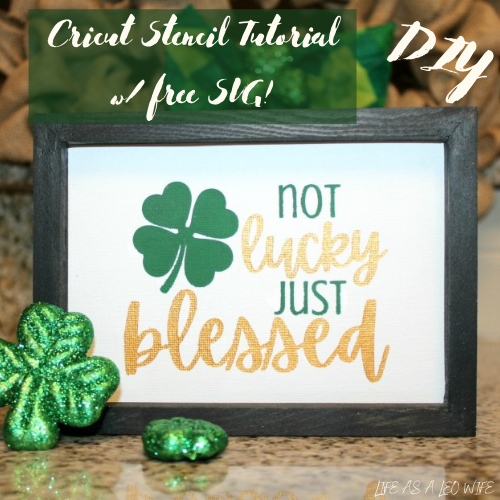
Hello friends! I’m so glad to have you here today. A few days ago I made a St. Patrick’s Day reverse canvas sign for my tiered tray with a canvas from Dollar Tree and a stencil. Today I’m going to share the SVG that I created to use on the sign and show you how to make your own stencil with your Cricut. I’m going to walk you through step by step, so even if you’ve just plugged your machine in, you can still do this!
What if you don’t have a cutting machine, but you want to make a sign for a vignette or tray? No problem! You can use the carbon copy method that I detail in this tutorial. All you need is a printer and a pencil. There’s another free PNG design for St. Patrick’s Day in that post you can download to use on other signs as well. I have free designs throughout the blog that you can use on signs for every season. Use the search box in the sidebar to find them for every season and holiday.
Supplies for a Cricut stencil:
- Cricut- I used my Cricut Explore Air 3. The Cricut Explore Air 2 is $100 cheaper and is a little slower than the Air 3. I look forward to getting the Cricut Maker which can cut more items including fabric for your sewing projects! That Maker set comes with all of the tools you need plus vinyl, cardstock, cutting mats, and more!
- vinyl- Indoor is cheaper usually and is fine for this project as the vinyl won’t be staying on.
- standard grip cutting mat
- weeding & scraping tool (credit card)- This tool kit is an amazing deal! It comes with the scoring stylus that fits into your Cricut for scoring things like cards, a scraper, weeder, scissors, tweezers, and a spatula for under $10.
- PNG or SVG- You can download my free St. Patrick’s Day PNG below. There are plenty of other PNGs available on the site, just use the search box to find some for any season.

Supplies for the Dollar Tree Reverse Canvas Sign:
- 4×6 Dollar Tree stretched canvas- If you make signs for seasonal decor, this set of 24 4×6 canvases are a good deal. You get 24 for $25, so they’re cheaper than Dollar Tree. This set of 24 3x3s would fit well on tiered trays. Those are the ones I’ve started to use. Just change the size before you cut your stencil to fit the smaller canvas.
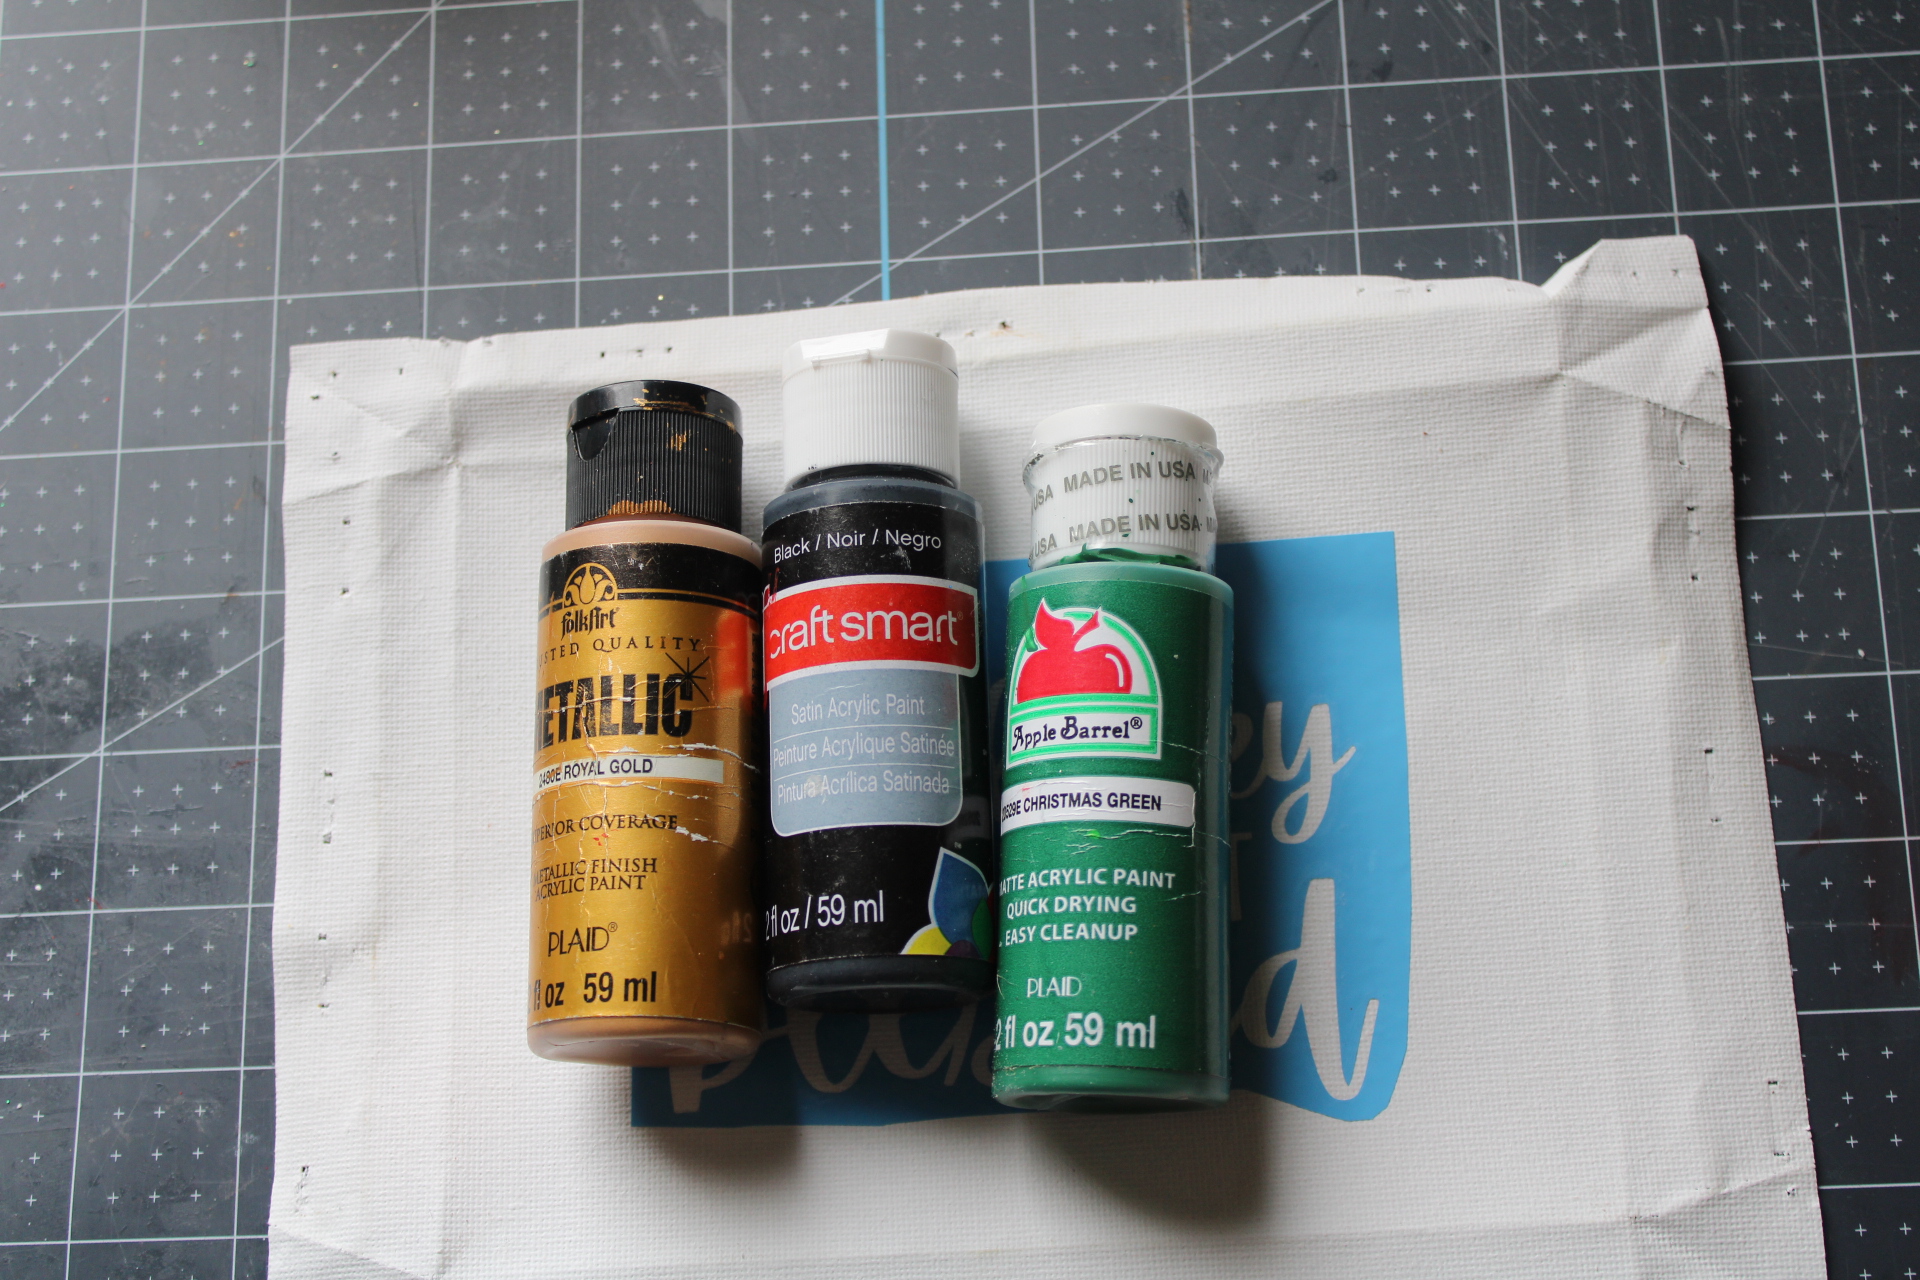
- acrylic paint- I used green, black, and gold.
- sandpaper (optional)
- light weight spackle (optional)
- staple gun- If you’re looking for a tool set for we crafty women, this one is affordable and cute with a staple gun, staple remover, hammer, screwdriver, utility knife, and more in a cute pink bag. If you just need the staple gun with staples, this light pink one is cute and affordable. If you want a cheaper one, this simple black staple gun is less than $10.
- or hot glue gun & glue
- scissors
- or rotary cutter- This is a great rotary cutter set that comes with a self-healing cutting mat, an acrylic ruler, extra blades, and an Exacto knife with extra blades.
Disclosure: I am a participant in the Amazon Services LLC Associates Program and the Dollar Tree Affiliate Program, affiliate programs that allow me to link to the products that you can use to make this project quickly and easily. If you purchase any of these products I may receive a very small commission at no cost to you! That commission helps me continue to bring these great decor DIYs, free printables, and all of the other goodies on this site to you. Thanks so much for your support!
Prepare the Canvas
Canvases are okay for decor, but they look even better framed. Lucky for us Dollar Tree’s stretched canvases have frames underneath!
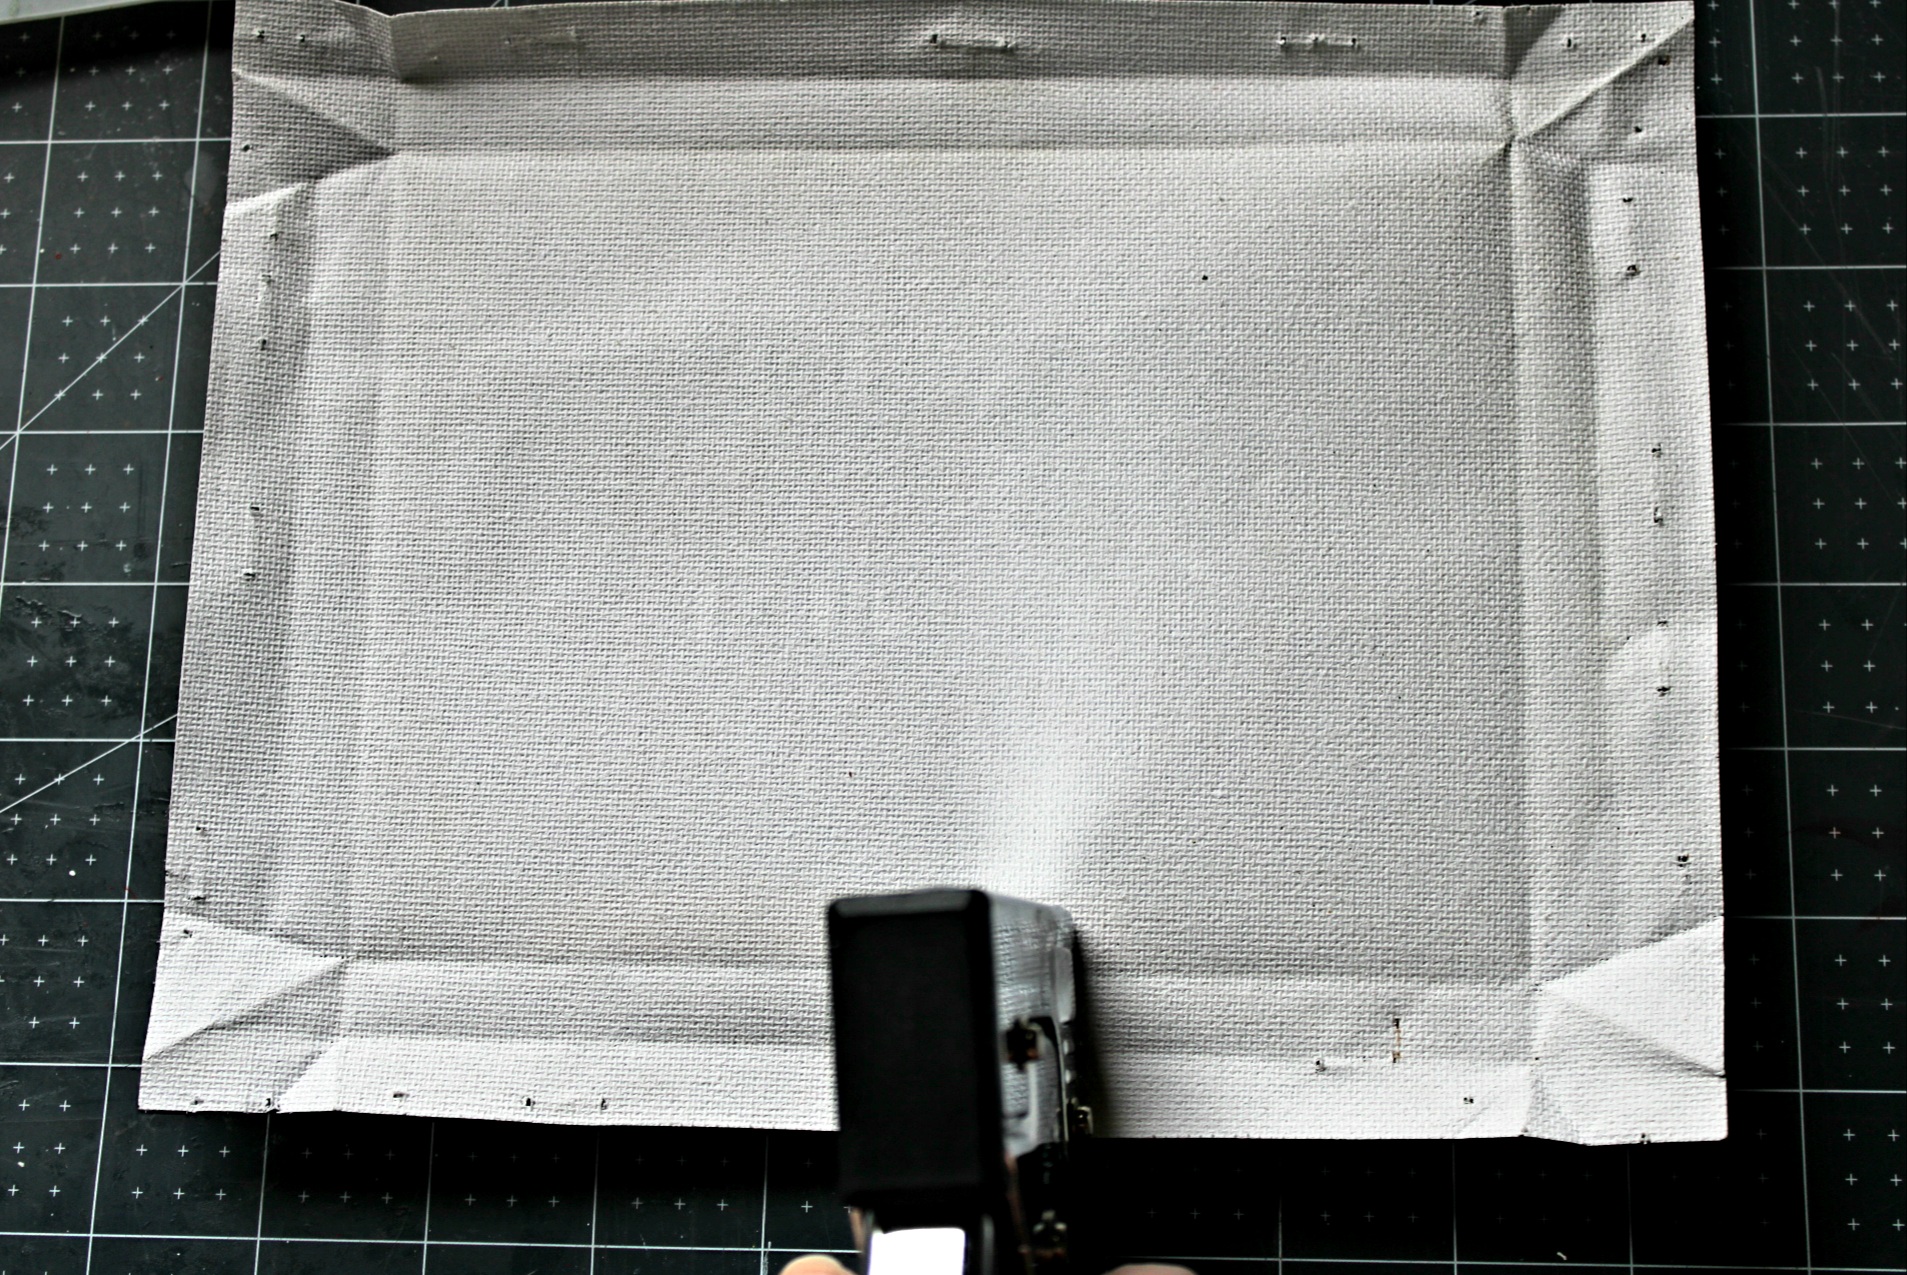
Turn the canvas upside down and remove the staples. I used a clay tool, but a small flat-head screwdriver works well. Once they’re pried up, they can be pulled out by hand pretty easily. If not, pull them out with pliers. When all of them are removed, take the canvas off the wood.


This step is optional, but it looks better. Take some lightweight spackle and cover the pieces of metal that hold the wood together in the corners. You can also cover any knicks and holes that are visible. I had a bit of a gap in some of the inner and outer corners as well as some knicks, so I filled those in. Allow it to dry for about an hour.


Sand the spackle and the wood frame to remove unevenness.

Once the wood is ready, you can paint or stain it to fit your needs. I painted mine black with only one light coat of black acrylic paint so that the wood grain still peaks through.

Download Free St. Patrick’s Day SVG
If you’d like to make the same sign I did, you can download this PNG which works just like an SVG. I created it in color so that you can print it out if you’d rather. You can resize it to suit your needs in the print settings. A PNG allows you to make it any size without losing quality. I’m also sharing the same design as an SVG for those of you who’d like to use this design to cut on vinyl with different colors instead of making a stencil. The tutorial for that isn’t in this post, but if you don’t already know how to do that you can search for a tutorial. For some reason when you upload this particular PNG to Design Space as a cut file it all changes to one color. That’s actually great for making a stencil and removes a few steps for you.

Upload Image to Design Space
Open Cricut Design Space and a new project. Click “Upload” at the bottom of the left-hand toolbar.

Click “Upload Image.”

Now click “Browse.”

Your download box will open. Choose the PNG file that you want to use, then click open.

Choose “simple,” and then “continue.”

The next screen is where you can remove the background if the design you’re using doesn’t have it done already. If you’re using the St. Patrick’s Day design that I shared, it should already have a transparent background. If for some strange reason there isn’t a transparent background or if you’re using another image, just click on the open space to remove it. When you click the open area outside the words that will remove most of the background. Next you will need to click on the spaces inside of the letters. When there’s a checkered background everywhere that should be blank, click “continue.”

On the next screen you will name the design and choose what type of design it is. I named my design “St. Patrick’s Day sign not lucky blessed.” I have several St. Patrick’s Day sign designs so I added the blessed part to be able to differentiate. Under that add some key words that you can use to search for the design. This is good for when you have a lot of uploaded files and you’re not sure what you want to use on a project. I suggest “St. Patrick’s Day,” “spring,” and/or lucky. Choose “cut file,” then “upload.”

Resize & Prepare Image
Now it’s time to make the image the size that you need. Since I was using my stencil for a 6×4 reverse canvas sign, I needed it to be 3.25″ tall. You will size yours to fit your sign, shirt, mug, etc. In the top toolbar you will see a width and a height box. Enter your proportions in those boxes. I set the height to 3.5″ which set the width automatically.

If you uploaded an SVG, you need the image to be one uniform color for a stencil. Click on “Color Sync” at the top of the right-side toolbar, just under the green “Make It” button. Drag all of the letters and the shamrock into the black toolbar with “not” and “just blessed”


The image uploads as individual letters and shapes, so you need to fix that before cutting. If you don’t, the machine will cut everything separate and that will not work for a stencil. Click “combine” in the bottom right toolbar, then click “weld.”

Now you should see everything welded together as one design in the right toolbar.

Cut the Cricut Stencil
Now it’s time to cut the stencil. Click the green “Make It” button in the top right corner.

You will now be on the cut screen. Turn your machine on by pressing the circle button at the top of the right side. Next press the “open” button on the left side of the machine.


Turn the wheel on the Cricut to “Vinyl.”

Back on the computer, click “Continue.” You mat will be black if you moved all of your letters to the black box on the color sync step. I changed mine to green so this screen is easier for you to see.

Place your vinyl (it doesn’t matter what color) onto a standard grip mat. I’m using a set from Amazon, but if you’re using a Cricut brand yours will be green. Mine is clear, so I’m sorry that it may be a little hard to see. Line the vinyl up in the middle and press it down so it’s secure.

Slide the mat under the two tabs on the left and right side of the machine and press the flashing arrow button while applying a little pressure to the end of the mat.
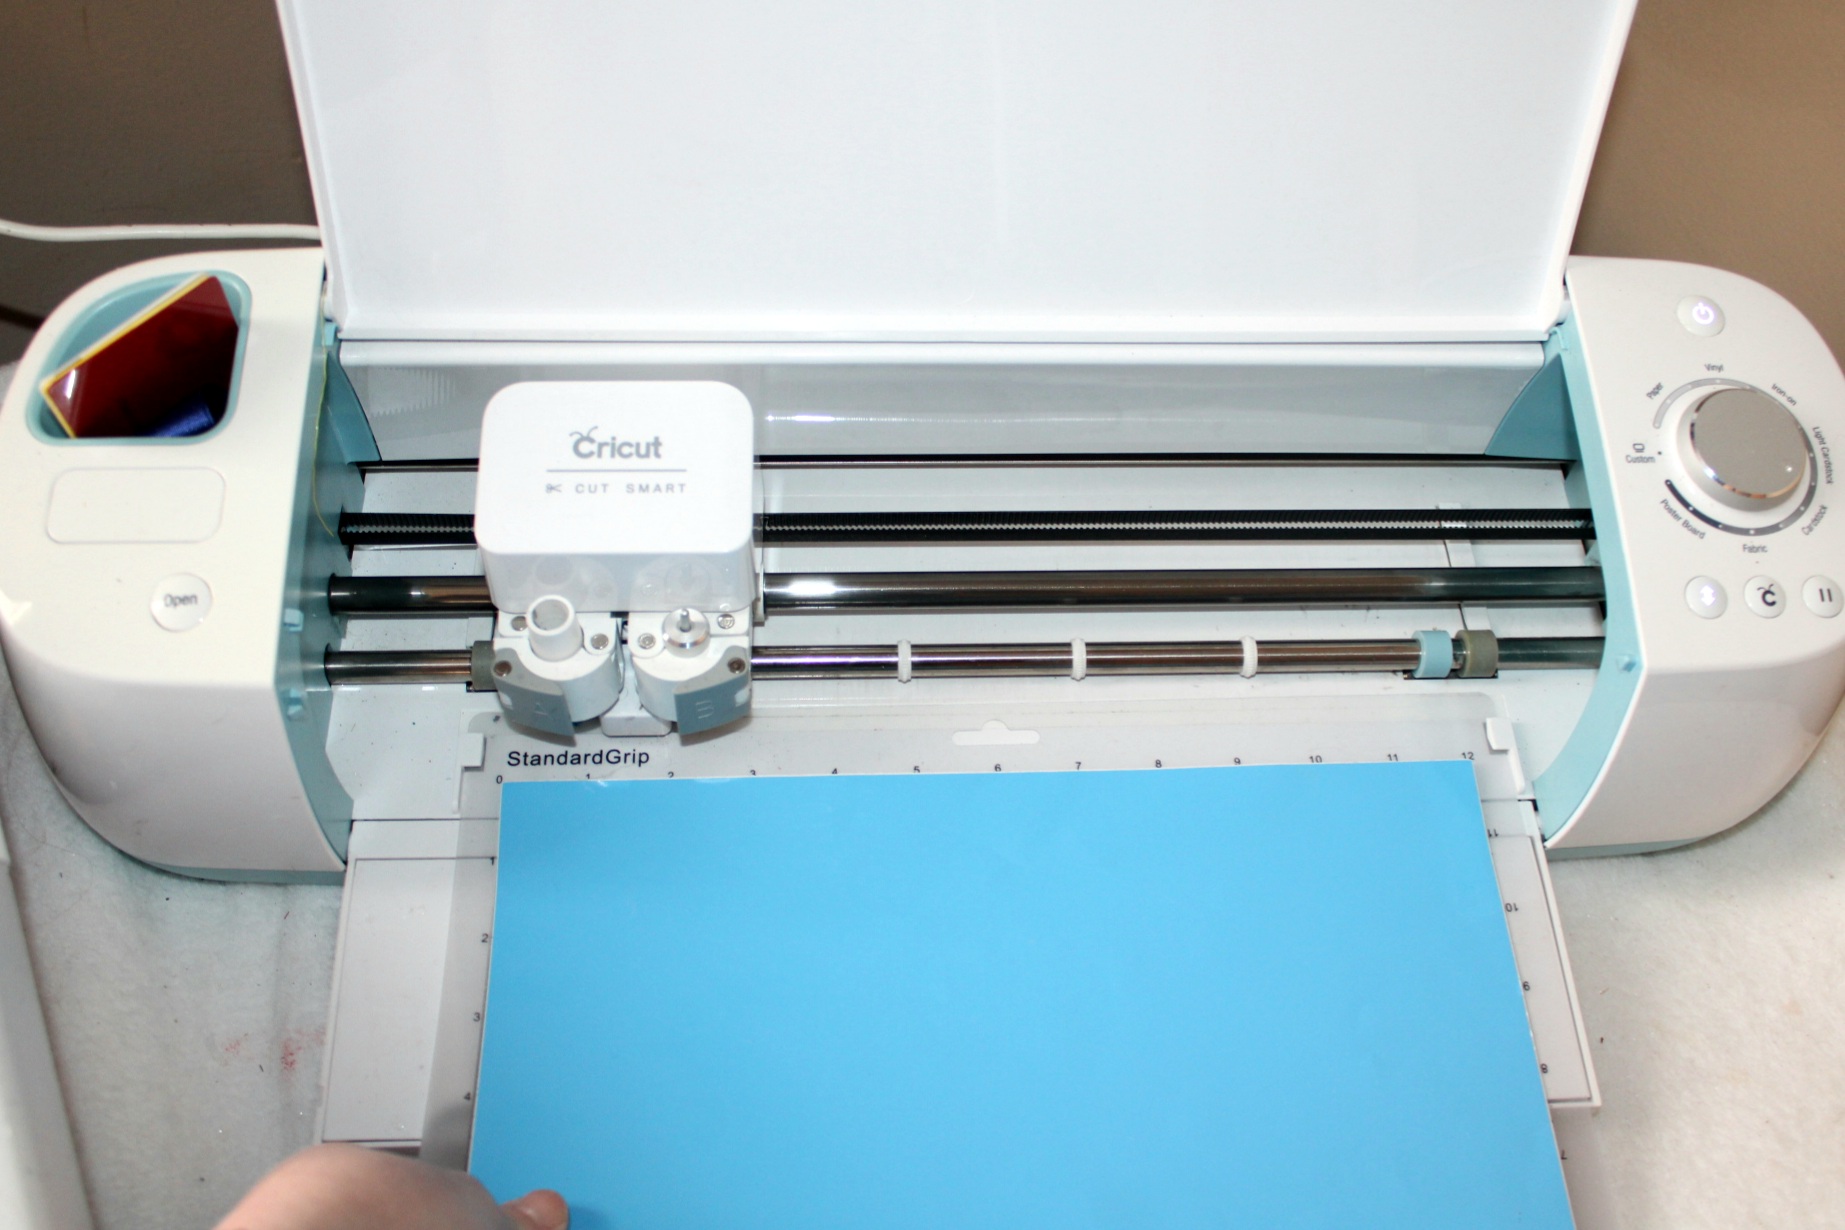

Press the flashing “C” button to start the cut.

Once the cut finishes, the arrow button will begin to flash again. Press it to eject the mat.

Remove the mat from the machine and the vinyl from the mat.
Prepare the Cricut Stencil
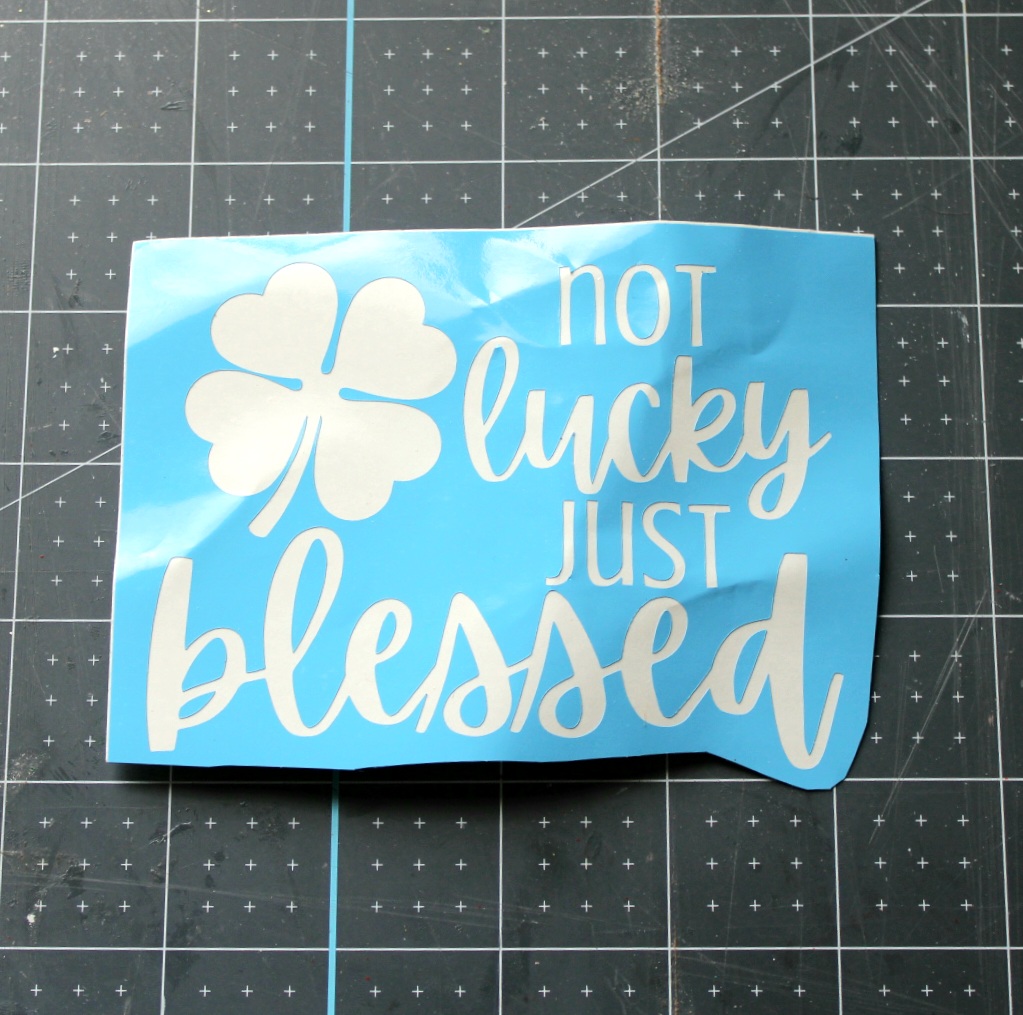
Cut the design from the rest of the sheet of vinyl. Give yourself a few inches on each side of the image if you’re new to stenciling.

With the design cut out, it’s time to weed the image. For a stencil, you need to reverse weed. That means you remove the main part of the design and keep the surrounding vinyl. Weed out and discard the shamrock and the words. Leave the inner parts of the letters like the “e,” “l”, “k,” etc.


Apply The Cricut Stencil to the Canvas
Now that the stencil is ready to use, you can apply it to the canvas. Cut a piece of contact or transfer paper to fit the stencil. I use contact paper from Dollar Tree, and I’ve been using the same $1 roll for years! Remove the backing and apply it to the vinyl with a scraper or credit card. Pay special attention to the free-floating pieces like the inner “o.” Go over those a little more than the rest since they tend to try to stay on the backing and not transfer to the tape.

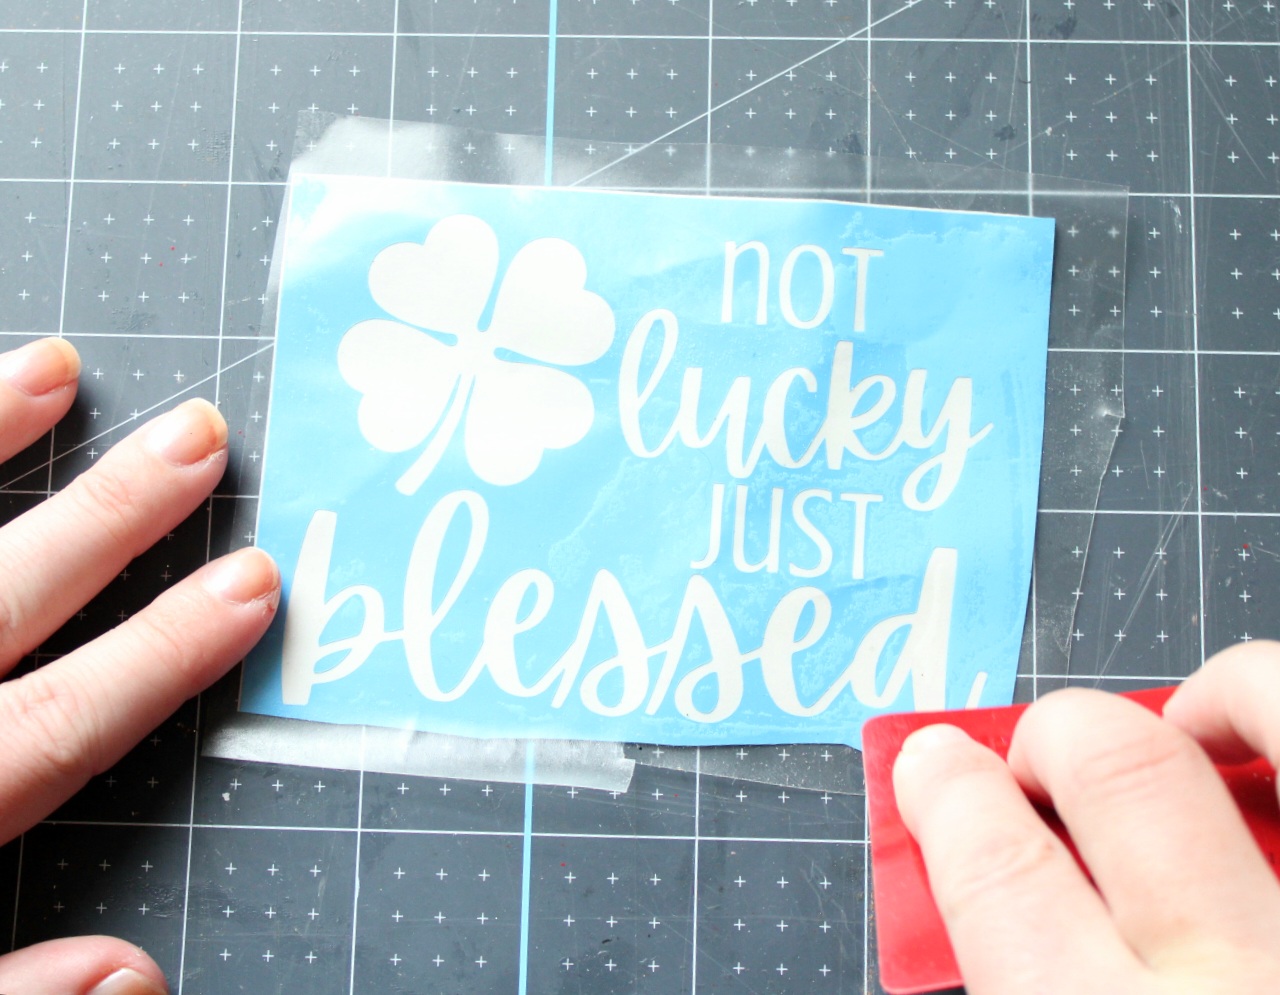
Remove the backing from the vinyl stencil.


Place the stencil on the center of the canvas. I laid the frame on top once I thought I had the stencil properly placed to ensure that no lines from where the canvas was folded on the frame would show once it was stapled back on.

Use your scraping tool or credit card and go over the stencil with it. Pay extra attention to the floating pieces as well as the edges of the letters and shamrock. That will help keep the paint from bleeding under. More on that in the next step.

Carefully remove the contact/transfer paper. You can use your credit card to keep the stencil down while pulling the paper off.

I went over the edges of the stencil once more before moving to the next step.

Paint the Cricut Stencil
Phew. I know your wrist might be a little sore from all of that rubbing! We’re finished with all that now. This step is optional, but it definitely worth it. Use a tiny paint brush and brush matte Mod Podge onto the edges of the letters and the shamrock where the vinyl and canvas meet. That will help seal it to the canvas to keep the paint from bleeding. It should be a thin layer that will take less than 5 minutes to dry.

You can barely see the Mod Podge in this picture. You can’t tell it’s there at all once the Cricut stencil is painted.

It’s time to paint! You can choose to paint everything one color or use multiple, whatever you prefer. I used green and metallic gold. I like to dab the paint on along the edges, but when I had more open space, like the shamrock, I did brush strokes. I’m not sure if dabbing made a difference, but I barely had any bleeding, just a few dots.

Leave it to dry for about an hour or two. You can blow dry it if you’re in a hurry. I was lol. Once it’s dry, carefully remove the main part of the stencil.

Now remove the vinyl from inside the letters. I used a pick tool I got from Dollar Tree.

Here it is before I put the frame back on.

Reattch the Frame
All that’s left to do is place the canvas back on the wood frame. Center the frame over the St. Patrick’s Day sign.

Once you like where it is, turn the frame upside down. Use a staple gun and staple the middle of one side to the wood. Stretch the canvas tight straight across and place another staple. Pulling taunt again, staple each end. I ran out of staples about 5 staples in, but it’s holding nice and tight. If you don’t have a staple gun, you can use hot glue.
Now it’s time to cut the excess canvas off of the St. Patrick’s Day sign. You can do this step before stapling it, but I’m paranoid I’ll make it too short! That would be a disaster after all my hard work! I use a rotary cutter. Just roll the blade along the edge of the wood. You can cut along the outside, right up against the wood, with scissors too.


Your St. Patrick’s Day sign made with your Cricut stencil is ready to display!
Isn’t that easy?! Now you know how to upload an SVG or PNG to Cricut Design Space, cut and use a vinyl stencil, as well as how to make a reverse canvas sign! Here are a few pictures of my sign. I plan to use it on my St. Patrick’s Day tiered tray. Get the tutorial for the shamrock wreath in the background here!

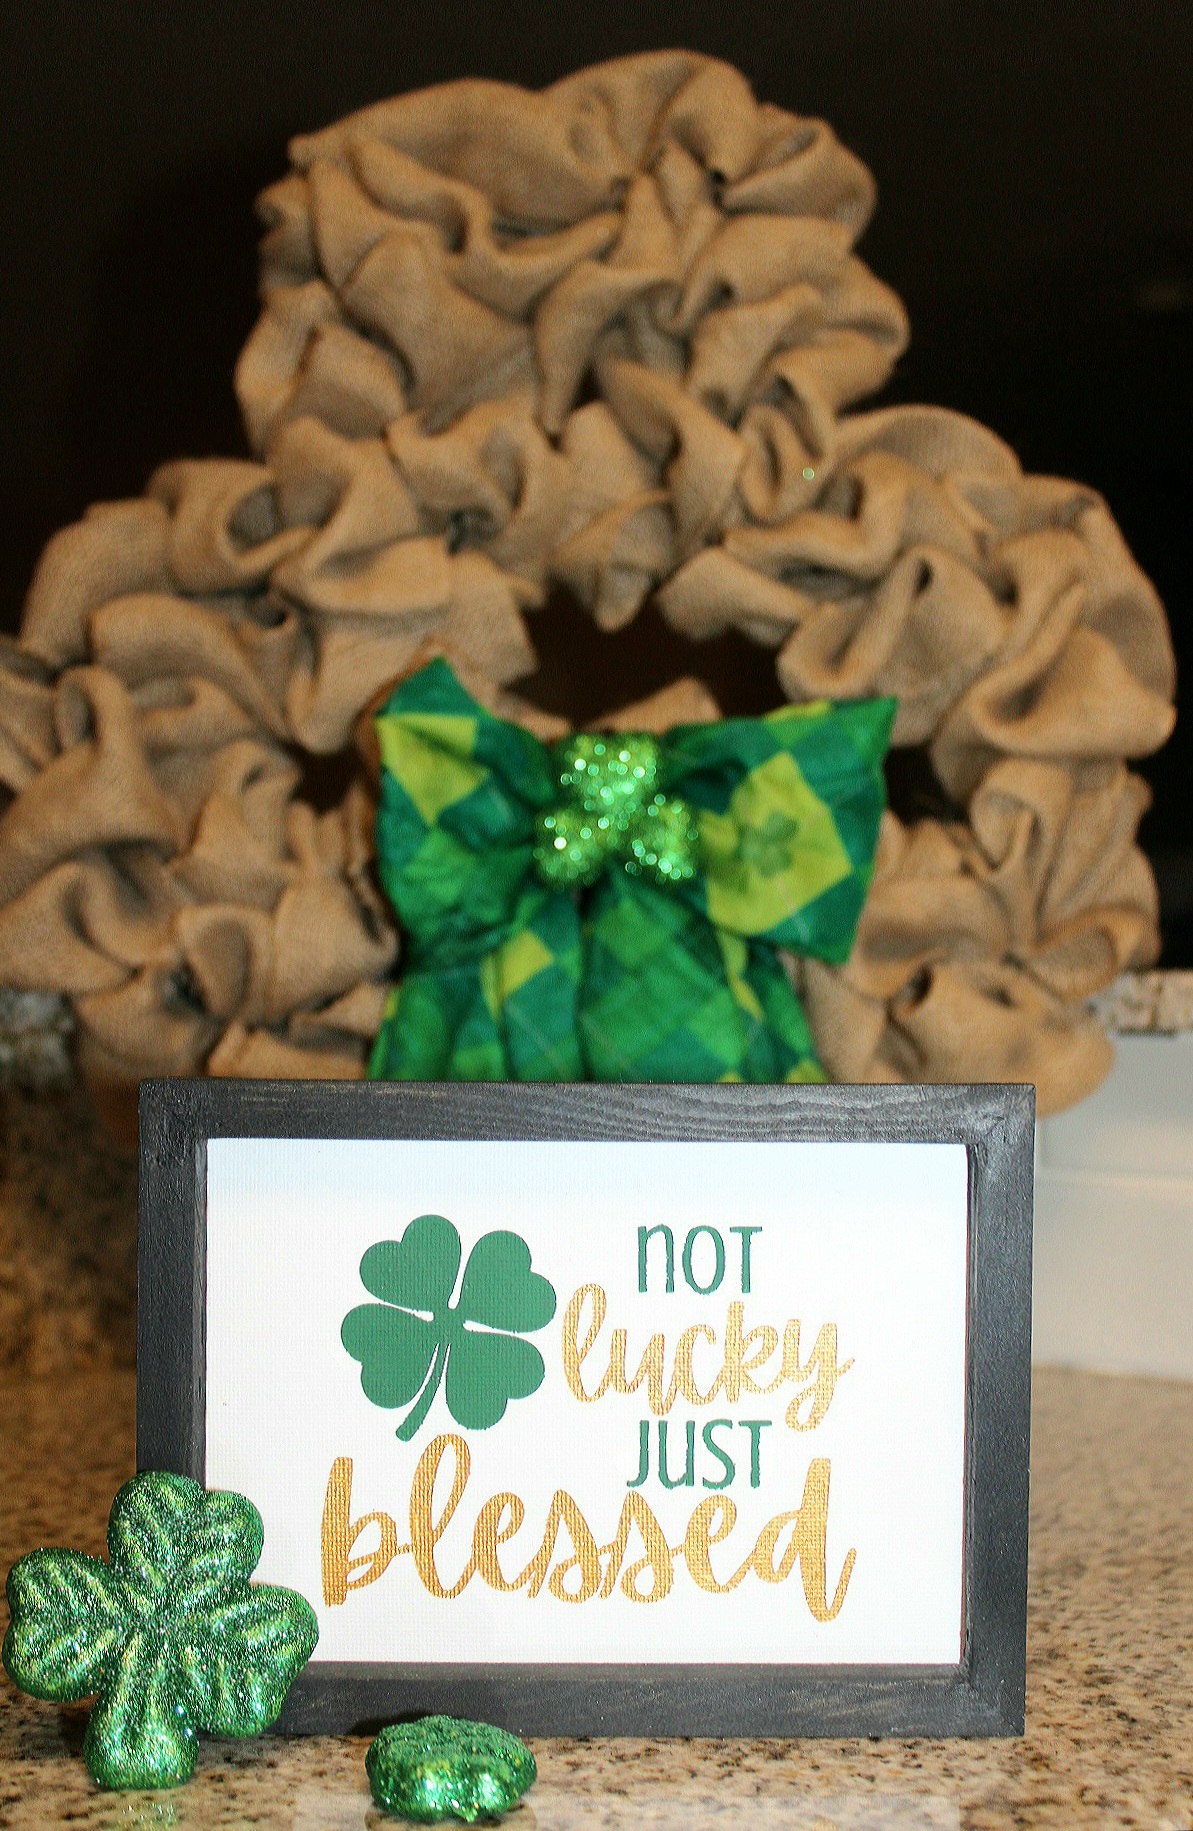

I love the saying on this sign. It brings to mind the Proverbs 31 wife. Proverbs 31:28 ESV says, “Her children rise up and call her blessed; her husband also, and he praises her.” That’s what I feel like. Nothing in my life was lucky. It was all God, pouring his blessings from heaven onto me and my family!
Shop this post:


I hope you enjoyed this tutorial!
Remember to pin this post or share it using the buttons at the bottom so you can get back to it later. I would love for you to follow me on social media using the buttons in the sidebar. It would mean the world to me! I plan on using this sign in my St. Patrick’s Day tiered tray. I have adorable tutorials coming later this week for some DIYs for it, as well as free printable St. Patrick’s Day wall art! Make sure you don’t miss those by entering your email address below. You’ll be notified when I add new posts, including tutorials, home decor, free printables, link parties, and more!
There are tons of other great tutorials and more on the blog, so stick around and see what you can find. You can use the search bar in the sidebar, or check out these ideas!


Follow me on Pinterest for new ideas added weekly! If you’re one of my blogger friends, make sure you link up on Happiness is Homemade & Crafty Creators before you leave! Head to the “Link Parties” page to find them. If you’re not a blogger, check those posts out for amazing ideas from bloggers around the world on all things homemade, recipes, crafts, decor, DIYs, kids ideas, fashion, and so much more!


Love the addition of the gold paint – it really makes the artwork pop 🙂
Thank you Lisa!