
Welcome friends! It’s time for our monthly Sustainable Craft Challenge where I join with some talented ladies to bring you a themed project with a sustainable twist. This month our theme is love, and since I’ve been sharing our Valentine’s family dinner and fun printables with you, I thought I’d share a project to use on our table. I made some adorable DIY place card holders that you can make for pennies! You can customize them in a million ways to use them for any holiday, shower, or wedding! Let me show you how I customized ours for Valentine’s Day, and I can’t wait to make more for every upcoming holiday.
DIY Place Card Holder Supplies:
- 5 gallon paint stir sticks- You can make two place card holders per stick.
- Beacon Quick Grip or E6000
- saw- I used a small hack saw.
- sandpaper
- ruler
- pencil
- paint brushes
- chalk paint or wood stain (optional)
- Mod Podge (optional)
- scrapbook paper (optional)

Measure & Mark Wood
When we bought our home back in May, we found quite a lot of paint and paint accessories left for us. There were packs of five gallon paint stir sticks that I just knew I’d find a use for at some point. Sustainable, check! I actually didn’t buy anything for this project. I’ve had everything else I used on hand for at least five years! So, I guess this is a super sustainable project, ha!
Anyway, I knew those paint stir sticks could somehow make some DIY place card holders. Last year I wanted to make some with wood blocks from Dollar Tree, but I don’t have a miter saw (or any other type) to cut a small slit in the top for the place cards. Using two paint stir sticks was perfect because they would create a natural slit for them. I checked Lowe’s and you can get a three pack for $1.12 (well at least where I live), and you can make six place card holders with that pack!
Now, let’s get to measuring! Measure and mark the stir sticks every 4″. You will get four pieces from one stick with a little left over where the handle is.

The stir sticks we had had the measurements on them. I did mark the opposite side as well so that I could flip them and start sawing on the opposite side as well because that’s easier with my sad little hack saw, lol.
Cut the Stir Sticks
Cut the measured sticks into 4″ pieces. Again, I used a small hack saw, but any saw will do. If you don’t have even a hack saw, Dollar Tree sells one!

Sand the pieces smooth.

Assemble the Place Card Holders
Once you have at least two 4″ pieces of wood cut, you can start to assemble a place card holder. I placed two pieces of wood together and put one of my left-over Valentine’s advent calendar envelopes in between them a bit. A normal place card is 3.5″x2,” so hopefully that will give you a guide of how much of the wood you need to leave unglued.
When you have a feel for how high you want the place card to extend, lay down one of the pieces of wood, leaving your stand-in place card toward the top. Add Quick Grip to the bottom and remember that the glue will spread up. I like Quick Grip so much better than E6000. It grips and dries so much faster without as much mess!

Place another piece of wood on top and hold them together for a moment while the glue takes hold. I did leave my envelope in while I did this.

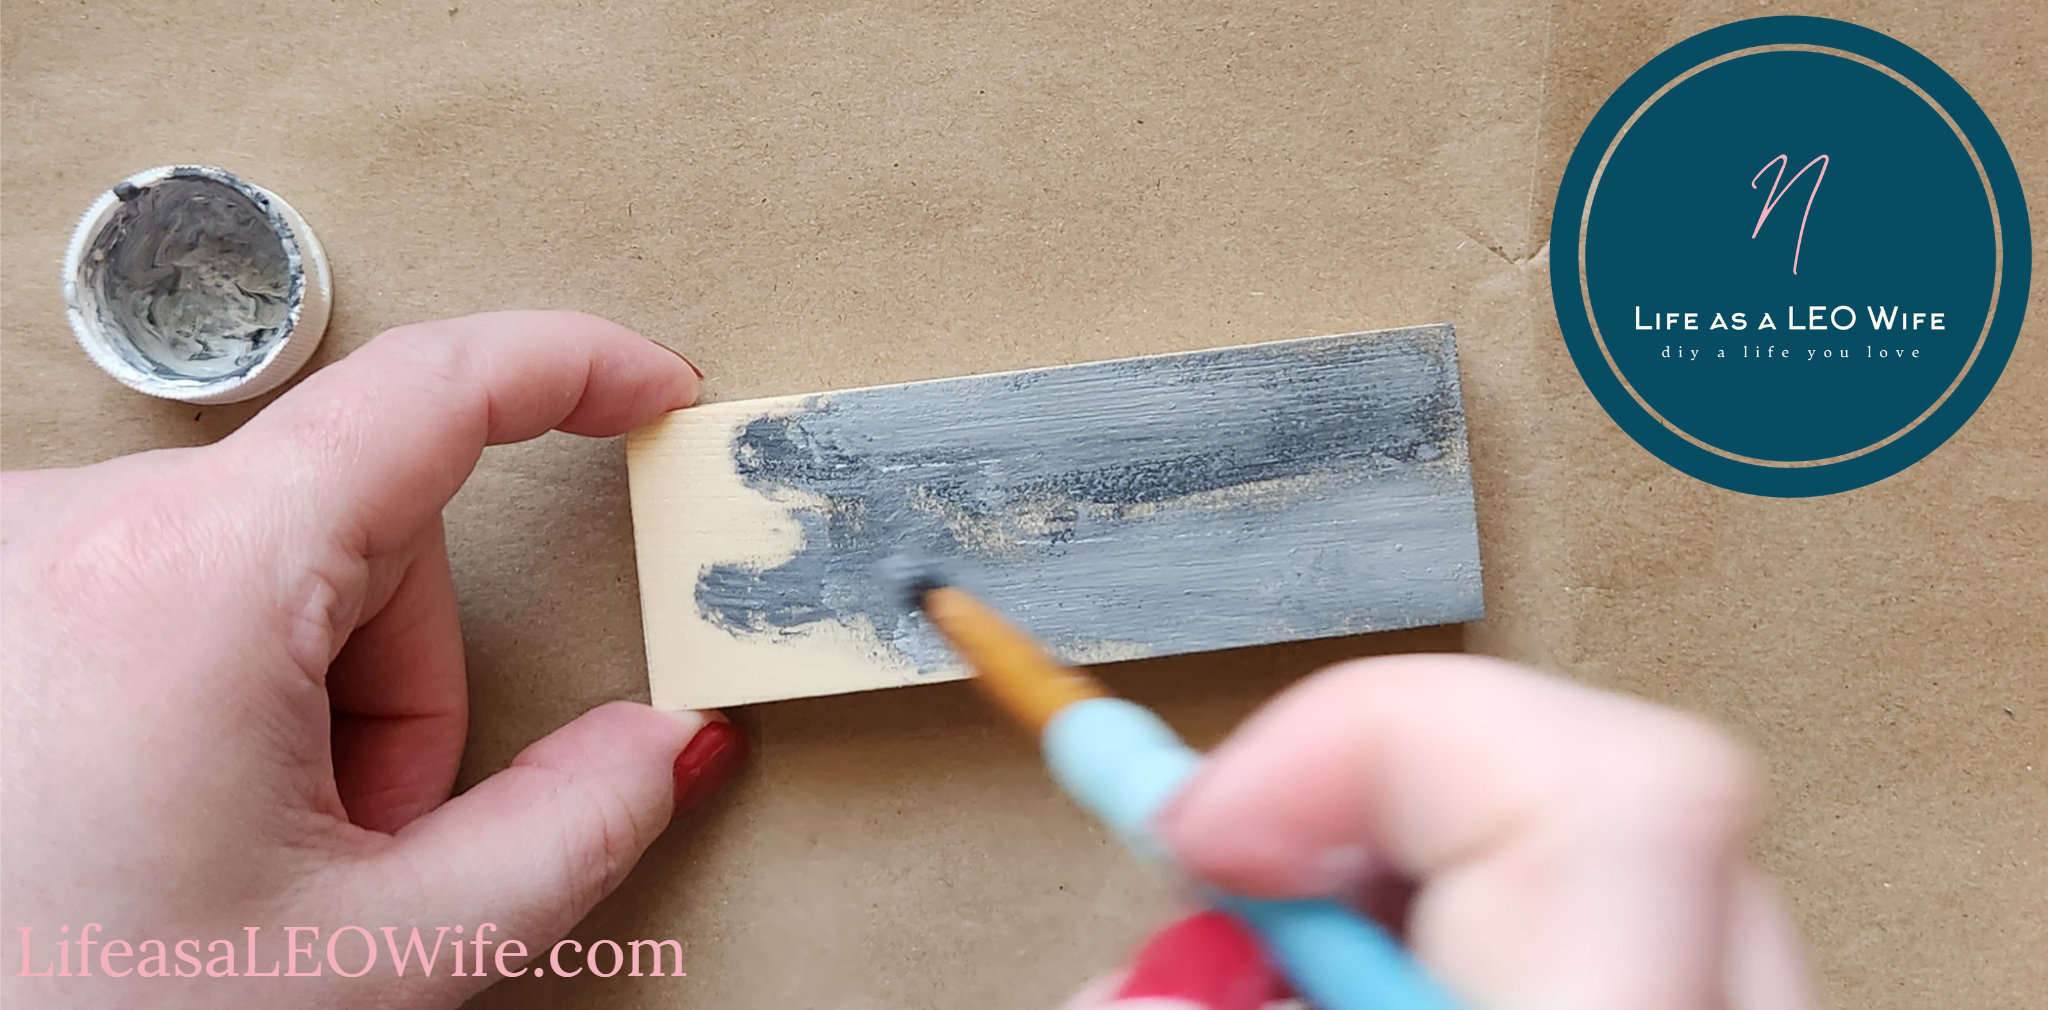
Paint or Stain the Wood
You could stop at this point, I mean, how easy is that? Or you can go ahead and embellish the place card holders a bit. I painted mine with chalk paint, one pink and one gray. I will be making two more, I just didn’t have time today. You could also stain the wood. I was so torn between the two, but since I plan to make many more, I figured I would stain the next batch!
Embellishment Options
You could just go with paint or stain, but you could also take it a step farther and embellish them a bit more. One option is to use your cutting machine to cut words or shapes to apply to the place card holders. I intended to go that route, but I thought I would make this a project that any of my readers could make, including those without a Cricut.
Another option would be stickers, rub-on transfers, or even just painting them if you’re a talented painter like some of the talented ladies joining today’s Sustainable Craft Challenge. I, however, am not one of those ladies. So, option four it was!
Embellish the DIY Place Card Holders
My recent Valentine’s dinner printable design inspiration came from a book of scrapbook paper that was bought years ago for the holiday. Since I was making these for our special night with dinner and fun, using that scrapbook paper was the perfect way to embellish these.
Cut a piece of cardstock paper to fit the front of your place card holder. You could do both sides, but I just went with one side and left the others painted. Don’t worry about having the size perfect because we’ll sand the extra off later.
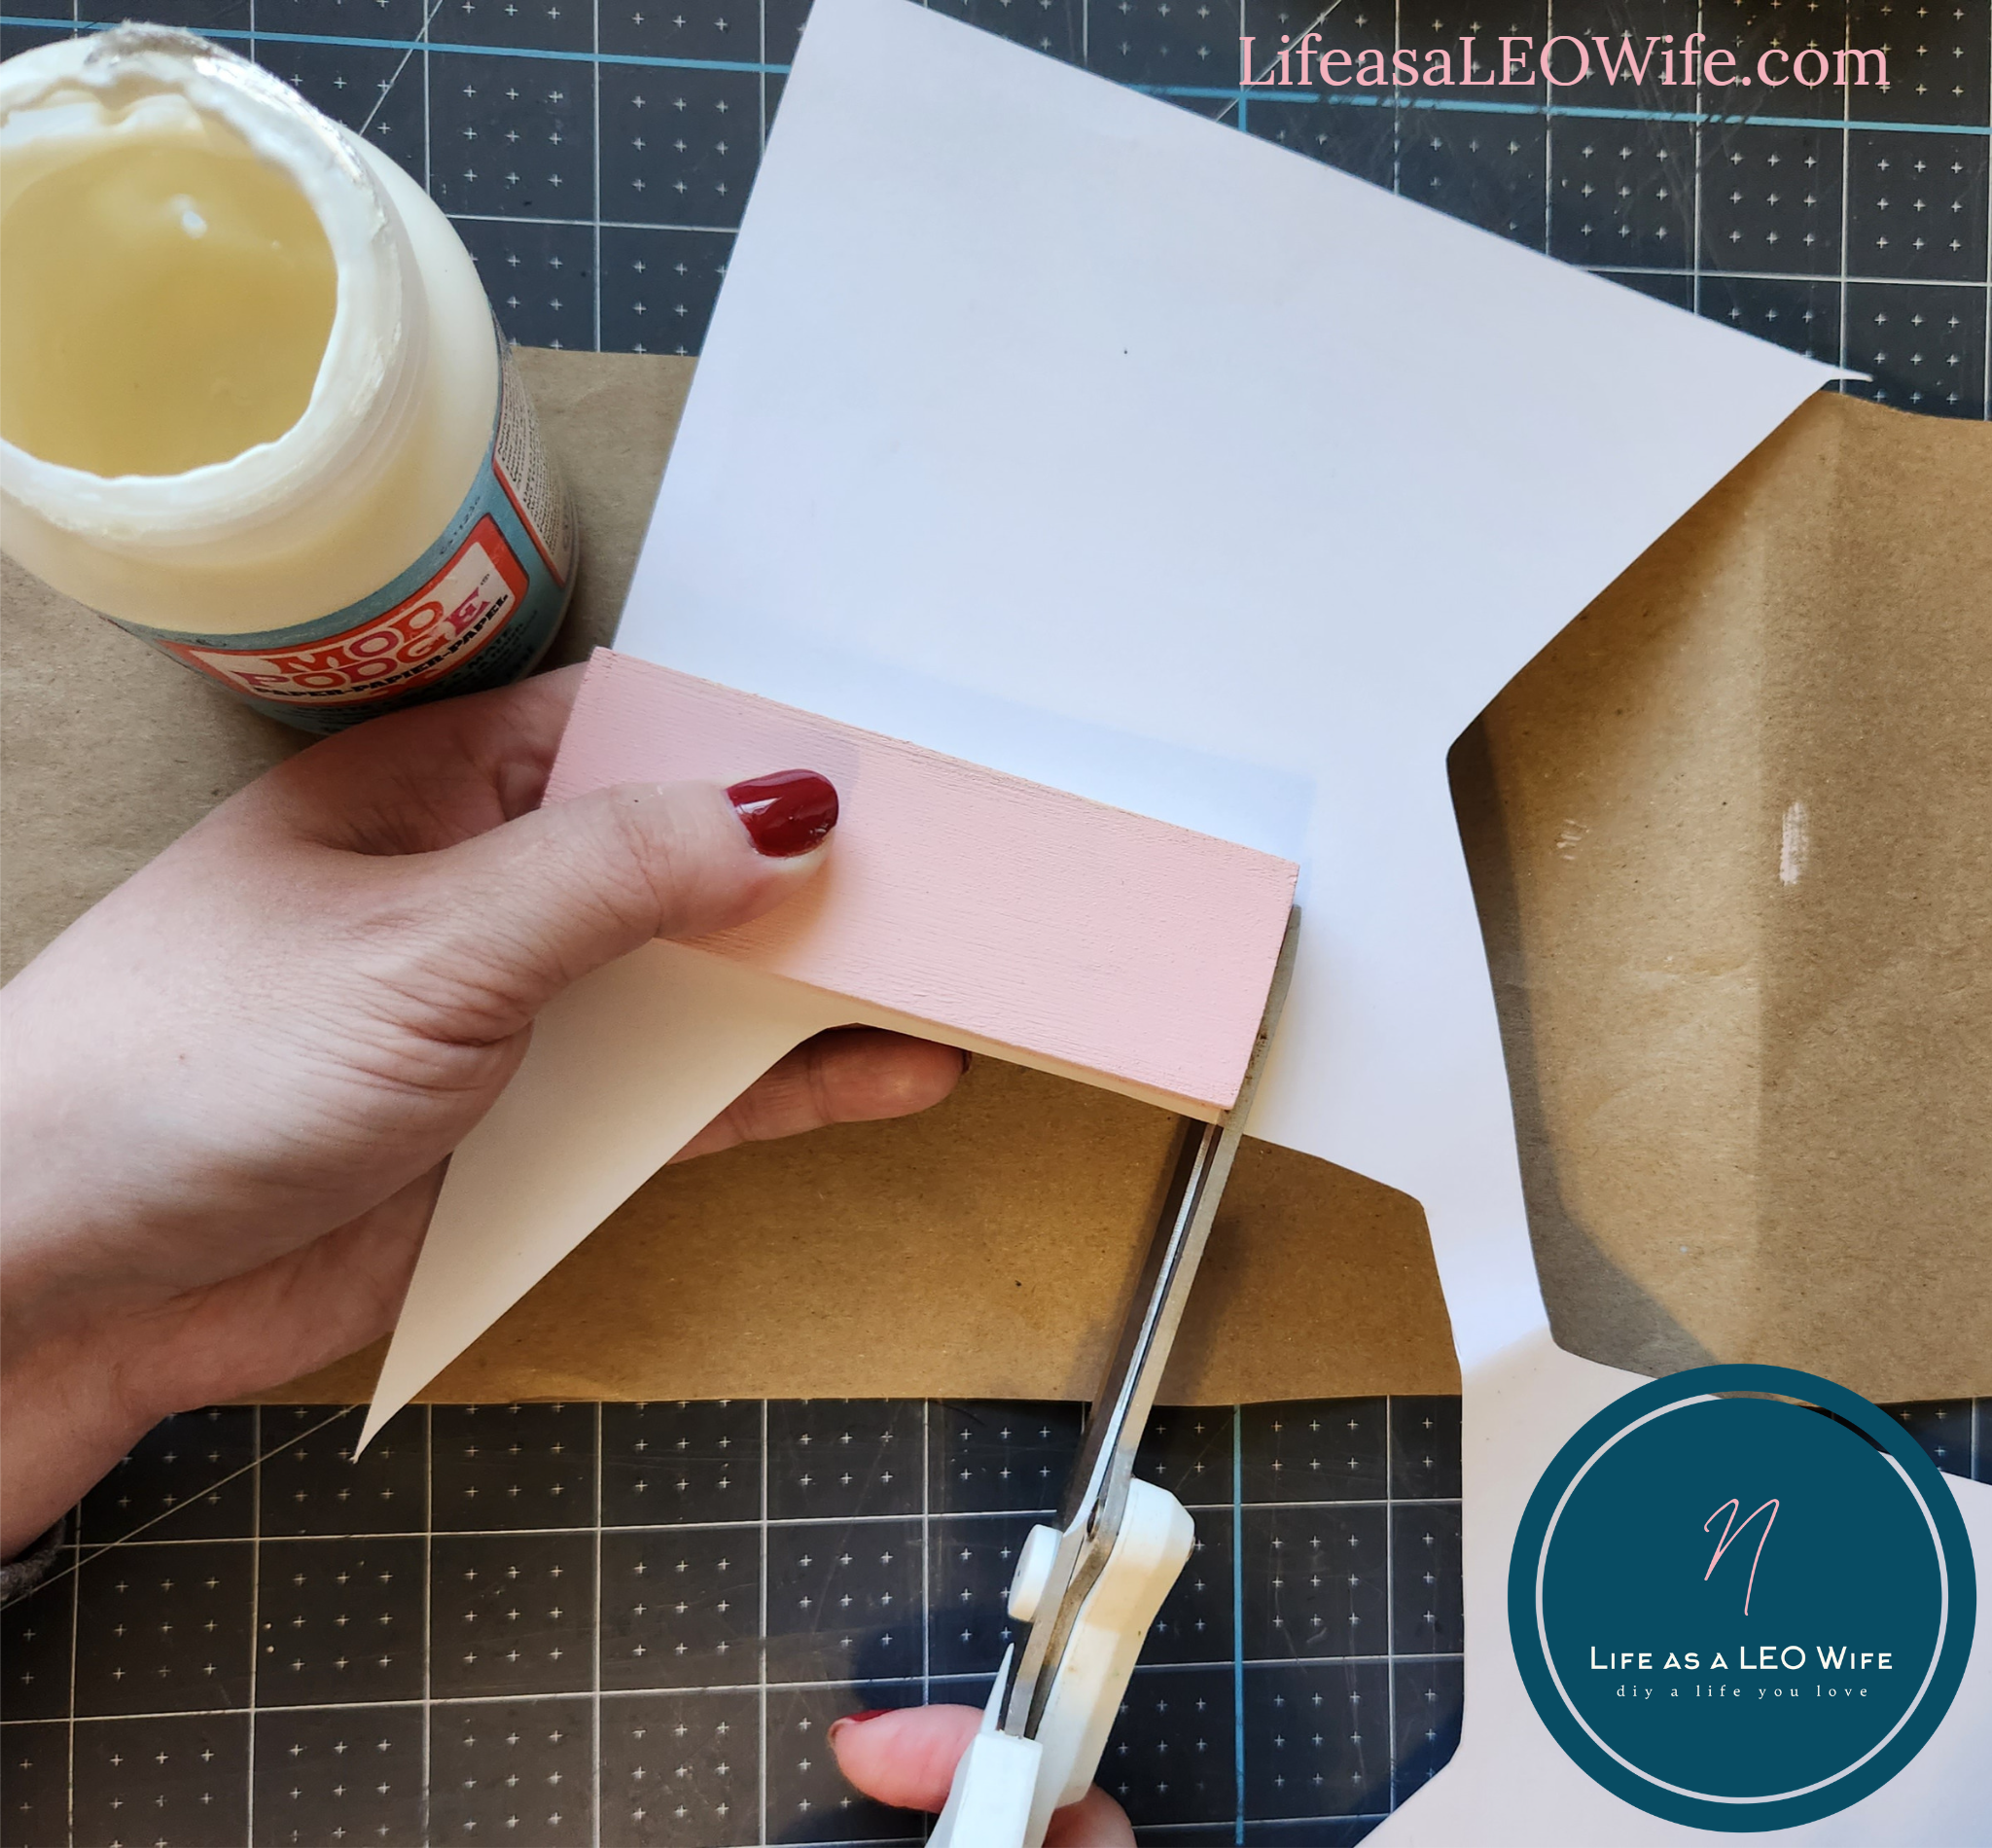
Brush a layer of Mod Podge on the front of the wood.

Place the cardstock on the Mod Podge and smooth it down.

When it has had a chance to dry a bit, brush a coat of Mod Podge over the cardstock on the place card holder.

When it dries, sand around the edges of the place card holder (just the side with the cardstock if you only did one like me). That will give it some distinction and a little farmhouse look as well as removing any paper overhang.

Matching Place Cards
For personal use only. All of my free printables & cut files are copyrighted material. Feel free to download these free designs and print them or use on your Cricut projects for your own use at home. They are not for commercial use, not to be placed on items for sale. That helps me keep these printables, SVGs, and PNGs coming to you for free! Another note: you will not my logo overlay on your downloaded design. It is there to keep people from downloading the images straight from Google, or others from stealing them to use on their site. Thanks for understanding! Feel free to share this post for your friends and family to make their own projects with this design!
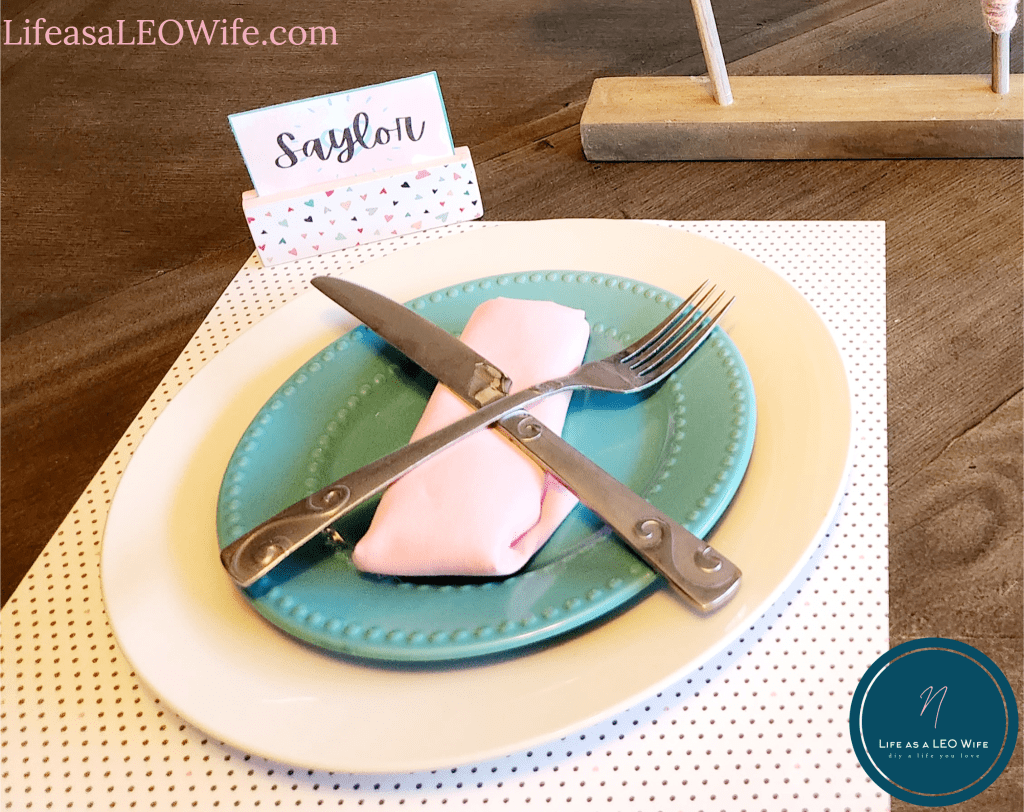
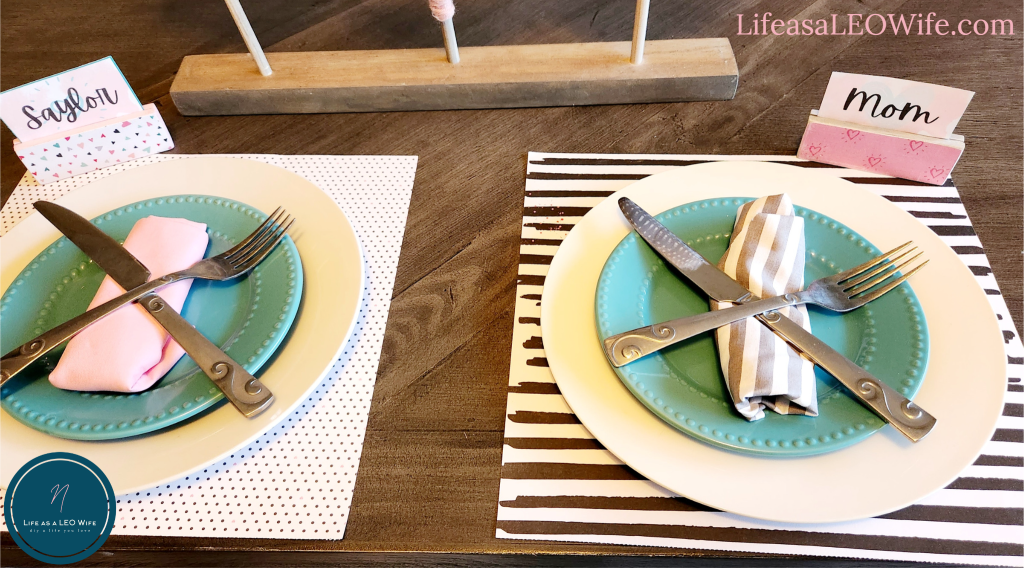
If you’re using my Valentine’s family dinner printables, I promised matching place cards, and here they are! Mom and Dad are on two of them, but the two others are blank. Why? Well because I don’t know your children’s names lol. But I’d be happy to customize them for you if you shoot me an email which is available on the contact me page. I had great fun customizing the Christmas Grinch movie night initiations for y’all. If not, you can print the pink ones for girls and write their names in and the turquoise for boys.
Video Tutorial
It’s that easy! Your DIY place card holders are ready to adorn your tablescape!
I really enjoyed making these, and I know they’re going to look so cute once I set up our Valentine’s dinner tablescape. Since that hasn’t happened yet, I just placed a few plates out so that you can kinda see what they will look like. We still haven’t gotten moved my grandmother’s dining set into our kitchen, so this little set up is on our very large coffee table. Remember this is a blog hop so keep reading to see the other projects that are shared!


Remember to pin the image below or share this post with the buttons on the left side of the page so you can find it when you’re ready to start your project! Also, follow me on Pinterest for new ideas added weekly! Be sure that you never miss a great tutorial for decor like wreaths, signs and other home decor, free printables, crafts, and other fun posts! Enter your email address below to be notified of new posts! Use the buttons below to follow me on social media for other great content.

On to the Hop!
Sum of Their Stories | Upcycle a Plastic Container with Paint Pens
Vicky Myers Creations | How to Make a Cute Paper Heart Garland
Sew Crafty Crochet | Valentine’s Day Gnome Scarf
Purple Hues & Me | Wire Hanger Soda Can
Treasures Made From Yarn | Heart Garland
Our Good Life | Wine Cork Phone Holder
Christine’s Crafts | Easy Valentine’s Cards Using Paper Scraps
Decor Craft Design | DIY Love Container for Valentine
A Rose Tinted World | DIY Heart Garland from Upcycled Cards
Mimi – A Great Name for Grandma | DIY Valentine Branch Tree
Songbird | DIY Lace Valentine’s Hearts
Southern Sunflowers | How to Decorate a Tin Can Planter
Don’t go yet! There’s more to see!
There’s plenty more to see here on the blog! If you’re looking for something specific, use the search box in the sidebar to look it up. If not, you might enjoy these ideas. Don’t have time to read them all now? That’s ok, just click over to the posts using the pictures and pin them for later. You can also add Life as a LEO Wife to your favorites and check back for new ideas and free printables and SVGs every Wednesday, as well as link parties with tons of shared ideas on Sundays!


SOOOO cute! You made it look easy. When it comes to working with wood, I am not very confident, but I would give these a try!
Thank you! I’m not either lol. I’ve told my husband the next tool we buy will be some kind of saw. I’m puny and using that hack saw takes some muscle lol!
This is so cool, Niki! And a simple handcrafted technique, too! I love that you can easily customize the holders to fit the occasion! Well done!
Thank you Gail. They were so easy. If I had a good saw I could’ve knocked all four out in under an hour!
You make it look so quick and easy, love the free place cards to download too:)
Thank you! It was so quick! If I didn’t have to saw with that tiny hack saw, they would’ve taken maybe 15 minutes of active work time each!
These are so pretty, you’d never guess in a million years what they started out as, it’s such a clever idea. The paper that you used to decorate is so cute too and I love the printables. Isn’t it just the best feeling when you can make something so cute without having to buy lots of new stuff – so satisfying!
Thanks Julie! It’s definitely satisfying! I’m running low on the pages from the Valentine’s scrapbook pack, & they’re not making them anymore. I’ve got to be selective with them because I love them. I based all of my Valentine’s decor on it this season. The pink & gray for the decor for the house, then the pink & aqua for our dinner.
This is a cute project! Perfect for a Valentine’s Day diner.
Thanks Marianne!
Your place card holders are adorable! I love that it’s such an easy project for anyone and it’s budget-friendly. They’d be perfect for food labels at a party, too.
Thank you! You’re right! That’s a great idea for our family movie nights for the different holidays.
Fantastic job making it super sustainable…that is awesome! I just love everything about table settings (and tend to spend too much at times on just the perfect items!) These are perfect diy place card holders and this idea can be used for all of the different holidays….I really love that! They are the perfect final touch to your Valentine’s Day table!
Thank you Shelly! I can’t wait to actually create our Valentine’s tablescape with them. I had to just throw some pieces out to get these pics. The kids will be helping decorate for our traditional Valentine’s dinner.
These are so cute!!! I really love the scrapbook paper you used!
Thank you!
These are so pretty! I love the addition of the printable cards. It makes the project so easy to replicate. Thank you!
Thanks Christine!
These are easy to make and cute for Valentine!
Thank you!
Cute addition for any party!
Thank you Julie!
What a lovely idea for when I have a dinner party. Very cute!
Thank you Jo!