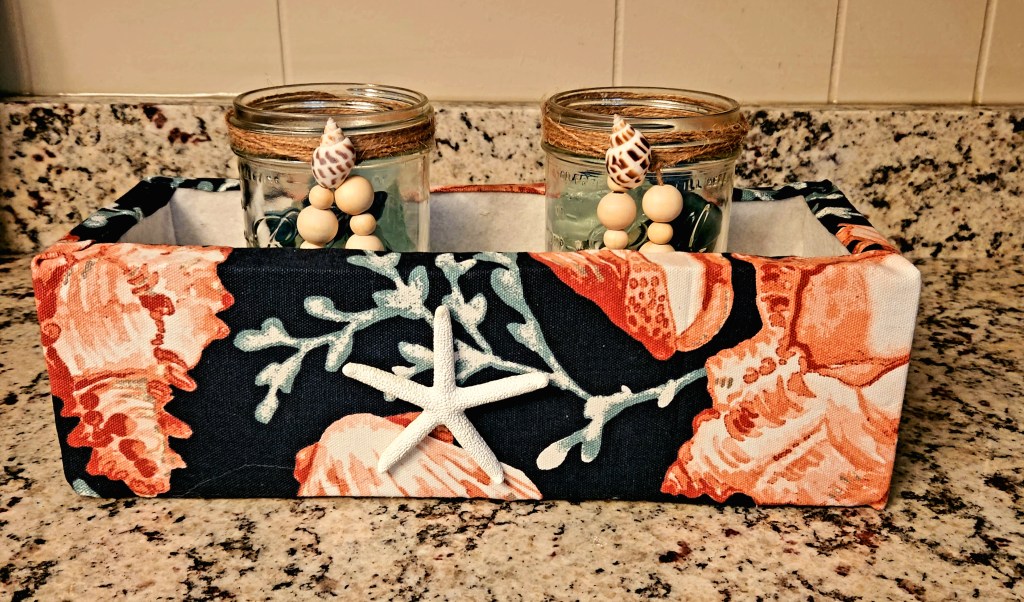
Welcome to our monthly Sustainable Pinterest Challenge! This month’s goal was to find a way to reuse items or a way use a one-time use item multiple times. I wasn’t sure exactly what I was going to do or what items I would use for quite a while. I thought about reusing some of the glass jars I’ve saved, but I figured you’ve already seen a million tutorials for those! A few days ago, I was searching Pinterest for inspirational ideas when I saw a wood planter box in a coastal centerpiece. My mind went back to an extremely thick piece of cardboard that had a wide chipboard piece in the middle, and I thought, “Wow, I could make a faux wood box with that!” Coastal is my summer home theme, so I got to crafting! Don’t worry if your home theme isn’t coastal, this box can be customized to match your home.

Our monthly Sustainable Pinterest Challenge is a blog hop where many bloggers gather together and share ideas for making things that have a sustainable element and were inspired by pins we found on Pinterest. Like I said, this month we were trying to make things from a one-use item. I was so thankful that my husband saved two large pieces of cardboard because they were perfect for making a faux wood box! I’ve never seen this type of cardboard before by the way. They came in 32″ TV boxes to protect the screens. The image below is the idea that inspired me. By the way, they wanted $72 for that centerpiece!! Ummm… no.


Stick around after the post to check out the great projects shared by the other ladies in the hop!
Julie | Sum of their Stories
Gail | Purple Hues and Me
Julie | Treasures Made From Yarn
Lydia | Life Beyond the Kitchen
Mel | Decor Craft Design
Niki | Life as a LEO Wife
T’onna | Sew Crafty Crochet
Donna | Modern on Monticello
DIY Coastal Centerpiece Supplies:
- 1″ thick piece of cardboard that you can get at least 4’x2′ or
- foamboard
- utility knife
- ruler
- fabric, cardstock, or paint to cover the box
- white felt (optional)
- scissors
- hot glue gun & glue
- glass or mason jars to go inside
- twine
- seashells
- starfish
- sea glass or flowers for the jars

Note about the pictures:
Sorry about my left hand in these tutorial photos. You may notice that the left side of my left hand isn’t really working. It won’t completely move along with the rest of my hand. It’s completely numb, but that painful kind of numb like when you fall asleep on your arm, and you have to move it and it sends those pins and needles pain shooting through it. I can’t really do fine motor movements with the other fingers either. It takes me a long time to button buttons because I can’t press my forefinger to my thumb firmly. Anyone else ever experience this? Just thought I’d let you know so you don’t think your hand needs to do what mine are doing in the photos lol!
Measure & Cut the Cardboard
The piece of cardboard that I use for my coastal centerpiece was about 2’x3′, just a bit bigger than a piece of foamboard. If you can’t find a piece or board that’s at least 1″ or thicker, you can use a piece of foamboard. It won’t have the same weigh to it, and you’ll have to be gentle with it, but that’s ok.
Place your ruler along the edge of the cardboard and measure 4″ from the bottom. Then lay the ruler on top of the cardboard at the 4″ spot and make a line 12″ long. Finally draw another 4″ line to the bottom. You’ll have a rectangle drawn (with two sides being the actual edges of the cardboard).


Use a utility or exacto knife and cut along the lines until you have the 4″x12″ piece of cardboard free from the rest.
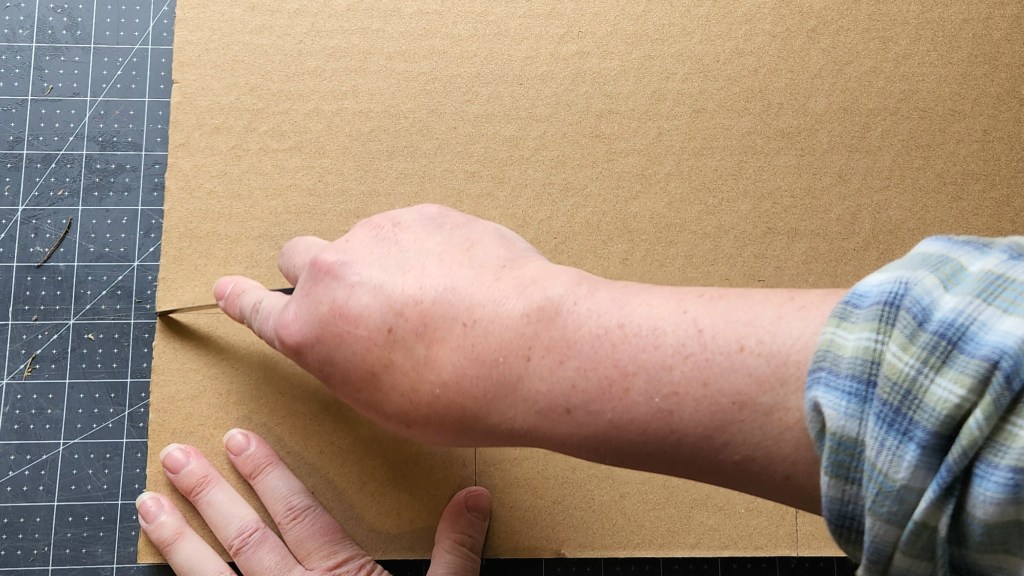

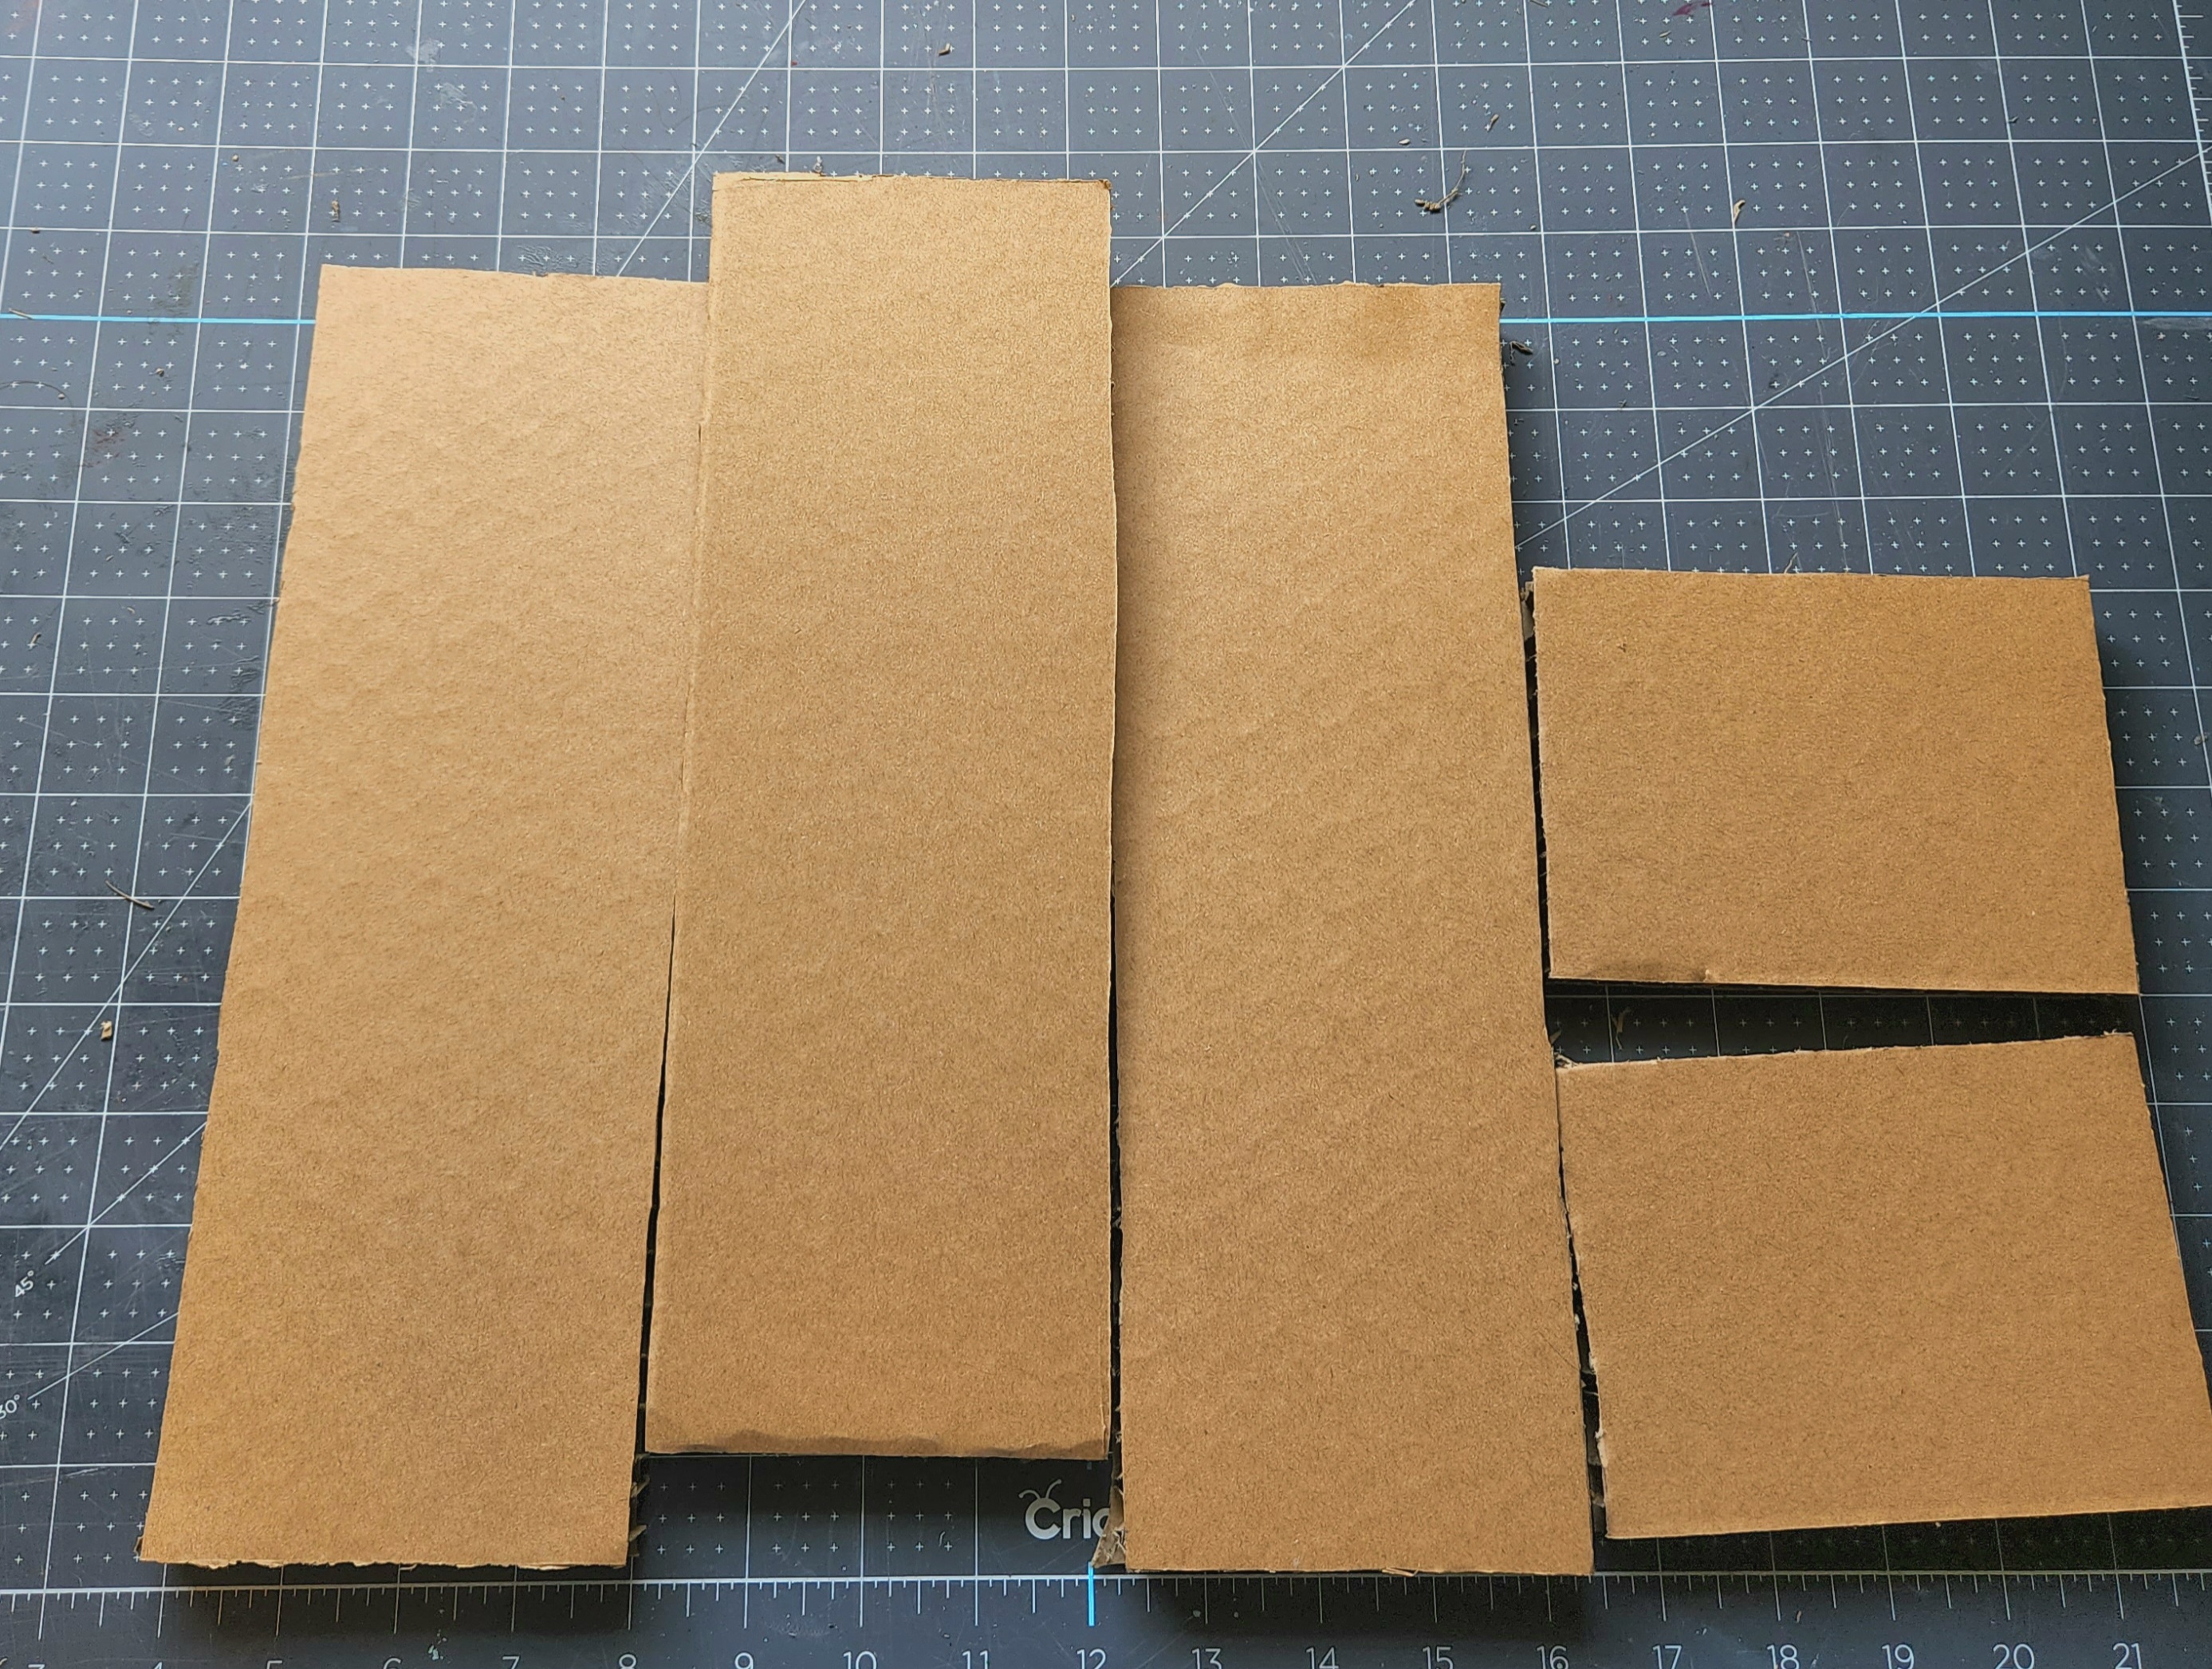
Repeat the process and cut two more pieces the same size.
Next you need to cut the final two sides of the planter box. I placed my three pieces of cardboard together with one flat and two sitting up on the sides right beside it, all on top of the big piece of cardboard. That allowed me to mark how wide the two end pieces needed to be. Draw a line along the side of the “almost-box.” (I hadn’t glued the pieces together yet.) Then draw the line for the top of these side pieces at 4″. Trace out two of the same size pieces.

Cut the cardboard along the lines just like with the 12″ pieces. You should have 5 separate sides now cut out.

Assemble the Faux Wood Planter
Once all of the pieces of the box are cut out, it’s time to glue it together. Squeeze hot glue along the bottom edge of one of the 12″ pieces of cardboard, then place the glued side right along the edge of one of the other long pieces. That will form a kind of “L.”

Add more hot glue along the bottom edge of the last long piece then put it on the other side of the two pieces you already glue together. You’ll have a “U” now.

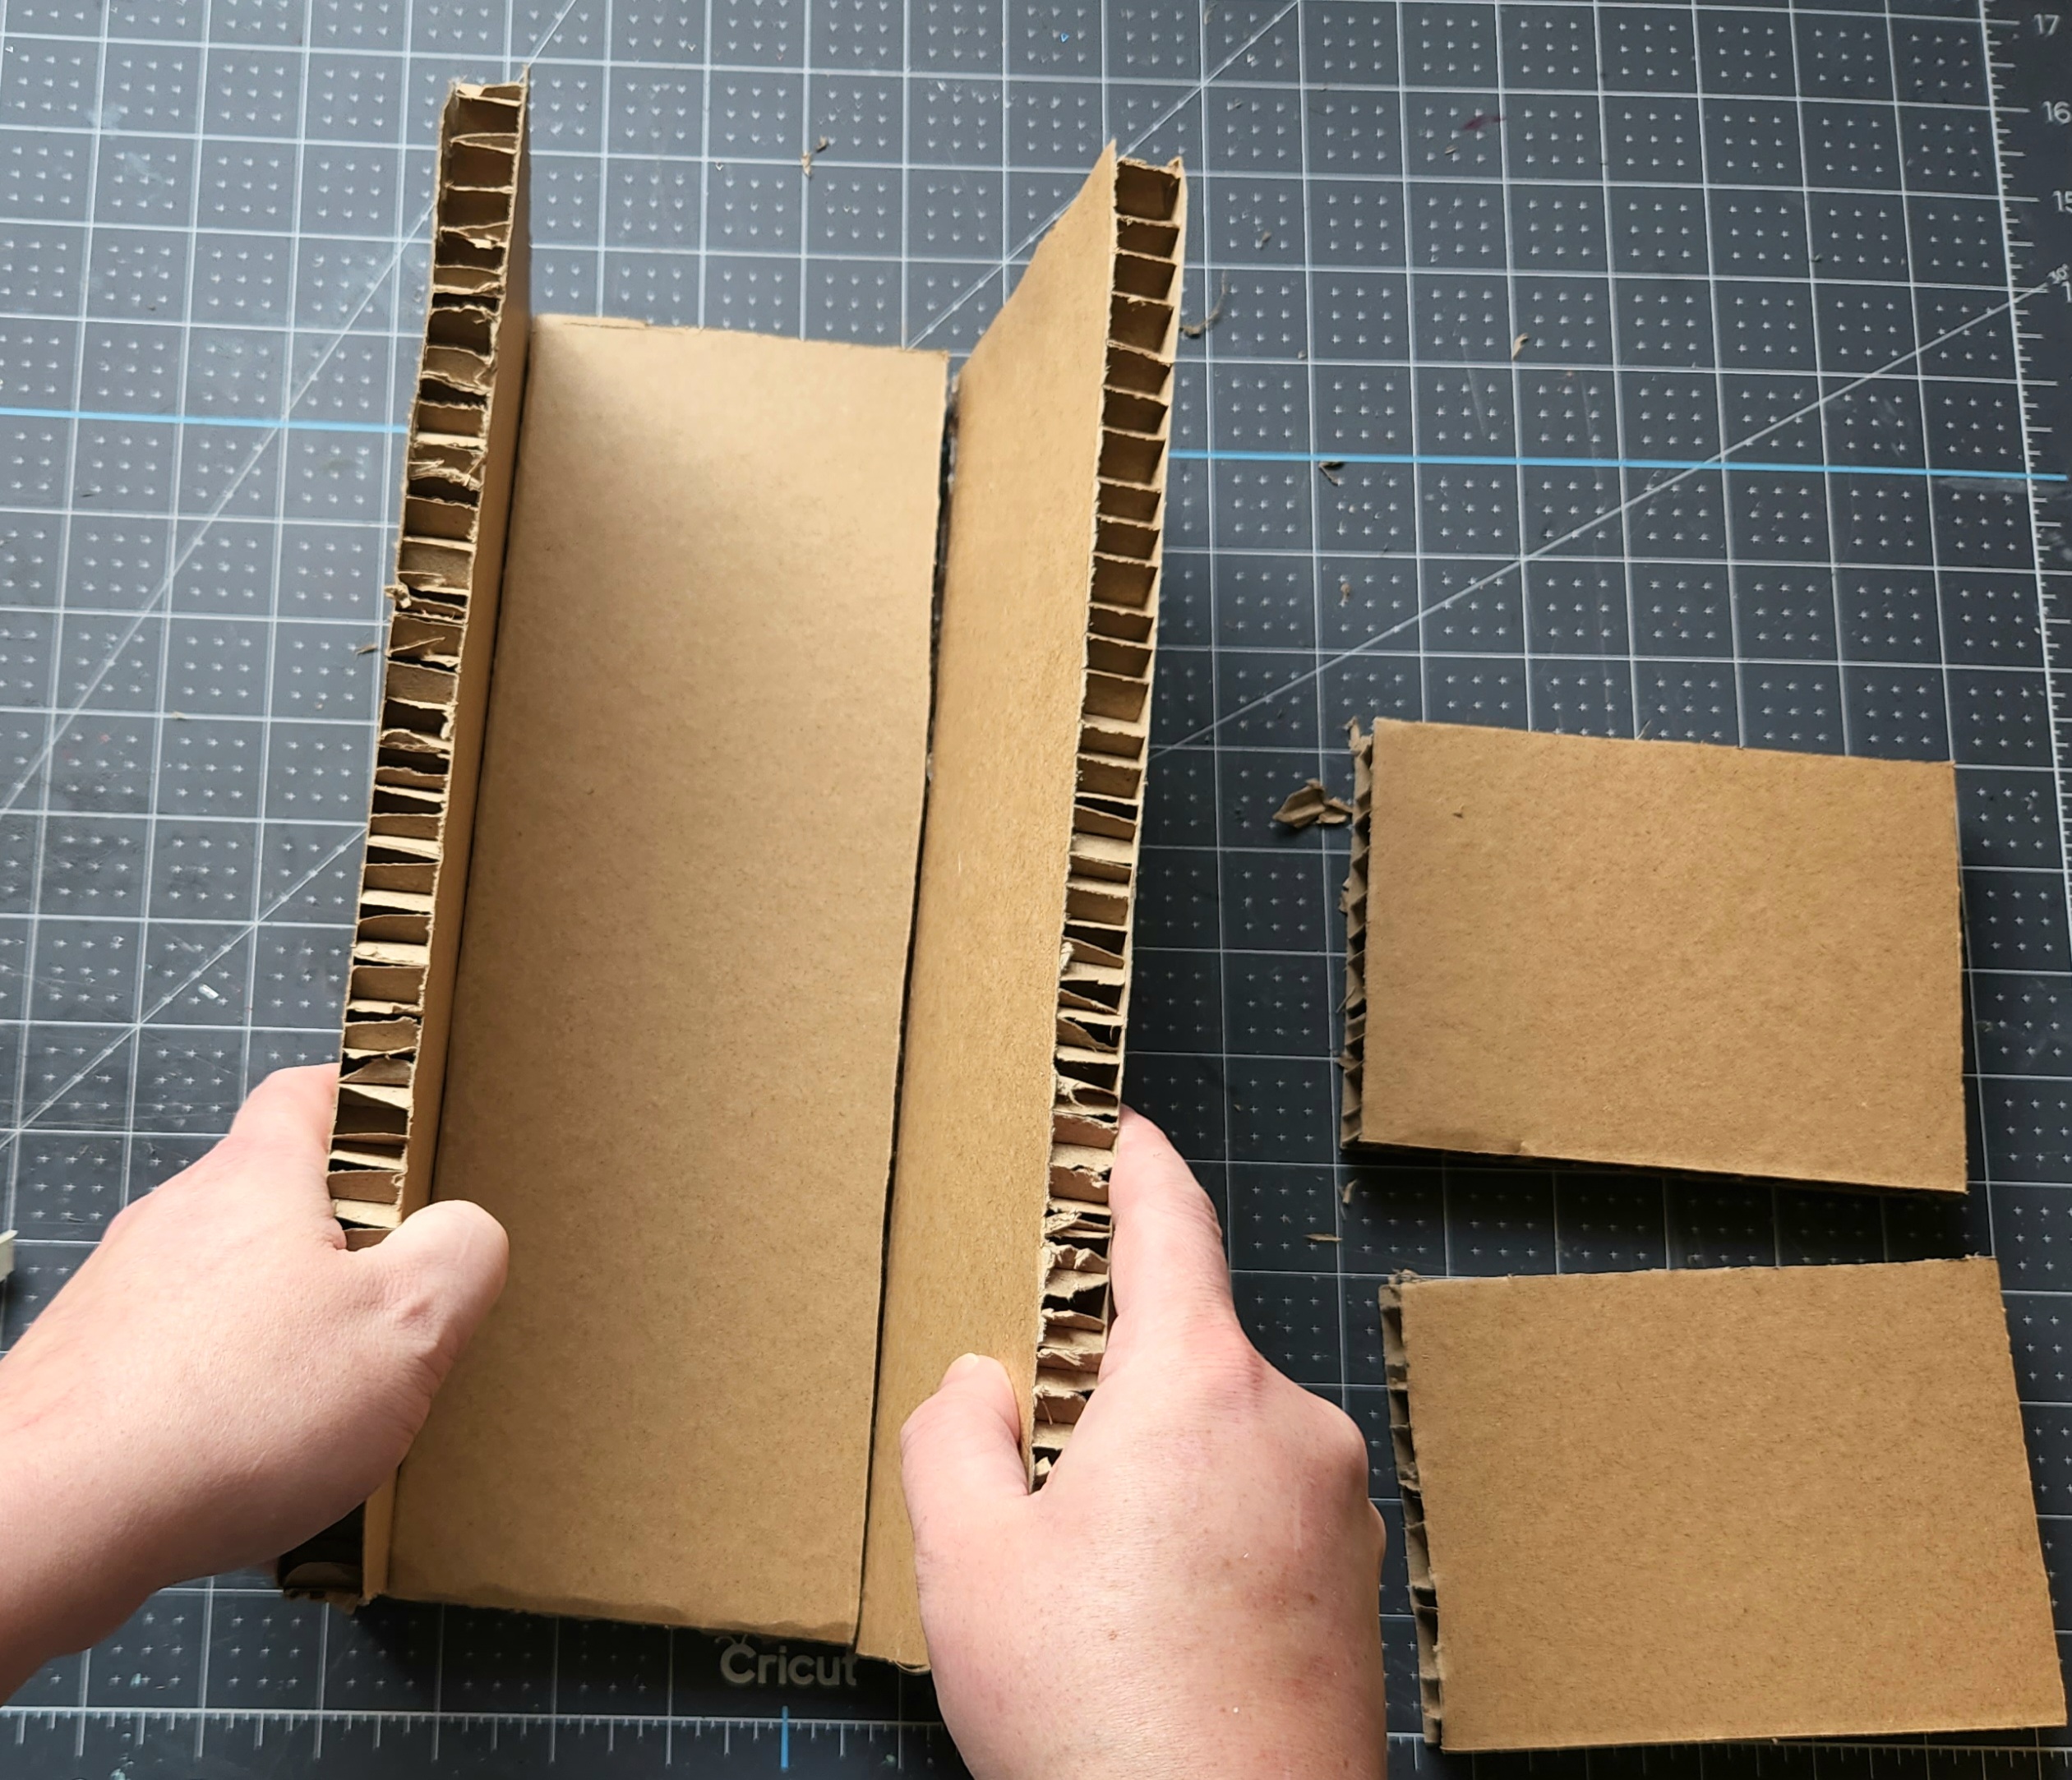
Finally glue the two end pieces on to the rest of the box.
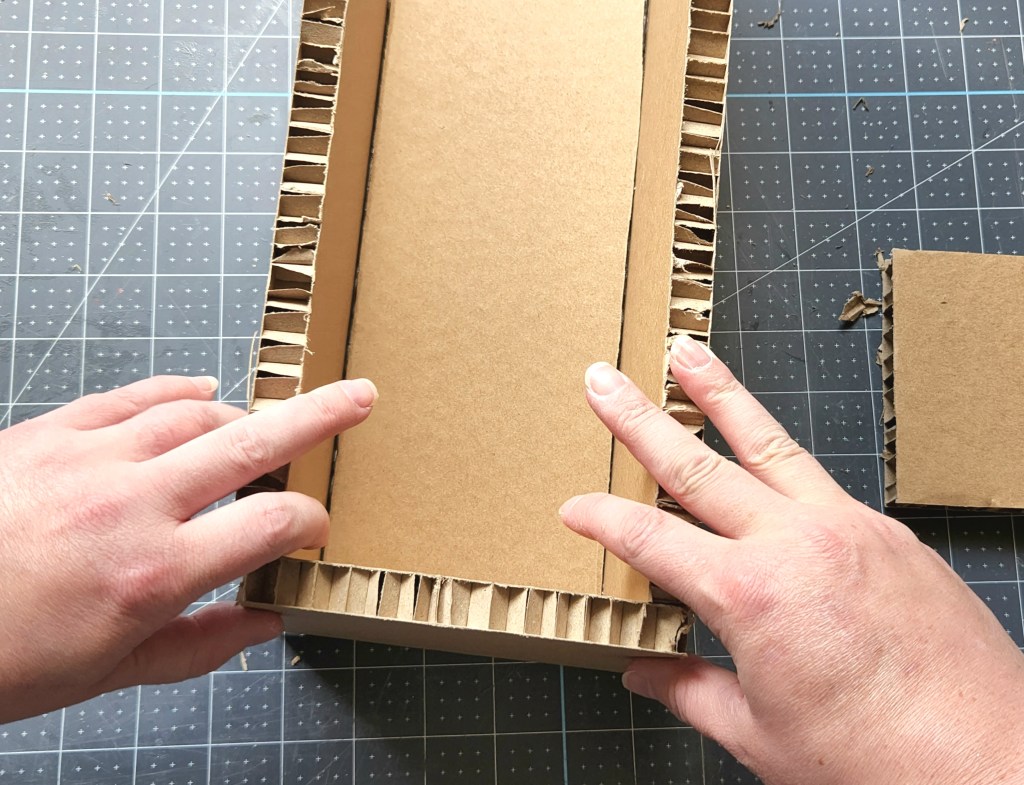

Now you have a fully formed planter box that you can use as your coastal centerpiece.
Line the Box
I wanted my planter box to look finished, so I lined it with white felt. I didn’t have a wide enough piece to just drop in the box and glue in place, so I had to cut two end pieces first.
Measure and cut two pieces to fit the shorter ends. They should be about 5″ wide and 4″ tall.

Add hot glue to the back of the two pieces of felt and place them inside each end of the box.


Luckily I had a wide enough piece of felt that could cover the bottom and two long sides with one piece. If you don’t, you can cut the felt and glue it in separately like you did with the sides.


Once your box is fully formed, it’s time to paint or cover it. I was going to paint it with gray chalk paint and cover the exposed chipboard sections along the top of the box but covering that would’ve looked way different than the rest of the box. If you cover the entire thing with printed cardstock, that will work. You could also use poster board to cover the foam parts of foamboard if you didn’t have thick cardboard. Then paint the entire box.

Cover or Paint the Coastal Centerpiece
I bought a precut package of beachy fabric that you’ve seen in several projects lately, like my rope tray and coaster set, a no sew pillowcase, and these coastal bookends. Since I couldn’t paint the box with the chipboard showing, I thought why not cover it with the fabric? I measured the fabric and cut it 6″ tall and about 32″ long.

I don’t have a sewing machine, so I did my usual “hem the fabric by gluing it” trick. If you have a sewing machine, you can use that to hem your fabric, or you can leave it like it is. I just wanted to have a finished look with no strings hanging off.
Hot glue the fabric around the sides of the box. I glued the fabric over the top edge of the box a few centimeters, then pulled it taunt and glued the other end on the bottom. That kept me from having raised glue that you could see underneath the fabric on the sides.


When you get to the corners, fold the fabric in and over itself just like when you’re wrapping a gift.


To finish covering it neatly, make sure the fabric comes back and ends right at the corner where you started gluing it on. Pull the fabric tightly and hot glue it in place.

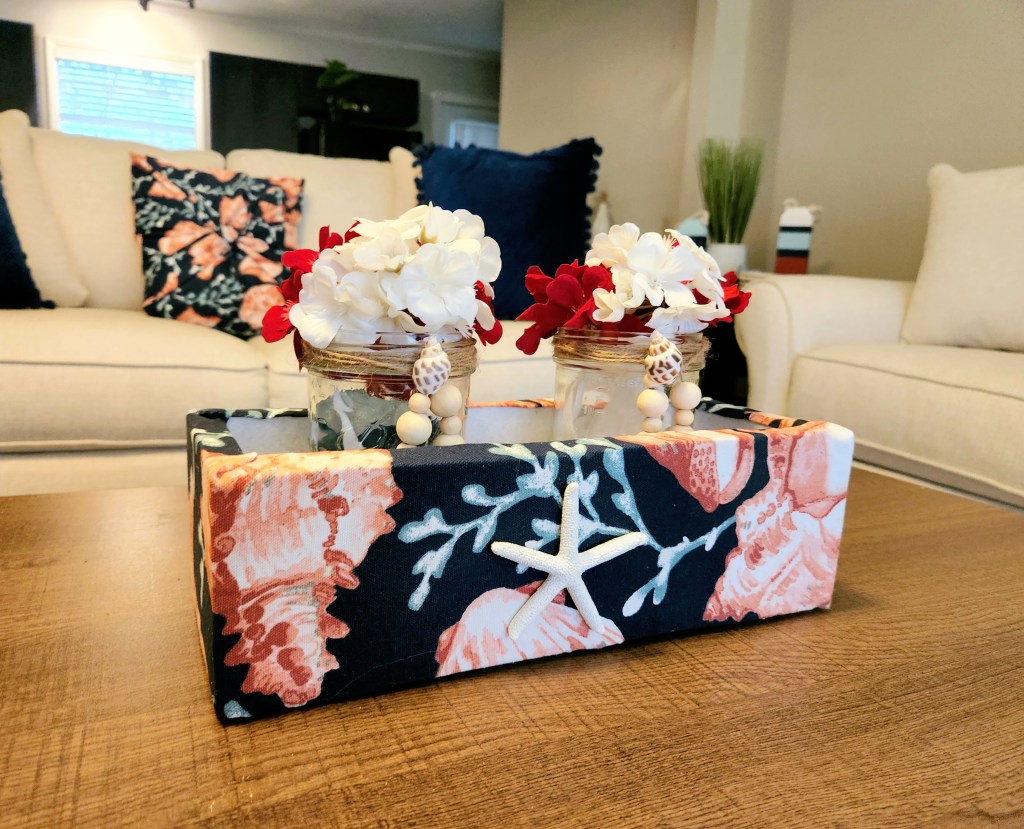
Here’s my covered box!

Embellish the Box
I decided to add a starfish onto the side of my box. This isn’t required. You could also use other types of shells or even twine.


Decorate the Jars
Now that your coastal centerpiece box is ready to go, prepare the jars to go inside. I used two Ball mason jars for mine. I would’ve liked to have taller ones, but they worked ok. Wrap twine around the top until you’re happy with the width of it. Instead of hot gluing the twine on, I tied it in place. You can do either.


I decided to add a little more to the jars, so I threaded six wood beads on some twine and tied it on the twine already on the jar. I made two strands for each jar.


To cover the place that I tied the beads on, I hot glued a small conch shell over the knots.

I placed sea glass rocks in my jars at first. I also tried some white and red hydrangeas since it’s the 4th. However you’d like to fill your jars is up to you.
That’s it! Your DIY coastal centerpiece is ready to display!
I love creating a piece of home decor for way less than you can buy it for. There are DIY planter boxes all over Etsy for $50-$115! I made mine with free cardboard, a piece of fabric that’s been used for a ton of other projects, and seashells I have on hand for years, so this was a free project for me. Gotta love that!
First, I filled my jars with sea glass, and here’s a few photos of that:


Then I swapped them out for flowers:

Keep reading to check out the other posts on our Sustainable Pinterest Challenge!
I hope you enjoyed this faux wood planter box tutorial! Remember to pin the image below and share on social media using the buttons at the end of the post or on the left side of the screen so you can get back to it when you’re ready to make it. Be sure to follow me on social media and via email so you never miss a great tutorial, free printable, or other amazing posts!

Don’t go yet! There’s more to see!
There’s plenty more to see here on the blog! If you’re looking for something specific, use the search box in the sidebar to look it up. If not, you might enjoy these ideas. Don’t have time to read them all now? That’s ok, just click over to the posts using the pictures and pin them for later. You can also add Life as a LEO Wife to your favorites and check back for new ideas and free printables and SVGs every Wednesday, as well as link parties with tons of shared ideas on Sundays!
On to the Hop!
I’m so glad that you’re still here! I hope that you’ll head over and check out all of the great posts that are shared in today’s Pinterest Challenge!
Julie from Sum of Their Stories | Upcycling Plastic Containers into Pretty Storage
Gail from Purple Hues & Me | Reusable Cleaning Wipes
T’onna from Sew Crafty Crochet | Crochet Shopping Bag
Donna from Modern on Monticello | DIY Glass Jar Gnomes
Julie from Treasures Made from Yarn | Market Bag
Lydia from Life Beyond the Kitchen | Makeup Remover Pads
Mel from Decor Craft Design | DIY Tiered Tray Upcycled Cookie Tins

Stick around! There’s plenty more to see here on the blog. If you’re looking for something in particular you can use the search box in the sidebar. If not, you might enjoy these posts:


Awesome idea to make a planter centerpiece out of that very thick cardboard, Niki! What an amazing way to repurpose the cardboard. Seems like it would have been hard to work with, but you did a great job! It turned out really pretty! I love the fabric you chose, too! It looks quite stylish!
Amazing! No one would ever know you started out with a piece of cardboard! It looks great Niki! I hope your hand is okay…
Jenna
I saw this and just assumed you’d decorated a wooden wine box or something. I’m so surprised to see it’s cardboard packaging under there! This looks SO expensive, and the jars with the beads just finishes it off so nicely.
Thank you! Those thick cardboard pieces have been begging me to use them lol!
You centerpiece is really pretty! I really like how you embellished the jars with the twine, beads, and shells. I love coastal decor.
Niki your coastal centerpiece came out so cute! I love the fabric you picked out. I would have never guessed that you made it from cardboard! great job
Love your coastal décor box! I like working with that type of cardboard, too.
I have carpal tunnel syndrome in both hands and wear braces when sleeping. Had surgery in one hand years ago and it helped tremendously. Hope you’re able to find some relief.
Thank you! I just found out that the braces for carpal tunnel should never have the metal piece on the palm side, and that it could worsen the condition. Now my stupid thumb moves up and down slightly (like when your eyebrow twitches and you can’t control it) for hours throughout the day. It’s insane. Wish I would’ve looked that us sooner lol. I really hope I don’t have to have surgery because I got a blood clot after having my large intestine removed. I’m sure the doctors will be reticent to do it, but my hand is flicking things out of it. I was working with half beads yesterday and must’ve flicked them on the floor at least a hundred times, literally. I can’t continue like this, so I hope they will be willing to do the surgery if it doesn’t get better. I’ll be looking for a new brace today. Happy birthday to me today lol!
Love this Niki! It instantly caught my eye at the Happiness is Homemade Link Party. I was absolutely floored once I went through your tutorial. Cardboard! What a wonderful project and your creativity never ceases to amaze it! Pinned!
Thank you! It’s this super thick cardboard that I really haven’t seen more than once or twice in the past. It’s about an inch or more thick with thick chipboard in the middle. I’m so glad my hubby thought to keep it for me! I’ve still got a full piece and a half left, so that’s great too.
Looks nice, I like the jars too! Thanks so much for linking up at A Themed Linkup 114 for Coastal Crafts and Décor. Pinned.
CONGRATS Niki! Your post is FEATURED at A Themed Linkup 115 for All Things American and Patriotic from the previous linkup for Coastal Crafts and Décor.
Great! Thank you!
Wow, Niki! That is a great use of cardboard! Very creative.
Thank you! Can’t wait to make one for fall.
What a gorgeous and oh so pretty center piece.
Thank you from your SSPS Team for sharing your various links with us at #265 SSPS Linky.
Thank you!