My son is 10 years old and now feels that he has outgrown his superhero (mostly Batman) bedroom decor. I’m one sad Momma for sure. We discussed several ideas for a tween boy’s room, and he settled on a “gamer room” theme. He got a new loft bed, desk, and bedding for Christmas. To save money, everything else will be a DIY Mom Original. His desk has several cute shelves, so I decided to upcycle a Dollar Tree table-top sign into a DIY gamer room sign. Today I’m going to share the “how-to” of making the sign and the free SVG design and the free printable. You can print the sign if you don’t have a Cricut to cut the image.
Y’all, I have so much more DIY decor for a gamer room coming. You do not want to miss some free printables that are on the way as well. They’re absolutely gorgeous prints that you can use to create a gallery wall. They will be designs that you can blow up to any size without losing the image quality. I am having his printed as engineer prints that will cover an entire wall. Make sure you follow me on social media using the buttons in the sidebar so that you don’t miss it! Enter your email address below to get an email when I add a new post, free printable, tutorial, and any other great idea. That way you know you won’t miss a thing!
To make a DIY gamer sign you need:
- a 5×5 Dollar Tree shadow box style sign- They have many different options, but any of them will do. They usually have an item glued in the middle, but they pop off easily. The one I used had a small wood piece that said, “be grateful always.”
- acrylic paint- I used gray and black.
- paint brushes
- 2 sheets of vinyl or HTV- I used orange and black vinyl. DT does have vinyl now. Use the color or your choice.
- transfer paper- I use contact paper from DT.
- painter’s or masking tape- This is optional, but I wanted to add a little flair to my son’s sign, so I used the tape to create a stripe of paint on the outside of the frame.
- ruler and pencil

Prep the Sign
Most of the 5×5 signs at Dollar Tree have another separate sign in the middle as you can see in the picture above. Use a tool with a flat, but somewhat sharp end, and carefully pry that smaller image off. I used a tool from a set of polymer clay tools with a pointy end and expands into a wider flat part. A screwdriver or a butter knife will work as well. Slide it under the small sign and pop it straight out. Try to do it cleanly and keep the paper that covers the entire inside of the sign intact. If it rips, you will need to try to take the paper off, perhaps using sandpaper to keep get it off. Otherwise, the paint will be uneven. My little sign popped off with very, very little effort.
Paint the DIY Gamer Sign
If there is any glue sticking up from the where the sign was pulled off, carefully peel it off. I was able to keep my paper fully intact, so I didn’t need to worry about pulling the paper off or having an uneven surface. With the sign removed, use a paint brush and acrylic paint and to paint the inside of the shadowbox, including the inside sides. I didn’t get a picture of all of that because I don’t have a tripod for my new camera yet. (I also haven’t gotten good at using it yet, so forgive the pictures. I’m thinking my Galaxy S20 still takes better pictures.) I did paint the front of the frame gray at first, but I ended up taping off the outsides and painted it black.

I decided, once I saw the completed DIY gamer sign, it needed a little something else. Normally I’d add a ribbon around the sign and a bow on top, but since this is for my son, I didn’t think that would be appropriate. However, if you are making your sign for a tween or teen girl, that would be perfect! I thought why not add a “racing stripe” to the outside of the sign. You can paint the extra stripe before or after adding the design.
Tape of a Stripe to Paint
To create the stripe you need a ruler. Measure from the back .25″ and make a small mark with a pencil on one end. Then measure .25″ from the front edge and make a pencil mark. Repeat that step on each side of the frame. I did it from each end on each side for a total of 8 measurements and 16 pencil marks.


Once you have all of the ends on each side of the frame marked, you need to add two pieces of painter’s tape along those lines. I cut my painter’s tape in half because it’s so wide, and it saved me a lot of tape. If you cut your tape, make sure you use the uncut side along your pencil marks so your lines are straight. To make sure it is straight, place the tape at the bottom pencil mark and make sure it’s lined up exactly with the top pencil mark on the same side. Continue that all the way around the frame. Go over the tape where it meets the open space that will be your stripe with your finger or fingernail over and over. That will ensure the paint doesn’t seep under it.
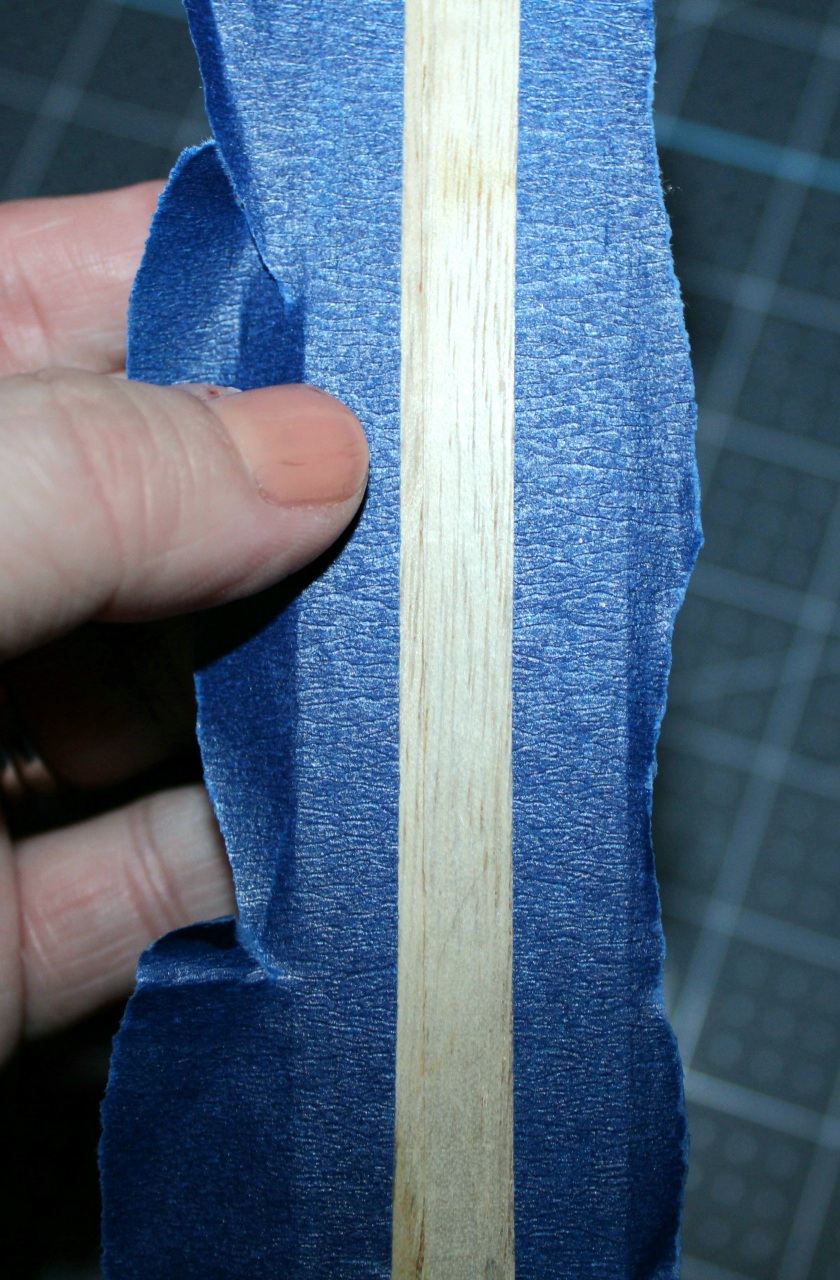
This is what you should be left with.

Paint the Stripe
Once you’re sure that the tape is nice and adhered to the frame, use the acrylic paint to paint between the tape.

Let it dry for a few hours. I’ve noticed if you take the tape off too early the paint will bleed a little. Once it’s completely dry, remove the painter’s tape.


Cut the Gamer Design
My Design Space Image
For this project I used my Cricut to cut a design. I have the Cricut Access subscription, so I didn’t spend anything extra in making it. You can use my design in Design Space here. If you don’t have the Access subscription, I believe the font is $4.99 and the image is $.99. You can also subscribe for $7.99/mo. I didn’t weld the image pieces together in order to save vinyl, but you can do it before you cut if you’re not good at centering the words on your own.

Free Printable Design
I know that not everyone has a cutting machine so I created a free printable image that you can use for your DIY gamer room sign instead. There are a few ways that you can use it. You can print it and put it in a regular frame, or if you’re upcycling a Dollar Tree shadowbox style sign, you can use Mod Podge.
I made the image 5×5, but it will download as a PNG which you can make any size without losing quality. When you print the image, check the print settings and make sure that “size to fit” or similar wording option isn’t selected, that way it remains at 5×5. My computer also gives me a drop-down box from which I can choose the size I want. I made an orange and dark gray design since that’s the colors of my son’s room, but I know a lot of people go with black and lime green for a gamer room, so I made that one as well.
FOR PERSONAL USE ONLY
As with all of my free printables, these are for at home, personal use only. If you would like to share them with friends or family, please share the link to this post with them. You can do so using the buttons at the bottom of this post or by giving them the URL directly. This allows me to continue to make these printables for you to use free of charge. This is my full-time job, so I rely on views from you wonderful people to make a living. I am so, so grateful for every single one of you! As always, when you download and print the images, they will not have my logo overlaid on them. I do this so that the images can’t be downloaded, copied, and/or printed directly from Google.
Apply the Printable to the DIY Gamer Sign
Once you’ve downloaded and printed the image (I would use cardstock to print on), cut it down to the 5×5 size. Brush the inside of the frame with Mod Podge then apply a little to the back of the image. Put the image inside the shadowbox and make sure it’s even. When it is, smooth the paper onto the Mod Podge to remove any bubbles.
A second option to add the image is to cut each letter and the controller out then Mod Podge them on just like you would if you were using items cut with a cutting machine (i.e., a Cricut). That way the color you painted the background would show through. However, if you don’t have time to do all that, it’s ok to put the entire image inside the shadowbox because you will still see the paint on the top, bottom, and on each side of the design and also the paint on the front of the frame and the stripe on the outside.
Apply the Vinyl Design
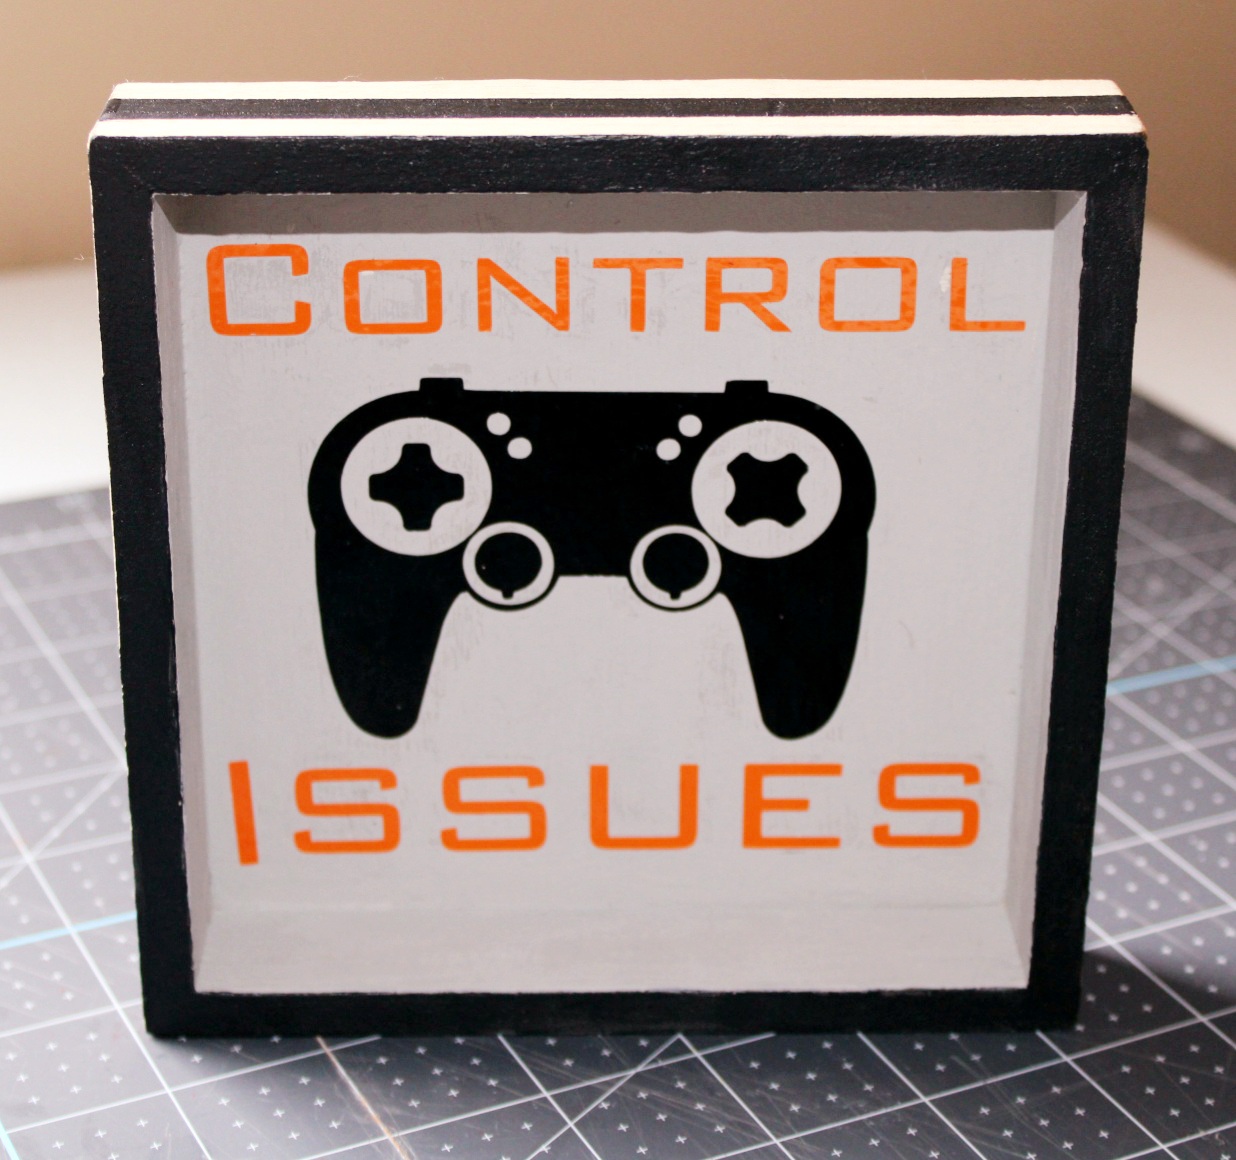
I’m not going to give a full instruction on how to apply a vinyl design because I’m sure most of you know how to do it. If you need a little more instruction on it, check out this post where I show you how to make a large farmhouse sign with a foam board. Cut and weed the design like you normally would. Use transfer or contact paper and go over it with a credit card to adhere the design to the paper. Remove the vinyl backing. Center the design and transfer it from the contact paper to the sign using the credit card or other scraping tool. Place the controller in the center and the words at the top and bottom of it.


Your DIY gamer room sign is finished!
That’s it! Your adorable sign is ready to hang or sit out. I am sitting mine on my son’s desk that he got for Christmas. I’m going to show you some up close shots of it, but I’m saving the entire desk reveal for when the whole room is finished. Everything is still being moved around, so it’s a mess right now lol.


I hope that you enjoyed this tutorial. Don’t forget to pin and share it so that you have it available when you’re ready to make the sign and print the free printable. I would love for you to tag me on social media when you make your own DIY gamer sign. Use the buttons in the sidebar to follow me on your favorite platform. I have a lot of great line of content coming up, so make sure you don’t miss it!
For my blogger friends, make sure you link up on Happiness is Homemade. Traffic Jam Weekend is going on hiatus due to the blogger who holds the code being unable to keep posting. I am starting a brand-new link up which will start this Thursday! I hope to see you there and spread the word!


2 thoughts on “DIY Gamer Sign Tutorial: a Dollar Tree Upcycle for Your Tween’s Room!”