It’s time to get a jump start on your spring decorating with this DIY spring hoop wreath. I can’t believe it’s almost spring! Where we live it definitely feels like it’s already here some days. This wreath is perfect and will get you from March all the way to June. It is beautiful, and I love it! I hope you like it and make your own.
To make your spring wreath you need:
” target=”_blank” rel=”noreferrer noopener sponsored nofollow”>gold 14″ hoop wreath
- faux tulips– I used 1 bunch of flowers, each bunch had 5 stems with 3 tulips on them, for a total of 15, from Michael’s. They were priced at $4 a bunch last year.
- hot glue gun and glue
- wire cutters
- navy satin 2.5″ ribbon
This wreath is really simple to make. While your glue gun is heating, use your wire cutters to cut each separate stem, with three tulips on each of them, off of the bunch. Cut each stem just below the greenery. You will end up with five stems.


Glue one of the stems onto the spring hoop wreath so that the flowers on that stem sit at 9 o’clock. Repeat that process by gluing the next stem so that those flowers sit just below the first. Continue in this manner until you have four stems on that side of the hoop.
Next, glue a stem so that the flowers on it sit at 3 o’clock. Follow the same steps that you did on the other side.


Once all of your flowers are glued on, four on each side, you will wrap the hoop with your navy satin ribbon. Put hot glue along the start of the ribbon, and wrap it over the ends of the bottom stems of the tulips on each side. Wrap the ribbon from the left side, across the bottom of the hoop until it reaches the right strip of flowers and around their bottoms. With the bottom of the spring hoop wreath wrapped, cut the ribbon and glue the ribbon in place on the back of the hoop.


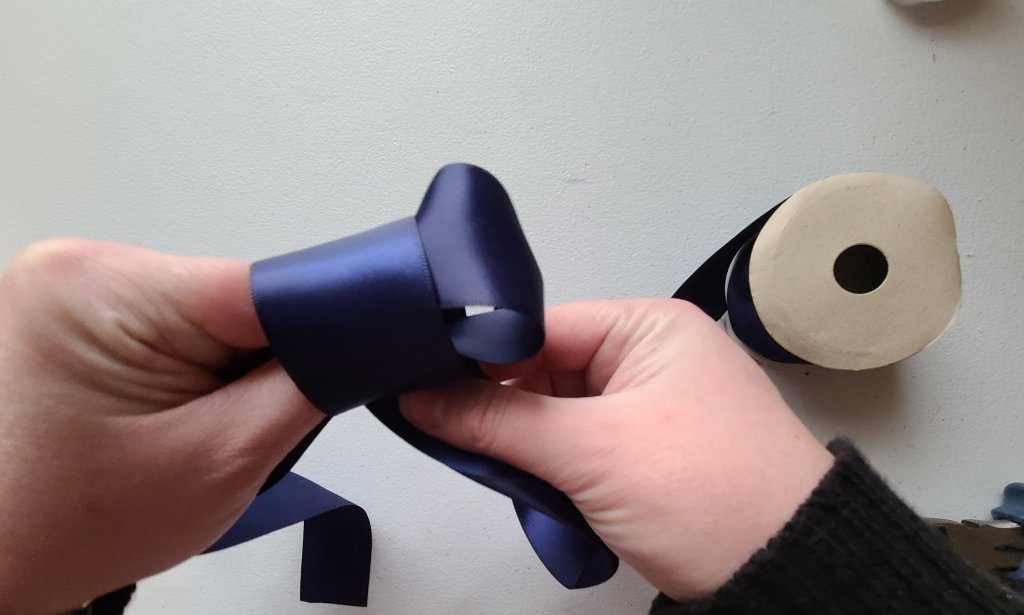
Make a bow.
The last thing you need to do is make a bow for your spring hoop wreath. Make the first loop about 5″ from the end of the ribbon. This will be the first tail. Tie the bow just like you would a shoe lace. Roll out 5 more inches of the ribbon and cut it off of the roll. Lay the bottom of each tail on top of each other, fold them in half vertically, and cut a half “V.” That will leave you with a beautiful bow. If your ribbon easily frays, take a lighter (carefully) and pass the ends along the flame. This will seal it and keep it from fraying. Glue the bow onto the spring hoop wreath in the center of the frame that you previously wrapped with the ribbon. It should sit at 6 o’clock.


Pick the perfect spot and hang you spring hoop wreath.
I hope you enjoy your spring hoop wreath as much as I have. I have mine hung in our dining room, but there are so many places you can put it. It will look great on your door too. There are many sizes of the hoops available, so the possibilities for your wreath are endless.


If you like this wreath, I hope you will check out some of our other wreaths and DIYs! This tutorial shows you how to create storage and organize your craft room or kids rooms while also serving as wall art! This post will explain how to make initial wall art for your master bedroom; ours serves as a headboard.
If you would like a full tulip wreath that isn’t a hoop wreath, you may want to check out this one from the DIY Village.
Thank you for reading my dear wifers! I’m so happy you stopped by. Enter your email address below so that you don’t miss a post. Leave your comments and questions below. When you make your hoop wreath, post a picture of in the comments section, or use the links below to follow us on social media and post your pictures and ideas on your favorite site.


That looks so nice!! Thanks so much for linking up with me at the Unlimited Monthly Link Party 22. Pinned!
Thank you! And thank you for hosting. It’s a big job.
Visiting again to say thanks so much for linking up with me at the Unlimited Monthly Link Party 23. Pinned again!
Thank you! Love linking up with you!