I’ve been seeing all kinds of faux books on tiered-trays, so I decided to make my own. You all know I’ve been prepping decor pieces to decorate my home in a beach theme, all the while participating in the A to Z Challenge for bloggers. Today’s theme is the letter V. My V is for very, very cute faux books. I really love them; they’re very cute, very perfect, and not too hard to make.
They were very cheap for me to make too. Which of the supplies you already have will determine how much it will cost for you to make.
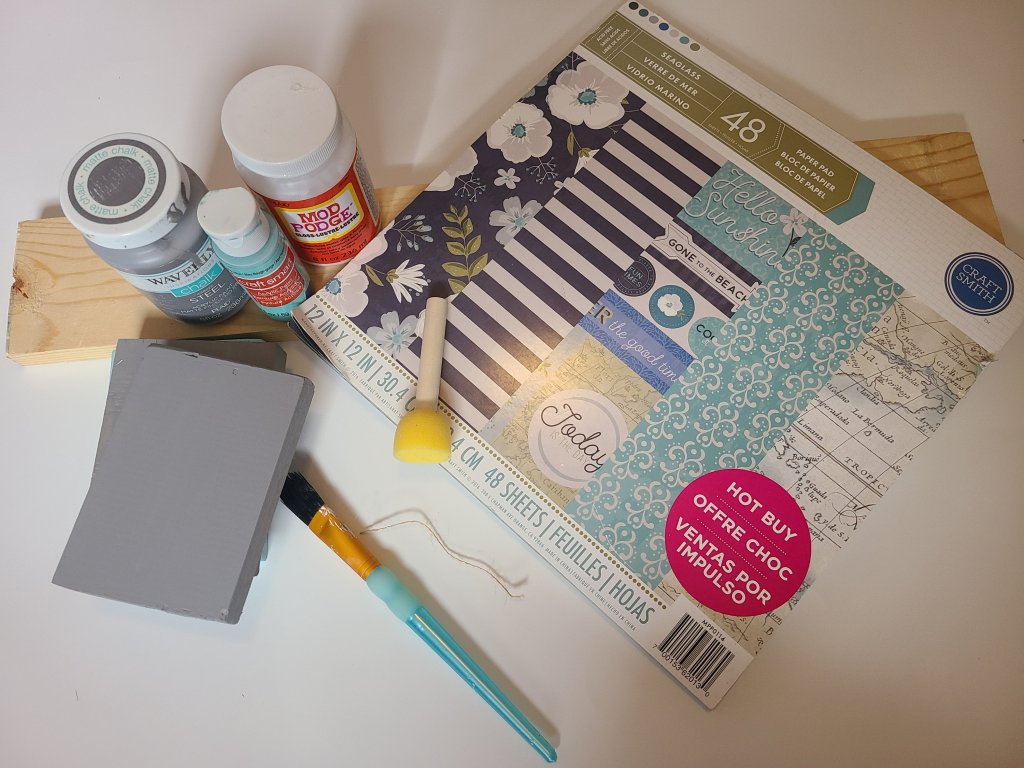
You need:
- wood at least 3.5″ wide- I made three faux books 5″ long by 3.5″ wide.
- saw or have Lowe’s cut it
- ruler or tape measure and pencil
- coastal theme scrapbook paper with words to add to the “spine” of the faux books
- Mod Podge and foam dabber or brush
- scissors
- robin’s egg blue and gray acrylic paint and paint brush
- twine or ribbon (optional)

Cut the Wood
I had left over wood we used in some way or another. It was 3.5″ wide. You’ll need wood that wide or a bit wider to make your faux books look like wide enough books. It doesn’t matter how long the wood is, as long as it’s long enough to make as many books as you’d like. I made three books 5″ long.
You need to first cut the wood to 5″ long. Measure the wood, using a ruler or tape measure, and mark it at 5″ using a pencil. My husband bought me a little hack saw a few weeks ago, and this was my first chance to use it. Having an electric saw would be easier, but it wasn’t too hard using the saw. Measure and cut three pieces of wood, or more if you want the stack taller.
If you find nice people working at Lowe’s or Home Depot, you can get them to cut it. I see all these bloggers who have them cut it, but I’ve not yet found anyone who will do that where I live. Maybe it’s just their general managers who forbid it. Who knows?!


Once cut, sand the ends of the wood to smooth them out.

Paint the wood.
Next paint the three wood pieces. I painted two of the faux books gray and one robin’s egg blue. You can use any color combinations you’d like, all one color, all a different color, whatever will match your area the best.
Make the sides of the wood into book spines.
Cut the words or pictures out of your scrapbook paper that you want to use as your book “titles.” A few other options for making the spines are to write on them using paint pens, paint them with stencils, or use a Cricut and vinyl. I’ll be sharing how to use the scrapbook paper with you.
Most scrapbook cardstock packs come with several pages with quotes, small pictures you can cut out, and frames you could use behind pictures. These are the papers from my pack that I have been using for my coastal projects.

For my gray faux books, I cut “keep swimming” and “be free” from a strip of words. For the robin’s egg blue book I used “You, me, and the sea.” Using your foam brush, dab Mod Podge on the “spine” of the wood and on the back of the scrapbook paper.

Place the strips of cardstock on to the side of the wood. Then dab another layer of Mod Podge on to the top of the cardstock and the wood.


Let them dry, then you can add the finishing touch.
Finish Up
Once your faux books are dry, it’s time to wrap them up. Stack them in the order you’d like. I placed my robin’s egg blue book in the middle of the two gray ones. Wrap your twine around the middle of the books and then tie it in a bow on top. I used twine type ribbon that came from Michael’s in a grab bag (if you find a sale on the grab bags get all that you can!).


The way your stack the books is up to you as well. I see most of them stacked neatly and straight on top of one another, but I like them turned just a bit so you can see they are actually separate faux books. You can also choose to use a ribbon in place of the twine.

That’s it! You can put the faux books on your tables, shelves, and trays, etc. For now mine are on my two-tier tray. I will be sharing my completed tray with you soon.
I hope you have enjoyed this tutorial. Stick around and check out my other beachy decor tutorials. Like this rope tray or this beach wreath. You may like the other tutorials for the A to Z Challenge. This is the V tutorial, very cute and easy faux books.

Make sure you enter your email address in the bar along the side or at the bottom of your screen. You will get an email each time I add a new post so you never miss anything! Follow me on social media using the buttons below and comment in the section below. I love chatting with you! Add your posts on my link parties and check out all of the wonderful content posted on them!


Looks great, very creative! Thanks so much for linking up with me at the Unlimited Link Party 25. Pinned!
Thank you!
This was so lovely. I am a leo too.I loved your ideas of decor they are so refreshing and in the time of lockdown we really need this.Keep doing and posting it.
Thank you for the kind words. Thank you and your family for your service to our communities! Law enforcement is a family job for sure!
What a cool project! I can think of so many places these DIY faux books would look wonderful. What a great way to perk up a space. Thank you for sharing and for being a part of the Hearth and Soul Link Party Community. Take care and have a lovely weekend!
Thank you!
Hello, Niki. Those are great decorations and I see where you mentioned the A to Z challenge, but not ours at Love to Craft where you have linked this project. You need to mention us and link back if you are entering our challenge, okay. Thanks, Aimeslee LTCCB DT
You are listed on the link party page.
I keep getting random messages from your group. Some say thanks, others, that these posts were shared in a previous month. Yes they were shared in a previous month, when I shared them. I haven’t shared anything recently. Thanks for visiting.