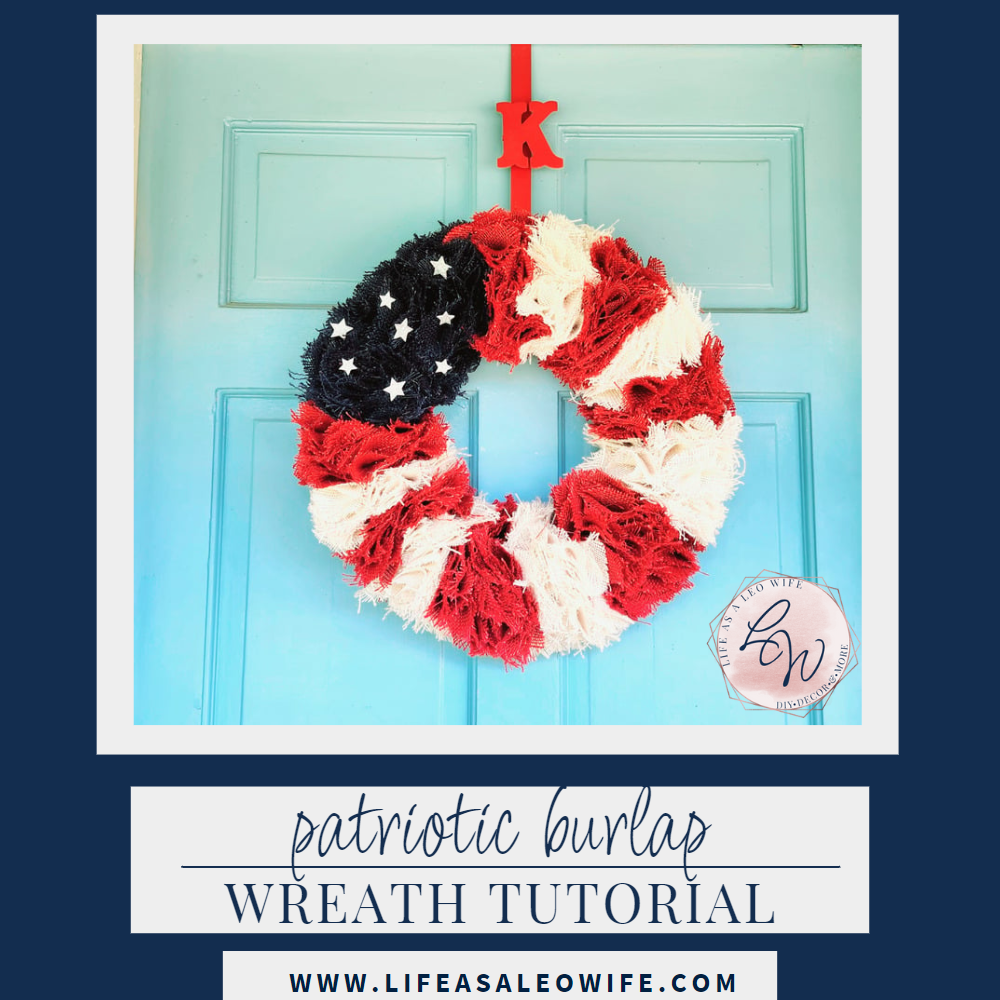
Welcome friends! I’m so glad that you’re here today because I have an amazing DIY project to share with you. If you’re looking for the perfect summer wreath look no further! This farmhouse style patriotic burlap wreath looks amazing hanging indoors or out and is great to use from Memorial Day to Labor Day since we have so many patriotic holidays over that time. The technique that I used for this wreath is new to the blog, so you don’t want to miss this tutorial. Let’s get into it!
Patriotic Burlap Wreath Supplies:
- 2 yards of white and red burlap: I used all of one package and about half of the second. These came from Walmart.
- styrofoam wreath form: I used a 15.6″ form from Walmart.
- foam stars
- scissors
- hot glue gun & glue
- push pins- They need to be longer than the ones that I got, which were size 12, 3/4″! Mine did not work so I had to use glue alone.
- circle- I used a 4″ glass candle jar lid.

Burlap Circles
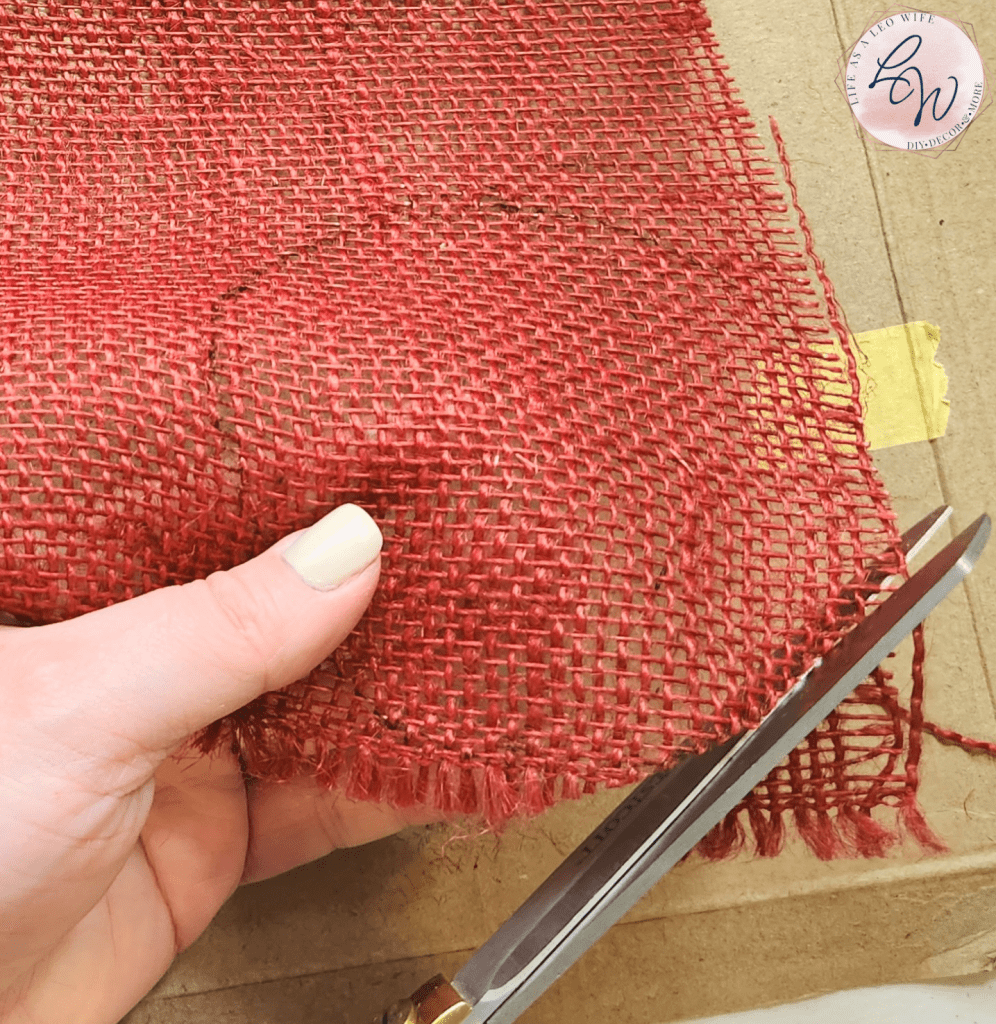
First you need to cut the burlap so that it can be used on the patriotic wreath. I could’ve cut it into strips to make a bubble burlap wreath, but I’ve made plenty of those and I wanted something different. So, for this wreath I used circles to create a cute new style.
Place a circle template onto the burlap. I used a 4″ lid to a Bath & Body Works 3-wick candle. Trace around it with a pen or fabric pencil. I used a red Sharpie for the navy and red burlap and a light green pencil for the white. Make lots and lots of circles on the burlap. To complete my patriotic wreath I needed an entire yard and a half (1.5 packs from Walmart) of red and white and about 3/4 of the yard of the blue.


I traced and cut half of the burlap on the red and white. Then when I started adding the circles to the wreath, I realized that I would need a lot more. So, I finished tracing and cutting the rest of the fabric. The next day (yes, it takes that long), I realized that I wouldn’t have enough, so my hubby went and bought another package of the red and white. I used 1/2 of them both to finish. You won’t have to do that, since I’m letting you know how much you’ll need. Just go ahead and trace circles on a yard and a half of the red and white and 3/4 of the blue.
Next, cut out your burlap circles.

Rights & Wrongs
Y’all know that I always let you know what went right and what went wrong in my projects so that you can get yours right on the first try. So, what went wrong with this one (other than not having enough burlap right away lol)? Well, I ordered straight pins to attach the burlap circles to the wreath form, but they were too short to hold them on properly. They kinda just fell off or wobbled around and unfolded. The pins I got are a size 12 and 3/4″ long. If you get longer pins to attach the burlap to the wreath form, that would be the easiest way to make this.
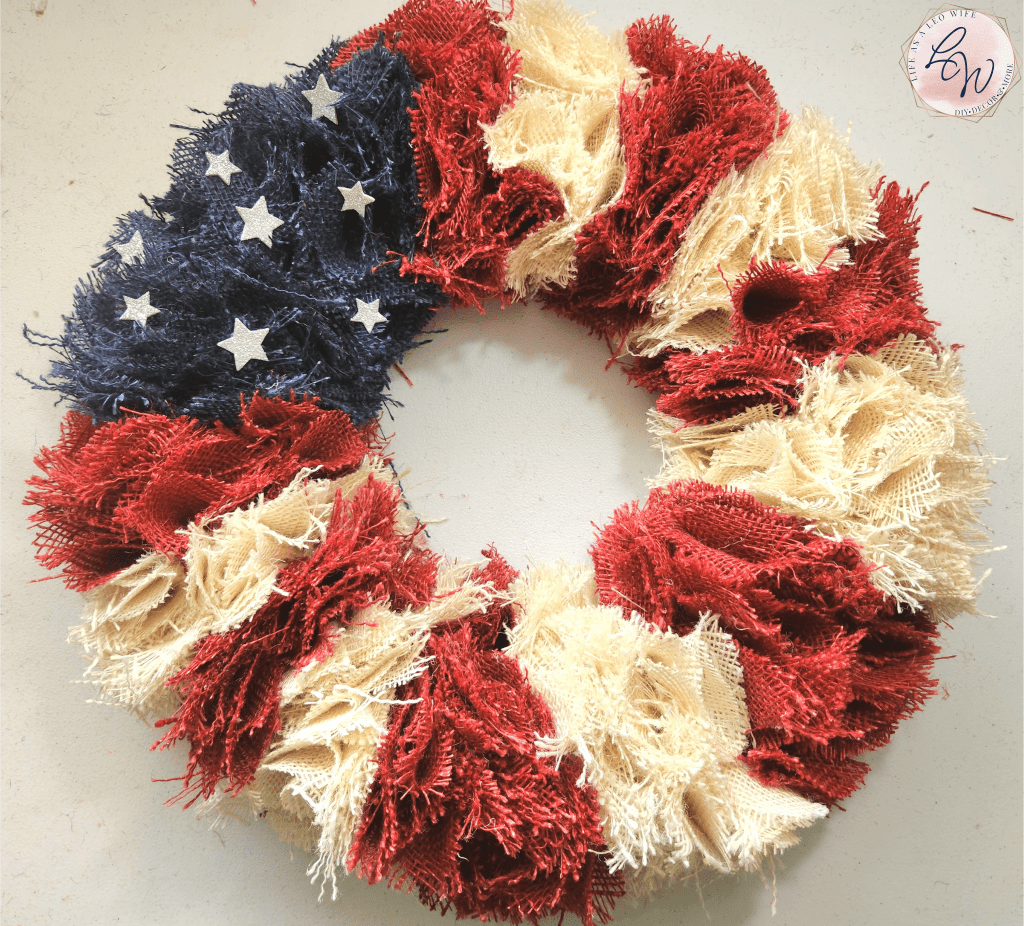
Also, I wanted 7 red stripes and 6 white ones on my patriotic burlap wreath just like the American flag. I ended up having to pull off sections of red and white to readd since I had them too skinny at first, then too wide, and it was just a whole thing. So, when you make your wreath, plan out your sections. I had a blue section of burlap that was almost 4″ on the outside of the wreath from. If my red and white stripes were all even, they would be 0.89″ each. At least that’s what the calculator says lol.
Finally, using silicone finger covers is almost a must for this patriotic burlap wreath. I couldn’t find mine anywhere, so I burned my fingers quite a few times before using a pen to hold the burlap circles closed while the glue dried. Then I got smart and used those little metal clips from the craft section at Dollar Tree to hold them closed while they dried so I could keep moving quickly. They were life savers (well, finger savers at least)! Then today, I found my silicone finger covers… But now that I think about it, the clips might just be faster because you can keep moving.
Attach the Burlap to the Wreath Form
Now it’s time to assemble your patriotic burlap wreath!
Add hot glue to the middle of your burlap circles then fold them in half, then in half again to form a triangle shape. Since my pins weren’t long enough, I needed to glue my burlap circles together before adding them onto my patriotic wreath. If you’re just using hot glue, you will need to do that too. If you’re just using pins, you can skip this, but it might help you if they’re already glued in this shape.


Go ahead and fold all of your circles. That way you get into a rhythm and your patriotic burlap wreath gets finished faster.
Now you can start attaching the burlap to the wreath. One way is to use a push pin, put it through the bottom point of the burlap then into the wreath form. Since you know how much of each color to add you can start with any color. I started with a red stripe and goofy me thought I could “eye it,” not making strict measurements.
If you’re using hot glue, squeeze some on the wreath form then place the burlap on it.

Add burlap circles to the wreath form on all three sides, outside, top, and inside the ring. When you have your almost 1″ stripe of red complete, move on to a white stripe. Or if you started with the blue section and you have 4,” move to the red stripe.


Continue adding burlap stripes, 7 red and 6 white, then 4″ of blue burlap until your patriotic wreath is covered.


Easy peasy, right?!
Add Embellishments
Now that your patriotic burlap wreath is assembled, you just need to add the finishing touches!
I used silver foam stars on the blue section of my burlap wreath. The burlap labeled “white” at Walmart is actually off-white, so the white foam stars just didn’t look right. The pack of stars that I got had white, gold and silver stars in small, medium, and large. I placed the small and medium ones the way I wanted them before removing the backing and placing them permanently on the wreath. They stuck really well without hot glue.


I really like the mix of small and medium stars. You could add a bow, but I thought that would be way too much. If you were to do a solid burlap wreath using this technique, you could use a patriotic ribbon to make a cute bow to add to the top.
Patriotic Burlap Wreath Video Tutorial
I created a video tutorial for y’all. I know it’s easier for some people to see the process in action. However, I thought I’d be smart and record it on my old phone because I’ve been having major issues with storage space to get these videos recorded, edited, and uploaded. Genius, right?! Yes! No. I forgot that the reason I got a new phone wasn’t because my screen was cracked. It was because the stupid wi-fi would no longer turn on.
So, I’m trying to get the individual videos to upload to a Google Drive so I can edit them into one cohesive video for you. They’re uploading SUPER, SUPER slow. I mean only 8 of the short 1 to 3 minute videos have taken 4 hours thus far. So hopefully I’ll have the video tutorial completed later today. Pin this tutorial so you can come back and see the video later. Follow me on social media using the buttons at the top of this post so that when you see the videos of the project on there you know it’s available here!
That’s it! Your star-spangled patriotic burlap wreath is complete!
What do you think? Isn’t this just adorable?!


Remember to pin the image below or share this post with the buttons on the left side of the page so you can find it when you’re ready to start your project! Also, follow me on Pinterest for new ideas added weekly! Be sure that you never miss a great tutorial for decor like wreaths, signs and other home decor, free printables, crafts, and other fun posts! Enter your email address below to be notified of new posts! Use the buttons below to follow me on social media for other great content.

Don’t go yet! There’s more to see!
There’s plenty more to see here on the blog! If you’re looking for something specific, use the search box in the sidebar to look it up. If not, you might enjoy these ideas. Don’t have time to read them all now? That’s ok, just click over to the posts using the pictures and pin them for later. You can also add Life as a LEO Wife to your favorites and check back for new ideas and free printables and SVGs every Wednesday, as well as link parties with tons of shared ideas on Sundays!


Very cute Niki! Thanks for the tutorial~
Thank you!
Niki,
I see this style of wreath making has been making a come back…Over 40 years ago, I made a bunch of Christmas wreaths to hang outside using red and green plastic bags with the same technique you showcased here…I used a small screwdriver to make the hole in the foam wreath…Then I made other wreaths with fabric using the same method…It is a good way to use up excess fabric our scraps…Thanks for sharing! Your wreath looks great!!
Hugs,
Deb
Thank you! That’s a great idea! I keep all of my fabric scraps, even the tiny ones lol.