Welcome ladies and gents! It’s been a few weeks since I shared a home decor DIY with you, so I’m so happy to be back with one today. A while back I found a pretty knotted rope vase on a higher end decor website, but it was $55 and there was no way that I was going to pay that for one small vase. I knew that I could find a way to make a similar one for a lot cheaper, and that is how this vase was born. In this post I will show you how to make a DIY knotted rope vase using two Dollar Tree items. Let’s get into this!
It’s time for our monthly Creative Craft Hop hosted this month by Donna from Modern on Monticello. On the third Thursday of each month I join a group of very talented ladies to bring you a new DIY to inspire you in your creative process. If you’re coming over from Carol at Blue Sky at Home, I am so glad to have you here! Don’t you just love her Christmas in July lace tree on burlap?! At the end of this post I will direct you to the next stop on our blog hop. I encourage you to visit everyone on the tour because they have some absolutely amazing ideas to share with you!

DIY Knotted Rope Vase Dollar Tree Supplies:
- white cotton rope- Dollar Tree has two options, and I used the thinner rope. The thick won’t work as well. If you don’t mind spending a little more, macrame cord would work really well. I didn’t have any on hand and didn’t have time to wait for some to ship.
- hot glue gun & glue
- round glass vase

Prep the Ropes
Since the Dollar Tree ropes are so thick (even though I used the thinner rope), you will need to take one apart to use the individual strands. Cut the tape from the end of the rope and unravel the three pieces.

You won’t need the entire rope. Once you have about 4′ you can stop unraveling it. I used 4′ pieces, but I only needed just under 3′ to finish my DIY knotted rope vase, but it’s better to have too much than not enough! It would be horrible to do all that work, then run out of rope and have to start over again.
Place tape around both ends of the rope strands to keep it from unraveling.
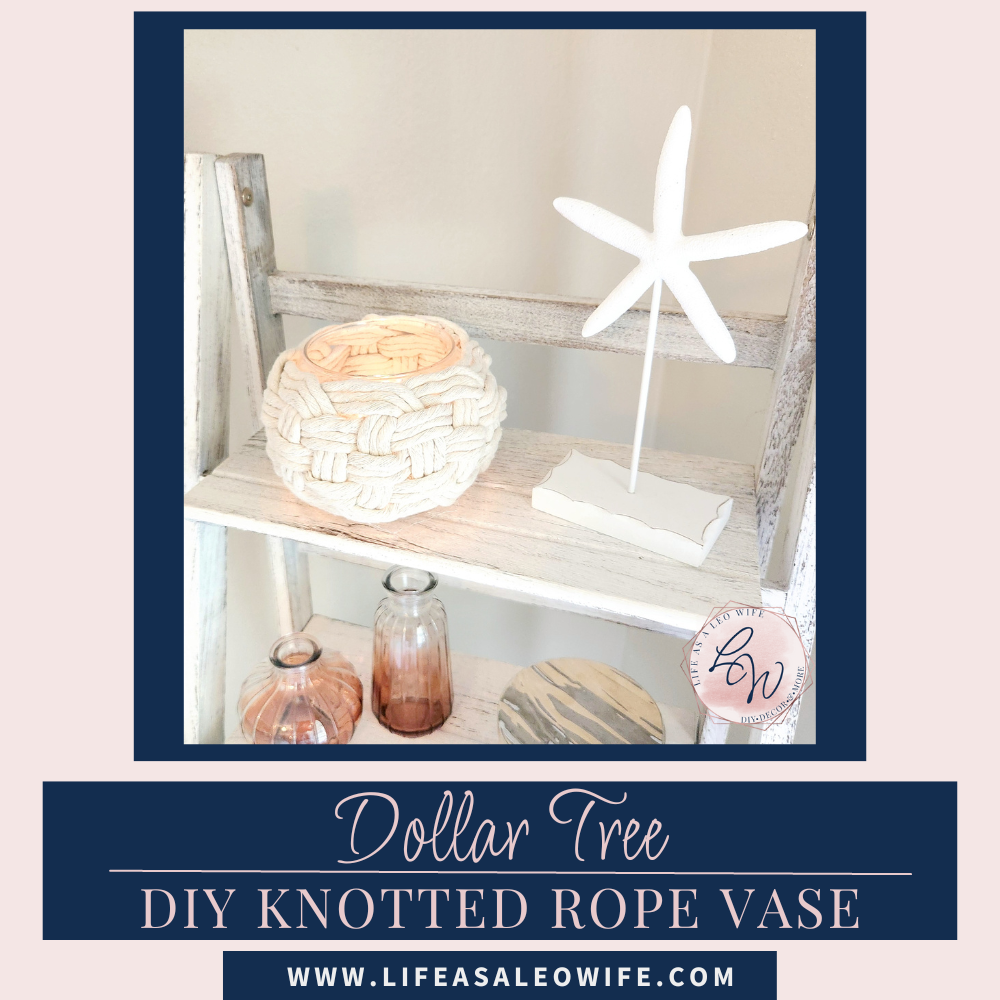
Attach Ropes to the Vase
Get started on your knotted rope vase by hot gluing the ends of the ropes in a line to the side of the vase. You want the entire vase covered. Start at the top and continue to the bottom. You need to have sets of three, so starting at the top allows you to leave the very bottom 1/8″ or so uncovered if it will mean adding a fourth rope to cover it. I didn’t get a picture of me attaching the last few ropes, but you’ll see them in the photos of the next step.


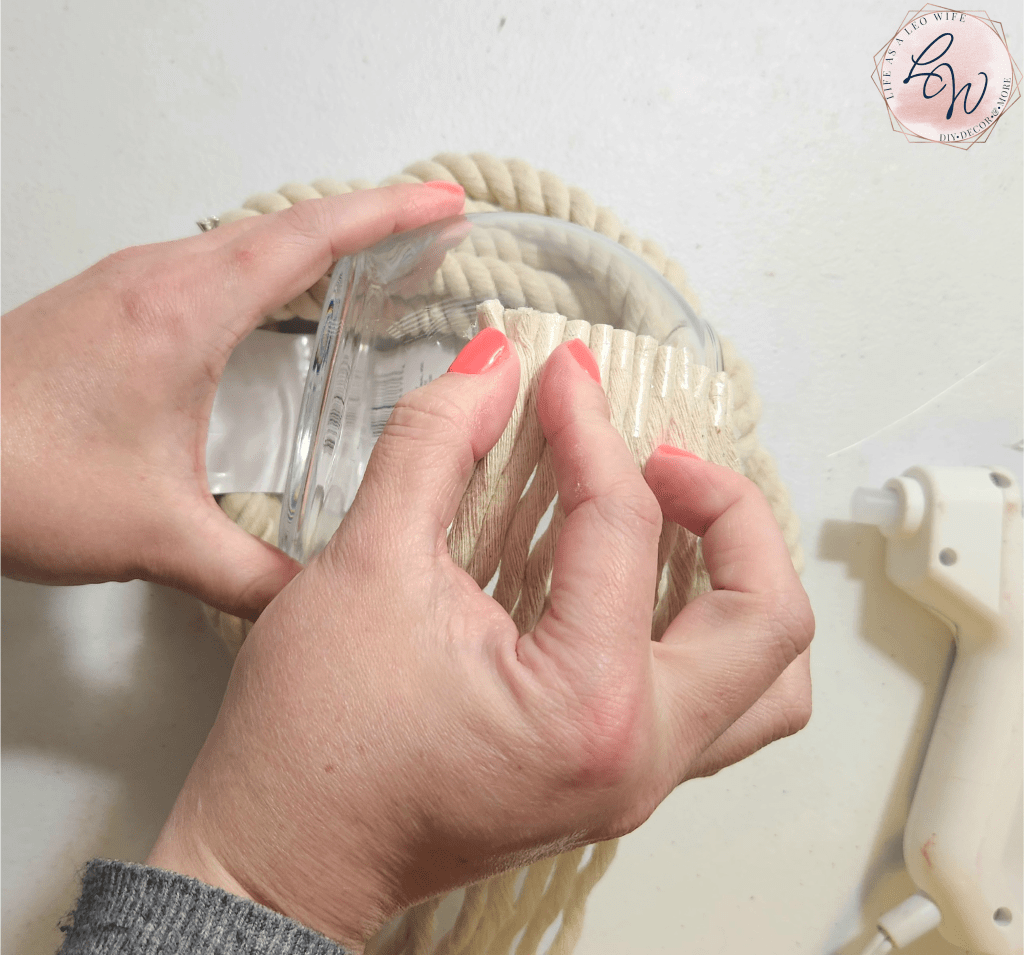
Start the Knotted Rope Pattern
Now it’s time to make a beautiful knotted rope pattern on your vase.
Take the bottom three ropes and move it up to the top. Pass them under the second set of three ropes, over the next three, under the next three, over the next, and under the top ropes. I took this picture when I was trying to use a vase that I spray painted a while back and it didn’t turn out well. I thought I could put to good use, but I figured out that the vase would show through at the top, so I had to take it apart. I just wanted you to see how to start the pattern.

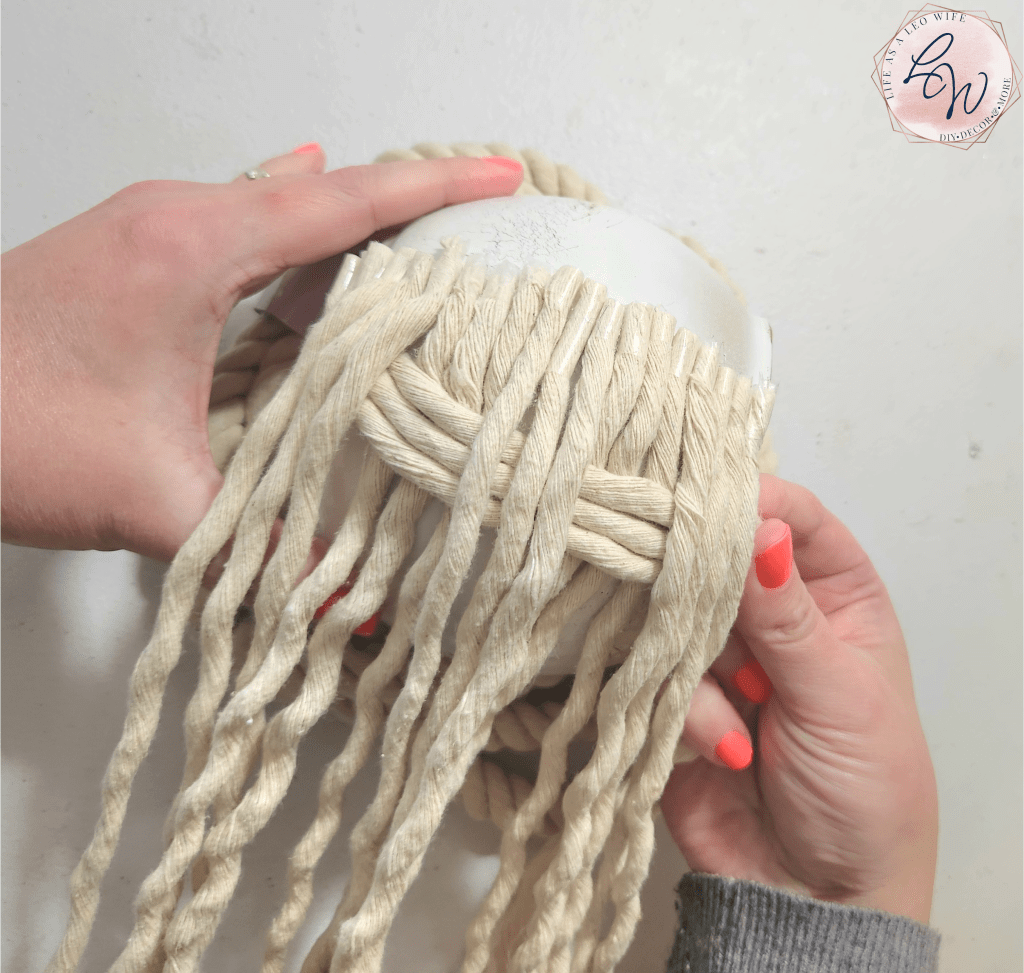
Side note, lol! At this point I realized I was not going to be able to do this project alone because the vase was going to roll. So, I enlisted my helpful hubby to help. He works outside for much of the day and the heat index is reaching up to 115°, so I didn’t want to make him come and stand in the craft room. He deserves to just sit and relax on the couch after his long, stressful days, so I brought my DIY knotted vase to him. Please excuse these photos taken the best that I could on top of the herringbone Alabama blanket he was using lol! (Roll tide!)
I removed the ropes from the scrapped vase, and this is the first row on the new vase (with hubby holding it lol).
Next, recreate the same pattern with the top three ropes, this time under, over, under, and finally over.
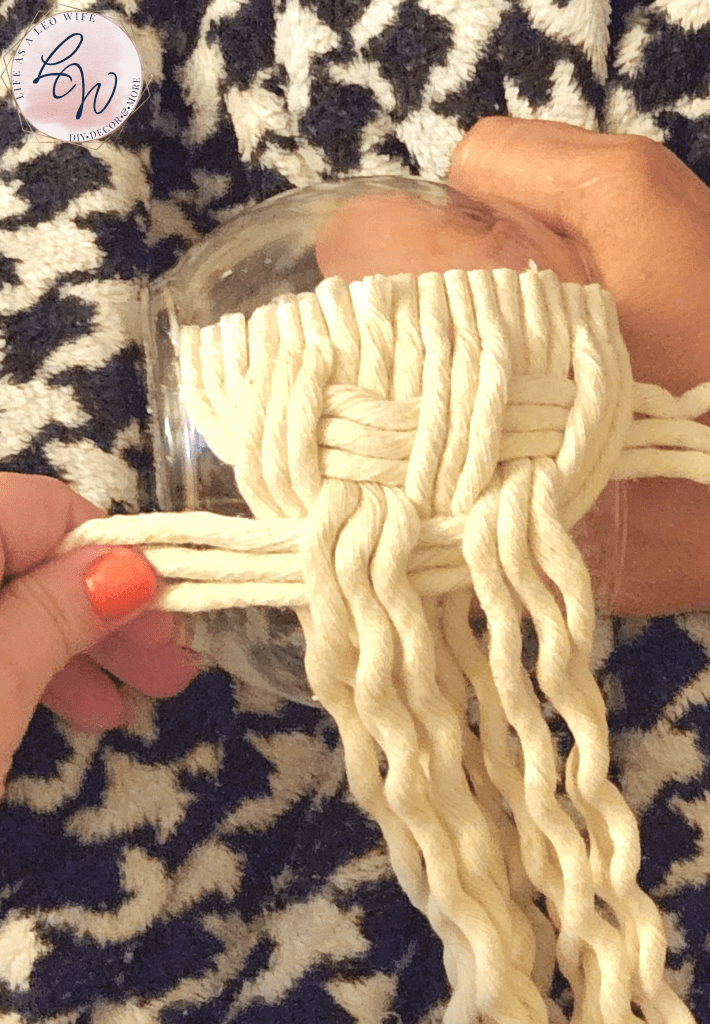
On the third row, start with the bottom three ropes again repeating the same pattern that you did with the first row. Then continue covering the entire vase in the same manner. Just have the person helping you turn the vase a bit as you go.


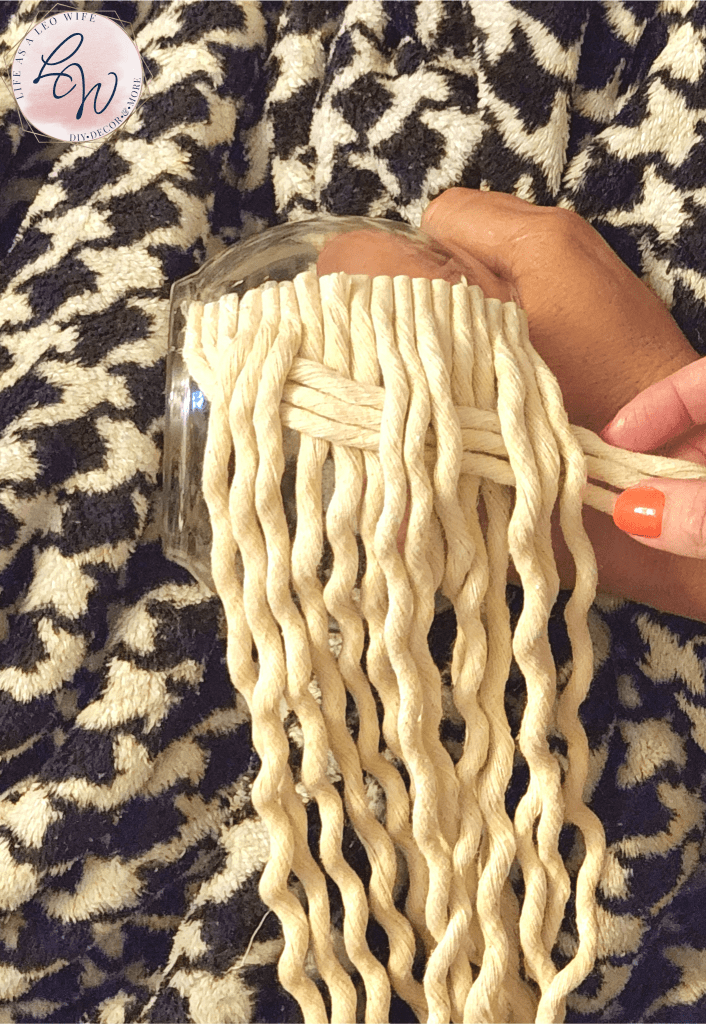
When you get back to where you started, this is what you will see. I have the ropes off-center here, but I made sure to center it before gluing.

Glue the Ropes in Place
Finally, lift the ropes and add a bit of hot glue along the side at the bottom. In the photo I was adding glue along the entire vase, but that didn’t work so just add enough for the bottom three ropes for now.
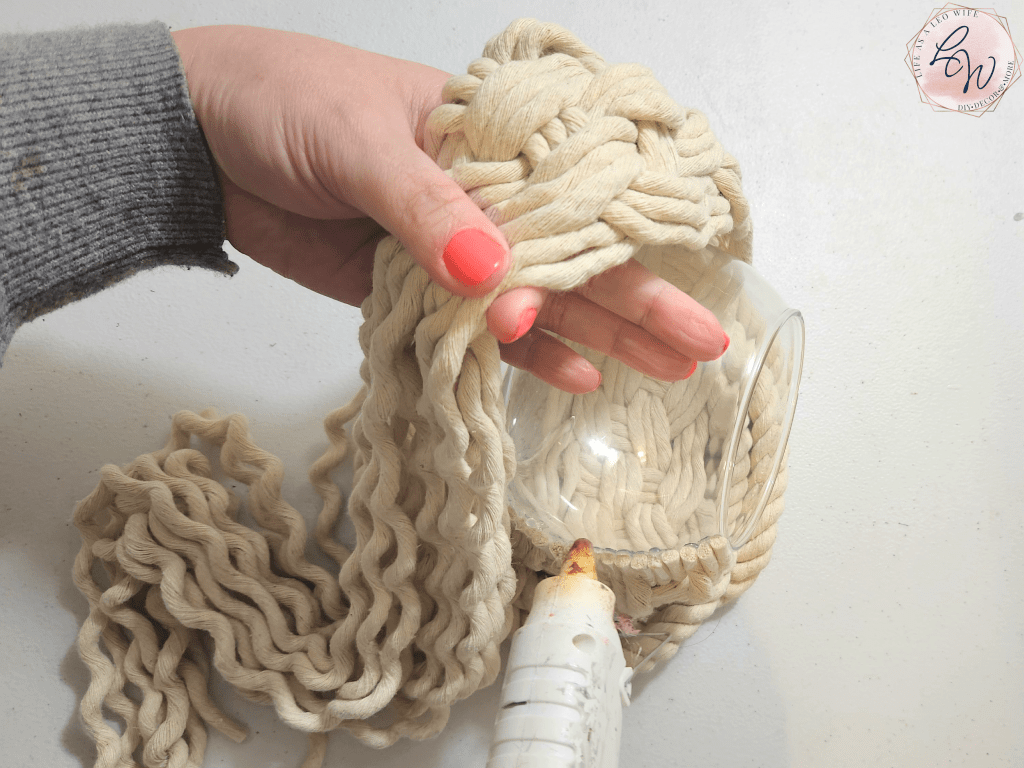
I didn’t get a photo of this, but I placed tape around the individual ropes to keep them from unraveling once I cut them off. Once you have the tape on and the first three ropes pressed on the glue on the vase, cut the excess off. Continue adding glue for each section then press the ropes down on it followed by cutting off the excess rope. I cut the ropes after gluing them down so that I could pull them tight with the extra length while gluing them down.
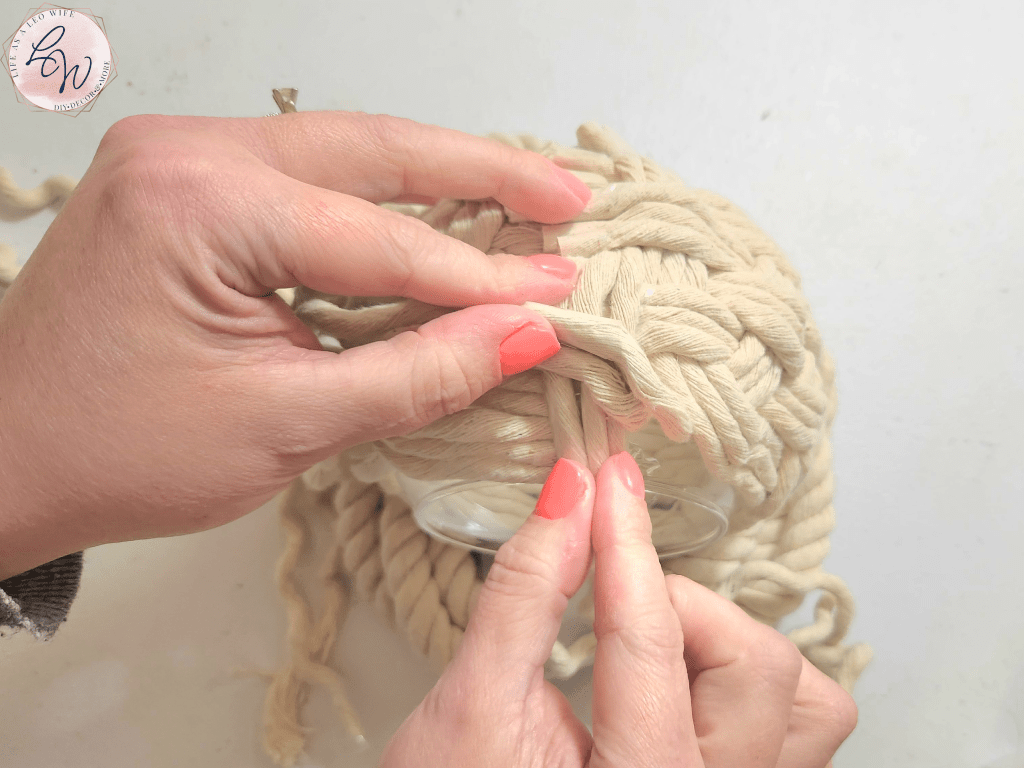


I made it look neat with the tape and pulling everything tight, but I still placed the vase with the seam in the back.
That’s it! Your DIY knotted rope vase is finished!
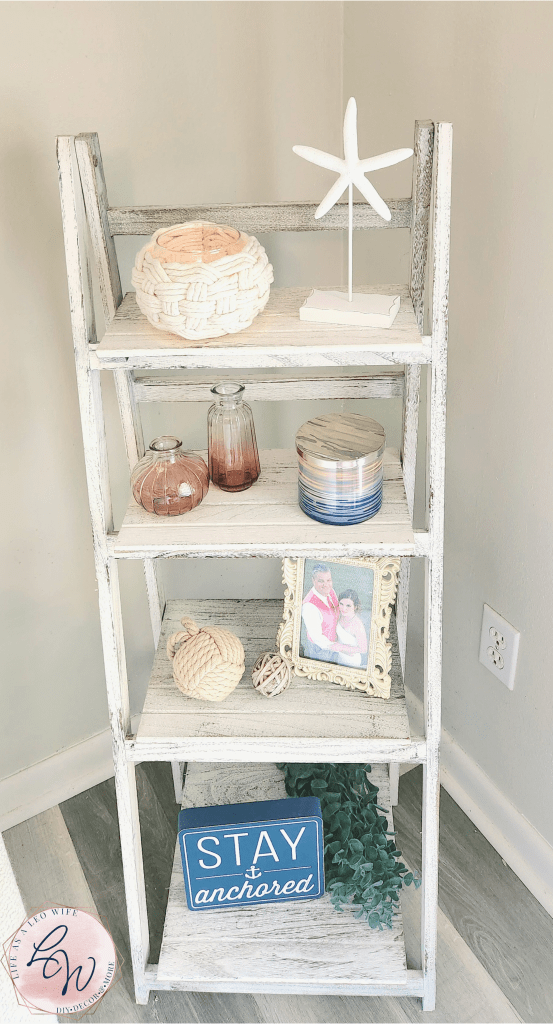
I really like the way this turned out! I may buy some macrame cord to make another one so that the curves of the unraveled rope won’t be there. Also, I want to go back with this one and pull some spots tighter, so I will update the photos once I get the chance to do that. Here’s the little cutie that saved me $50+! There’s a candle inside, but you can use it to hold anything.

My knotted rope vase’s new home is on the farmhouse ladder shelf in the corner of our living room.
Stick around because I’m about to send you on to the next stop on our Creative Craft Hop.

Remember to pin the image below or share this post with the buttons on the left side of the page so you can find it when you’re ready to start your project! Also, follow me on Pinterest for new ideas added weekly! Be sure that you never miss a great tutorial for decor like wreaths, signs and other home decor, free printables, crafts, and other fun posts! Enter your email address below to be notified of new posts! Use the buttons below to follow me on social media for other great content.

Creative Craft Hop
I hope you’re enjoying our craft hop this month! Next up on the tour is Donna over at Modern on Monticello where she is going to show you how to make a DIY plant trellis for indoor plants. It’s so neat, and I know you’re going to love it!
Donna – Modern on Monticello | DIY Plant Trellis for Indoor Plants
Terrie – Decorate & More with Tip | DIY Fluffy Snowman Wreath
Gail – Purple Hues & Me | Pet Keepsake Christmas Ornament DIY
Allyson – Southern Sunflowers | Easy Dollar Tree Potholder Craft
Ann – Apple Street Cottage | Lace Tree on Burlap Christmas in July
Cecilia – My Thrift Store Addiction | DIY Pollinator Puddler and Self-Watering Olla
Tammy – Patina & Paint | Up-cycled Ornament Door Hanger
Jenna – The Painted Apron | Side Table Makeover
Carol – Blue Sky at Home | Lace Tree on Burlap Christmas in July
Don’t go yet! There’s more to see!
There’s plenty more to see here on the blog! If you’re looking for something specific, use the search box in the sidebar to look it up. If not, you might enjoy these ideas. Don’t have time to read them all now? That’s ok, just click over to the posts using the pictures and pin them for later. You can also add Life as a LEO Wife to your favorites and check back for new ideas and free printables and SVGs every Wednesday, as well as link parties with tons of shared ideas on Sundays!


This is beautiful and genius all rolled into one! I love everything about this. Great job and thanks so much for sharing!
Thank you Tammy! Much cheaper than buying one, but I do want to try one with macrame cord soon!
Gorgeous, Niki! Your knotted rope vase certainly looks boutique ready with a high end look propped on on your display ladder! Great job!
Thank you Gail!
This is so pretty, Niki, I love the pattern you created with the rope. It’s just perfect for a summer/coastal theme.
Thank you! I can’t wait to try on different vases.
It looks great Niki. Love the tutorial, so easy to follow. Thank you!
Thank you! I hoped the pics of me on the sofa were good enough lol!
Wow Niki, how clever are you! Your knotted rope vase looks fantastic, the technique is amazing! Your tutorials are always so good and thorough, thank you~ Happy crafting!
Thank you! You’re too kind!
Wow Niki! I love the way this turned out. It is darling, and something that looks like a million bucks!
Thank you! Can’t wait to get straight ropes for another one!
Great job, Niki. I’ve wondered how those rope projects were made. Thanks for the tutorial. Just did a post about 19 Rope and Twine Projects. Wish I had seen this one.
Thank you Carol! You can always add another one 😉 lol!
Wow, your knotted vase looks awesome! You succeeded in making it look high-end. Pinned.
Thank you!
I have these supplies already in my craft room and you have inspired me to try one out. Thanks for sharing a beautiful project.
Thanks Donna! Can’t wait to see what you come up with!
LOVE this coastal vase, Niki! I hope we get to see that at Tuesday Turn About this week!
Thank you! I just shared over there Julie! Great minds lol!
Clever idea! I’m in a nautical mode this month. This would fit right in.
Thank you! I was too over the summer!
Amazing, Niki!! It looks SO professional!! You did such a great job with this one. I’m very impressed. What a fun decor piece to use for Summer!! Thanks for sharing at Home Imagined this week!
Aww, thanks Rachel! It was my first “macrame” project *even though I used cheap DT rope it was still a weaving project, done the way you would with macrame cord).
Niki, I would love to feature your vase at TTA this week, but I can’t save any of your images… I sent you an email request… would you be able to send me a photo in order to feature you? If I don’t hear from you by tonight, I’ll go on to my next choice. 🙁
Thank you! I’m honored Julie! I emailed you the photos. Thanks for reaching out & not just skipping me. I so appreciate it! I had to install a right click block due to a website that was stealing my posts, word for word, pictures, videos and all! I asked them to stop over and over, but they didn’t care that this is my full-time job and how I pay my bills. So sad that there are people like that out there! They have stopped, after not being able to copy for months, so I removed the plugin that blocks the save. I thought I had already done that about a month ago, but somehow, I didn’t lol! It’s off now.
Hey Niki, You know I love a Great Dollar Tree DIY and this is fantastic! I’m going to share it in my weekly newsletter tomorrow!! Blessings, Donna
Thank you so much! I’m thrilled!